2011 INFINITI QX56 wheel bolts
[x] Cancel search: wheel boltsPage 2878 of 5598

FENDER PROTECTOREXT-23
< REMOVAL AND INSTALLATION >
C
DE
F
G H
I
J
L
M A
B
EXT
N
O P
FENDER PROTECTOR
FENDER PROTECTOR
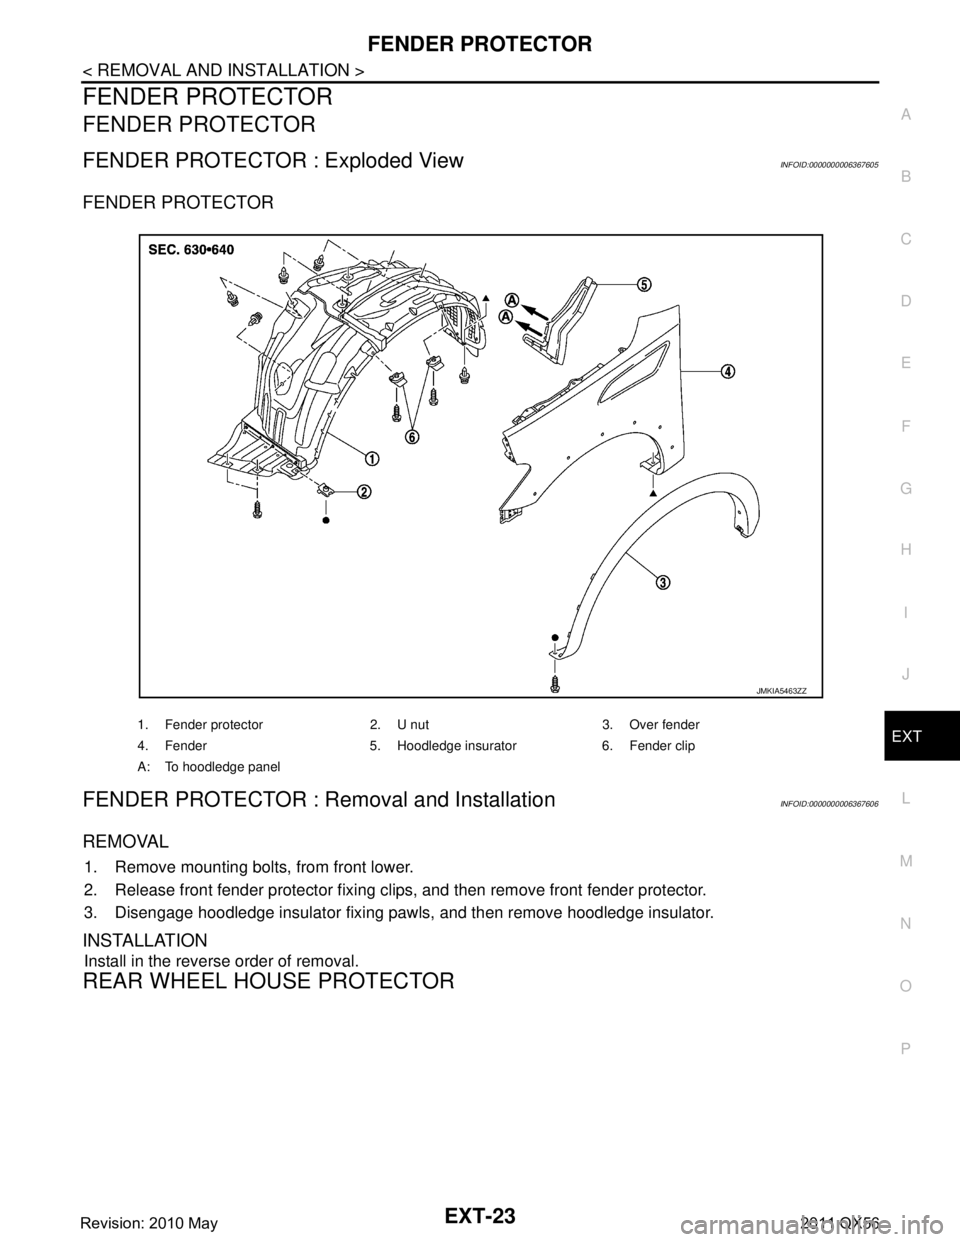
FENDER PROTECTOR : Exploded ViewINFOID:0000000006367605
FENDER PROTECTOR
FENDER PROTECTOR : Remo val and InstallationINFOID:0000000006367606
REMOVAL
1. Remove mounting bolts, from front lower.
2. Release front fender protector fixing clips, and then remove front fender protector.
3. Disengage hoodledge insulator fixing pawls, and then remove hoodledge insulator.
INSTALLATION
Install in the reverse order of removal.
REAR WHEEL HOUSE PROTECTOR
1. Fender protector 2. U nut 3. Over fender
4. Fender 5. Hoodledge insurator 6. Fender clip
A: To hoodledge panel
JMKIA5463ZZ
Revision: 2010 May2011 QX56
Page 2882 of 5598

OVER FENDEREXT-27
< REMOVAL AND INSTALLATION >
C
DE
F
G H
I
J
L
M A
B
EXT
N
O P
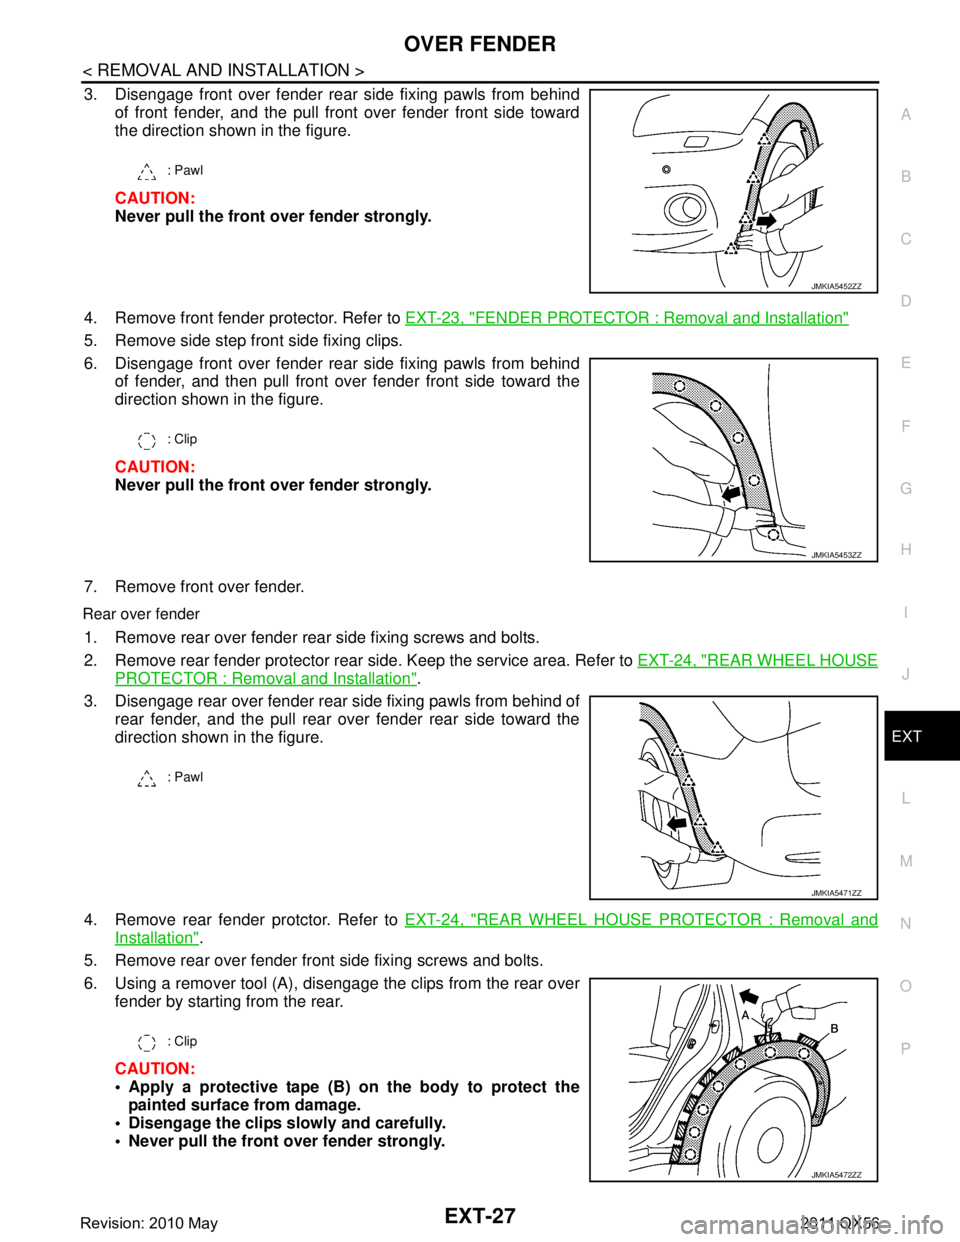
3. Disengage front over fender rear side fixing pawls from behind of front fender, and the pull front over fender front side toward
the direction shown in the figure.
CAUTION:
Never pull the front over fender strongly.
4. Remove front fender protector. Refer to EXT-23, "
FENDER PROTECTOR : Removal and Installation"
5. Remove side step front side fixing clips.
6. Disengage front over fender rear side fixing pawls from behind
of fender, and then pull front over fender front side toward the
direction shown in the figure.
CAUTION:
Never pull the front over fender strongly.
7. Remove front over fender.
Rear over fender
1. Remove rear over fender rear side fixing screws and bolts.
2. Remove rear fender protector rear side. Keep the service area. Refer to EXT-24, "
REAR WHEEL HOUSE
PROTECTOR : Removal and Installation".
3. Disengage rear over fender rear side fixing pawls from behind of rear fender, and the pull rear over fender rear side toward the
direction shown in the figure.
4. Remove rear fender protctor. Refer to EXT-24, "
REAR WHEEL HOUSE PROTECTOR : Removal and
Installation".
5. Remove rear over fender front side fixing screws and bolts.
6. Using a remover tool (A), disengage the clips from the rear over fender by starting from the rear.
CAUTION:
Apply a protective tape (B) on the body to protect the
painted surface from damage.
Disengage the clips slowly and carefully.
Never pull the front o ver fender strongly.
: Pawl
JMKIA5452ZZ
: Clip
JMKIA5453ZZ
: Pawl
JMKIA5471ZZ
: Clip
JMKIA5472ZZ
Revision: 2010 May2011 QX56
Page 2908 of 5598
![INFINITI QX56 2011 Factory Service Manual
FAX-8
< REMOVAL AND INSTALLATION >[2WD]
FRONT WHEEL HUB AND KNUCKLE
REMOVAL AND INSTALLATION
FRONT WHEEL HUB AND KNUCKLE
Exploded ViewINFOID:0000000006225418
Removal and InstallationINFOID:0000000006 INFINITI QX56 2011 Factory Service Manual
FAX-8
< REMOVAL AND INSTALLATION >[2WD]
FRONT WHEEL HUB AND KNUCKLE
REMOVAL AND INSTALLATION
FRONT WHEEL HUB AND KNUCKLE
Exploded ViewINFOID:0000000006225418
Removal and InstallationINFOID:0000000006](/manual-img/42/57033/w960_57033-2907.png)
FAX-8
< REMOVAL AND INSTALLATION >[2WD]
FRONT WHEEL HUB AND KNUCKLE
REMOVAL AND INSTALLATION
FRONT WHEEL HUB AND KNUCKLE
Exploded ViewINFOID:0000000006225418
Removal and InstallationINFOID:0000000006225419
REMOVAL
1. Remove tires with power tool. Refer to
WT-64, "Removal and Installation".
2. Remove brake hose bracket. Refer to BR-23, "
FRONT : Removal and Installation".
3. Remove caliper assembly mounting bolts. Hang caliper assembly in a place where it will not interfere with work. Refer to BR-37, "
BRAKE CALIPER ASSEMBLY : Removal and Installation".
CAUTION:
Never depress brake pedal while brake caliper is removed.
4. Remove disc rotor. CAUTION:
Put matching marks on the wh eel hub and bearing assembly and the disc rotor before removing
the disc rotor.
Never drop disc rotor.
5. Remove wheel sensor harness. Refer to BRC-134, "
FRONT WHEEL SENSOR : Removal and Installa-
tion".
CAUTION:
Never pull on wheel sensor harness.
6. Remove steering outer socket. Refer to ST-42, "
Removal and Installation".
7. Set suitable jack under lower link.
1. Steering knuckle 2. Cotter pin 3. Splash guard
4. Hub bolt 5. Wheel hub and bearing assembly 6. Disc rotor
Refer to GI-4, "
Components" for symbols in the figure.
JPDIF0294GB
Revision: 2010 May2011 QX56
Page 2909 of 5598
![INFINITI QX56 2011 Factory Service Manual
FRONT WHEEL HUB AND KNUCKLEFAX-9
< REMOVAL AND INSTALLATION > [2WD]
C
EF
G H
I
J
K L
M A
B
FA X
N
O P
8. Remove shock absorber mounting bolt from lower link. Refer to FSU-10, "Removal and Installati INFINITI QX56 2011 Factory Service Manual
FRONT WHEEL HUB AND KNUCKLEFAX-9
< REMOVAL AND INSTALLATION > [2WD]
C
EF
G H
I
J
K L
M A
B
FA X
N
O P
8. Remove shock absorber mounting bolt from lower link. Refer to FSU-10, "Removal and Installati](/manual-img/42/57033/w960_57033-2908.png)
FRONT WHEEL HUB AND KNUCKLEFAX-9
< REMOVAL AND INSTALLATION > [2WD]
C
EF
G H
I
J
K L
M A
B
FA X
N
O P
8. Remove shock absorber mounting bolt from lower link. Refer to FSU-10, "Removal and Installation".
9. Separate upper link from steering knuckle, using the ball joint remover (commercial service tool), and
remove upper link.
CAUTION:
Temporarily tighten the nut to prevent damage to threads and to prevent the ball joint remover
from suddenly coming off.
Never damage ball joint boot.
10. Remove wheel hub and bearing assembly, and then remove splash guard.
11. Remove lower link from steering knuckle. CAUTION:
Never damage ball joint boot.
12. Remove steering knuckle.
13. Remove hub bolts (1) from wheel hub and bearing assembly, using the ball joint remover (A) (commercial service tool).
CAUTION:
Remove hub bolt only when necessary.
Never hammer the hub bolt to avoid impact to the wheel
hub and bearing assembly.
Pull out the hub bolt in a di rection perpendicular to the
wheel hub and bearing assembly.
14. Perform inspection after removal. Refer to FAX-9, "
Inspection".
INSTALLATION
Note the following, and install in the reverse order of removal.
Place a suitable washer (A) as shown in the figure to install the hub
bolts (1) by using the tightening force of the nut (B).
CAUTION:
Check that there is no cl earance between wheel hub and
bearing assembly, and hub bolt.
Never reuse hub bolt.
Perform the final tightening of each of parts under unladen condi-
tions, which were removed when removing wheel hub and bearing
assembly and steering knuckle.
Never reuse cotter pin.
Perform inspection after installation. Refer to FA X - 9 , "
Inspection".
InspectionINFOID:0000000006225420
INSPECTION AFTER REMOVAL
Check components for deformation, cracks, and other damage. Replace it if necessary.
Ball Joint Inspection
Check boots of lower link and steering outer socket ba ll joint for breakage, axial play, and torque. Refer to
FSU-15, "
Inspection" and ST-46, "Inspection".
INSPECTION AFTER INSTALLATION
1. Check wheel sensor harness for proper connection. Refer to BRC-134, "FRONT WHEEL SENSOR :
Exploded View".
2. Check the wheel alignment. Refer to FSU-7, "
Inspection".
3. Adjust neutral position of steering angle sensor. Refer to BRC-64, "
Work Procedure".
JPDIF0299ZZ
JPDIF0300ZZ
Revision: 2010 May2011 QX56
Page 2918 of 5598
![INFINITI QX56 2011 Factory Service Manual
FAX-18
< REMOVAL AND INSTALLATION >[4WD]
FRONT WHEEL HUB AND KNUCKLE
REMOVAL AND INSTALLATION
FRONT WHEEL HUB AND KNUCKLE
Exploded ViewINFOID:0000000006225396
Removal and InstallationINFOID:000000000 INFINITI QX56 2011 Factory Service Manual
FAX-18
< REMOVAL AND INSTALLATION >[4WD]
FRONT WHEEL HUB AND KNUCKLE
REMOVAL AND INSTALLATION
FRONT WHEEL HUB AND KNUCKLE
Exploded ViewINFOID:0000000006225396
Removal and InstallationINFOID:000000000](/manual-img/42/57033/w960_57033-2917.png)
FAX-18
< REMOVAL AND INSTALLATION >[4WD]
FRONT WHEEL HUB AND KNUCKLE
REMOVAL AND INSTALLATION
FRONT WHEEL HUB AND KNUCKLE
Exploded ViewINFOID:0000000006225396
Removal and InstallationINFOID:0000000006225397
REMOVAL
1. Remove tires.
2. Remove brake hose bracket. Refer to
BR-23, "
FRONT : Removal and Installation".
3. Remove caliper assembly mounting bolts. Hang caliper assembly in a place where it will not interfere with work. Refer to BR-37, "
BRAKE CALIPER ASSEMBLY : Removal and Installation".
CAUTION:
Never depress brake pedal while brake caliper is removed.
4. Remove disc rotor. CAUTION:
Put matching marks on the wh eel hub and bearing assembly and the disc rotor before removing
the disc rotor.
Never drop disc rotor.
5. Remove wheel sensor harness. Refer to BRC-134, "
FRONT WHEEL SENSOR : Removal and Installa-
tion".
CAUTION:
Never pull on wheel sensor harness.
6. Remove steering outer socket. Refer to ST-42, "
Removal and Installation".
1. Steering knuckle 2. Cotter pin 3. Splash guard
4. Hub bolt 5. Wheel hub and bearing assembly 6. Disc rotor
7. Wheel hub lock nut
A. Tightening must be done following the installation procedure. Refer to FA X - 1 8 , "
Removal and Installation".
Refer to GI-4, "
Components" for symbols in the figure.
JPDIF0298GB
Revision: 2010 May2011 QX56
Page 2919 of 5598
![INFINITI QX56 2011 Factory Service Manual
FRONT WHEEL HUB AND KNUCKLEFAX-19
< REMOVAL AND INSTALLATION > [4WD]
C
EF
G H
I
J
K L
M A
B
FA X
N
O P
7. Set suitable jack under lower link.
8. Remove shock absorber mounting bolt from lower link. R INFINITI QX56 2011 Factory Service Manual
FRONT WHEEL HUB AND KNUCKLEFAX-19
< REMOVAL AND INSTALLATION > [4WD]
C
EF
G H
I
J
K L
M A
B
FA X
N
O P
7. Set suitable jack under lower link.
8. Remove shock absorber mounting bolt from lower link. R](/manual-img/42/57033/w960_57033-2918.png)
FRONT WHEEL HUB AND KNUCKLEFAX-19
< REMOVAL AND INSTALLATION > [4WD]
C
EF
G H
I
J
K L
M A
B
FA X
N
O P
7. Set suitable jack under lower link.
8. Remove shock absorber mounting bolt from lower link. Refer to FSU-10, "
Removal and Installation".
9. Separate upper link from steering knuckle, using the ball joint remover (commercial service tool), and
remove upper link.
CAUTION:
Temporarily tighten the nut to prevent damage to threads and to prevent the ball joint remover
from suddenly coming off.
Never damage ball joint boot.
10. Remove cotter pin, and then loosen wheel hub lock nut.
11. Put matching mark on drive shaft and wheel hub and bearing assembly. CAUTION:
Use paint or similar substance for matc hing marks. Never scratch the surface.
12. Patch wheel hub lock nut with a piece of wood. Hammer the wood to disengage wheel hub and bearing assembly from drive shaft.
CAUTION:
Never place drive shaft joint at an extreme angle. Also be careful not to overextend slide joint.
Never allow drive shaft to hang down without support for or joint sub-assembly, shaft and the
other parts.
NOTE:
Use suitable puller, if wheel hub and bearing assembly and drive shaft cannot be separated even after
performing the above procedure.
13. Remove wheel hub lock nut.
14. Remove wheel hub and bearing assembly, and then remove splash guard.
15. Remove lower link from steering knuckle. CAUTION:
Never damage ball joint boot.
16. Remove steering knuckle.
17. Remove hub bolts (1) from wheel hub and bearing assembly, using the ball joint remover (A) (commercial service tool).
CAUTION:
Remove hub bolt only when necessary.
Never hammer the hub bolt to avoid impact to the wheel
hub and bearing assembly.
Pull out the hub bolt in a di rection perpendicular to the
wheel hub and bearing assembly.
18. Perform inspection after removal. Refer to FAX-20, "
Inspection".
INSTALLATION
Note the following, and install in the reverse order of removal.
Place a suitable washer (A) as shown in the figure to install the hub
bolts (1) by using the tightening force of the nut (B).
CAUTION:
Check that there is no cl earance between wheel hub and
bearing assembly, and hub bolt.
Never reuse hub bolt.
Use the following torque range for tightening the wheel hub lock nut.
CAUTION:
Since the drive shaft is assembled by press-fitting , use the tightening torque range for the wheel
hub lock nut.
Be sure to use torque wrench to tighten th e wheel hub lock nut. Never use a power tool.
Perform the final tightening of each of parts under unladen conditions, which were removed when removing
wheel hub and bearing assembly and steering knuckle.
JPDIF0299ZZ
: 118 – 123 N·m (12.1 – 12.5 kg-m, 87 – 90 ft-lb)
JPDIF0300ZZ
Revision: 2010 May2011 QX56
Page 2922 of 5598
![INFINITI QX56 2011 Factory Service Manual
FAX-22
< REMOVAL AND INSTALLATION >[4WD]
FRONT DRIVE SHAFT
FRONT DRIVE SHAFT
Exploded ViewINFOID:0000000006225402
Removal and InstallationINFOID:0000000006225403
REMOVAL
1. Remove tires.
2. Remove br INFINITI QX56 2011 Factory Service Manual
FAX-22
< REMOVAL AND INSTALLATION >[4WD]
FRONT DRIVE SHAFT
FRONT DRIVE SHAFT
Exploded ViewINFOID:0000000006225402
Removal and InstallationINFOID:0000000006225403
REMOVAL
1. Remove tires.
2. Remove br](/manual-img/42/57033/w960_57033-2921.png)
FAX-22
< REMOVAL AND INSTALLATION >[4WD]
FRONT DRIVE SHAFT
FRONT DRIVE SHAFT
Exploded ViewINFOID:0000000006225402
Removal and InstallationINFOID:0000000006225403
REMOVAL
1. Remove tires.
2. Remove brake hose bracket. Refer to
BR-23, "
FRONT : Removal and Installation".
3. Remove caliper assembly mounting bolts. Hang caliper assembly in a place where it will not interfere with work. Refer to BR-37, "
BRAKE CALIPER ASSEMBLY : Removal and Installation".
CAUTION:
Never depress brake pedal while brake caliper is removed.
4. Remove disc rotor. Refer to FAX-18, "
Removal and Installation".
5. Remove wheel sensor harness. Refer to BRC-134, "
FRONT WHEEL SENSOR : Removal and Installa-
tion".
CAUTION:
Never pull on wheel sensor harness.
6. Remove height sensor from upper link (right side). Refer to EXL-136, "
Removal and Installation".
7. Remove steering outer socket. Refer to ST-42, "
Removal and Installation".
8. Set suitable jack under lower link.
9. Remove shock absorber mounting bolt from lower link. Refer to FSU-10, "
Removal and Installation".
10. Separate upper link from steering knuckle, using t he ball joint remover (commercial service tool), and
remove upper link.
CAUTION:
Temporarily tighten the nut to prevent damage to threads and to prevent the ball joint remover
from suddenly coming off.
1. Circular clip 2. Dust shield 3. Housing
4. Snap ring 5. Ball cage/steel ball/inner race assem-
bly6. Stopper ring
7. Boot band 8. Boot 9. Shaft
10. Circular clip 11. Joint sub-assembly : Wheel side
: NISSAN genuine grease or an equivalent.
Refer to GI-4, "
Components" for symbols not described on the above.
JPDIF0279ZZ
Revision: 2010 May2011 QX56
Page 2938 of 5598

FUEL TANKFL-9
< REMOVAL AND INSTALLATION >
C
DE
F
G H
I
J
K L
M A
FL
NP
O
3. Remove LH rear wheel and tire.
4. Disconnect fuel filler hose, vent hose and EVAP hose at fuel tank side.
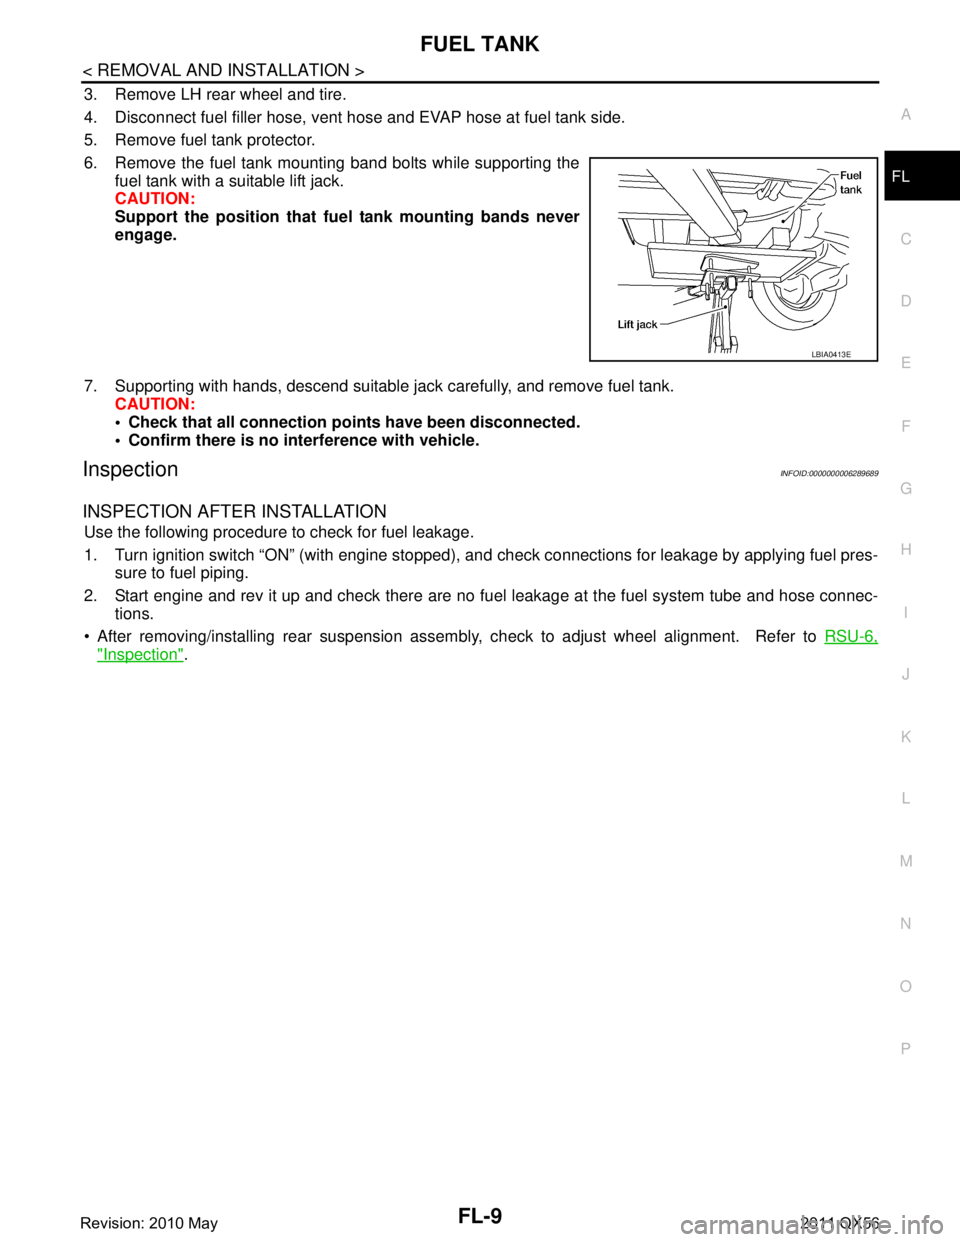
5. Remove fuel tank protector.
6. Remove the fuel tank mounting band bolts while supporting the
fuel tank with a suitable lift jack.
CAUTION:
Support the position that fu el tank mounting bands never
engage.
7. Supporting with hands, descend suitable jack carefully, and remove fuel tank. CAUTION:
Check that all connection po ints have been disconnected.
Confirm there is no interference with vehicle.
InspectionINFOID:0000000006289689
INSPECTION AFTER INSTALLATION
Use the following procedure to check for fuel leakage.
1. Turn ignition switch “ON” (with engine stopped), and check connections for leakage by applying fuel pres-
sure to fuel piping.
2. Start engine and rev it up and check there are no f uel leakage at the fuel system tube and hose connec-
tions.
After removing/installing rear suspension assembly, check to adjust wheel alignment. Refer to RSU-6,
"Inspection".
LBIA0413E
Revision: 2010 May2011 QX56