2011 INFINITI QX56 steering wheel
[x] Cancel search: steering wheelPage 2563 of 5598

EM-1
ENGINE
C
DE
F
G H
I
J
K L
M
SECTION EM
A
EM
N
O P
CONTENTS
ENGINE MECHANICAL
PRECAUTION ................ ...............................3
PRECAUTIONS .............................................. .....3
Precaution for Procedure without Cowl Top Cover ......3
Precaution for Supplemental Restraint System
(SRS) "AIR BAG" and "SEAT BELT PRE-TEN-
SIONER" ...................................................................
3
Precaution Necessary for Steering Wheel Rota-
tion after Battery Disconnect .....................................
3
Precaution for Drain Engine Coolant and Engine
Oil ..............................................................................
4
Precaution for Disconnecting Fuel Piping .................4
Precaution for Handling High Pressure Fuel Sys-
tem ............................................................................
4
Precaution for Removal and Disassembly ................4
Precaution for Inspection, Repair and Replace-
ment ..........................................................................
4
Precaution for Assembly and Installation ..................4
Parts Requiring Angle Tightening .............................5
Precaution for Liquid Gasket .....................................5
Definitions of Bank Names ........................................6
PREPARATION ............................................7
PREPARATION .............................................. .....7
Special Service Tool ........................................... ......7
Commercial Service Tool ..........................................9
BASIC INSPECTION ...................................12
CAMSHAFT VALVE CLEARANCE ............... ....12
Inspection ............................................................ ....12
COMPRESSION PRESSURE ............................16
Inspection ............................................................ ....16
SYMPTOM DIAGNOSIS ..............................18
NOISE, VIBRATION AND HARSHNESS
(NVH) TROUBLESHOOTING ........................ ....
18
NVH Troubleshooting - Engine Noise .............. ....18
Use the Chart Below to Help You Find the C
ause of the Symptom ........................................ ....
19
PERIODIC MAINTENANCE ........................20
DRIVE BELTS ...................................................20
Exploded View ..................................................... ....20
Checking ..................................................................20
Tension Adjustment ................................................20
Removal and Installation .........................................20
Inspection ................................................................21
AIR CLEANER FILTER .....................................22
Exploded View .........................................................22
Removal and Installation .........................................22
SPARK PLUG ...................................................23
Exploded View .........................................................23
Removal and Installation .........................................23
Inspection ................................................................24
REMOVAL AND INSTALLATION ...............25
ENGINE COVER ...............................................25
Exploded View ..................................................... ....25
Removal and Installation .........................................25
DRIVE BELT AUTO TENSIONER AND IDLER
PULLEY .............................................................
26
Exploded View .........................................................26
Removal and Installation .........................................26
AIR CLEANER AND AIR DUCT .......................27
Exploded View .........................................................27
Removal and Installation .........................................27
Inspection ................................................................28
IGNITION COIL .................................................29
Exploded View .........................................................29
Removal and Installation .........................................29
INTAKE MANIFOLD .........................................30
Exploded View .........................................................30
Revision: 2010 May2011 QX56
Page 2565 of 5598

PRECAUTIONSEM-3
< PRECAUTION >
C
DE
F
G H
I
J
K L
M A
EM
NP
O
PRECAUTION
PRECAUTIONS
Precaution for Procedur
e without Cowl Top CoverINFOID:0000000006289506
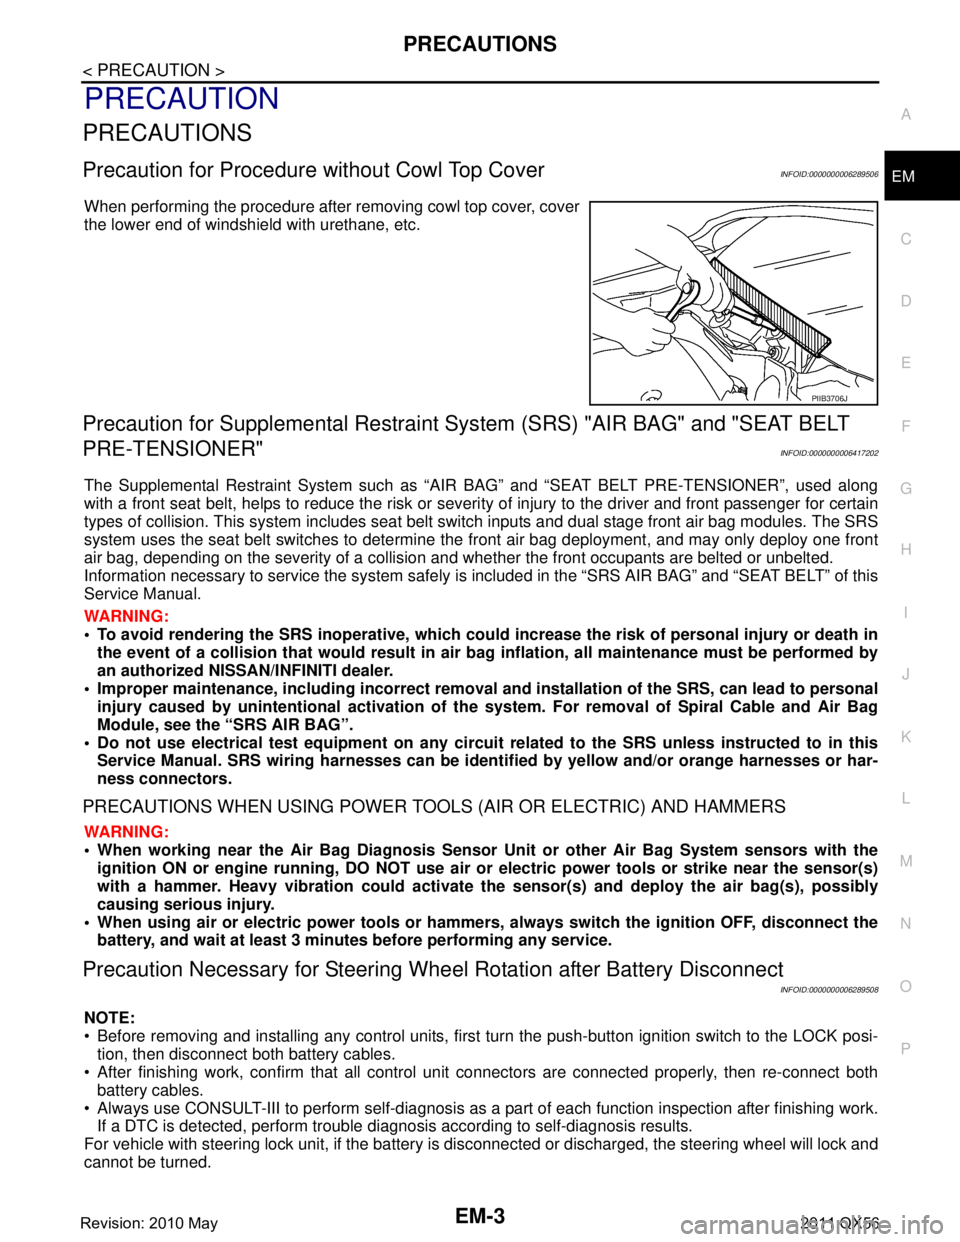
When performing the procedure after removing cowl top cover, cover
the lower end of windshield with urethane, etc.
Precaution for Supplemental Restraint System (SRS) "AIR BAG" and "SEAT BELT
PRE-TENSIONER"
INFOID:0000000006417202
The Supplemental Restraint System such as “A IR BAG” and “SEAT BELT PRE-TENSIONER”, used along
with a front seat belt, helps to reduce the risk or severi ty of injury to the driver and front passenger for certain
types of collision. This system includes seat belt switch inputs and dual stage front air bag modules. The SRS
system uses the seat belt switches to determine the front air bag deployment, and may only deploy one front
air bag, depending on the severity of a collision and whether the front occupants are belted or unbelted.
Information necessary to service the system safely is included in the “SRS AIR BAG” and “SEAT BELT” of this
Service Manual.
WARNING:
• To avoid rendering the SRS inoper ative, which could increase the risk of personal injury or death in
the event of a collision that would result in air ba g inflation, all maintenance must be performed by
an authorized NISSAN/INFINITI dealer.
Improper maintenance, including in correct removal and installation of the SRS, can lead to personal
injury caused by unintentional act ivation of the system. For removal of Spiral Cable and Air Bag
Module, see the “SRS AIR BAG”.
Do not use electrical test equipm ent on any circuit related to the SRS unless instructed to in this
Service Manual. SRS wiring harnesses can be identi fied by yellow and/or orange harnesses or har-
ness connectors.
PRECAUTIONS WHEN USING POWER TOOLS (AIR OR ELECTRIC) AND HAMMERS
WARNING:
When working near the Air Bag Diagnosis Sensor Unit or other Air Bag System sensors with the
ignition ON or engine running, DO NOT use air or electric power tools or strike near the sensor(s)
with a hammer. Heavy vibration could activate the sensor(s) and deploy the air bag(s), possibly
causing serious injury.
When using air or electric power tools or hammers , always switch the ignition OFF, disconnect the
battery, and wait at least 3 minutes before performing any service.
Precaution Necessary for Steering Wh eel Rotation after Battery Disconnect
INFOID:0000000006289508
NOTE:
Before removing and installing any control units, first tu rn the push-button ignition switch to the LOCK posi-
tion, then disconnect both battery cables.
After finishing work, confirm that all control unit connectors are connected properly, then re-connect both
battery cables.
Always use CONSULT-III to perform self-diagnosis as a part of each function inspection after finishing work.
If a DTC is detected, perform trouble diagnos is according to self-diagnosis results.
For vehicle with steering lock unit, if the battery is disconnected or discharged, the steering wheel will lock and
cannot be turned.
PIIB3706J
Revision: 2010 May2011 QX56
Page 2566 of 5598

EM-4
< PRECAUTION >
PRECAUTIONS
If turning the steering wheel is required with the battery disconnected or discharged, follow the operation pro-
cedure below before starting the repair operation.
OPERATION PROCEDURE
1. Connect both battery cables.
NOTE:
Supply power using jumper cables if battery is discharged.
2. Turn the push-button ignition switch to ACC position. (At this time, the steering lock will be released.)
3. Disconnect both battery cables. The steering lock wi ll remain released with both battery cables discon-
nected and the steering wheel can be turned.
4. Perform the necessary repair operation.
5. When the repair work is completed, re-connect bot h battery cables. With the brake pedal released, turn
the push-button ignition switch from ACC position to ON position, then to LOCK position. (The steering
wheel will lock when the push-button igniti on switch is turned to LOCK position.)
6. Perform self-diagnosis check of all control units using CONSULT-III.
Precaution for Drain Engine Coolant and Engine OilINFOID:0000000006289509
Drain engine coolant and engine oil when engine is cooled.
Precaution for Disconnecting Fuel PipingINFOID:0000000006289510
Before starting work, check no fire or sp ark producing items are in the work area.
Release fuel pressure before disconnecting and disassembly.
After disconnecting pipes, plug openings to stop fuel leakage.
Precaution for Handling High Pressure Fuel SystemINFOID:0000000006289511
High pressure fuel system components are betw een high pressure fuel pump and fuel injector.
Always release fuel pressure and never start the engine when performing removal and installation.
When removing or installing parts without releasing fuel pressure, fuel may be splashed and, if fuel contacts
skin or eyes, it may cause inflammation.
Precaution for Removal and DisassemblyINFOID:0000000006289512
When instructed to use SST, use specified tools. Always be careful to work safely, avoid forceful or unin-
structed operations.
Exercise maximum care to avoid damage to mating or sliding surfaces.
Cover openings of engine system with tape or the equival ent, if necessary, to seal out foreign materials.
Mark and arrange disassembly parts in an organi zed way for easy troubleshooting and assembly.
When loosening nuts and bolts, as a basic rule, star t with the one furthest outside, then the one diagonally
opposite, and so on. If the order of loosening is specified, do exactly as specified. Power tools may be used
where noted in the step.
Precaution for Inspection, Repair and ReplacementINFOID:0000000006289513
Before repairing or replacing, thoroughly inspect parts. Inspect new replacement parts in the same way, and
replace if necessary.
Precaution for Assembly and InstallationINFOID:0000000006289514
Use torque wrench to tighten bolts or nuts to specification.
When tightening nuts and bolts, as a basic rule, equally tighten in several different steps starting with the
ones in center, then ones on inside and outside diagonally in this order. If the order of tightening is specified,
do exactly as specified.
Replace with new gasket, packing, oil seal or O-ring.
Thoroughly wash, clean, and air-blow each part. Carefully check engine oil or engine coolant passages for
any restriction and blockage.
Dowel pins are used for several parts alignment. When replacing and reassembling parts with dowel pins,
check that dowel pins are installed in the original position.
Revision: 2010 May2011 QX56
Page 2602 of 5598

EM-40
< REMOVAL AND INSTALLATION >
EXHAUST MANIFOLD AND THREE WAY CATALYST
EXHAUST MANIFOLD AND THREE WAY CATALYST
Exploded ViewINFOID:0000000006289550
Removal and InstallationINFOID:0000000006289551
REMOVAL
WARNING:
Perform the work when the exhaust and cooling system have cooled sufficiently.
1. Drain engine coolant from radiator. Refer to CO-8, "
Draining".
CAUTION:
Perform this step when the engine is cold.
Never spill engine coolant on drive belt.
2. Remove reservoir tank. Refer to CO-13, "
Exploded View".
3. Remove drive belt. Refer to EM-20, "
Removal and Installation".
4. Remove power steering oil pump. Refer to ST-48, "
Exploded View".
5. Remove radiator. Refer to CO-13, "
Exploded View".
6. Remove front under cover. Refer to EXT-25, "
Exploded View".
7. Remove front wheels and tires. Refer to WT-64, "
Exploded View".
8. Remove A/C compressor. Refer to HA-30, "
Exploded View".
9. Remove alternator and alternator bracket. Refer to CHG-25, "
Exploded View".
10. Remove exhaust front tube (bank 1 and bank 2). Refer to EX-5, "
Exploded View".
1. Air fuel ratio sensor 1 (bank 2) 2. Exhaust manifold cover (bank 2) 3. Exhaust manifold and three way cat-
alyst (bank 2)
4. Gasket 5. Exhaust manifold and three way cat-
alyst (bank 1)6. Exhaust manifold cover (bank 1)
7. Air fuel ratio sensor 1 (bank 1)
Refer to GI-4, "
Components" for symbols in the figure.
JSBIA0389GB
Revision: 2010 May2011 QX56
Page 2661 of 5598

ENGINE ASSEMBLYEM-99
< UNIT REMOVAL AND INSTALLATION >
C
DE
F
G H
I
J
K L
M A
EM
NP
O
4WD models
Removal and InstallationINFOID:0000000006289577
WARNING:
Situate the vehicle on a flat and solid surface.
Place chocks at the front
and back of rear wheels.
For engines not equipped with engi ne slingers, attach proper slingers and bolts described in PARTS
CATALOG.
CAUTION:
Always be careful to work safely, and avo id forceful or uninstructed operations.
Never start working until exhaust system and engine coolant are cool enough.
If items or work required are not covered by th e engine section, refer to the applicable sections.
Always use the support poin t specified for lifting.
Use either 2-pole lift type or separate type lift as much as possible. If board-on type is used for
unavoidable reasons, support at r ear axle jacking point with transmi ssion jack or similar tool before
starting work, in preparat ion for the backward shift of the center of gravity.
For supporting points fo r lifting and jacking point at rear axle, refer to GI-32, "
Garage Jack and
Safety Stand".
NOTE:
When removing/installing only the engine mounting, the hold engine assembly as instructed bellow:
1. Remove hood assembly. Refer to DLK-215, "
Exploded View".
2. Remove the following components and related parts: Battery. Refer to PG-164, "
Exploded View".
Battery tray.
Power steering reservoir tank bracket. Refer to ST-54, "
Exploded View".
Air cleaner case assembly and air duct. Refer to EM-27, "
Exploded View".
JPBIA4256GB
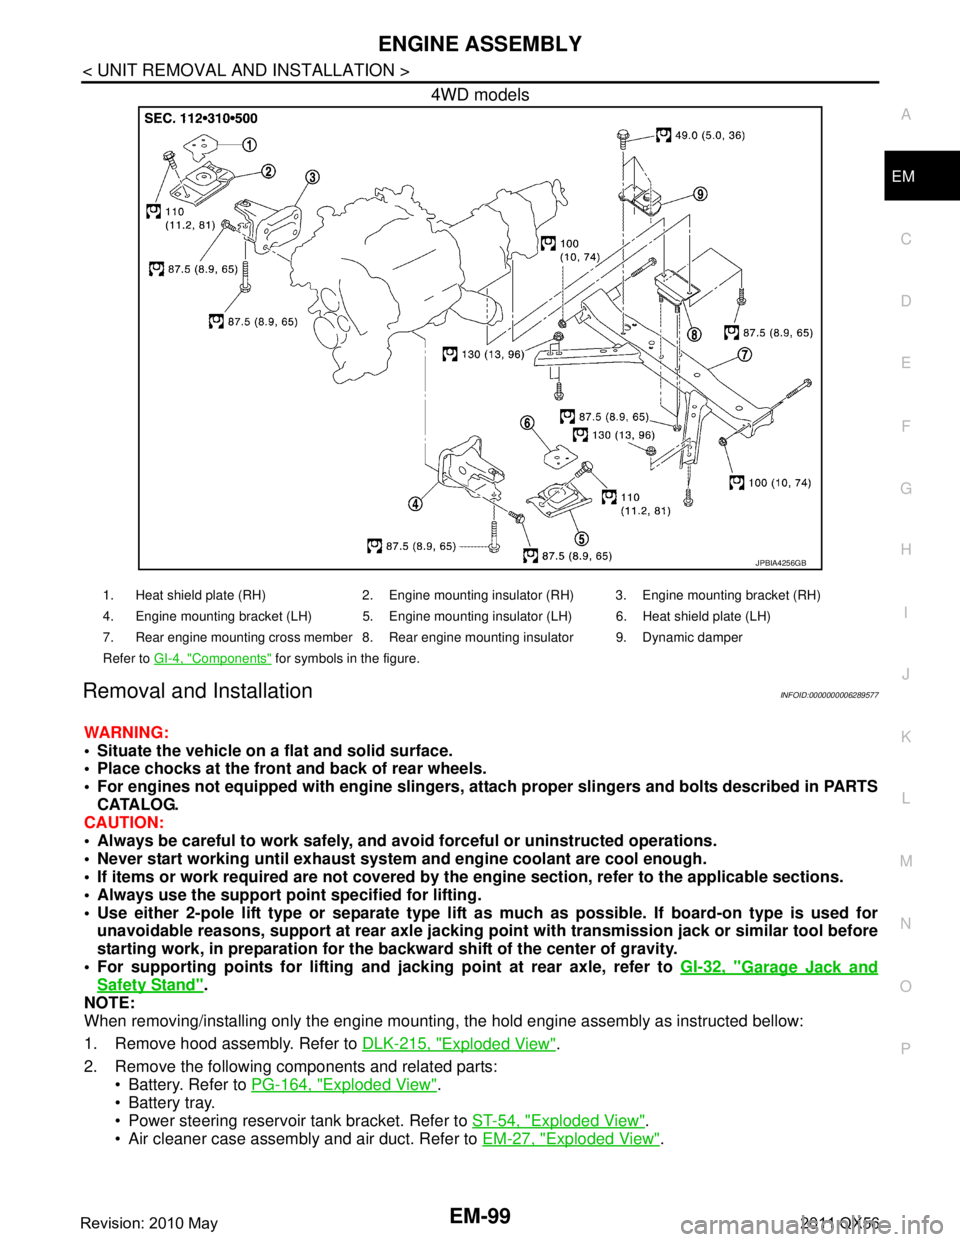
1. Heat shield plate (RH) 2. Engine mounting insulator (RH) 3. Engine mounting bracket (RH)
4. Engine mounting bracket (LH) 5. Engine mounting insulator (LH) 6. Heat shield plate (LH)
7. Rear engine mounting cross member 8. Rear engine mounting insulator 9. Dynamic damper
Refer to GI-4, "
Components" for symbols in the figure.
Revision: 2010 May2011 QX56
Page 2662 of 5598

EM-100
< UNIT REMOVAL AND INSTALLATION >
ENGINE ASSEMBLY
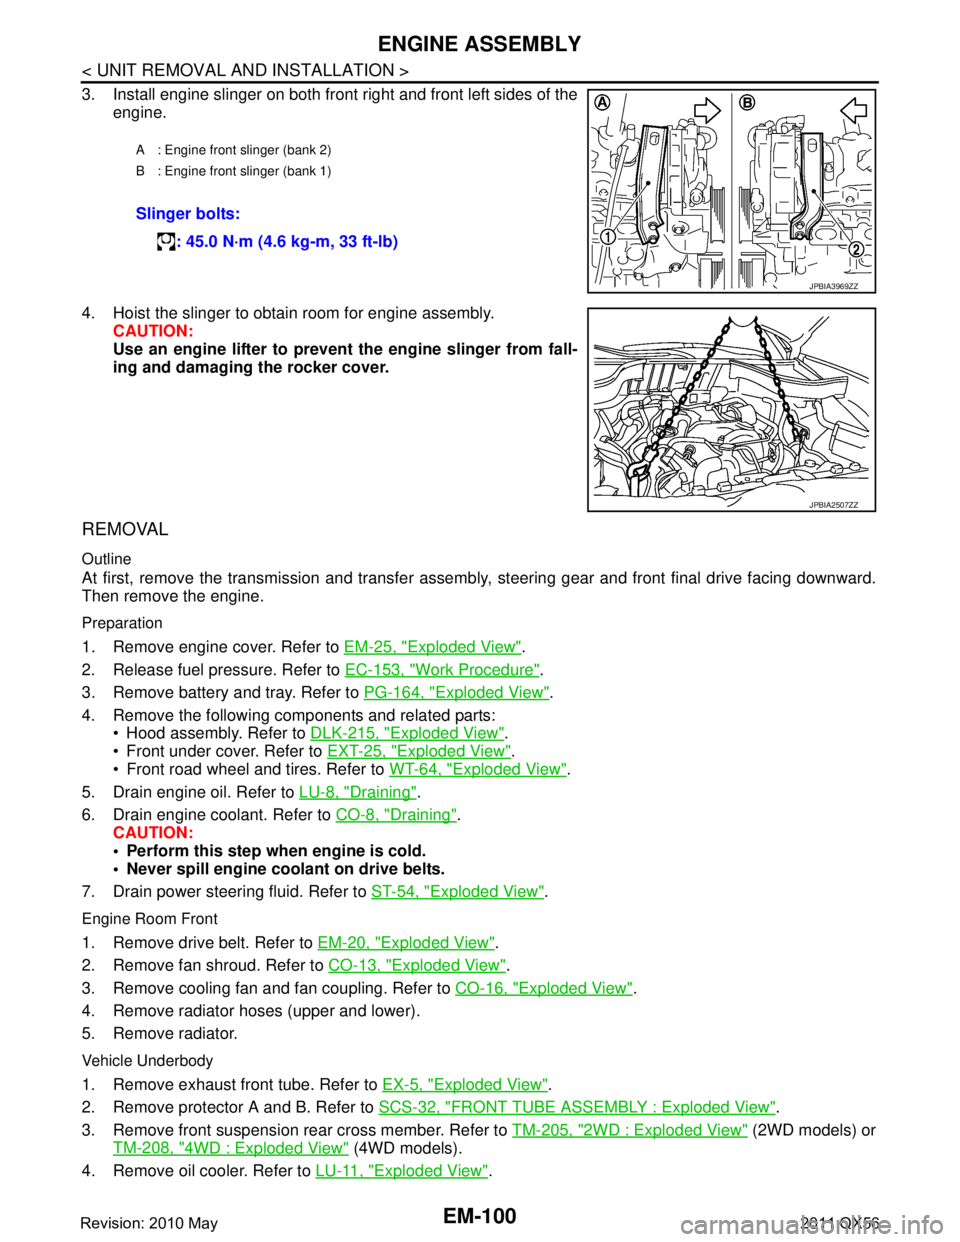
3. Install engine slinger on both front right and front left sides of theengine.
4. Hoist the slinger to obtain room for engine assembly. CAUTION:
Use an engine lifter to prevent the engine slinger from fall-
ing and damaging the rocker cover.
REMOVAL
Outline
At first, remove the transmission and transfer assemb ly, steering gear and front final drive facing downward.
Then remove the engine.
Preparation
1. Remove engine cover. Refer to EM-25, "Exploded View".
2. Release fuel pressure. Refer to EC-153, "
Work Procedure".
3. Remove battery and tray. Refer to PG-164, "
Exploded View".
4. Remove the following components and related parts: Hood assembly. Refer to DLK-215, "
Exploded View".
Front under cover. Refer to EXT-25, "
Exploded View".
Front road wheel and tires. Refer to WT-64, "
Exploded View".
5. Drain engine oil. Refer to LU-8, "
Draining".
6. Drain engine coolant. Refer to CO-8, "
Draining".
CAUTION:
Perform this step when engine is cold.
Never spill engine coolant on drive belts.
7. Drain power steering fluid. Refer to ST-54, "
Exploded View".
Engine Room Front
1. Remove drive belt. Refer to EM-20, "Exploded View".
2. Remove fan shroud. Refer to CO-13, "
Exploded View".
3. Remove cooling fan and fan coupling. Refer to CO-16, "
Exploded View".
4. Remove radiator hoses (upper and lower).
5. Remove radiator.
Vehicle Underbody
1. Remove exhaust front tube. Refer to EX-5, "Exploded View".
2. Remove protector A and B. Refer to SCS-32, "
FRONT TUBE ASSEMBLY : Exploded View".
3. Remove front suspension rear cross member. Refer to TM-205, "
2WD : Exploded View" (2WD models) or
TM-208, "
4WD : Exploded View" (4WD models).
4. Remove oil cooler. Refer to LU-11, "
Exploded View".
A : Engine front slinger (bank 2)
B : Engine front slinger (bank 1)
Slinger bolts:
: 45.0 N·m (4.6 kg-m, 33 ft-lb)
JPBIA3969ZZ
JPBIA2507ZZ
Revision: 2010 May2011 QX56
Page 2725 of 5598
![INFINITI QX56 2011 Factory Service Manual
SYSTEMEXL-15
< SYSTEM DESCRIPTION > [XENON TYPE]
C
D
E
F
G H
I
J
K
M A
B
EXL
N
O P
ACTIVE ADAPTIVE FRONT-LIGHTI NG SYSTEM : System DiagramINFOID:0000000006213899
ACTIVE ADAPTIVE FRONT-LIGHTING SYSTE INFINITI QX56 2011 Factory Service Manual
SYSTEMEXL-15
< SYSTEM DESCRIPTION > [XENON TYPE]
C
D
E
F
G H
I
J
K
M A
B
EXL
N
O P
ACTIVE ADAPTIVE FRONT-LIGHTI NG SYSTEM : System DiagramINFOID:0000000006213899
ACTIVE ADAPTIVE FRONT-LIGHTING SYSTE](/manual-img/42/57033/w960_57033-2724.png)
SYSTEMEXL-15
< SYSTEM DESCRIPTION > [XENON TYPE]
C
D
E
F
G H
I
J
K
M A
B
EXL
N
O P
ACTIVE ADAPTIVE FRONT-LIGHTI NG SYSTEM : System DiagramINFOID:0000000006213899
ACTIVE ADAPTIVE FRONT-LIGHTING SYSTEM : System DescriptionINFOID:0000000006213900
OUTLINE
AFS (ACTIVE ADAPTIVE FRONT-LIGHTING SY STEM) is controlled by AFS control unit.
AFS has AFS control (swivel control) and the headlamp auto aiming control.
- AFS control swivels the headlamp to the steering direction.
- Headlamp auto aiming control moves the headlamp light axis up/down according to the vehicle height.
AFS (ADAPTIVE FRONT-LIGHTING SYSTEM)
AFS Control Description
AFS control unit controls the headlamp (right) only when the steering wheel is turned rightward, and the
headlamp (left) only when the steering wheel is turned leftward.
AFS control unit detects the vehicle condition nec essary for AFS control with the following signals.
- AFS switch signal
- Vehicle speed signal (received from combination meter via CAN communication)
- Steering angle sensor signal (received from steering angle sensor via CAN communication)
- Shift position signal (received from TCM via CAN communication)
- Low beam status signal (received from IPDM E/R via CAN communication)
- Engine speed signal (received from ECM via CAN communication)
When the operation conditions are satisfied, AFS c ontrol unit controls the swivel angle depending on the
steering angle and the vehicle speed.
AFS operation condition- Swivel actuator initialization completed
- AFS “ON”(AFS OFF indicator lamp “OFF”)
- Headlamp ON
- While the engine running
- Selector lever position other than “P” or “R”
- Vehicle speed approximately 25 km/h (15.5 MPH) or more (Left swivel only; Right swivel activates regardless of the vehicle speed.)
Swivel Actuator Initialization
AFS control unit performs the swivel actuator in itialization when detecting that the engine starts.
JMLIA1077GB
Revision: 2010 May2011 QX56
Page 2790 of 5598
![INFINITI QX56 2011 Factory Service Manual
EXL-80
< DTC/CIRCUIT DIAGNOSIS >[XENON TYPE]
C0126 STEERING ANGLE SENSOR SIGNAL
C0126 STEERING ANGLE SENSOR SIGNAL
DTC LogicINFOID:0000000006213944
DTC DETECTION LOGIC
DTC CONFIRMATION PROCEDURE
1.DT INFINITI QX56 2011 Factory Service Manual
EXL-80
< DTC/CIRCUIT DIAGNOSIS >[XENON TYPE]
C0126 STEERING ANGLE SENSOR SIGNAL
C0126 STEERING ANGLE SENSOR SIGNAL
DTC LogicINFOID:0000000006213944
DTC DETECTION LOGIC
DTC CONFIRMATION PROCEDURE
1.DT](/manual-img/42/57033/w960_57033-2789.png)
EXL-80
< DTC/CIRCUIT DIAGNOSIS >[XENON TYPE]
C0126 STEERING ANGLE SENSOR SIGNAL
C0126 STEERING ANGLE SENSOR SIGNAL
DTC LogicINFOID:0000000006213944
DTC DETECTION LOGIC
DTC CONFIRMATION PROCEDURE
1.DTC ERASE
Erase the DTC memory of AFS with CONSULT-III.
>> GO TO 2.
2.DTC CONFIRMATION
1. Start the engine.
2. Turn the steering wheel to the maximum right/left.
3. Select the self-diagnosis with CONSULT-III.
4. Check the self-diagnosis result. Refer to EXL-39, "
DTC Index".
Is DTC
“C0126” detected?
YES >> Refer to EXL-80, "Diagnosis Procedure".
NO >> Refer to GI-40, "
Intermittent Incident".
Diagnosis ProcedureINFOID:0000000006213945
1.ABS ACTUATOR AND ELECTRICAL UNIT (CONTROL UNIT) SELF-DIAGNOSIS
Check the self-diagnosis result with CONSULT-III. C heck that ABS actuator and electrical unit (control unit)
does not detect any DTCs.
Is any DTC detected?
YES >> Check ABS actuator and electrical unit (control unit).Refer to BRC-51, "DTC Index".
NO >> GO TO 2.
2.DTC ERASE
Erase DTC memory of AFS with CONSULT-III.
Is the memory erased?
YES >> Inspection end.
NO >> Replace AFS control unit. Refer to EXL-135, "
Removal and Installation"
DTC No. Trouble diagnosis name DTC detection condition Possible causes
C0126 Steering angle sensor signal In any of the following conditions
The steering angle sensor signal
is not received.
The steering angle sensor signal error is received.
Out-of-standard signal (-900 °-
+900 °) is received. Steering angle sensor
AFS control unit
Revision: 2010 May2011 QX56