2011 HYUNDAI TUCSON lock
[x] Cancel search: lockPage 174 of 382
493
Features of your vehicle
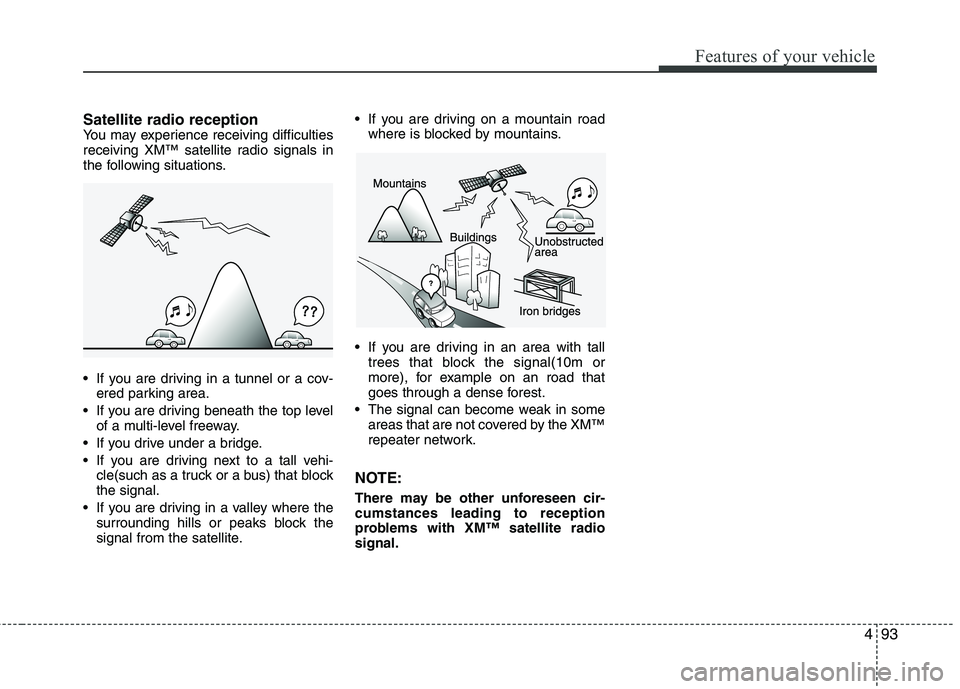
Satellite radio receptionYou may experience receiving difficulties
receiving XM™ satellite radio signals in
the following situations.
If you are driving in a tunnel or a cov-ered parking area.
If you are driving beneath the top level of a multi-level freeway.
If you drive under a bridge.
If you are driving next to a tall vehi- cle(such as a truck or a bus) that block the signal.
If you are driving in a valley where the surrounding hills or peaks block the
signal from the satellite. If you are driving on a mountain road
where is blocked by mountains.
If you are driving in an area with tall trees that block the signal(10m or
more), for example on an road that
goes through a dense forest.
The signal can become weak in some areas that are not covered by the XM™
repeater network.
NOTE:
There may be other unforeseen cir- cumstances leading to reception
problems with XM™ satellite radiosignal.
Page 177 of 382
![HYUNDAI TUCSON 2011 Owners Manual Features of your vehicle
96
4
Using RADIO, SETUP, VOLUME
and AUDIO CONTROL
1. AM Selection Button
Pressing the [AM] button selects the AM
band. AM Mode is displayed on the LCD.
2. FM Selection But HYUNDAI TUCSON 2011 Owners Manual Features of your vehicle
96
4
Using RADIO, SETUP, VOLUME
and AUDIO CONTROL
1. AM Selection Button
Pressing the [AM] button selects the AM
band. AM Mode is displayed on the LCD.
2. FM Selection But](/manual-img/35/56206/w960_56206-176.png)
Features of your vehicle
96
4
Using RADIO, SETUP, VOLUME
and AUDIO CONTROL
1. AM Selection Button
Pressing the [AM] button selects the AM
band. AM Mode is displayed on the LCD.
2. FM Selection Button Turns to FM mode and toggles FM1 and
FM2 when the button is pressed each
time.
3. Automatic Station Seek Button
When the [SEEK ] is pressed, it will
automatically tune to the next lower station.
When the [SEEK ] is pressed, it will automatically tune to the next higher station.
4. Power ON/OFF Button & Volume Control Knob
Turns the audio system on/off whenthe ignition switch is on ACC or ON.
If the knob is turned clockwise/counter- clockwise, the volume will increase
/decrease.
5. Preset Selection Button
Press [1]~[6] buttons less than 0.8 sec-ond to play the station saved in each
button.
Press [1]~[6] b utton more than 0.8 sec-
ond or longer to save the current station
to the respective button with a beep.
6. SCAN Button
When the button is pressed, it auto- matically scans the radio stations
upwards.
The SCAN feature steps through each station, starting from the initial station,
for ten seconds.
Press the [SCAN] button again to stop the scan feature and to listen to the currently selected channel.
7. DISP Button
Turn the LCD Display & Backlight on/off
when [DISP] button press.
8. SETUP Button
Press this Button to enter SETUP mode,
If no action is taken for 8 seconds, it will
return to previous mode.
In “SETUP” mode, rotate the TUNE knob
to move the cursor between items, and
push the TUNE knob to select.
Select whether long file names are
scrolled continuously (“ON”) or just once(“OFF”).
Select this item to turn the SDVC(Speed
Dependent Volume Control) feature ON
or OFF. If it is turned ON, volume level is adjusted automatically according to the
vehicle speed.
This function creates virtual sound
effects and allows adjustments to the
BASS level. HIGH
➟MID ➟LOW ➟OFF
Select default display of XM mode.
“Category/Channel name” or “Artist/Song
Title” can be selected.
Page 178 of 382
![HYUNDAI TUCSON 2011 Owners Manual 497
Features of your vehicle
Select this item to enter BLUETOOTH®
setup mode. Refer to “BLUETOOTH
PHONE OPERATION” section for
detailed information.
Press the [SETUP] button. Use the vol- HYUNDAI TUCSON 2011 Owners Manual 497
Features of your vehicle
Select this item to enter BLUETOOTH®
setup mode. Refer to “BLUETOOTH
PHONE OPERATION” section for
detailed information.
Press the [SETUP] button. Use the vol-](/manual-img/35/56206/w960_56206-177.png)
497
Features of your vehicle
Select this item to enter BLUETOOTH®
setup mode. Refer to “BLUETOOTH
PHONE OPERATION” section for
detailed information.
Press the [SETUP] button. Use the vol-
ume controller to adjust the clock in the
following order: CLOCK
ENTERhour or
minute. Adjust the hour and press the [ENTER]
button to set. Use the same method to
adjust the minute and press the [ENTER]
button to complete and exit from clock
adjustment mode.
Pressing the [SETUP] button while in
POWER OFF screen will allow the user
to make immediately adjustments to the
clock.
9. TUNE Knob & Audio Control
Knob
clock wise to increase or decrease from
current frequency.
(AM 10kHz, FM 200kHz)
Pressing the button changes the BASS,
MIDDLE, TREBLE, FADER and BAL-
ANCE TUNE mode. The mode selected
is shown on the display. After selecting
each mode, rotate the Audio control knob
clockwise or counterclockwise.
To increase the BASS, rotate the knob
clockwise, while to decrease the BASS,
rotate the knob counterclockwise.
To increase the MIDDLE, rotate the knob
clockwise, while to decrease the MID-
DLE, rotate the knob counterclockwise.
Control
To increase the TREBLE, rotate the knob
clockwise, while to decrease the TRE-
BLE, rotate the knob counterclockwise.
Turn the control knob clockwise to
emphasize rear speaker sound (front
speaker sound will be attenuated). When
the control knob is turned counterclock-
wise, front speaker sound will be empha-
sized (rear speaker sound will be attenu- ated).
Rotate the knob clockwise to emphasize
right speaker sound (left speaker sound
will be attenuated). When the control
knob is turned counter clockwise, left
speaker sound will be emphasized (right
speaker sound will be attenuated).
Page 181 of 382
Features of your vehicle
100
4
- MP3 CD : File Name, Title, Artist,
Album, Folder, Total Files (Not displayed
if the information is unavailable on the
CD or file.)
10. FOLDER Moving Button
Press [FOLDER ] button to move to child folder of the current folder and
display the first song in the folder.
Press TUNE/ ENTER knob to move to
the folder displayed. It will play the first
song in the folder.
Press [FOLDER ] button to move to parent folder of the current folder and
display the first song in the folder.
Press TUNE/ENTER knob to move to
the folder displayed.
11. SEARCH Knob & ENTER Button
Turn this knob clockwise to browsesongs after current song, or counter-
clockwise to browse songs before cur-
rent song. To play the displayed song,
press the knob.
Pressing this knob without turning enters to AUDIO CONTROL mode.
NOTE:
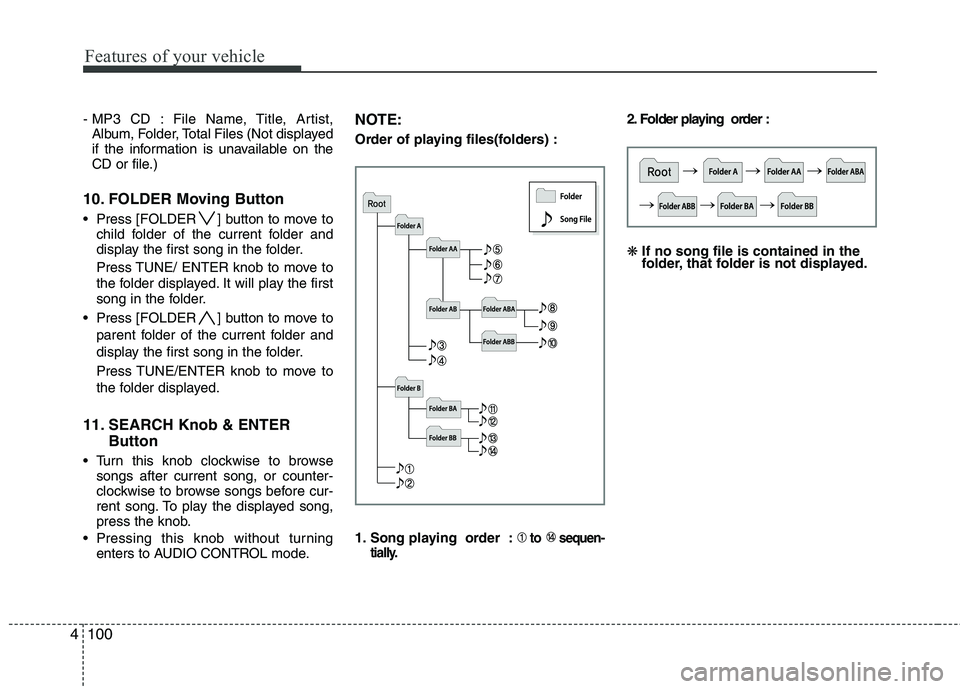
Order of playing files(folders) :
1. Song playing order :
to sequen-
tially.
2. Folder playing order : ❋ If no song file is contained in the
folder, that folder is not displayed.
Page 185 of 382
Features of your vehicle
104
4
Using USB device
1. AUX/USB Selection Button
If the auxiliary device is connected, it
switches to AUX or USB mode to play the
sound from the auxiliary player.
If there is no auxiliary device, then the message "No Media" will become dis-
played on the LCD for 3 seconds and
returns to previous mode.
2. TRACK Selection Button
Press the [TRACK ] button for less
than 0.8 seconds to play from the beginning of the current song.
Press the button for less than 0.8 sec- onds and press it again within 1 sec-
ond to move to and play the previous song.
Press the button for 0.8 seconds or
longer to play the song in reverse
direction in fast speed.
Press the [TRACK ] button for less
than 0.8 seconds to move to the next
song. Press the button for 0.8 seconds
or longer to play the song in forward
direction in fast speed.
3. RANDOM Playback Button
Press this button for less than 0.8 sec- onds to play songs randomly in current
folder.
Press this button for 0.8 seconds or longer to play songs randomly in entire
USB device.
To cancel RANDOM play, press this button again.
4. REPEAT Button
Press this button for less than 0.8 sec-onds to repeat current song.
Press this button for 0.8 seconds or longer to repeat all songs in current
folder.
To cancel REPEAT, press this button again.
5. SCAN Selection Button
Plays each song in the USB device for 10
seconds.
To cancel SCAN Play, press this button again.
6. INFO Button
Displays the information of the file cur-
rently played in the order of FILE NAME
➟ TITLE ➟ ARTIST ➟ ALBUM ➟ FOLDER➟ TOTAL FILE ➟NORMAL DISPLAY ➟FILE NAME ➟… (Displays no informa-
tion if the file has no song information.)
7. FOLDER Moving Button
Press [FOLDER ] button to move to
child folder of the current folder and
display the first song in the folder.
Press TUNE/ ENTER knob to move to
the folder displayed. It will play the first
song in the folder.
Press [FOLDER ] button to move to parent folder display the first song in
the folder.
Press TUNE/ENTER knob to move to
the folder displayed.
8. SEARCH Knob & ENTER Button
songs after current song, or counter
clockwise to browse songs before cur-
rent song. To play the displayed song,
press the knob.
enters to AUDIO CONTROL mode.
Page 188 of 382
4107
Features of your vehicle
Using iPod®
1. iPod Selection Button
If iPod is connected, it switches to the
iPod mode from the previous mode to
play the song files stored in the iPod.
If there is no iPod connected, then it dis-
plays the message "No Media" for 3 sec-
onds and returns to the previous mode.
2. TRACK Selection Button
Press the [TRACK ] but ton for less
than 0.8 seconds to play from the
beginning of the song currently played.
Press the button for less than 0.8 sec- onds and press it again within 1 sec-
ond to move to and play the previous
track.
Press the button for 0.8 seconds or
longer to play the song in reverse
direction in fast speed.
Press the [TRACK ] button for less than 0.8 seconds to move to the next
track.
Press the button for 0.8 seconds or
longer to play the song in forward direc-
tion in fast speed.
3. REPEAT Button
Repeats the song currently played.
4. RANDOM Playback Button
Press this button for less than 0.8 sec-onds to shuffle order of all songs in
current category. (Song Random)
Press this button for 0.8 seconds or longer to shuffle order of albums in cur-
rent category. (Album Random)
To cancel RANDOM Play, press this button again.
5. INFO Button
Displays the information of the file cur-
rently played in the order of TITLE ➟ARTIST ➟ALBUM ➟NORMAL DISPLAY➟TITLE ➟... (Displays no information if
the file has no song information.)
6. CATEGORY Selection Button
Moves to the upper category from cur-
rently played category of the iPod.
To move to (play) the category (song)
displayed, press TUNE/ENTER knob.
You will be able to search through the
lower category of the selected category. The order of iPod’s category is SONG,
ALBUMS, ARTISTS, GENRES, and iPod.
7. SEARCH Knob & ENTER
Button
When you rotate the knob clockwise, it
will display the songs (category) ahead
of the song currently played (category in
the same level).
Also, when you rotate the knob counter-
clockwise, it will display the songs (cate-
gory) before the song currently played
(category in the same level).
To listen to the song displayed in the
song category, press the button to skip to
and play the selected song.
Pressing the button changes the BASS,
MIDDLE, TREBLE, FADER and BAL-
ANCE TUNE mode. The mode selected
is shown on the display. After selecting
each mode, rotate the Audio control knob
clockwise or counterclockwise.
Page 190 of 382
4109
Features of your vehicle
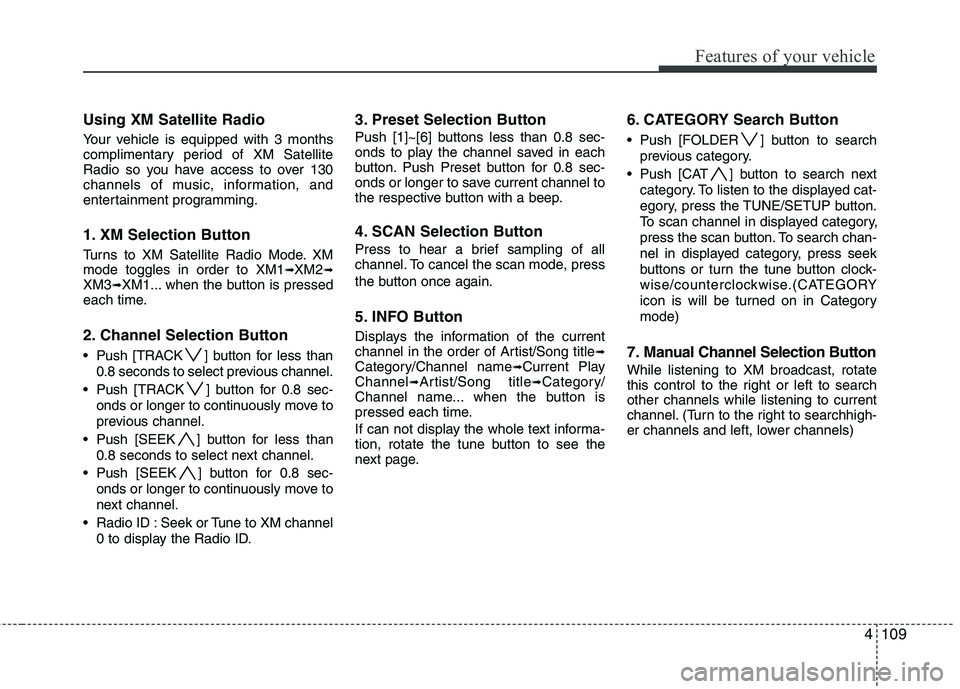
Using XM Satellite Radio
Your vehicle is equipped with 3 months
complimentary period of XM Satellite
Radio so you have access to over 130
channels of music, information, and
entertainment programming.
1. XM Selection Button
Turns to XM Satellite Radio Mode. XMmode toggles in order to XM1➟XM2➟XM3➟XM1... when the button is pressed
each time.
2. Channel Selection Button
Push [TRACK ] button for less than
0.8 seconds to select previous channel.
Push [TRACK ] button for 0.8 sec- onds or longer to continuously move to
previous channel.
Push [SEEK ] button for less than 0.8 seconds to select next channel.
Push [SEEK ] button for 0.8 sec- onds or longer to continuously move to
next channel.
Radio ID : Seek or Tune to XM channel 0 to display the Radio ID.
3. Preset Selection Button
Push [1]~[6] buttons less than 0.8 sec-
onds to play the channel saved in each
button. Push Preset button for 0.8 sec-
onds or longer to save current channel to
the respective button with a beep.
4. SCAN Selection Button
Press to hear a brief sampling of all
channel. To cancel the scan mode, press
the button once again.
5. INFO Button
Displays the information of the current
channel in the order of Artist/Song title➟Category/Channel name➟Current Play
Channel➟Artist/Song title➟Category/
Channel name... when the button is
pressed each time.
If can not display the whole text informa-
tion, rotate the tune button to see the
next page.
6. CATEGORY Search Button
Push [FOLDER ] button to search
previous category.
Push [CAT ] button to search next category. To listen to the displayed cat-
egory, press the TUNE/SETUP button.
To scan channel in displayed category,
press the scan button. To search chan-
nel in displayed category, press seek
buttons or turn the tune button clock-
wise/counterclockwise.(CATEGORY
icon is will be turned on in Categorymode)
7. Manual Channel Selection Button
While listening to XM broadcast, rotate
this control to the right or left to searchother channels while listening to current
channel. (Turn to the right to searchhigh-
er channels and left, lower channels)
Page 204 of 382

53
Driving your vehicle
Before entering vehicle
• Be sure that all windows, outside mir-ror(s), and outside lights are clean.
Check the condition of the tires.
Check under the vehicle for any sign of leaks.
Be sure there are no obstacles behind you if you intend to back up.
Necessary inspections
Fluid levels, such as engine oil, engine
coolant, brake fluid, and washer fluid
should be checked on a regular basis,
with the exact interval depending on the
fluid. Further details are provided in sec-
tion 7, “Maintenance”.
Before starting
Close and lock all doors.
Position the seat so that all controls are
easily reached.
Adjust the inside and outside rearview mirrors. Be sure that all lights work.
Check all gauges.
Check the operation of warning lights
when the ignition switch is turned to the ON position.
Release the parking brake and make sure the brake warning light goes out.
For safe operation, be sure you are famil-
iar with your vehicle and its equipment.
BEFORE DRIVING
WARNING
All passengers must be properly
belted whenever the vehicle is mov-
ing. Refer to “Seat belts” in section
3 for more information on their
proper use.
WARNING
Always check the surrounding
areas near your vehicle for people,
especially children, before putting a
vehicle into “Drive” or “Reverse”.
CALIFORNIA PROPOSI-
TION 65 WARNING
Engine exhaust and a wide variety of automobile components and
parts, including components foundin the interior furnishings in a vehi-
cle, contain or emit chemicals
known to the State of California to
cause cancer and birth defects and
reproductive harm. In addition, cer-
tain fluids contained in vehicles
and certain products of component
wear contain or emit chemicals
known to the State of California to
cause cancer and birth defects or
other reproductive harm.