2011 HYUNDAI TUCSON phone
[x] Cancel search: phonePage 2 of 382
F2
Your Hyundai should not be modified in any way. Such modifications may adversely affect the per-
formance, safety or durability of your Hyundai and may, in addition, violate conditions of the limited
warranties covering the vehicle. Certain modifications may also be in violation of regulations estab-
lished by the U.S. Department of Transportation and other federal or state agencies.
Your vehicle is equipped with electronic fuel injection and other electronic components. It is possible
for an improperly installed/adjusted two-way radio or cellular telephone to adversely affect electronic
systems. For this reason, we recommend that you carefully follow the radio manufacturer's instruc-
tions or consult your Hyundai dealer for precautionary measures or special instructions if you choose
to install one of these devices.
CAUTION: MODIFICATIONS TO YOUR HYUNDAI
TWO-WAY RADIO OR CELLULAR TELEPHONE INSTALLATION
Page 17 of 382
23
Your vehicle at a glance
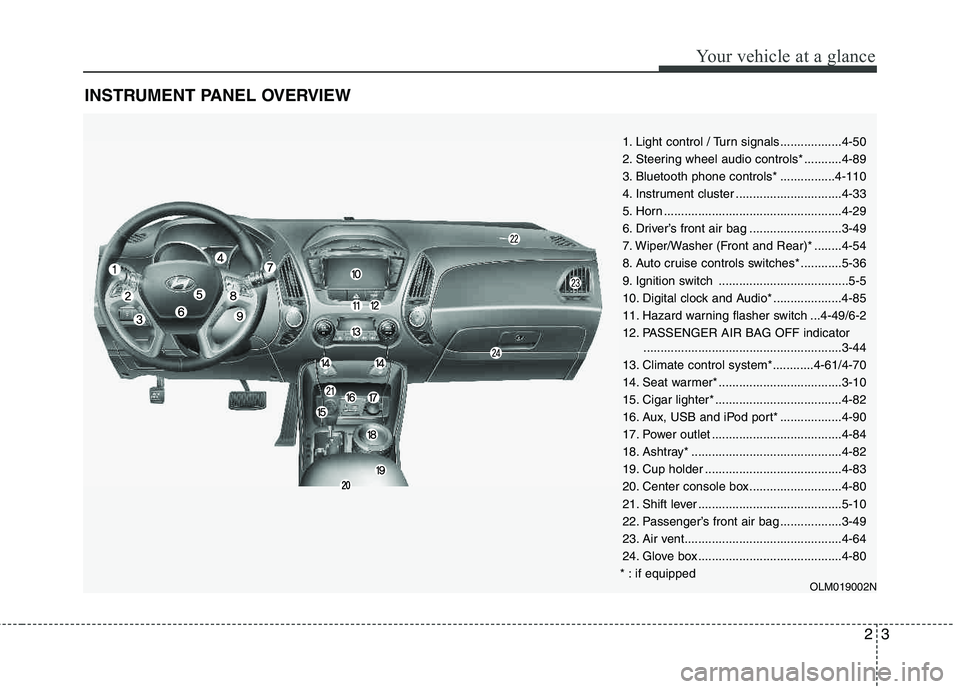
INSTRUMENT PANEL OVERVIEW
1. Light control / Turn signals..................4-50
2. Steering wheel audio controls* ...........4-89
3. Bluetooth phone controls* ................4-110
4. Instrument cluster ...............................4-33
5. Horn ....................................................4-29
6. Driver’s front air bag ...........................3-49
7. Wiper/Washer (Front and Rear)* ........4-54
8. Auto cruise controls switches* ............5-36
9. Ignition switch ......................................5-5
10. Digital clock and Audio* ....................4-85
11. Hazard warning flasher switch ...4-49/6-2
12. PASSENGER AIR BAG OFF indicator..........................................................3-44
13. Climate control system*............4-61/4-70
14. Seat warmer* ....................................3-10
15. Cigar lighter* .....................................4-82
16. Aux, USB and iPod port* ..................4-90
17. Power outlet ......................................4-84
18. Ashtray* ............................................4-82
19. Cup holder ........................................4-83
20. Center console box...........................4-80
21. Shift lever ..........................................5-10
22. Passenger’s front air bag ..................3-49
23. Air vent..............................................4-64
24. Glove box ..........................................4-80
* : if equipped
OLM019002N
Page 103 of 382

Features of your vehicle
22
4
(Continued)
Use only approved portable plas-
tic fuel containers designed to
carry and store gasoline.
Do not use cellular phones while refueling. Electric current and/or
electronic interference from cel-
lular phones can potentially
ignite fuel vapors causing a fire.
When refueling, always shut the engine off. Sparks produced byelectrical components related to
the engine can ignite fuel vapors
causing a fire. Once refueling is
complete, check to make sure thefiller cap and filler door are
securely closed, before starting
the engine.
DO NOT use matches or a lighter and DO NOT SMOKE or leave a lit
cigarette in your vehicle while at
a gas station especially during
refueling. Automotive fuel is
highly flammable and can, when
ignited, result in fire.
(Continued)(Continued)
Do not get back into a vehicleonce you have begun refueling
since you can generate static
electricity by touching, rubbing
or sliding against any item or fab-
ric (polyester, satin, nylon, etc.)
capable of producing static elec-
tricity. Static electricity discharge
can ignite fuel vapors resulting in
rapid burning. If you must re-
enter the vehicle, you should
once again eliminate potentially
dangerous static electricity dis-
charge by touching a metal part
of the vehicle, away from the fuel
filler neck, nozzle or other gaso-
line source.
When using an approved portable fuel container, be sure toplace the container on the
ground prior to refueling. Static
electricity discharge from the
container can ignite fuel vapors
causing a fire. Once refueling has
begun, contact with the vehicleshould be maintained until the
filling is complete.
(Continued)WARNING - Refueling dan-
gers
Automotive fuels are flammable
materials. When refueling, please
note the following guidelines care-
fully. Failure to follow these guide-
lines may result in severe personal
injury, severe burns or death by fire
or explosion.
Read and follow all warningsposted at the gas station facility.
Before refueling, note the loca- tion of the Emergency Gasoline
Shut-Off, if available, at the gas
station facility.
Before touching the fuel nozzle, you should eliminate potentially
dangerous static electricity dis-
charge by touching another metal
part of the vehicle, a safe dis-
tance away from the fuel filler
neck, nozzle, or other gas source.
(Continued)
Page 165 of 382
Features of your vehicle
84
4
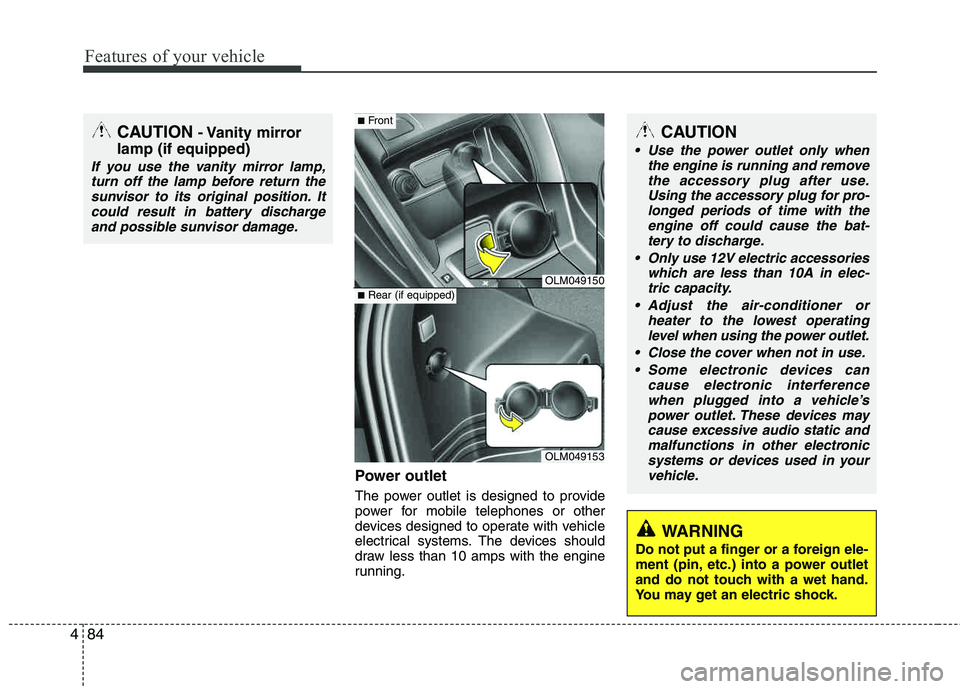
Power outlet
The power outlet is designed to provide
power for mobile telephones or other
devices designed to operate with vehicle
electrical systems. The devices should
draw less than 10 amps with the engine
running.
CAUTION- Vanity mirror
lamp (if equipped)
If you use the vanity mirror lamp, turn off the lamp before return thesunvisor to its original position. It
could result in battery dischargeand possible sunvisor damage.
OLM049150
OLM049153
■ Front
■Rear (if equipped)
CAUTION
Use the power outlet only when
the engine is running and removethe accessory plug after use.
Using the accessory plug for pro-longed periods of time with the engine off could cause the bat-tery to discharge.
Only use 12V electric accessories which are less than 10A in elec-tric capacity.
Adjust the air-conditioner or heater to the lowest operatinglevel when using the power outlet.
Close the cover when not in use.
Some electronic devices can cause electronic interferencewhen plugged into a vehicle’s
power outlet. These devices maycause excessive audio static andmalfunctions in other electronicsystems or devices used in your
vehicle.
WARNING
Do not put a finger or a foreign ele-
ment (pin, etc.) into a power outlet
and do not touch with a wet hand.
You may get an electric shock.
Page 171 of 382
Features of your vehicle
90
4
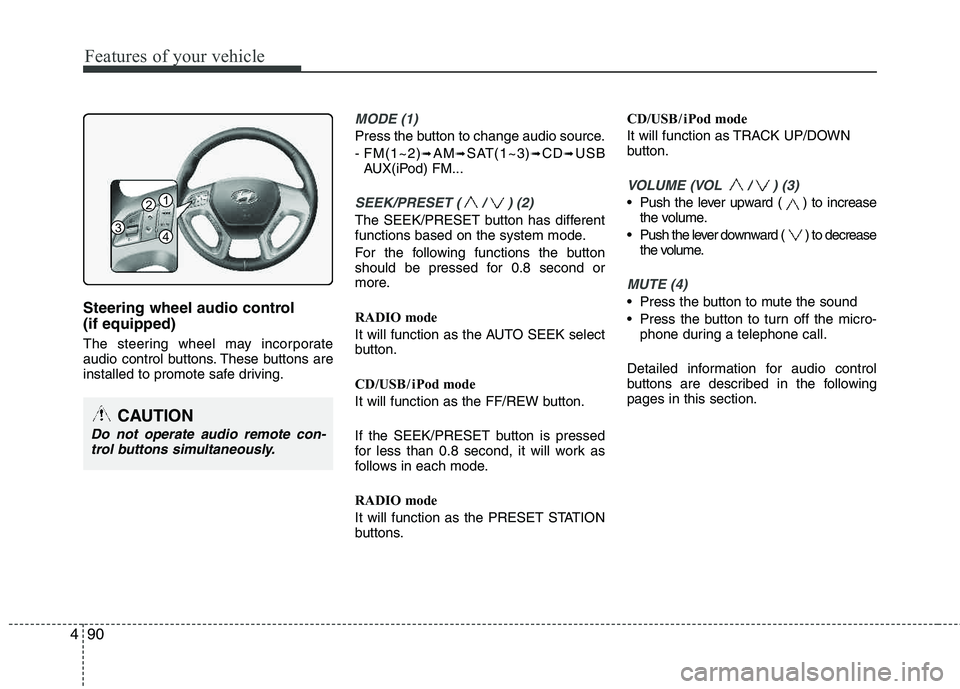
Steering wheel audio control (if equipped)
The steering wheel may incorporate
audio control buttons. These buttons are
installed to promote safe driving.
MODE (1)
Press the button to change audio source.
- FM(1~2)
➟AM➟SAT(1~3)➟CD➟USB
AUX(iPod) FM...
SEEK/PRESET ( / ) (2)
The SEEK/PRESET button has different
functions based on the system mode.
For the following functions the button
should be pressed for 0.8 second or
more.
RADIO mode
It will function as the AUTO SEEK select
button.
CD/USB / i Pod mode
It will function as the FF/REW button.
If the SEEK/PRESET button is pressed
for less than 0.8 second, it will work as
follows in each mode.
RADIO mode
It will function as the PRESET STATION
buttons. CD/USB / i Pod mode
It will function as TRACK UP/DOWN
button.
VOLUME (VOL / ) (3)
• Push the lever upward ( ) to increase
the volume.
Push the lever downward ( ) to decrease the volume.
MUTE (4)
Press the button to mute the sound
Press the button to turn off the micro-phone during a telephone call.
Detailed information for audio control
buttons are described in the followingpages in this section.
CAUTION
Do not operate audio remote con- trol buttons simultaneously.
1
3
2
4
Page 175 of 382
Features of your vehicle
94
4
Using a cellular phone or a two-way
radio
When a cellular phone is used inside the
vehicle, noise may be produced from the
audio equipment. This does not mean that something is wrong with the audio
equipment. In such a case, use the cellu-
lar phone at a place as far as possible from the audio equipment.
Care of discs
If the temperature inside the vehicle is too high, open the vehicle windows for
ventilation before using your vehicle
audio.
It is illegal to copy and use MP3/WMA files without permission. Use CDs that
are created only by lawful means.
Do not apply volatile agents such as benzene and thinner, normal cleaners
and magnetic sprays made for ana-
logue disc onto CDs.
To prevent the disc surface from get- ting damaged. Hold and carry CDs by the edges or the edges of the center
hole only.
Clean the disc surface with a piece of soft cloth before playback (wipe it fromthe center to the outside edge).
Do not damage the disc surface or attach pieces of sticky tape or paper onto it.
Make sure objects other than CDs are not inserted into the CD player (Do not
insert more than one CD at a time). Keep CDs in their cases after use to
protect them from scratches or dirt.
Depending on the type of CD-R/CD- RW CDs, certain CDs may not operate
normally according to manufacturing companies or making and recording
methods. In such circumstances, if you
still continue to use those CDs, they
may cause the malfunction of your
vehicle audio system.
✽✽ NOTICE - Playing an
Incompatible Copy
Protected Audio CD
Some copy protected CDs, which do not
comply with the international audio CD
standards (Red Book), may not play on
your vehicle audio. Please note that if
you try to play copy protected CDs and
the CD player does not perform correct-
ly the CDs maybe defective, not the CD
player.
WARNING
Do not use a cellular phone while
driving. Stop at a safe location to
use a cellular phone.
Page 178 of 382
![HYUNDAI TUCSON 2011 Owners Manual 497
Features of your vehicle
Select this item to enter BLUETOOTH®
setup mode. Refer to “BLUETOOTH
PHONE OPERATION” section for
detailed information.
Press the [SETUP] button. Use the vol- HYUNDAI TUCSON 2011 Owners Manual 497
Features of your vehicle
Select this item to enter BLUETOOTH®
setup mode. Refer to “BLUETOOTH
PHONE OPERATION” section for
detailed information.
Press the [SETUP] button. Use the vol-](/manual-img/35/56206/w960_56206-177.png)
497
Features of your vehicle
Select this item to enter BLUETOOTH®
setup mode. Refer to “BLUETOOTH
PHONE OPERATION” section for
detailed information.
Press the [SETUP] button. Use the vol-
ume controller to adjust the clock in the
following order: CLOCK
ENTERhour or
minute. Adjust the hour and press the [ENTER]
button to set. Use the same method to
adjust the minute and press the [ENTER]
button to complete and exit from clock
adjustment mode.
Pressing the [SETUP] button while in
POWER OFF screen will allow the user
to make immediately adjustments to the
clock.
9. TUNE Knob & Audio Control
Knob
clock wise to increase or decrease from
current frequency.
(AM 10kHz, FM 200kHz)
Pressing the button changes the BASS,
MIDDLE, TREBLE, FADER and BAL-
ANCE TUNE mode. The mode selected
is shown on the display. After selecting
each mode, rotate the Audio control knob
clockwise or counterclockwise.
To increase the BASS, rotate the knob
clockwise, while to decrease the BASS,
rotate the knob counterclockwise.
To increase the MIDDLE, rotate the knob
clockwise, while to decrease the MID-
DLE, rotate the knob counterclockwise.
Control
To increase the TREBLE, rotate the knob
clockwise, while to decrease the TRE-
BLE, rotate the knob counterclockwise.
Turn the control knob clockwise to
emphasize rear speaker sound (front
speaker sound will be attenuated). When
the control knob is turned counterclock-
wise, front speaker sound will be empha-
sized (rear speaker sound will be attenu- ated).
Rotate the knob clockwise to emphasize
right speaker sound (left speaker sound
will be attenuated). When the control
knob is turned counter clockwise, left
speaker sound will be emphasized (right
speaker sound will be attenuated).
Page 183 of 382
Features of your vehicle
102
4
(Continued)
If the USB device is divided by logical drives, only the music fileson the highest-priority drive are
recognized by car audio.
Devices such as MP3 Player/ Cellular phone/Digital camera canbe unrecognizable by standard
USB I/F can be unrecognizable.
Some non-standard USB devices (METAL COVER TYPE USB) canbe unrecognizable.
Some USB flash memory readers (such as CF, SD, microSD, etc.) orexternal-HDD type devices can be
unrecognizable.
Music files protected by DRM (DIGITAL RIGHTS MANAGE-MENT) are not recognizable.
The data in the USB memory may be lost while using this audio.Always back up important data on
a personal storage device.
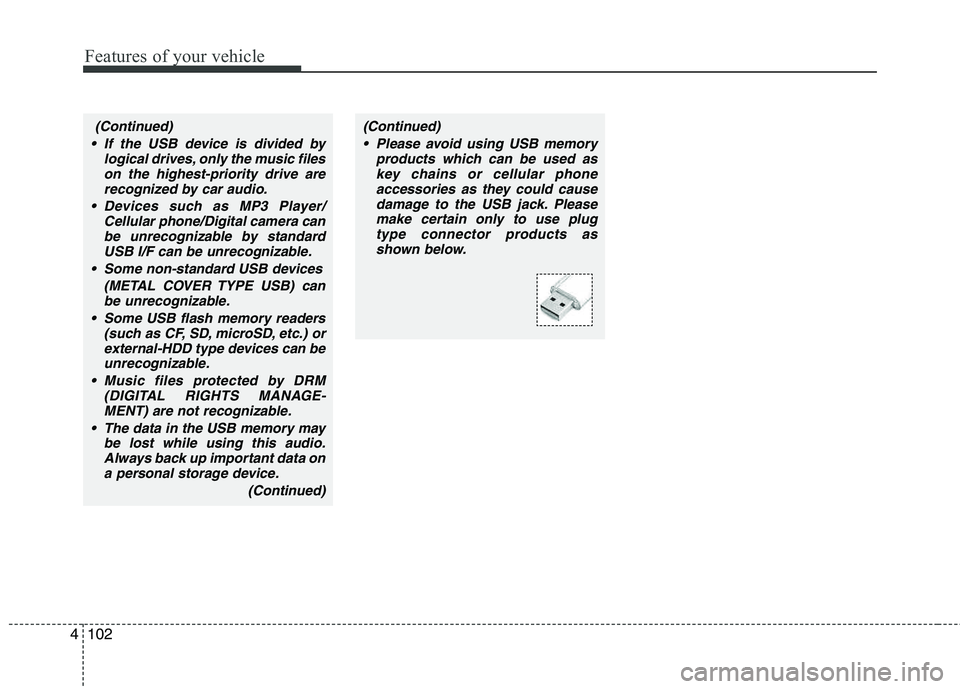
(Continued)(Continued) Please avoid using USB memory products which can be used askey chains or cellular phoneaccessories as they could cause
damage to the USB jack. Pleasemake certain only to use plugtype connector products as
shown below.