2011 HYUNDAI TUCSON Page 7
[x] Cancel search: Page 7Page 4 of 382
F4FOREWORD
Thank you for choosing Hyundai. We are pleased to welcome you to the growing number of discriminating people who drive
Hyundais. The advanced engineering and high-quality construction of each Hyundai we build is something of which we're very proud.
Your Owner's Manual will introduce you to the features and operation of your new Hyundai. It is suggested that you read it care-
fully because the information it contains can contribute greatly to the satisfaction you receive from your new car.
The manufacturer also recommends that all service and maintenance on your car be performed by an authorized Hyundai dealer.
Hyundai dealers are prepared to provide high-quality service, maintenance and any other assistance that may be required.
HYUNDAI MOTOR AMERICA
Note
: Because future owners will also need the information included in this manual, if you sell this Hyundai, please leave the man-
ual in the vehicle for their use. Thank you.
Copyright 2010 Hyundai Motor America. All rights reserved. No part of this publication may be reproduced, stored in any retrieva l
system or transmitted in any form or by any means without the prior written permission of Hyundai Motor America.
CAUTION
Severe engine and transaxle damage may result from the use of poor quality fuels and lubricants that do not meet Hyundai specifications. You must always use high quality fuels and lubricants that meet the specifications listed on Page 8-4 in theVehicle Specifications section of the Owner's Manual.
Page 114 of 382
433
Features of your vehicle
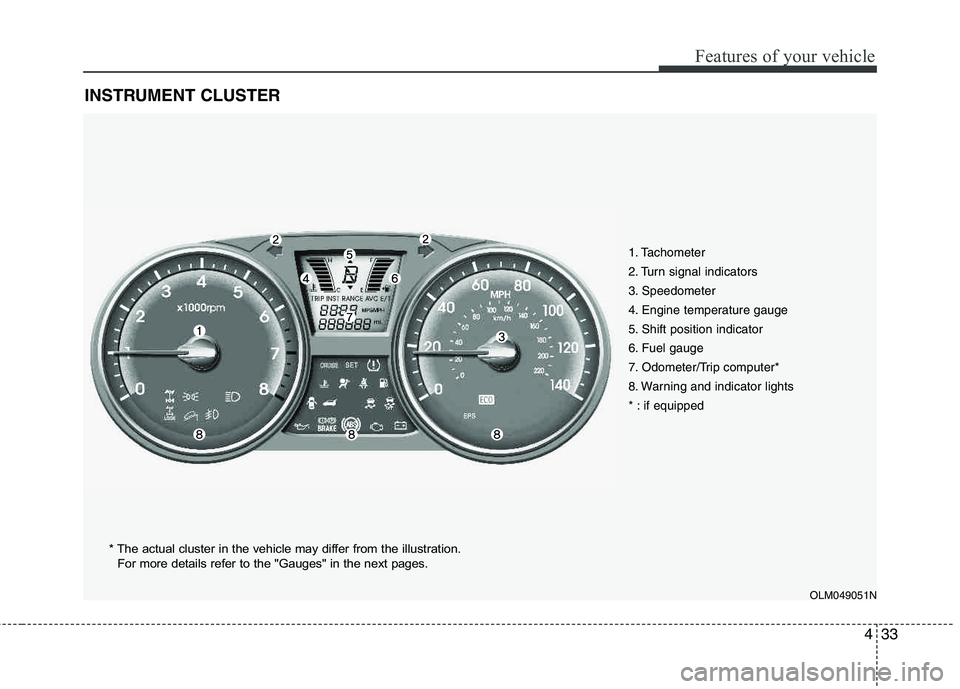
INSTRUMENT CLUSTER
1. Tachometer
2. Turn signal indicators
3. Speedometer
4. Engine temperature gauge
5. Shift position indicator
6. Fuel gauge
7. Odometer/Trip computer*
8. Warning and indicator lights
* : if equipped
OLM049051N
* The actual cluster in the vehicle may differ from the illustration.
For more details refer to the "Gauges" in the next pages.
Page 121 of 382

Features of your vehicle
40
4
Warnings and indicators
All warning lights are checked by turning
the ignition switch ON (do not start the
engine). Any light that does not illuminate
should be checked by an authorized
HYUNDAI dealer.
After starting the engine, check to make
sure that all warning lights are off. If any are still on, this indicates a situation that
needs attention. When releasing the
parking brake, the brake system warning
light should go off. The fuel warning light
will stay on if the fuel level is low.
ECO indicator (if equipped)
The ECO indicator is a system that helps
you to drive economically.
It is displayed if you drive fuel efficiently
to help you improve fuel efficiency.
The ECO indicator (green) will turn on
when you are driving fuel efficiently in
the ECO ON mode.
If you don't want the indicator dis-
played, you can turn the ECO ON
mode to OFF mode by pressing the
TRIP button.
As per ECO ON/OFF Mode operation,
refer to the previous page.
The fuel-efficiency can be changed by the driver's driving habit and road con-dition.
The ECO indicator does not function in P (Park), N (Neutral), and R (Reverse).
Air bag warning light
This warning light will illuminate for
approximately 6 seconds each time you
turn the ignition switch to the ON posi- tion. This light also comes on when the
Supplemental Restraint System (SRS) is
not working properly. If the AIR BAG
warning light does not come on, or con-
tinuously remains on after operating for
about 6 seconds when you turned the
ignition switch to the ON position or start-
ed the engine, or if it comes on while
driving, have the SRS inspected by an
authorized HYUNDAI dealer.
ECO
WARNING
Don't keep watching the indicator
while driving. It will distract you while driving and cause an acci-
dent that results in severe personal
injury.
Page 171 of 382
Features of your vehicle
90
4
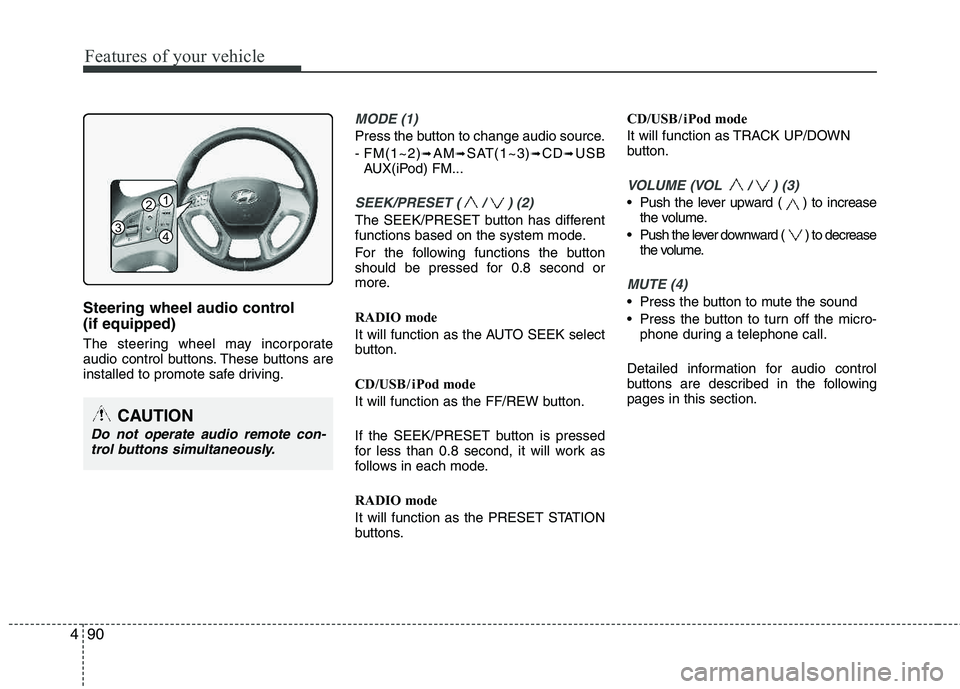
Steering wheel audio control (if equipped)
The steering wheel may incorporate
audio control buttons. These buttons are
installed to promote safe driving.
MODE (1)
Press the button to change audio source.
- FM(1~2)
➟AM➟SAT(1~3)➟CD➟USB
AUX(iPod) FM...
SEEK/PRESET ( / ) (2)
The SEEK/PRESET button has different
functions based on the system mode.
For the following functions the button
should be pressed for 0.8 second or
more.
RADIO mode
It will function as the AUTO SEEK select
button.
CD/USB / i Pod mode
It will function as the FF/REW button.
If the SEEK/PRESET button is pressed
for less than 0.8 second, it will work as
follows in each mode.
RADIO mode
It will function as the PRESET STATION
buttons. CD/USB / i Pod mode
It will function as TRACK UP/DOWN
button.
VOLUME (VOL / ) (3)
• Push the lever upward ( ) to increase
the volume.
Push the lever downward ( ) to decrease the volume.
MUTE (4)
Press the button to mute the sound
Press the button to turn off the micro-phone during a telephone call.
Detailed information for audio control
buttons are described in the followingpages in this section.
CAUTION
Do not operate audio remote con- trol buttons simultaneously.
1
3
2
4
Page 190 of 382
4109
Features of your vehicle
Using XM Satellite Radio
Your vehicle is equipped with 3 months
complimentary period of XM Satellite
Radio so you have access to over 130
channels of music, information, and
entertainment programming.
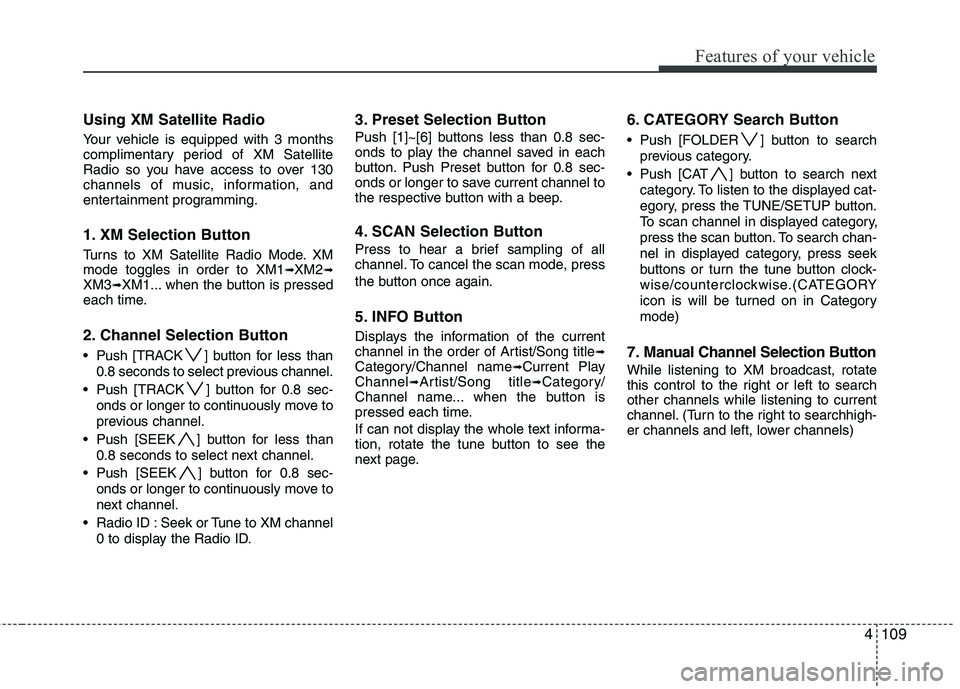
1. XM Selection Button
Turns to XM Satellite Radio Mode. XMmode toggles in order to XM1➟XM2➟XM3➟XM1... when the button is pressed
each time.
2. Channel Selection Button
Push [TRACK ] button for less than
0.8 seconds to select previous channel.
Push [TRACK ] button for 0.8 sec- onds or longer to continuously move to
previous channel.
Push [SEEK ] button for less than 0.8 seconds to select next channel.
Push [SEEK ] button for 0.8 sec- onds or longer to continuously move to
next channel.
Radio ID : Seek or Tune to XM channel 0 to display the Radio ID.
3. Preset Selection Button
Push [1]~[6] buttons less than 0.8 sec-
onds to play the channel saved in each
button. Push Preset button for 0.8 sec-
onds or longer to save current channel to
the respective button with a beep.
4. SCAN Selection Button
Press to hear a brief sampling of all
channel. To cancel the scan mode, press
the button once again.
5. INFO Button
Displays the information of the current
channel in the order of Artist/Song title➟Category/Channel name➟Current Play
Channel➟Artist/Song title➟Category/
Channel name... when the button is
pressed each time.
If can not display the whole text informa-
tion, rotate the tune button to see the
next page.
6. CATEGORY Search Button
Push [FOLDER ] button to search
previous category.
Push [CAT ] button to search next category. To listen to the displayed cat-
egory, press the TUNE/SETUP button.
To scan channel in displayed category,
press the scan button. To search chan-
nel in displayed category, press seek
buttons or turn the tune button clock-
wise/counterclockwise.(CATEGORY
icon is will be turned on in Categorymode)
7. Manual Channel Selection Button
While listening to XM broadcast, rotate
this control to the right or left to searchother channels while listening to current
channel. (Turn to the right to searchhigh-
er channels and left, lower channels)
Page 240 of 382
539
Driving your vehicle
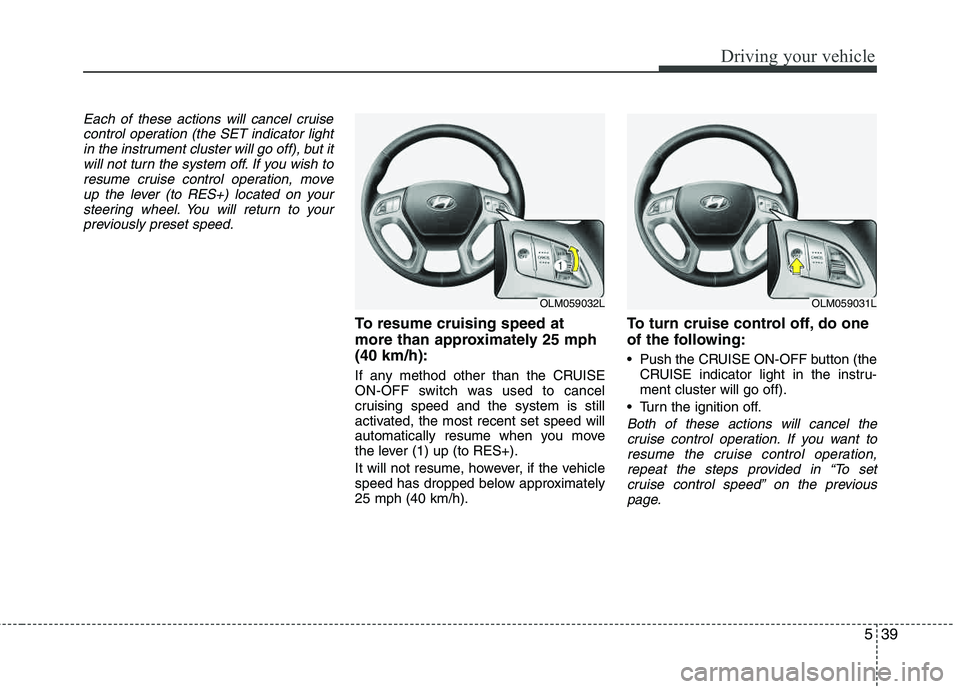
Each of these actions will cancel cruisecontrol operation (the SET indicator light
in the instrument cluster will go off), but itwill not turn the system off. If you wish toresume cruise control operation, moveup the lever (to RES+) located on your
steering wheel. You will return to yourpreviously preset speed.
To resume cruising speed at
more than approximately 25 mph(40 km/h):
If any method other than the CRUISE
ON-OFF switch was used to cancel
cruising speed and the system is still
activated, the most recent set speed will
automatically resume when you move
the lever (1) up (to RES+).
It will not resume, however, if the vehicle
speed has dropped below approximately25 mph (40 km/h).
To turn cruise control off, do one
of the following:
Push the CRUISE ON-OFF button (the CRUISE indicator light in the instru- ment cluster will go off).
Turn the ignition off.
Both of these actions will cancel the cruise control operation. If you want to
resume the cruise control operation,repeat the steps provided in “To set cruise control speed” on the previous
page.
OLM059032LOLM059031L
Page 277 of 382
615
What to do in an emergency
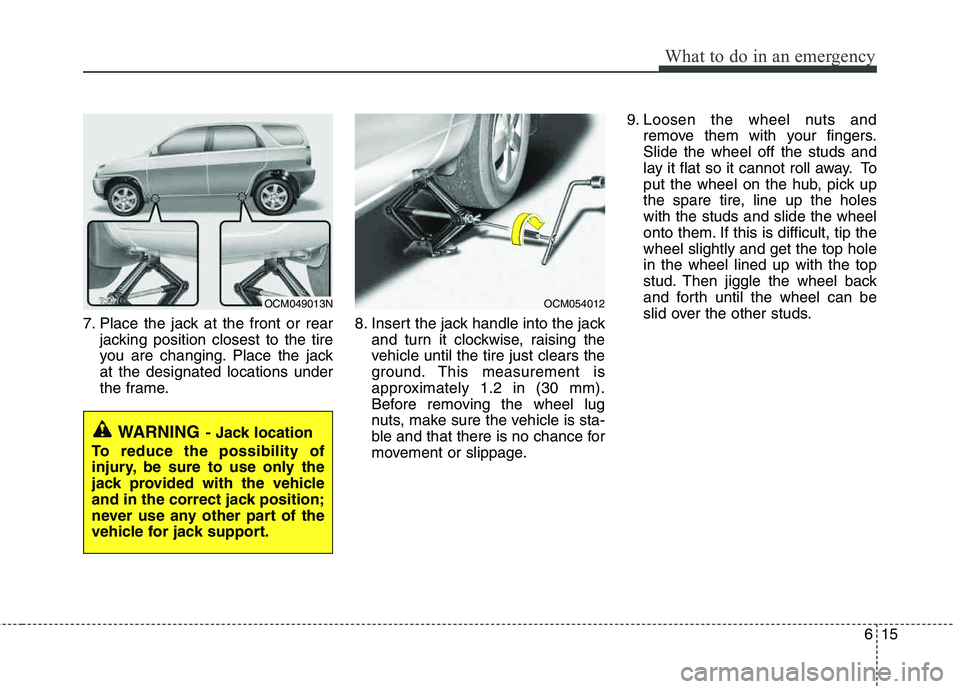
7. Place the jack at the front or rearjacking position closest to the tire
you are changing. Place the jackat the designated locations under
the frame. 8. Insert the jack handle into the jack
and turn it clockwise, raising the
vehicle until the tire just clears the
ground. This measurement is
approximately 1.2 in (30 mm).
Before removing the wheel lug
nuts, make sure the vehicle is sta-
ble and that there is no chance for
movement or slippage. 9. Loosen the wheel nuts and
remove them with your fingers.Slide the wheel off the studs and
lay it flat so it cannot roll away. To
put the wheel on the hub, pick up
the spare tire, line up the holeswith the studs and slide the wheel
onto them. If this is difficult, tip thewheel slightly and get the top holein the wheel lined up with the top
stud. Then jiggle the wheel back
and forth until the wheel can be
slid over the other studs.
WARNING- Jack location
To reduce the possibility of
injury, be sure to use only the
jack provided with the vehicle
and in the correct jack position;
never use any other part of the
vehicle for jack support.
OCM049013NOCM054012
Page 289 of 382
73
Maintenance
MAINTENANCE SERVICES
You should exercise the utmost care to
prevent damage to your vehicle and
injury to yourself whenever performing
any maintenance or inspection proce-
dures.
Should you have any doubts concerning
the inspection or servicing of your vehi-
cle, we strongly recommend that you
have an authorized HYUNDAI dealer
perform this work.
An authorized HYUNDAI dealer has fac-
tory-trained technicians and genuine
HYUNDAI parts to service your vehicle
properly. For expert advice and quality
service, see an authorized HYUNDAI
dealer.
Inadequate, incomplete or insufficient
servicing may result in operational prob-
lems with your vehicle that could lead to
vehicle damage, an accident, or person-
al injury.
Owner’s responsibility
✽✽ NOTICE
Maintenance Service and Record
Retention are the owner's responsibility.
You should retain documents that show
proper maintenance has been performed
on your vehicle in accordance with the
scheduled maintenance service charts
shown on the following pages. You need
this information to establish your compli-
ance with the servicing and maintenance
requirements of your vehicle warranties.
Detailed warranty information is provided
in your Owner’s Handbook & Warranty
Information booklet. Repairs and adjustments required as a
result of improper maintenance or a lack
of required maintenance are not covered.
We recommend you have your vehicle
maintained and repaired by an author-
ized HYUNDAI dealer. An authorized
HYUNDAI dealer meets HYUNDAI’s high
service quality standards and receives
technical support from HYUNDAI in
order to provide you with a high level of
service satisfaction.
Owner maintenance precautions
Improper or incomplete service may
result in problems. This section gives
instructions only for the maintenance
items that are easy to perform.
As explained earlier in this section, sev-
eral procedures can be done only by an
authorized HYUNDAI dealer with special
tools.
✽✽ NOTICE
Improper owner maintenance during the
warranty period may affect warranty
coverage. For details, read the separate
Owner’s Handbook & Warranty
Information booklet provided with the
vehicle. If you're unsure about any serv-
icing or maintenance procedure, have it
done by an authorized HYUNDAI dealer.