2011 HYUNDAI TUCSON turn signal bulb
[x] Cancel search: turn signal bulbPage 123 of 382

Features of your vehicle
42
4
Parking brake & brake
fluid warning light
Parking brake warning
This light is illuminated when the parking
brake is applied with the ignition switch in
the START or ON position. The warning
light should go off when the parking
brake is released while engine is run-ning.
The parking brake warning chime will
sound to remind you that the parking
brake is applied when you are driving
above 6 mph (10 km/h). Always release
the parking brake before you drive.
Low brake fluid level warning
If the warning light remains on, it may
indicate that the brake fluid level in the
reservoir is low.
If the warning light remains on:
1. Drive carefully to the nearest safe location and stop your vehicle.
2. With the engine stopped, check the brake fluid level immediately and add
fluid as required. Then check all brake
components for fluid leaks. 3. Do not drive the vehicle if leaks are
found, the warning light remains on or
the brakes do not operate properly.
Have the vehicle towed to any author-
ized HYUNDAI dealer for a brake sys-
tem inspection and necessary repairs.
Your vehicle is equipped with a dual-
diagonal braking system. This means you
still have braking on two wheels even if
one of the brake circuits is damaged or
malfunctions. With only one of the circuits
working, more than normal pedal travel
and greater pedal pressure are required
to stop the car. Also, the car will not stop
in as short a distance with only a portion
of the brake system working. If the
brakes fail while you are driving, shift to a
lower gear for additional engine braking
and stop the car as soon as it is safe to
do so.
To check bulb operation, check whether
the parking brake and brake fluid warning
light illuminates when the ignition switchis in the ON position.
Seat belt warning
As a reminder to the driver, the seat belt
warning light will blink for approximately
6 seconds each time you turn the ignition
switch ON, regardless of belt fastening.
For details, refer to the seat belt on chap- ter 3.
Turn signal indicator
The blinking green arrows on the instru-
ment panel show the direction indicated
by the turn signals. If the arrow comes on
but does not blink, blinks more rapidly
than normal, or does not illuminate at all,
a malfunction in the turn signal system is
indicated. Your dealer should be consult-
ed for repairs.
This indicator also blinks when the haz-
ard warning switch is turned on.
WARNING
Driving the vehicle with a warning
light on is dangerous. If the brake
warning light remains on, have the
brakes checked and repaired imme-
diately by an authorized HYUNDAI
dealer.
Page 134 of 382
453
Features of your vehicle
To signal a lane change, move the turn
signal lever slightly and hold it in position
(B). The lever will return to the OFF posi-tion when released.
If an indicator stays on and does not
flash or if it flashes abnormally, one of the
turn signal bulbs may be burned out andwill require replacement.
One-touch lane change function (if equipped)
To activate an one-touch lane change
function, move the turn signal lever
slightly for less than 0.5 second and then
release it. The lane change signals will
blink 3 times.
✽✽ NOTICE
If an indicator flash is abnormally quick
or slow, a bulb may be burned out or
have a poor electrical connection in the
circuit.
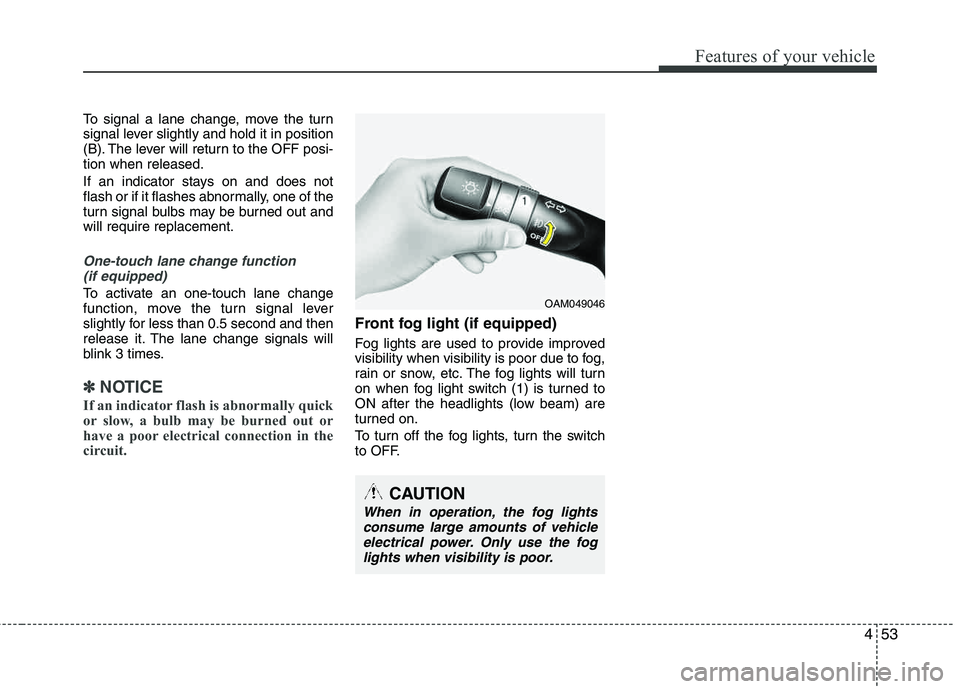
Front fog light (if equipped)
Fog lights are used to provide improved
visibility when visibility is poor due to fog,
rain or snow, etc. The fog lights will turn
on when fog light switch (1) is turned to
ON after the headlights (low beam) are
turned on.
To turn off the fog lights, turn the switch
to OFF.
OAM049046
CAUTION
When in operation, the fog lights consume large amounts of vehicleelectrical power. Only use the foglights when visibility is poor.
Page 253 of 382
Driving your vehicle
52
5
Driving with a trailer
Towing a trailer requires a certain
amount of experience. Before setting out
for the open road, you must get to know
your trailer. Acquaint yourself with the
feel of handling and braking with the
added weight of the trailer. And always
keep in mind that the vehicle you are
driving is now a good deal longer and not
nearly so responsive as your vehicle is
by itself.
Before you start, check the trailer hitch
and platform, safety chains, electrical
connector(s), lights, tires and mirror
adjustment. If the trailer has electric
brakes, start your vehicle and trailer mov-
ing and then apply the trailer brake con-
troller by hand to be sure the brakes are
working. This lets you check your electri-
cal connection at the same time.
During your trip, check occasionally to be
sure that the load is secure, and that the
lights and any trailer brakes are still work-ing.
Following distance
Stay at least twice as far behind the vehi-
cle ahead as you would when driving
your vehicle without a trailer. This can
help you avoid situations that require
heavy braking and sudden turns.
Passing
You’ll need more passing distance up
ahead when you’re towing a trailer. And,
because of the increased vehicle length,
you’ll need to go much farther beyond the
passed vehicle before you can return to
your lane. Due to the added load to the
engine when going uphill the vehicle may
also take longer to pass than it would on
flat ground.
Backing up
Hold the bottom of the steering wheel
with one hand. Then, to move the trailer
to the left, just move your hand to the left.
To move the trailer to the right, move your
hand to the right. Always back up slowly
and, if possible, have someone guide
you.
Making turns
When you’re turning with a trailer, make
wider turns than normal. Do this so your
trailer won’t strike soft shoulders, curbs,
road signs, trees, or other objects. Avoid
jerky or sudden maneuvers. Signal well in
advance before turning or lane changes.
Turn signals when towing a trailer
When you tow a trailer, your vehicle has
to have a different turn signal flasher and
extra wiring. The green arrows on your
instrument panel will flash whenever you
signal a turn or lane change. Properly
connected, the trailer lights will also flash
to alert other drivers you’re about to turn,
change lanes, or stop.
When towing a trailer, the green arrows
on your instrument panel will flash for
turns even if the bulbs on the trailer are
burned out. Thus, you may think drivers
behind you are seeing your signals
when, in fact, they are not. It’s important
to check occasionally to be sure the trail-
er bulbs are still working. You must also
check the lights every time you discon-
nect and then reconnect the wires.
Do not connect a trailer lighting system
directly to your vehicle’s lighting system.
Use only an approved trailer wiring har-
ness.
Page 345 of 382
759
Maintenance
LIGHT BULBS
Use only the bulbs of the specifiedwattage.
✽✽ NOTICE
After heavy, driving rain or washing,
headlight and taillight lenses could
appear frosty. This condition is caused by
the temperature difference between the
lamp inside and outside. This is similar
to the condensation on your windows
inside your vehicle during the rain and
doesn’t indicate a problem with your
vehicle. If the water leaks into the lamp
bulb circuitry, have the vehicle checked
by an authorized HYUNDAI dealer.
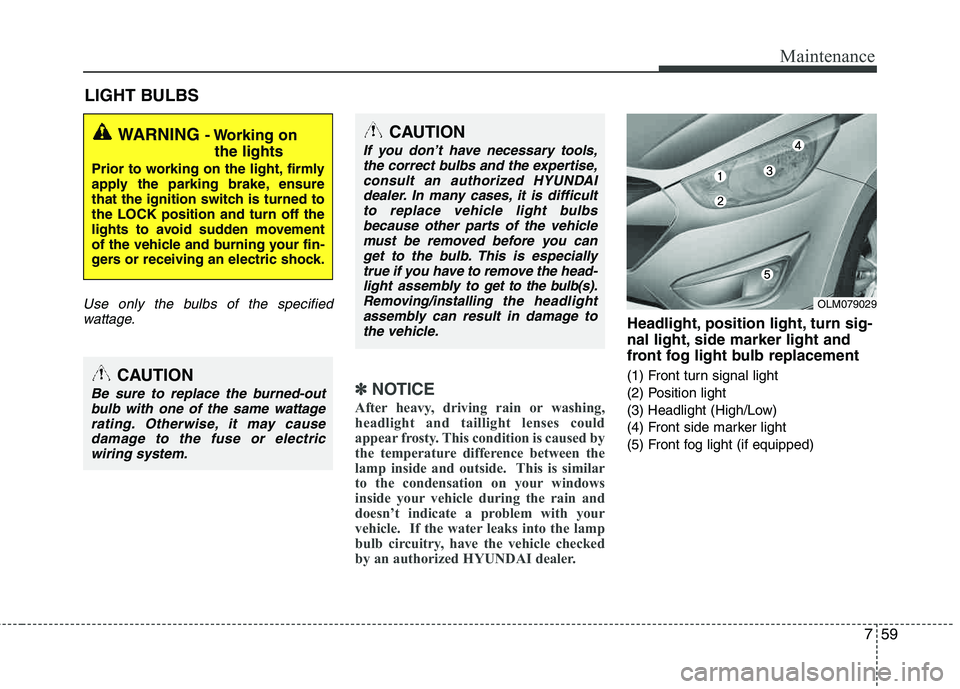
Headlight, position light, turn sig-
nal light, side marker light and
front fog light bulb replacement
(1) Front turn signal light
(2) Position light
(3) Headlight (High/Low)
(4) Front side marker light
(5) Front fog light (if equipped)
WARNING - Working on the lights
Prior to working on the light, firmly
apply the parking brake, ensure
that the ignition switch is turned tothe LOCK position and turn off the
lights to avoid sudden movement
of the vehicle and burning your fin-
gers or receiving an electric shock.
CAUTION
Be sure to replace the burned-outbulb with one of the same wattagerating. Otherwise, it may cause damage to the fuse or electric
wiring system.
CAUTION
If you don’t have necessary tools, the correct bulbs and the expertise,consult an authorized HYUNDAI
dealer. In many cases, it is difficultto replace vehicle light bulbsbecause other parts of the vehiclemust be removed before you can
get to the bulb. This is especiallytrue if you have to remove the head-light assembly to
get to the bulb(s).
Removing/installingthe headlight
assembly can result in damage to
the vehicle.OLM079029
Page 347 of 382
761
Maintenance
5. Remove the bulb from the headlightassembly.
6. Install a new headlight bulb and snap the headlight bulb retaining wire into
position by aligning the wire with the
groove on the bulb.
7. Connect the headlight bulb socket- connector.
8. Install the headlight bulb cover by turn- ing it clockwise.
Front fog light bulbs (if equipped)
If the light bulb is not operating, have the
vehicle checked by an authorized
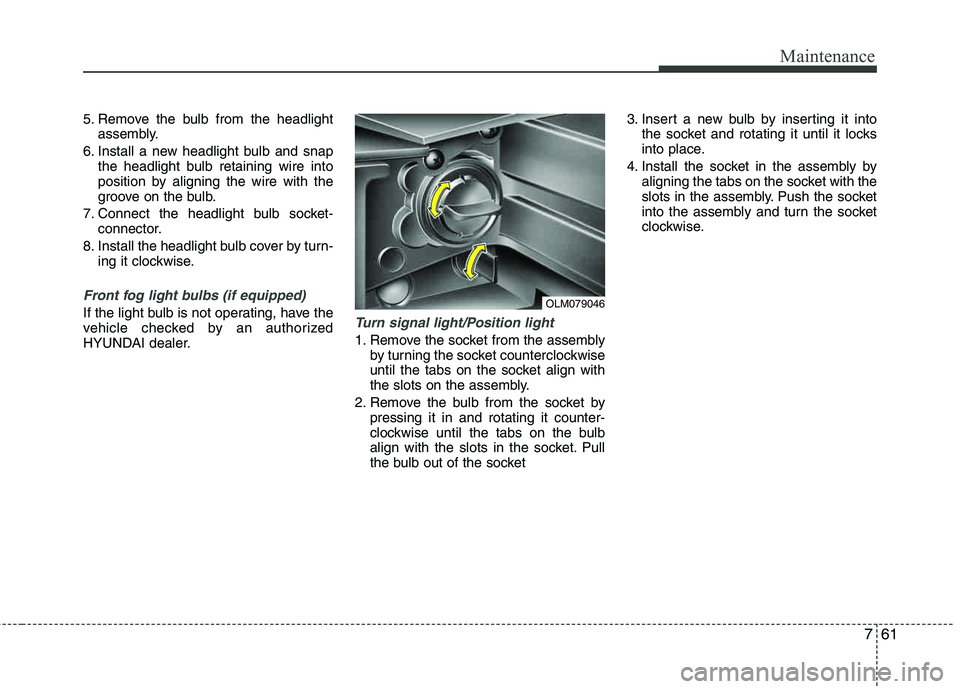
HYUNDAI dealer.Turn signal light/Position light
1. Remove the socket from the assembly by turning the socket counterclockwise
until the tabs on the socket align with
the slots on the assembly.
2. Remove the bulb from the socket by pressing it in and rotating it counter-
clockwise until the tabs on the bulb
align with the slots in the socket. Pull
the bulb out of the socket 3. Insert a new bulb by inserting it into
the socket and rotating it until it locks
into place.
4. Install the socket in the assembly by aligning the tabs on the socket with the
slots in the assembly. Push the socket
into the assembly and turn the socket
clockwise.
OLM079046
Page 348 of 382
Maintenance
62
7
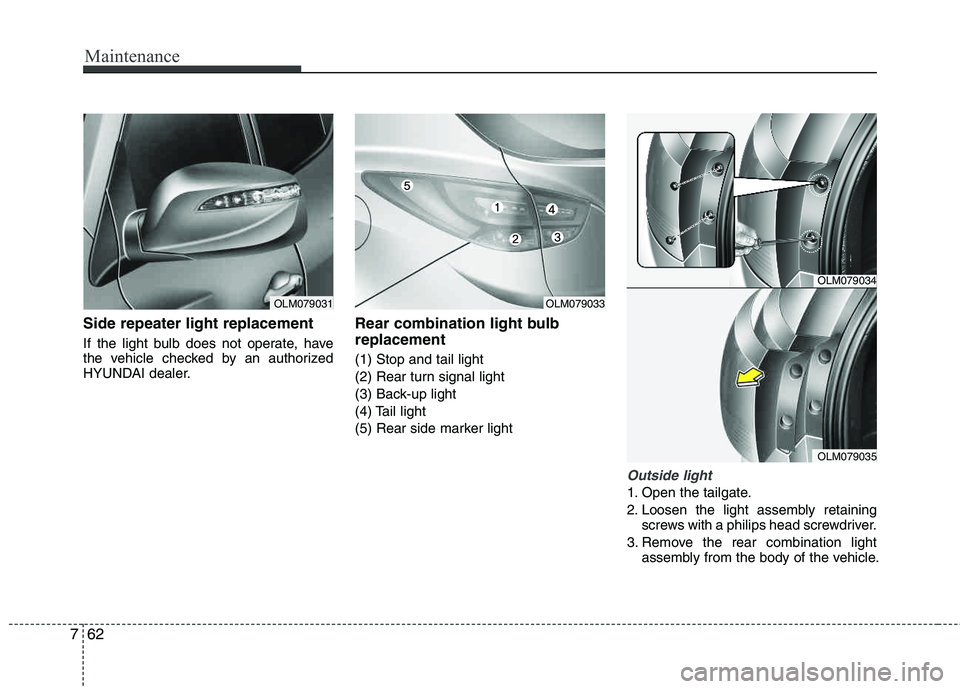
Side repeater light replacement
If the light bulb does not operate, have
the vehicle checked by an authorized
HYUNDAI dealer.
Rear combination light bulb replacement
(1) Stop and tail light
(2) Rear turn signal light
(3) Back-up light
(4) Tail light
(5) Rear side marker light
Outside light
1. Open the tailgate.
2. Loosen the light assembly retaining
screws with a philips head screwdriver.
3. Remove the rear combination light assembly from the body of the vehicle.
OLM079031OLM079033
OLM079034
OLM079035
Page 363 of 382
Specifications, Consumer information, Reporting safety defects
2
8
Item in (mm)
Overall length 173.2 (4400)
Overall width 71.7 (1820)
Overall height 65.2 (1655) / 66.3 (1685)* 1
Front tread 62.4 (1585)
Rear tread 62.44 (1586)
Wheelbase 103.9 (2640)
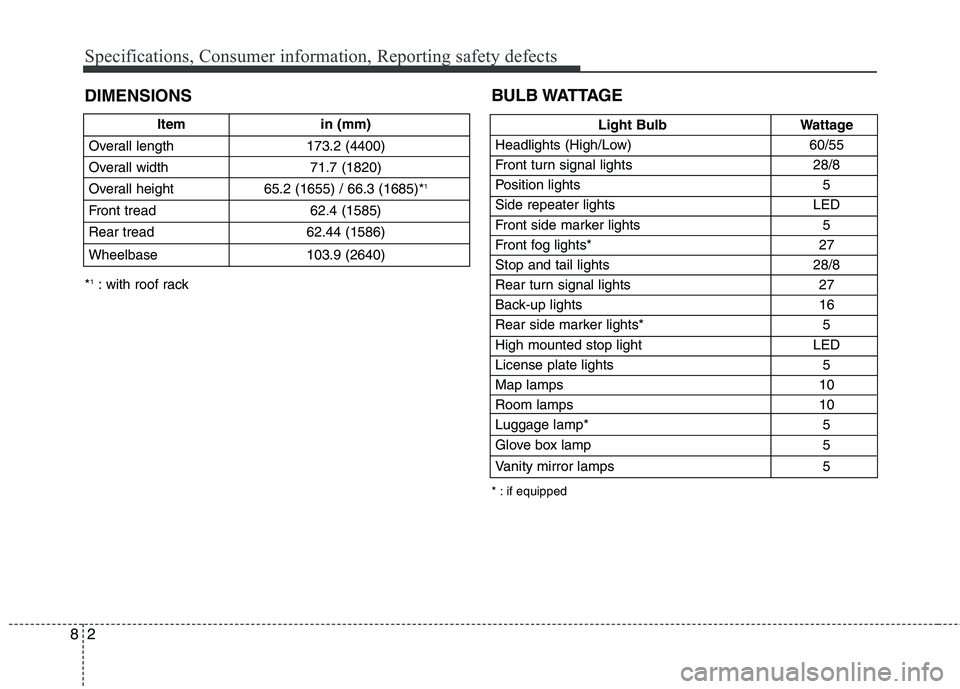
DIMENSIONS
Light Bulb Wattage
Headlights (High/Low) 60/55
Front turn signal lights 28/8
Position lights 5
Side repeater lights LED
Front side marker lights 5
Front fog lights* 27
Stop and tail lights 28/8
Rear turn signal lights 27
Back-up lights 16
Rear side marker lights* 5
High mounted stop light LED
License plate lights 5 Map lamps 10
Room lamps 10
Luggage lamp* 5
Glove box lamp 5
Vanity mirror lamps 5
BULB WATTAGE
* : if equipped
* 1
: with roof rack
Page 375 of 382
I3
Index
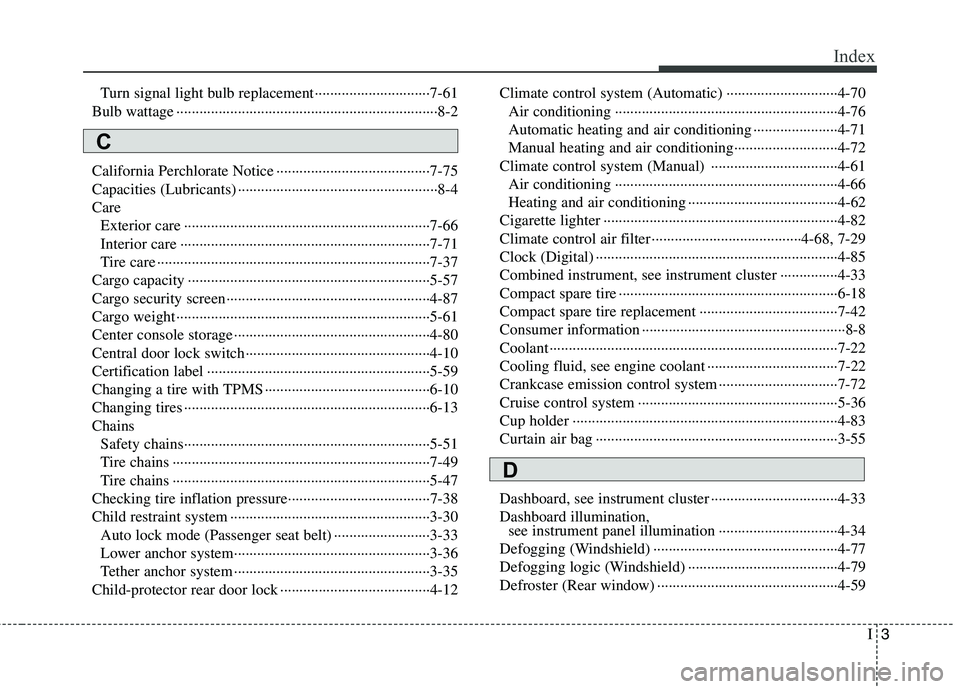
Turn signal light bulb replacement······························7-61
Bulb wattage ····································································8-2
California Perchlorate Notice ········································7-75
Capacities (Lubricants) ····················································8-4Care Exterior care ································································7-66
Interior care ·································································7-71
Tire care ·······································································7-37
Cargo capacity ·······························································5-57
Cargo security screen·····················································4-87
Cargo weight ··································································5-61
Center console storage ···················································4-80
Central door lock switch················································4-10
Certification label ··························································5-59
Changing a tire with TPMS ···········································6-10
Changing tires ································································6-13Chains Safety chains································································5-51
Tire chains ···································································7-49
Tire chains ···································································5-47
Checking tire inflation pressure·····································7-38
Child restraint system ····················································3-30 Auto lock mode (Passenger seat belt) ·························3-33
Lower anchor system···················································3-36
Tether anchor system ···················································3-35
Child-protector rear door lock ·······································4-12 Climate control system (Automatic) ·····························4-70
Air conditioning ··························································4-76
Automatic heating and air conditioning ······················4-71
Manual heating and air conditioning···························4-72
Climate control system (Manual) ·································4-61 Air conditioning ··························································4-66
Heating and air conditioning ·······································4-62
Cigarette lighter ·····························································4-82
Climate control air filter ·······································4-68, 7-29
Clock (Digital) ·······························································4-85
Combined instrument, see instrument cluster ···············4-33
Compact spare tire ·························································6-18
Compact spare tire replacement ····································7-42
Consumer information ·····················································8-8
Coolant ···········································································7-22
Cooling fluid, see engine coolant ··································7-22
Crankcase emission control system ·······························7-72
Cruise control system ····················································5-36
Cup holder ·····································································4-83
Curtain air bag ·······························································3-55
Dashboard, see instrument cluster ·································4-33 Dashboard illumination, see instrument panel illumination ·······························4-34
Defogging (Windshield) ················································4-77
Defogging logic (Windshield) ·······································4-79
Defroster (Rear window) ···············································4-59
C
D