2011 HYUNDAI TUCSON clutch
[x] Cancel search: clutchPage 18 of 382
Your vehicle at a glance
4
2
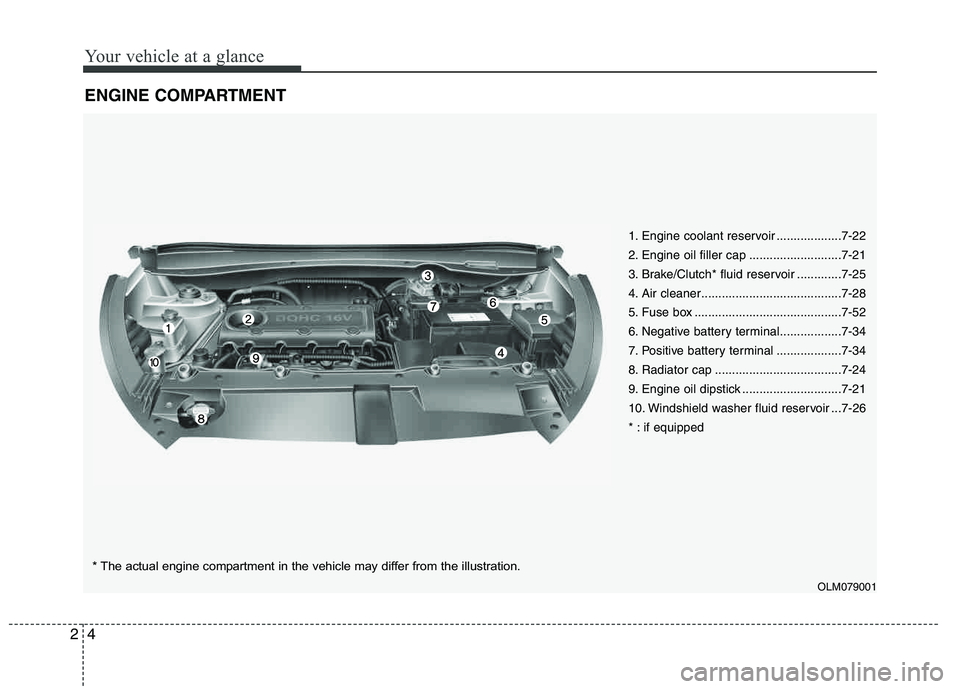
ENGINE COMPARTMENT
1. Engine coolant reservoir ...................7-22
2. Engine oil filler cap ...........................7-21
3. Brake/Clutch* fluid reservoir .............7-25
4. Air cleaner.........................................7-28
5. Fuse box ...........................................7-52
6. Negative battery terminal..................7-34
7. Positive battery terminal ...................7-34
8. Radiator cap .....................................7-24
9. Engine oil dipstick .............................7-21
10. Windshield washer fluid reservoir ...7-26
* : if equipped
OLM079001
* The actual engine compartment in the vehicle may differ from the illustration.
Page 207 of 382
Driving your vehicle
6
5
Starting the engine1. Make sure the parking brake is
applied.
2. Manual Transaxle - Depress the
clutch pedal fully and shift the
transaxle into Neutral. Keep the clutch
pedal and brake pedal depressed
while turning the ignition switch to the
start position.
Automatic Transaxle - Place the
transaxle shift lever in P (Park).
Depress the brake pedal fully.
You can also start the engine when
the shift lever is in the N (Neutral)position.
3. Turn the ignition switch to START and hold it there until the engine starts (a
maximum of 10 seconds), then
release the key.
4. In extremely cold weather (below -18°C / 0°F) or after the vehicle has
not been operated for several days, let
the engine warm up without depress-
ing the accelerator.
Whether the engine is cold or warm, it
should be started without depressing
the accelerator.
WARNING
Always wear appropriate shoes when
operating your vehicle. Unsuitable
shoes (high heels, ski boots,etc.)
may interfere with your ability to use
the brake and accelerator pedal, and
the clutch (if equipped).
CAUTION
If the engine stalls while the vehicle in motion, do not attempt to movethe shift lever to the P (Park) posi-
tion. If traffic and road conditionspermit, you may put the shift leverin the N (Neutral) position while the vehicle is still moving and turn the
ignition switch to the START posi- tion in an attempt to restart theengine.
CAUTION
Do not engage the starter for more than 10 seconds. If the engine stalls
or fails to start, wait 5 to 10 secondsbefore re-engaging the starter.Improper use of the starter may
damage it.
Page 208 of 382
57
Driving your vehicle
Manual transaxle operation
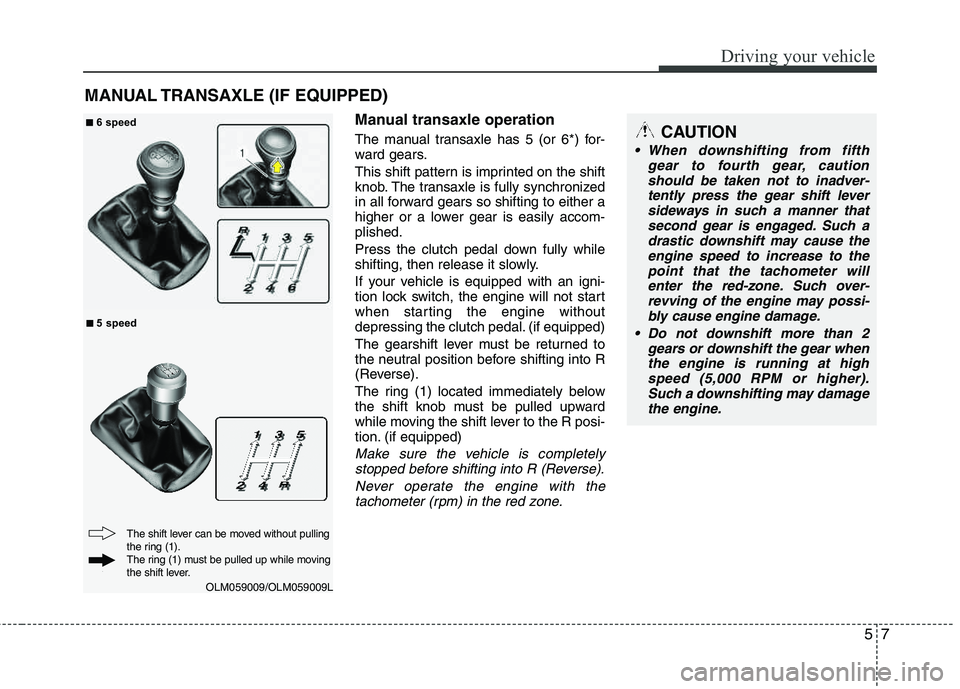
The manual transaxle has 5 (or 6*) for-
ward gears.
This shift pattern is imprinted on the shift
knob. The transaxle is fully synchronized
in all forward gears so shifting to either a
higher or a lower gear is easily accom- plished.
Press the clutch pedal down fully while
shifting, then release it slowly.
If your vehicle is equipped with an igni-
tion lock switch, the engine will not start
when starting the engine without
depressing the clutch pedal. (if equipped)
The gearshift lever must be returned to
the neutral position before shifting into R
(Reverse).
The ring (1) located immediately below
the shift knob must be pulled upward
while moving the shift lever to the R posi-
tion. (if equipped)
Make sure the vehicle is completelystopped before shifting into R (Reverse).
Never operate the engine with thetachometer (rpm) in the red zone.
MANUAL TRANSAXLE (IF EQUIPPED)
OLM059009/OLM059009L
CAUTION
When downshifting from fifth gear to fourth gear, cautionshould be taken not to inadver-
tently press the gear shift leversideways in such a manner that second gear is engaged. Such adrastic downshift may cause the
engine speed to increase to thepoint that the tachometer willenter the red-zone. Such over-
revving of the engine may possi-bly cause engine damage.
Do not downshift more than 2 gears or downshift the gear when
the engine is running at high speed (5,000 RPM or higher).Such a downshifting may damage
the engine.
The shift lever can be moved without pulling
the ring (1).
The ring (1) must be pulled up while moving
the shift lever.
■■ 6 speed
■
■ 5 speed
Page 209 of 382
Driving your vehicle
8
5
During cold weather, shifting may be
difficult until the transaxle lubricant has
warmed up. This is normal and not
harmful to the transaxle.
If you've come to a complete stop and it's hard to shift into 1st or R (Reverse),
put the shift lever in N (Neutral) posi-
tion and release the clutch. Press the
clutch pedal back down, and then shift
into 1st or R (Reverse) gear position.Using the clutch
The clutch should be pressed all the way
to the floor before shifting, then released
slowly. The clutch pedal should always be
fully released while driving. Do not rest
your foot on the clutch pedal while driv-
ing. This can cause unnecessary wear.
Do not partially engage the clutch to hold
the vehicle on an incline. This causes
unnecessary wear. Use the foot brake or
parking brake to hold the vehicle on an
incline. Do not operate the clutch pedal
rapidly and repeatedly.
This vehicle is equipped with a Hill-start
Assist Control(HAC) that will hold the
vehicle in place for about 2 seconds
when the brake is released on a sleep
enough uphill grade (about 8° incline).
Practice releasing the brake and apply-
ing the throttle with your right foot while
releasing the clutch with your left foot, so
you learn how the HAC works.
CAUTION
To avoid premature clutch wear
and damage, do not drive withyour foot resting on the clutch
pedal. Also, don’t use the clutchto hold the vehicle stopped on an uphill grade, while waiting for atraffic light, etc.
Do not use the shift lever as a handrest during driving, as thiscan result in premature wear of
the transaxle shift forks.
When operating the clutch pedal, press the clutch pedal down fully.
If you don't press the clutch pedalfully, the clutch may be damagedor noise may occur.
WARNING
Before leaving the driver’s seat,
always set the parking brake fully
and shut the engine off. Then makesure the transaxle is shifted into 1st
gear when the vehicle is parked on
a level or uphill grade, and shifted
into R (Reverse) on a downhill
grade. Unexpected and sudden
vehicle movement can occur if
these precautions are not followed
in the order identified.
WARNING
The HAC is activated only for about
2 seconds, so when the vehicle is
starting off always depress theaccelerator pedal.
Page 210 of 382
59
Driving your vehicle
Downshifting
When you must slow down in heavy traf-
fic or while driving up steep hills, down-
shift before the engine starts to labor.
Downshifting reduces the chance of
stalling and gives better acceleration
when you again need to increase your
speed. When the vehicle is traveling
down steep hills, downshifting helps
maintain safe speed and prolongs brake
life.
This vehicle is geared for improved fuel
economy and may need to be driven in a
lower gear when driving up hills or into
high winds. Using top gear is best for fuel
economy, but you should use the best
gear for the road conditions.
Good driving practices
Never take the vehicle out of gear andcoast down a hill. This is extremely
hazardous. Always leave the vehicle in
gear.
Don't "ride" the brakes. This can cause them to overheat and malfunction.
Instead, when you are driving down a
long hill, slow down and shift to a lower
gear. When you do this, engine braking
will help slow down the vehicle.
Slow down before shifting to a lower gear. This will help avoid over-revving
the engine, which can cause damage.
Slow down when you encounter cross winds. This gives you much better con-
trol of your vehicle.
Be sure the vehicle is completely stopped before you attempt to shift into
reverse. The transaxle can be dam-
aged if you do not. To shift into reverse,
depress the clutch, move the shift lever
to neutral, then shift to the reverseposition.
Exercise extreme caution when driving on a slippery surface. Be especially
careful when braking, accelerating or
shifting gears. On a slippery surface,
an abrupt change in vehicle speed can
cause the drive wheels to lose traction
and the vehicle to go out of control.WARNING
Always buckle-up! In a collision, an unbelted occupant is signifi-
cantly more likely to be seriously
injured or killed than a properly belted occupant.
Avoid high speeds when corner- ing or turning.
Do not make quick steering wheel movements, such as sharp
lane changes or fast, sharp turns.
The risk of rollover is greatly increased if you lose control of
your vehicle at highway speeds.
Loss of control often occurs if two or more wheels drop off the
roadway and the driver over-
steers to reenter the roadway.
In the event your vehicle leaves the roadway, do not steer sharply.
Instead, slow down before pulling
back into the travel lanes.
Never exceed posted speed lim- its.
Page 237 of 382

Driving your vehicle
36
5
1. Cruise indicator
2. Cruise set indicator
The cruise control system allows you to
program the vehicle to maintain a con-stant speed without pressing the acceler-ator pedal. This system is designed to function
above approximately 25 mph (40 km/h).
✽✽
NOTICE
During normal cruise control operation,
when the SET switch is activated or
reactivated after applying the brakes,
the cruise control will energize after
approximately 3 seconds. This delay is
normal.
CRUISE CONTROL SYSTEM
WARNING
If the cruise control is left on, (CRUISE indicator light in the
instrument cluster illuminated)
the cruise control can be
switched on accidentally. Keep
the cruise control system off
(CRUISE indicator light OFF)
when the cruise control is not in
use, to avoid inadvertently set-ting a speed.
Use the cruise control system only when traveling on open
highways in good weather.
Do not use the cruise control when it may not be safe to keep
the vehicle at a constant speed,
for instance, driving in heavy or
varying traffic, or on slippery
(rainy, icy or snow-covered) or
winding roads or over 6% up-hill
or down-hill roads.
Pay particular attention to the driving conditions whenever
using the cruise control system.
Be careful when driving downhill using the cruise control system,
which may increase the vehiclespeed.
OLM059030N
CAUTION
During cruise-speed driving of a
manual transaxle vehicle, do not
shift into neutral without depress-ing the clutch pedal, since theengine will be overrevved. If thishappens, depress the clutch pedalor release the cruise control ON- OFF switch.
Page 239 of 382
Driving your vehicle
38
5
To decrease the cruising speed:
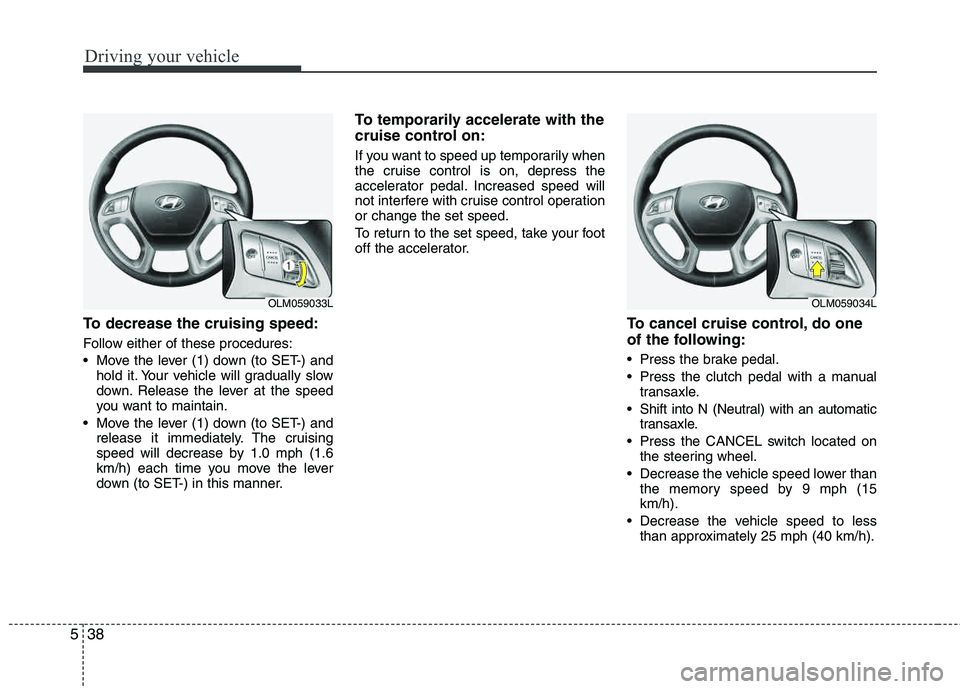
Follow either of these procedures:
Move the lever (1) down (to SET-) and
hold it. Your vehicle will gradually slow
down. Release the lever at the speed
you want to maintain.
Move the lever (1) down (to SET-) and release it immediately. The cruising
speed will decrease by 1.0 mph (1.6
km/h) each time you move the lever
down (to SET-) in this manner.
To temporarily accelerate with the
cruise control on:
If you want to speed up temporarily when
the cruise control is on, depress the
accelerator pedal. Increased speed will
not interfere with cruise control operationor change the set speed.
To return to the set speed, take your foot
off the accelerator.
To cancel cruise control, do one
of the following:
Press the brake pedal.
Press the clutch pedal with a manual
transaxle.
Shift into N (Neutral) with an automatic transaxle.
Press the CANCEL switch located on the steering wheel.
Decrease the vehicle speed lower than the memory speed by 9 mph (15 km/h).
Decrease the vehicle speed to less than approximately 25 mph (40 km/h).
OLM059033LOLM059034L
Page 241 of 382
Driving your vehicle
40
5
Your vehicle's fuel economy depends
mainly on your style of driving, where you
drive and when you drive.
Each of these factors affects how many
miles (kilometers) you can get from a gal-
lon (liter) of fuel. To operate your vehicle
as economically as possible, use the fol-
lowing driving suggestions to help save
money in both fuel and repairs:
Drive smoothly. Accelerate at a moder-
ate rate. Don't make "jack-rabbit" starts or full-throttle shifts and maintain a
steady cruising speed. Don't race
between stoplights. Try to adjust your
speed to the traffic so you don't have to
change speeds unnecessarily. Avoid
heavy traffic whenever possible.
Always maintain a safe distance from
other vehicles so you can avoid unnec-
essary braking. This also reduces
brake wear.
Drive at a moderate speed. The faster you drive the more fuel your vehicle
uses. Driving at a moderate speed, in
the highest gear appropriate for the
conditions, especially on the highway,
is one of the most effective ways to reduce fuel consumption. Don't "ride" the brake pedal or clutch
pedal. This can increase fuel consump-
tion and also increase wear on these
components. In addition, driving with
your foot resting on the brake pedal
may cause the brakes to overheat,
which reduces their effectiveness and
may lead to more serious conse-
quences.
Take care of your tires. Keep them inflated to the recommended pressure.
Incorrect inflation, either too much or
too little, results in unnecessary tire
wear. Check the tire pressures at leastonce a month.
Be sure that the wheels are aligned correctly. Improper alignment can
result from hitting curbs or driving too
fast over irregular surfaces. Poor align-
ment causes faster tire wear and may
also result in other problems as well as
greater fuel consumption. Keep your vehicle in good condition.
For better fuel economy and reduced
maintenance costs, maintain your vehi- cle in accordance with the mainte-
nance schedule in section 7. If you
drive your vehicle in severe conditions, more frequent maintenance is required
(see section 7 for details).
Keep your vehicle clean. For maximum service, your vehicle should be kept
clean and free of corrosive materials. It
is especially important that mud, dirt,
ice, etc. not be allowed to accumulate
on the underside of the vehicle. This
extra weight can result in increased
fuel consumption and also contributeto corrosion.
Travel lightly. Don't carry unnecessary weight in your vehicle. Weight reduces
fuel economy.
Don't let the engine idle longer than necessary. If you are waiting (and not
in traffic), turn off your engine and
restart only when you're ready to go.
ECONOMICAL OPERATION