Page 411 of 722

Turn the dial to select a sound setup
mode, then press ENTER to set your
selection. See page f or more
sound setting inf ormation.
If you receive a call when the
Audio is playing, press the
PICK-UPbuttononthesteering
wheel. The screen and the center
displayswitchtotheHFLmode(see
page ).
Af ter ending the call, press the
HANG-UP button to go back to theAudio mode. To take the system out of the
Audio mode, press one of
the other source buttons than the
USB/AUX button. When a
compatible audio unit is connected to
the auxiliary input jack, press the
USB/AUX button to select it.
Switching to another mode pauses
the music playing f rom your phone.
329
517
As required by the FCC: This device complies with Part 15 of theFCC rules. Operation is subject to thef ollowing two conditions: (1) This devicemay not cause harmf ul interf erence, and(2) this device must accept anyinterf erence received, includinginterf erence that may cause undesiredoperation.
Changes or modif ications not expresslyapproved by the party responsible f orcompliance could void the user’sauthority to operate the equipment.
This device complies with IndustryCanada Standard RSS-210.Operation is subject to the f ollowing twoconditions: (1) this device may not causeinterf erence, and (2) this device mustaccept any interf erence that may causeundesired operation of the device.
Bluetooth
Bluetooth Bluetooth
T o t urn of f t he Bluet oot h
Audio
mode
T o switch to HFL mode
Bluetooth
Audio System (Models with navigation system)
408
10/07/17 10:28:45 31TK8600_413
2011 Odyssey
Page 416 of 722

�µ
�µ
On all models except LXIf your vehicle’s battery is
disconnected or goes dead, or the
radio f use is removed, the audio
system will disabled itself . If this
happens, there are two methods to
make it work again. Turn the ignition
switch to the ON (II) position, press
the power/volume knob once. The
enter code screen will appear. Vehicle Specif ic Method Press
and hold the power/volume knob f or
a f ew seconds, the audio unit will
check the VIN inf ormation stored in
the vehicle. The audio system will
start activating if the VIN
informationstoredintheaudio
system and the vehicle match.
Security Code Method The enter
code screen will appear. Use the
preset buttons to enter the five-digit
code. The code is on the radio code
card included in your owner’s
manual kit. When it is entered
correctly, the radio will start playing. Youshouldhavereceivedacardthat
lists your audio system code number
and serial number. It is best to store
this card in a saf e place at home. In
addition, you should write the audio
system’s serial number in this owner’s
manual.
If you make a mistake entering the
code, do not start over; complete the
f ive-digit sequence, then enter the
correct code. You have ten tries to
enter the correct code. If you are
unsuccessful in ten attempts, you
must then leave the system on for 1
hour bef ore trying again.
If you cannot activate the audio
system, and lose the card, take the
vehicle to your dealer.
Radio Thef t Protection
Features
413
10/07/17 10:29:19 31TK8600_418
2011 Odyssey
Page 420 of 722

To operate the rear entertainment
system f rom the f ront panel, press
the REAR SOURCE button. You will
hear two beeps and the indicator in
the button comes on to show that the
control panel is enabled.
When REAR SOURCE is selected,
the f ront entertainment system
audio controls can also be used to
operate the rear entertainment
system in all modes.To play the radio, the buttons for the
f ront entertainment system have the
same f unctions.
The media that the rear passengers
are listening to will then be heard
f rom the f ront speakers.
If you do not operate the rear
entertainment system f rom the f ront
panel within 20 seconds, the
indicator in the REAR SOURCE
button will go of f and the display will
return to the front entertainment
system automatically. If an audio CD is loaded into the
upper slot, select the CD/CDL or
CD button. If a DVD or CD is loaded
into the lower slot, select the DVD
button.
The DVD player in your rear
entertainment system can play DVD
video discs, audio CDs, MP3/WMA
discs and DTS CDs.
Open the overhead screen by pulling
down the bottom edge of the screen
until it locks into place when f ully
extended. If you pull down the
screen too far forward, past the
second detent, the display will turn
off. Push the screen up to the second
or first detent to turn the display
back on. To close the screen, push it
up until it locks into place when f ully
closed.
CONT INUED
To Select Rear Entertainment
f rom the Front Control Panel
Operating the DVD Player f rom
the Front Control Panel
Rear Entertainment System
Features
417
REAR CONTROL PANEL
OVERHEADSCREEN
10/07/17 10:29:50 31TK8600_422
2011 Odyssey
Page 421 of 722
�µ�µ
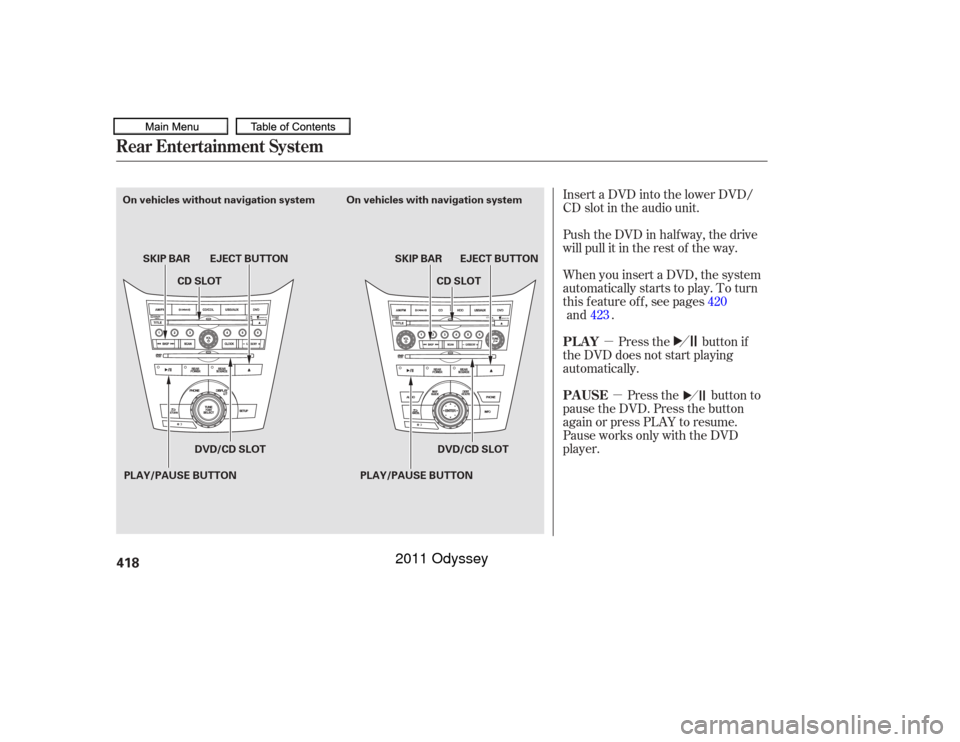
Insert a DVD into the lower DVD/
CD slot in the audio unit.
Push the DVD in half way, the drive
will pull it in the rest of the way.
When you insert a DVD, the system
automatically starts to play. To turn
this f eature of f , see pages
.
Press the button if
the DVD does not start playing
automatically.
Press the button to
pause the DVD. Press the button
again or press PLAY to resume.
Pause works only with the DVD
player. 420
Rear Entertainment System
PL AY
PAUSE
418PLAY/PAUSE BUTTONSKIP BAR
PLAY/PAUSE BUTTONSKIP BAR EJECT BUTTON
EJECT BUTTON
On vehicles without navigation system On vehicles with navigation system
CD SLOT
CD SLOT
DVD/CD SLOT DVD/CD SLOT
10/07/17 10:29:59 31TK8600_423
and423
2011 Odyssey
Page 448 of 722

Open the overhead screen by
pushing the OPEN button. The
screen will swing down part-way.
Pivot the screen the rest of the way.
If you pivot the screen too f ar
f orward, past the second detent. The
display will turn of f . Pivot the screen
back to the second or first detent to
turn the display back on. To close
the screen, pivot it up until it latches.
To operate the rear entertainment
system f rom the f ront panel, press
the REAR SOURCE button. You will
hear two beeps and the indicator in
the button comes on to show that the
control panel is enabled.
When REAR SOURCE is selected,
the f ront entertainment system
audio controls can also be used to
operate the rear entertainment
system in all modes.
To play the radio, the buttons for the
f ront entertainment system have the
same f unctions.
The media that the rear passengers
are listening to will then be heard
f rom the f ront speakers. If an audio CD is loaded into the
upper slot, select the CD button. If a
DVDorCDisloadedintothelower
slot, select the DVD button.
The DVD player in your rear
entertainment system can play DVD
video discs, audio CDs, MP3/WMA
discs and DTS CDs.
If you do not operate the rear
entertainment system f rom the f ront
panel within 20 seconds, the
indicator in the REAR SOURCE
button will go of f and the display will
return to the front entertainment
system automatically.
CONT INUED
To Select Rear Entertainment
f rom the Front Control Panel
Operating the DVD Player f rom
the Front Control Panel
Ultrawide Rear Entertainment System
Features
445
REAR CONTROL PANEL
OPEN BUTTON
OVERHEADSCREEN
10/07/17 10:33:49 31TK8600_450
2011 Odyssey
Page 451 of 722

�µ�µ
You can select between the two
screen modes, single or dual, f or the
overhead screen.
In single mode, your selected source
appears in the center of the screen.
In dual mode, two separate screens
appear side to side. In dual mode,
you can only select one output
source f rom the f ront audio system.
The other media f or the other screen
must come f rom ‘‘AUX-VIDEO’’ or
‘‘AUX-HDMI.’’
Press this
button to change the selectable
entertainment source f rom the
overhead screen. Turn the interf ace
dial and press the ENTER button to
set your selected source. When you press
this button while the overhead
screen is in the dual mode, you can
choose which source to continue in
single mode, and which source to
end. The message ‘‘Choose which
source to continue’’ appears. Turn
the interf ace dial to make your
selection, then press ENTER.
See page f or more details about
screen modes.
With the overhead screen in single
mode, the SINGLE button f unctions
the same as the SOURCE button.
450
SOURCE button
SINGLE button
Ultrawide Rear Entertainment SystemScreen modes448
SOURCE
BUTTONSINGLE
BUTTONDUAL
BUTTONSWAP
BUTTON INTERFACE DIAL
ENTER
BUTTON
DVD
BUTTON
AUX
BUTTON
10/07/17 10:34:12 31TK8600_453
2011 Odyssey
Page 486 of 722

�·�µ
If your garage door was
manuf actured bef ore April 1, 1982,
you may not be able to program
HomeLink to operate it. These units
do not have safety features that
cause the motor to stop and reverse
it if an obstacle is detected during
closing, increasing the risk of injury. Do not use HomeLink with any
garage door opener that lacks saf ety
stop and reverse f eatures.
Units manuf actured between April 1,
1982 and January 1, 1993 may be
equipped with saf ety stop and
reverse f eatures. If your unit does
not have an external entrapment
protection system, an easy test to
conf irm the f unction and
perf ormance of the saf ety stop and
reverse f eature is to lay a 2 4
under the closing door. The door
should stop and reverse upon
contacting the piece of wood.
As an additional safety feature,
garage door openers manuf actured
af ter January 1, 1993 are required to
have external entrapment protection
systems, such as an electronic eye,
which detect an object obstructing
the door.
Refer to the safety information thatcame with your garage door opener
to test that the safety features are
f unctioning properly. If you do not
have this information, contact the
manuf acturer of the equipment.
Bef ore programming HomeLink to a
garage door or gate opener, make
sure that people and objects are out
of thewayof thedevicetoprevent
potential injury or damage.
When programming a garage door
opener, park just outside the garage.
If you just
received your vehicle and have not
trained any of the buttons in
HomeLink bef ore, you should erase
any previously learned codes bef ore
training the first button. To do this,
press and hold the two outside
buttons on the HomeLink
transceiver for about 20 seconds,
until the red indicator f lashes.
Release the buttons, then proceed to
step 1.
The HomeLink
Universal
Transceiver built into your vehicle
canbeprogrammedtooperateupto
three remote controlled devices
around your home, such as garage
doors, lighting, or home security
systems.
Bef ore programming your
HomeLink to operate a garage door
opener, conf irm that the opener has
an external entrapment protection
system, such as an ‘‘electronic eye,’’
or other saf ety and reverse stop
f eatures.
On all models except LX
CONT INUED
Important Saf ety Precautions T raining HomeL ink
General Inf ormation
Bef ore you begin
HomeL ink
Universal Transceiver
Features
483
10/07/17 10:39:12 31TK8600_488
2011 Odyssey
Page 487 of 722
If you are training the second or third buttons, go directly to step 1.HomeL ink
Universal Transceiver
484
10/07/17 10:39:24 31TK8600_489
2011 Odyssey