Page 455 of 722
oftheTUNE/SKIP
bar to scroll up/down an")
Press the SOURCE button and turn
the interf ace dial to ‘‘XM1’’ or ‘‘XM2.’’
Press ENTER to listen to the XM
Radio. You can press either side
(or)oftheTUNE/SKIP
bar to scroll up/down and select
channels within a category (in
CATEGORY mode), or to scroll up/
down and select f rom among all
available channels (in CH mode).Press the MENU button to display
theaudiomenuontheoverhead
screen. You can enter the
highlighted f unction by pressing the
ENTER button. These f unctions
have the same features as those of
the f ront audio system.
Pressing and holding the TITLE/
SCROLL button f or 5 seconds
enables you to switch between
search modes.
To listen to the radio, press the
SOURCE button for the selectable
sources to appear in the overhead
screen. Turn the interf ace dial to
select ‘‘AM,’’ ‘‘FM1’’ or ‘‘FM2,’’ then
press the ENTER button.
Press the MENU button to display
theAudioMenuontheoverhead
screen. You can enter the
highlighted f unction by pressing the
ENTER button. These f unctions
have the same features as those of
the f ront audio system. You can
press and hold either side ( or
)of theTUNE/SKIPbarto
skip (seek) up/down, and press
either side ( of ) of the
TUNE/SKIP bar to tune up/down. To Play the Radio f rom the Rear
Control Panel
To Play the XM Radio f rom the
Rear Control Panel
Ultrawide Rear Entertainment System452
REAR CONTROL PANEL
OVERHEAD SCREEN
10/07/17 10:34:48 31TK8600_457
2011 Odyssey
Page 458 of 722
�Ý�Û
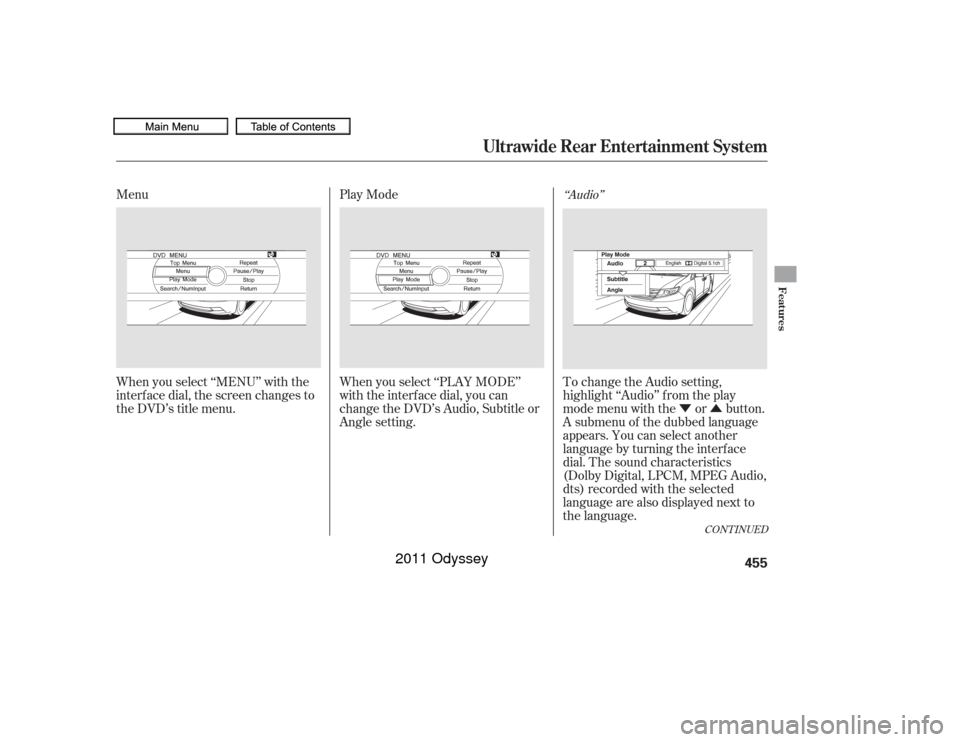
Menu
Play Mode
When you select ‘‘MENU’’ with the
interf ace dial, the screen changes to
the DVD’s title menu. When you select ‘‘PLAY MODE’’
with the interface dial, you can
change the DVD’s Audio, Subtitle or
Angle setting. To change the Audio setting,
highlight ‘‘Audio’’ f rom the play
mode menu with the or button.
A submenu of the dubbed language
appears. You can select another
language by turning the interf ace
dial. The sound characteristics
(Dolby Digital, LPCM, MPEG Audio,
dts) recorded with the selected
language are also displayed next to
the language.
‘‘Audio’’
CONT INUED
Ultrawide Rear Entertainment System
Features
455
10/07/17 10:35:16 31TK8600_460
2011 Odyssey
Page 464 of 722
Select ‘‘Wide’’ by turning the
interf ace dial then press the ENTER
button. The available settings are
displayed, and the current setting is
highlighted in blue. Select the
desired setting by turning the
interf ace dial, then press the ENTER
button.The selected setting will be
highlighted in blue f or 1 second, and
the screen returns to the play mode
in the selected setting.
Select ‘‘Zoom’’ by turning the
interf ace dial then press the ENTER
button. The available settings are
displayed, and the current setting is
highlighted in blue. Select the
desired setting by turning the
interf ace dial, then press the ENTER
button.Wide
Zoom
CONT INUED
Ultrawide Rear Entertainment System
Features
461
10/07/17 10:36:07 31TK8600_466
2011 Odyssey
Page 465 of 722
The selected setting will be
highlighted in blue f or 1 second, and
the screen returns to the play mode
in the selected setting.Appearance
You can change the color of the
menu screen to white, black, blue,
brown, or red. It can be also
synchronized with the front
navigation system. Rotate the
interface dial to the setting you want,
then press the ENTER button. To change the personal surround
setting, highlight ‘‘Personal
Surround’’ f rom the setup menu with
the interf ace dial and press the
ENTER button. The ef f ect selection
appears. Personal SurroundUltrawide Rear Entertainment System462
10/07/17 10:36:13 31TK8600_467
2011 Odyssey
Page 478 of 722

The compass may need to be
manually calibrated af ter exposure to
a strong magnetic field. If the
compassseemstobecontinually
showing the wrong direction and is
not self -calibrating, or the compass
display is blinking with the CAL
indicator on, do the f ollowing
procedure.Do this procedure in an open
area, away f rom buildings, power
lines, and other vehicles.
Turn the ignition switch to the ON
(II) position.
Press and hold the SETUP button
f or about 5 seconds. The display
shows you the compass setting
menu items.
When you turn the ignition switch to
the ON (II) position, the compass is
self-calibrating, then the compass
display is shown in the display. Compass operation can be af f ected
by driving near power lines or
stations, across bridges, through
tunnels, over railroad crossings, past
large vehicles, or driving near large
objects that can cause a magnetic
disturbance. It can also be af f ected
by accessories such as antennas and
roof racks that are mounted by
magnets.
1.
2.
CONT INUED
On EX and EX-L models withoutnavigation system
Compass Calibration
Compass Operation
Compass
Features
475
NOTE:
U.S. EX models
EX-L and Canadian EX models U.S. EX models
EX-L and Canadian EX models
10/07/19 15:54:24 31TK8600_480
2011 Odyssey
Page 480 of 722
. If the correct
zone is not shown, turn the
selecto")
Once the correct zone is displayed,
press the selector knob. The
display then returns to normal.
Find the zone f or your area on the
map (see page ). If the correct
zone is not shown, turn the
selector knob to cycle the zone
lists up or down.
In most areas, there is a variation
between magnetic north and true
north. Zone selection is required so
the compass can compensate f or this
variation. To check and select the
zone, do this:
Turn the ignition switch to the ON
(II) position.
If necessary, press the RETURN
button to return to the previous
display. Pressing the SETUP
button will cancel the compass
setting mode.
Press and hold the SETUP button
f or about 5 seconds. The display
shows you the compass setting
menu items.
Turn the selector knob to select
‘‘ZONE’’ or ‘‘Zone Adjust.’’ Press
the selector knob to enter your
selection. The display shows you
the currently selected zone
number.
4.
5.
2.
3. 1.
478
CONT INUED
Compass Zone Selection
Compass
Features
477
U.S. EX models
EX-L and Canadian EX modelsU.S. EX models
EX-L and Canadian EX models
10/07/19 15:54:44 31TK8600_482
2011 Odyssey
Page 482 of 722

The alarm will also be activated if a
passenger inside the locked vehicle
turns the ignition switch on.
The security system will not set if
the hood, tailgate, or any door is not
f ully closed. Bef ore you leave the
vehicle, make sure the doors,
tailgate, and hood are securely
closed.To see if the system is set
af ter you exit the vehicle, press the
LOCK button on the remote
transmitter within 5 seconds. If the
system is set, the horn will beep
once.
Do not attempt to alter this system
or add other devices to it.
The security system helps to protect
your vehicle and valuables f rom thef t.
The horn sounds and a combination
of headlights, parking lights, side
marker lights, and taillights f lash if
someone attempts to break into your
vehicleorremovetheradio.This
alarm continues f or 2 minutes, then
the system resets. To reset an
activated system before the 2
minutes have elapsed, unlock the
driver’s door with the key or the
remote transmitter.
The security system automatically
sets 15 seconds after you lock the
doors, hood, and the tailgate. For the
system to activate, you must lock the
doorsandthetailgatefromthe
outside with the key, driver’s lock
tab, door lock master switch, or
remote transmitter. The security
system indicator on the instrument
panel starts blinking immediately to
show you the system is setting itself .
Once the security system is set,
opening any door, the tailgate, or the
hood without using the key or the
remote transmitter, will cause it to
alarm. It also alarms if the audio unit
is removed f rom the dashboard or
the wiring is cut.
On all models except LX
Security System
Features
479
NOTE:
SECURITY SYSTEM INDICATOR
10/07/17 10:38:38 31TK8600_484
2011 Odyssey
Page 486 of 722

�·�µ
If your garage door was
manuf actured bef ore April 1, 1982,
you may not be able to program
HomeLink to operate it. These units
do not have safety features that
cause the motor to stop and reverse
it if an obstacle is detected during
closing, increasing the risk of injury. Do not use HomeLink with any
garage door opener that lacks saf ety
stop and reverse f eatures.
Units manuf actured between April 1,
1982 and January 1, 1993 may be
equipped with saf ety stop and
reverse f eatures. If your unit does
not have an external entrapment
protection system, an easy test to
conf irm the f unction and
perf ormance of the saf ety stop and
reverse f eature is to lay a 2 4
under the closing door. The door
should stop and reverse upon
contacting the piece of wood.
As an additional safety feature,
garage door openers manuf actured
af ter January 1, 1993 are required to
have external entrapment protection
systems, such as an electronic eye,
which detect an object obstructing
the door.
Refer to the safety information thatcame with your garage door opener
to test that the safety features are
f unctioning properly. If you do not
have this information, contact the
manuf acturer of the equipment.
Bef ore programming HomeLink to a
garage door or gate opener, make
sure that people and objects are out
of thewayof thedevicetoprevent
potential injury or damage.
When programming a garage door
opener, park just outside the garage.
If you just
received your vehicle and have not
trained any of the buttons in
HomeLink bef ore, you should erase
any previously learned codes bef ore
training the first button. To do this,
press and hold the two outside
buttons on the HomeLink
transceiver for about 20 seconds,
until the red indicator f lashes.
Release the buttons, then proceed to
step 1.
The HomeLink
Universal
Transceiver built into your vehicle
canbeprogrammedtooperateupto
three remote controlled devices
around your home, such as garage
doors, lighting, or home security
systems.
Bef ore programming your
HomeLink to operate a garage door
opener, conf irm that the opener has
an external entrapment protection
system, such as an ‘‘electronic eye,’’
or other saf ety and reverse stop
f eatures.
On all models except LX
CONT INUED
Important Saf ety Precautions T raining HomeL ink
General Inf ormation
Bef ore you begin
HomeL ink
Universal Transceiver
Features
483
10/07/17 10:39:12 31TK8600_488
2011 Odyssey