Page 1168 of 2057

3. If a new lower arm is installed it will benecessary to check and adjust the front wheel
alignment.
REFER to: Front Toe Adjustment (204-00
Suspension System - General Information,
General Procedures)
/ Rear Toe Adjustment (204-00 Suspension
System - General Information, General
Procedures).
Strut or Shock Absorber Inspection
NOTE: Inspect the struts or shock absorber for
signs of oil weepage or leaks. Make sure that the
oil is not from another source.
Weepage:
• deposits a thin film of oil on the strut and spring assembly or shock absorber.
• is normally noticed due to a collection of dust on the strut and spring assembly or shock
absorber.
• occurs during the normal running-in period of 4800 - 8050 km. After this period no new signs
of oil should be visible.
• does not require new struts or shock absorbers to be installed.
Leakage:
• covers the entire strut and spring assembly or shock absorber with oil.
• will drip oil onto the surrounding suspension components.
• requires new struts or shock absorbers to be installed.
Strut or Shock Absorber Testing
NOTE: Struts or shock absorbers must be tested
in the vertical position.
1. Remove both strut and spring assemblies or shock absorbers. The piston rods should extend.
• Disassemble the strut and spring assemblies.
REFER to: Front Strut and Spring Assembly
(204-01 Front Suspension, Removal and
Installation).
2. Compress the piston rods. Both piston rods should offer the same resistance when
compressing.
3. Compress and release the piston rods. The piston rods should extent equally. 4. Compress and pull the piston rod in the vertical
position. Feel if the resistance force at the point
of direction change-over is perceptible without
a lag. If a lag is perceptible it is an indication of
damper valve damage and new struts or shock
absorbers must be installed. REFER to:
Front Strut and Spring Assembly (204-01 Front
Suspension, Removal and Installation),
Spring (204-02 Rear Suspension, Removal and
Installation).
Load-Levelling Shock Absorber
1. With the vehicle unladen, measure and note the dimensions between the base of the wheel rim
and the top of the rear fender on both sides.
• The measurements on both sides should be approximately equal.
2. With a load of 4 average size adults and a 100 kg weight, measure and note the dimensions
between the base of the wheel rim and the top
of the rear fender on both sides.
3. NOTE: Due to the internal ratchet mechanism of the suspension components, the height
of the rear of the vehicle should rise during
the road test.
With a load of 4 average size adults and a 100
kg weight, drive the vehicle for 3 km on a road
of normal condition.
4. With a load of 4 average size adults and a 100 kg weight, measure and note the dimensions
between the base of the wheel rim and the top
of the rear fender on both sides.
5. If the dimensions on both sides are no longer approximately equal, install new load levelling
shock absorbers.
REFER to: Spring(204-02 Rear Suspension,
Removal and Installation).
6. NOTE: Due to the internal ratchet mechanism of the suspension components, the height
of the rear of the vehicle should rise during
the road test.
If the dimensions are approximately equal,
unload the vehicle and drive the vehicle for 3
km on a road of normal condition.
7. With the vehicle unladen, measure and note the dimensions between the base of the wheel rim
and the top of the rear fender on both sides.
Check the final dimensions with the original
dimensions taken in the unladen condition.
G1080717en2008.50 Kuga8/2011
204-00- 13
Suspension System - General Information
204-00- 13
DIAGNOSIS AND TESTING
TO MODEL INDEX
BACK TO CHAPTER INDEX
FORD KUGA 2011.0MY WORKSHOP REPAIR MANUAL
Page 1170 of 2057
Front Toe Adjustment(14 117 3)
General EquipmentWheel Alignment System
NOTE: Make sure that the vehicle is standing on
a level surface.
1. CAUTION: Make sure that the steering wheel lock is engaged.
NOTE: Make sure that the road wheels are in
the straight ahead position.
E99259
2. Check the toe setting on both sides.
General Equipment: Wheel Alignment System
3. Loosen on both sides.
Torque: 69
Nm
1.
2.NOTE: Make sure that the boot is correctly
located.
Rotate the tie-rods an equal amount in either
a clockwise or a counterclockwise direction
to adjust the toe setting on both sides.
2
E67410
1
2
G1000721en2008.50 Kuga8/2011
204-00- 15
Suspension System - General Information
204-00- 15
GENERAL PROCEDURES
TO MODEL INDEX
BACK TO CHAPTER INDEX
FORD KUGA 2011.0MY WORKSHOP REPAIR MANUAL
Page 1172 of 2057

SECTION 204-01 Front Suspension
VEHICLE APPLICATION:2008.50 Kuga
PA G E
CONTENTS
SPECIFICATIONS
204-01-2
Specifications ........................................................................\
..............................................
DESCRIPTION AND OPERATION 204-01-3
Front Suspension (Component Location) ........................................................................\
...
204-01-4
Front Suspension (Overview) ........................................................................\
.....................
204-01-4
Overview ........................................................................\
.....................................................
204-01-5
Spring and damper assembly ........................................................................\
.....................
204-01-6
Subframe ........................................................................\
....................................................
204-01-7
Stabilizer bar ........................................................................\
...............................................
REMOVAL AND INSTALLATION 204-01-8
(14 371 0)
Wheel Hub ........................................................................\
..............................
204-01-9
(14 411 0;
14 411 4;
Front Wheel Bearing
........................................................................\
...............
14 412 0;
14 414 4;
14 416 4)
204-01-13
(14 706 0;
14 707 0;
14 709 0)
Lower Arm
........................................................................\
..............................
204-01-15
(14 752 0)
Front Stabilizer Bar ........................................................................\
.................
204-01-20
(14 754 0;
14 754 4)
Front Stabilizer Bar Bushing
........................................................................\
...
204-01-21
(14 343 0)
Wheel Knuckle ........................................................................\
........................
204-01-26
(14 781 0;
14 782 0)
Front Strut and Spring Assembly
....................................................................
DISASSEMBLY AND ASSEMBLY 204-01-29
(14 783 4)
Front Strut and Spring Assembly ....................................................................
204-01-1
Front Suspension
204-01- 1
.
TO MODEL INDEX
BACK TO CHAPTER INDEX
FORD KUGA 2011.0MY WORKSHOP REPAIR MANUAL
Page 1176 of 2057

Description
Item
Stabilizer bar bushes and bracket
9Description
Item
10 Wheel hub
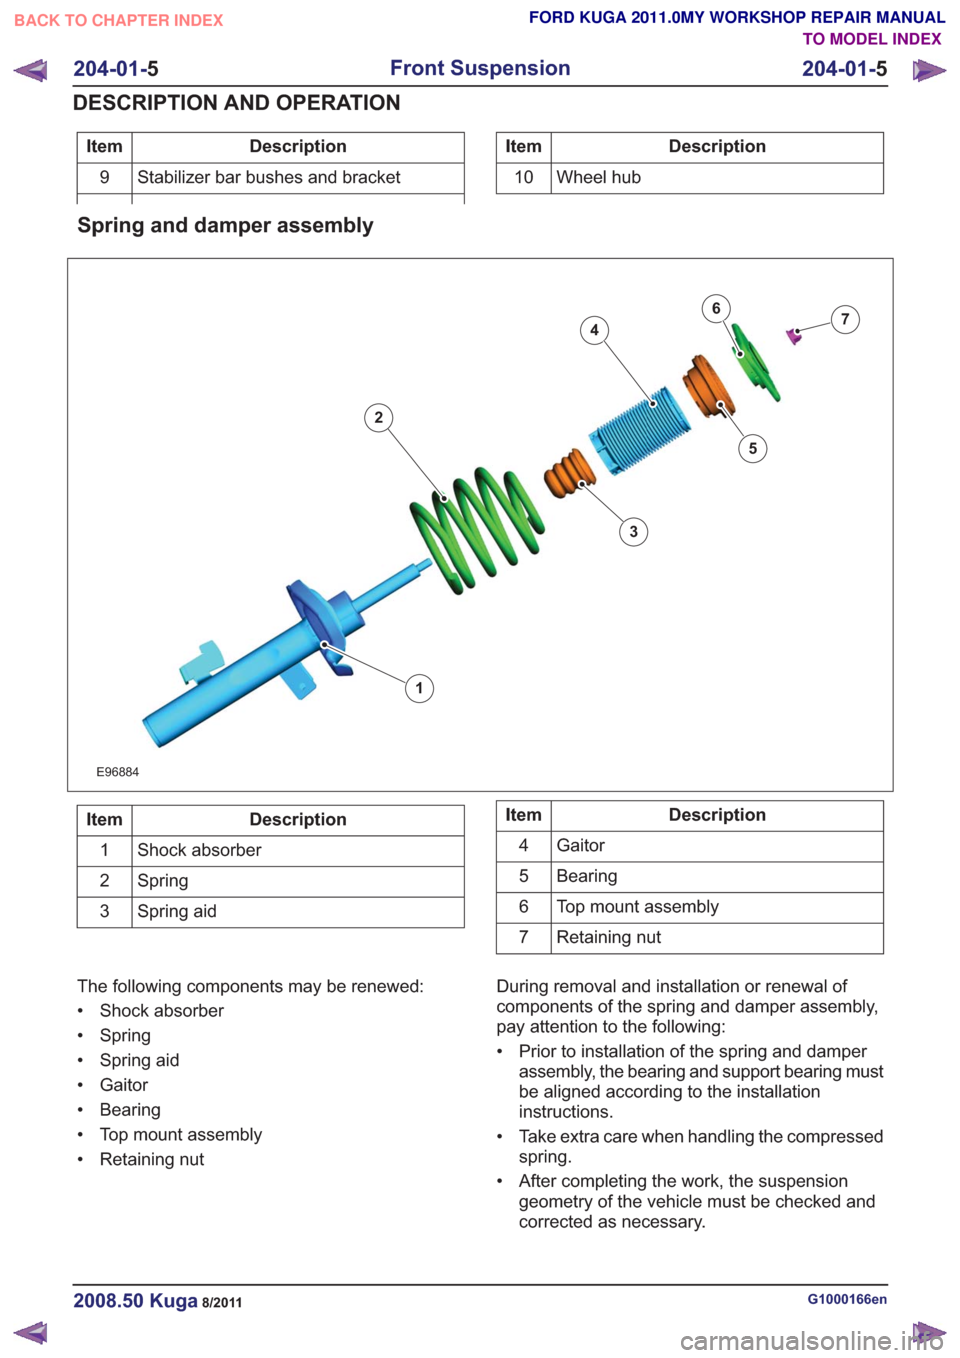
Spring and damper assembly
E96884
1
2
3
4
5
67
Description
Item
Shock absorber
1
Spring
2
Spring aid
3Description
Item
Gaitor
4
Bearing
5
Top mount assembly
6
Retaining nut
7
The following components may be renewed:
• Shock absorber
• Spring
• Spring aid
• Gaitor
• Bearing
• Top mount assembly
• Retaining nut During removal and installation or renewal of
components of the spring and damper assembly,
pay attention to the following:
• Prior to installation of the spring and damper
assembly, the bearing and support bearing must
be aligned according to the installation
instructions.
• Take extra care when handling the compressed spring.
• After completing the work, the suspension geometry of the vehicle must be checked and
corrected as necessary.
G1000166en2008.50 Kuga8/2011
204-01- 5
Front Suspension
204-01- 5
DESCRIPTION AND OPERATION
TO MODEL INDEX
BACK TO CHAPTER INDEX
FORD KUGA 2011.0MY WORKSHOP REPAIR MANUAL
Page 1177 of 2057
Subframe
E96885
1
2
2
3
3
Description
Item
Subframe
1
Rear bushes, subframe
2
Front bushes, subframe
3
The following components may be renewed:
• Subframe
• Subframe bushes During removal and installation or renewal of
components of the subframe, pay attention to the
following:
• Before installing the subframe bushes, they
must be aligned according to the installation
instructions.
• When the subframe is installed or removed, it must be aligned with the vehicle body using the
appropriate special tools.
• After completing the work, the suspension geometry of the vehicle must be checked and
corrected as necessary.
G1000166en2008.50 Kuga8/2011
204-01- 6
Front Suspension
204-01- 6
DESCRIPTION AND OPERATION
TO MODEL INDEX
BACK TO CHAPTER INDEX
FORD KUGA 2011.0MY WORKSHOP REPAIR MANUAL
Page 1178 of 2057
Stabilizer bar
E98611
1
2
3
Description
Item
Stabilizer bar
1
Bushes, stabilizer bar
2
Bracket, stabilizer bar bushes
3
The following components may be renewed:
• Stabilizer bar
• Bushes, stabilizer bar
• Bracket, stabilizer bar bushes
During removal and installation or renewal of
components of the stabilizer bar, pay attention to
the following:
• Before installing the stabilizer bar bushes, they must be aligned according to the installation
instructions.
• After completing the work, the suspension geometry of the vehicle must be checked and
corrected as necessary.
G1000166en2008.50 Kuga8/2011
204-01- 7
Front Suspension
204-01- 7
DESCRIPTION AND OPERATION
TO MODEL INDEX
BACK TO CHAPTER INDEX
FORD KUGA 2011.0MY WORKSHOP REPAIR MANUAL
Page 1182 of 2057
E99400
205-071-01
204-158205-295
6.
E103391
Installation
1. NOTE:Make sure that the sensor ring is
correctly located.
G1000206en2008.50 Kuga8/2011
204-01- 11
Front Suspension
204-01- 11
REMOVAL AND INSTALLATION
TO MODEL INDEX
BACK TO CHAPTER INDEX
FORD KUGA 2011.0MY WORKSHOP REPAIR MANUAL
Page 1184 of 2057
Lower Arm(14 706 0; 14 707 0; 14 709 0)
Special Tool(s)204-605
Separator, Lower Arm Ball
Joint
E63772
204-609
Protection Cap, Ball Joint
Gaiter
E75372
Removal
NOTE:Removal steps in this procedure may
contain installation details.
1. Refer to: Wheel and Tire (204-04 Wheels and
Tires, Removal and Installation).
2.
E98543
x7
3. Torque: 83Nm
E97635
4.If equipped.
Torque: 8
Nm
E75215
5.Special Tool(s): 204-605
E97732
204-605
G1000207en2008.50 Kuga8/2011
204-01- 13
Front Suspension
204-01- 13
REMOVAL AND INSTALLATION
TO MODEL INDEX
BACK TO CHAPTER INDEX
FORD KUGA 2011.0MY WORKSHOP REPAIR MANUAL