2011 CHEVROLET MALIBU turn signal
[x] Cancel search: turn signalPage 243 of 382
Black plate (1,1)Chevrolet Malibu Owner Manual - 2011
Vehicle Care 10-1
Vehicle Care
General Information
General Information . . . . . . . . . . 10-2
California Proposition65 Warning . . . . . . . . . . . . . . . . . 10-3
California Perchlorate Materials Requirements . . . . 10-3
Accessories and Modifications . . . . . . . . . . . . . . . 10-3
Vehicle Checks
Doing Your OwnService Work . . . . . . . . . . . . . . . 10-4
Hood . . . . . . . . . . . . . . . . . . . . . . . . 10-5
Engine Compartment Overview . . . . . . . . . . . . . . . . . . . 10-6
Engine Oil . . . . . . . . . . . . . . . . . . . 10-9
Engine Oil Life System . . . . . 10-12
Automatic Transmission Fluid . . . . . . . . . . . . . . . . . . . . . . 10-13
Engine Air Cleaner/Filter . . . . 10-14
Cooling System . . . . . . . . . . . . 10-15
Engine Coolant . . . . . . . . . . . . . 10-16
Engine Overheating . . . . . . . . 10-19 Overheated Engine
Protection
Operating Mode . . . . . . . . . . . 10-20
Power Steering Fluid . . . . . . . 10-21
Washer Fluid . . . . . . . . . . . . . . . 10-22
Brakes . . . . . . . . . . . . . . . . . . . . . 10-22
Brake Fluid . . . . . . . . . . . . . . . . . 10-23
Battery . . . . . . . . . . . . . . . . . . . . . 10-25
Starter Switch Check . . . . . . . 10-25
Automatic Transmission Shift Lock Control Function
Check . . . . . . . . . . . . . . . . . . . . . 10-26
Ignition Transmission Lock Check . . . . . . . . . . . . . . . . . . . . . 10-26
Park Brake and P (Park) Mechanism Check . . . . . . . . 10-26
Wiper Blade Replacement . . . . . . . . . . . . . . 10-27
Headlamp Aiming
Headlamp Aiming . . . . . . . . . . 10-27
Bulb Replacement
Bulb Replacement . . . . . . . . . . 10-28
Halogen Bulbs . . . . . . . . . . . . . . 10-28
Taillamps, Turn Signal, andStoplamps . . . . . . . . . . . . . . . . 10-28
License Plate Lamp . . . . . . . . 10-29
Replacement Bulbs . . . . . . . . . 10-29
Electrical System
Electrical System Overload . . . . . . . . . . . . . . . . . . 10-30
Fuses . . . . . . . . . . . . . . . . . . . . . . 10-30
Engine Compartment Fuse Block . . . . . . . . . . . . . . . . . . . . . 10-31
Instrument Panel Fuse Block . . . . . . . . . . . . . . . . . . . . . 10-33
Rear Compartment Fuse Block . . . . . . . . . . . . . . . . . . . . . 10-35
Wheels and Tires
Tires . . . . . . . . . . . . . . . . . . . . . . . . 10-38
Winter Tires . . . . . . . . . . . . . . . . 10-39
Low-Profile Tires . . . . . . . . . . . 10-39
Tire Sidewall Labeling . . . . . . 10-40
Tire Designations . . . . . . . . . . . 10-42
Tire Terminology andDefinitions . . . . . . . . . . . . . . . . 10-42
Tire Pressure . . . . . . . . . . . . . . . 10-45
Tire Pressure for High-Speed Operation . . . . . . . . . . . . . . . . . 10-46
Tire Pressure Monitor System . . . . . . . . . . . . . . . . . . . 10-47
Tire Pressure Monitor Operation . . . . . . . . . . . . . . . . . 10-48
Tire Inspection . . . . . . . . . . . . . . 10-51
Tire Rotation . . . . . . . . . . . . . . . 10-52
Page 270 of 382
Black plate (28,1)Chevrolet Malibu Owner Manual - 2011
10-28 Vehicle Care
Bulb Replacement
For the proper type of replacement
bulbs, seeReplacement Bulbson
page 10‑29.
For any bulb changing procedure
not listed in this section, contact
your dealer.
Halogen Bulbs
{WARNING
Halogen bulbs have pressurized
gas inside and can burst if you
drop or scratch the bulb. You or
others could be injured. Be sure
to read and follow the instructions
on the bulb package.
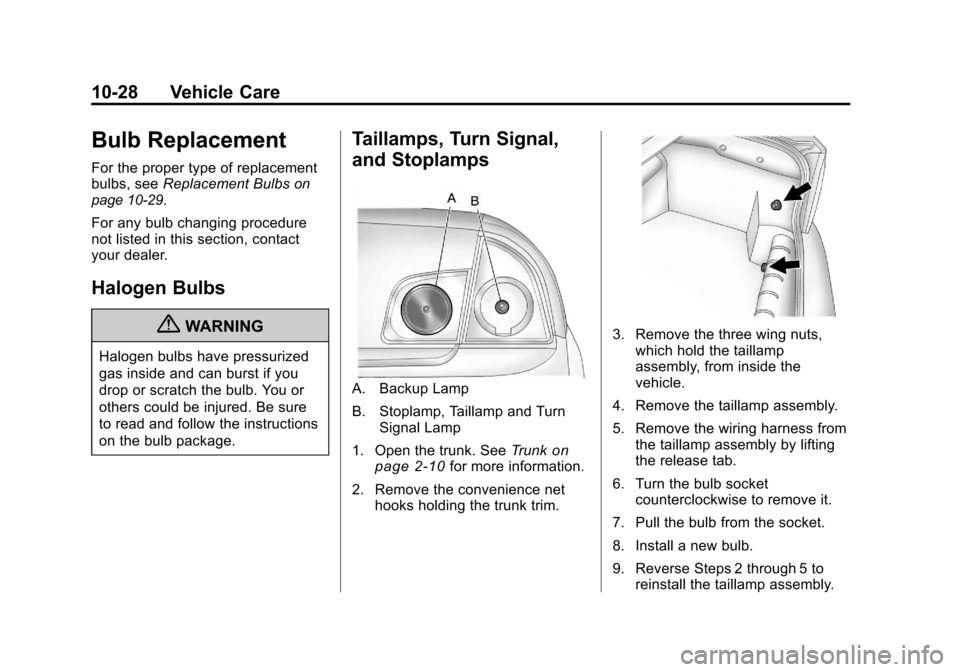
Taillamps, Turn Signal,
and Stoplamps
A. Backup Lamp
B. Stoplamp, Taillamp and Turn Signal Lamp
1. Open the trunk. See Trunk
on
page 2‑10for more information.
2. Remove the convenience net hooks holding the trunk trim.
3. Remove the three wing nuts,which hold the taillamp
assembly, from inside the
vehicle.
4. Remove the taillamp assembly.
5. Remove the wiring harness from the taillamp assembly by lifting
the release tab.
6. Turn the bulb socket counterclockwise to remove it.
7. Pull the bulb from the socket.
8. Install a new bulb.
9. Reverse Steps 2 through 5 to reinstall the taillamp assembly.
Page 271 of 382
Black plate (29,1)Chevrolet Malibu Owner Manual - 2011
Vehicle Care 10-29
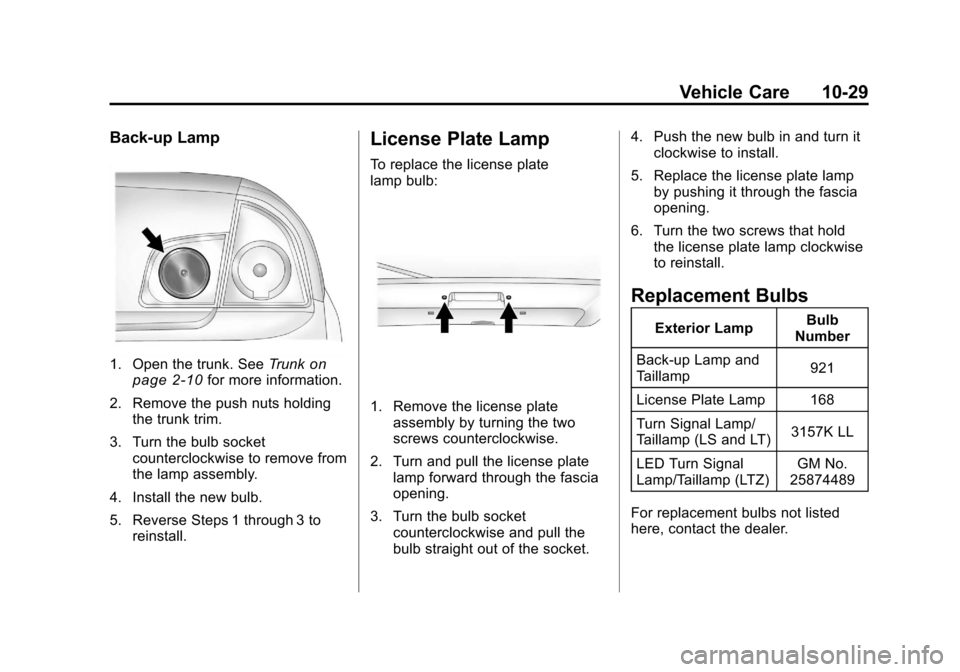
Back-up Lamp
1. Open the trunk. SeeTrunkon
page 2‑10for more information.
2. Remove the push nuts holding the trunk trim.
3. Turn the bulb socket counterclockwise to remove from
the lamp assembly.
4. Install the new bulb.
5. Reverse Steps 1 through 3 to reinstall.
License Plate Lamp
To replace the license plate
lamp bulb:
1. Remove the license plateassembly by turning the two
screws counterclockwise.
2. Turn and pull the license plate lamp forward through the fascia
opening.
3. Turn the bulb socket counterclockwise and pull the
bulb straight out of the socket. 4. Push the new bulb in and turn it
clockwise to install.
5. Replace the license plate lamp by pushing it through the fascia
opening.
6. Turn the two screws that hold the license plate lamp clockwise
to reinstall.
Replacement Bulbs
Exterior Lamp Bulb
Number
Back-up Lamp and
Taillamp 921
License Plate Lamp 168
Turn Signal Lamp/
Taillamp (LS and LT) 3157K LL
LED Turn Signal
Lamp/Taillamp (LTZ) GM No.
25874489
For replacement bulbs not listed
here, contact the dealer.
Page 290 of 382
Black plate (48,1)Chevrolet Malibu Owner Manual - 2011
10-48 Vehicle Care
The TPMS malfunction indicator is
combined with the low tire pressure
telltale. When the system detects a
malfunction, the telltale will flash for
approximately one minute and then
remain continuously illuminated.
This sequence will continue upon
subsequent vehicle start‐ups as
long as the malfunction exists.
When the malfunction indicator is
illuminated, the system may not be
able to detect or signal low tire
pressure as intended. TPMS
malfunctions may occur for a variety
of reasons, including the installation
of replacement or alternate tires or
wheels on the vehicle that prevent
the TPMS from functioning properly.
Always check the TPMS malfunction
telltale after replacing one or more
tires or wheels on your vehicle to
ensure that the replacement or
alternate tires and wheels allow the
TPMS to continue to function
properly.
SeeTire Pressure Monitor
Operation
on page 10‑48for
additional information.
Federal Communications
Commission (FCC) and
Industry Canada
See Radio Frequency Statementon
page 13‑17for information regarding
Part 15 of the Federal
Communications Commission (FCC)
rules and Industry Canada
Standards RSS-210/220/310.
Tire Pressure Monitor
Operation
This vehicle may have a Tire
Pressure Monitor System (TPMS).
The TPMS is designed to warn the
driver when a low tire pressure
condition exists. TPMS sensors are
mounted onto each tire and wheel
assembly, excluding the spare tire
and wheel assembly. The TPMS
sensors monitor the air pressure in
the vehicle's tires and transmits the
tire pressure readings to a receiver
located in the vehicle.
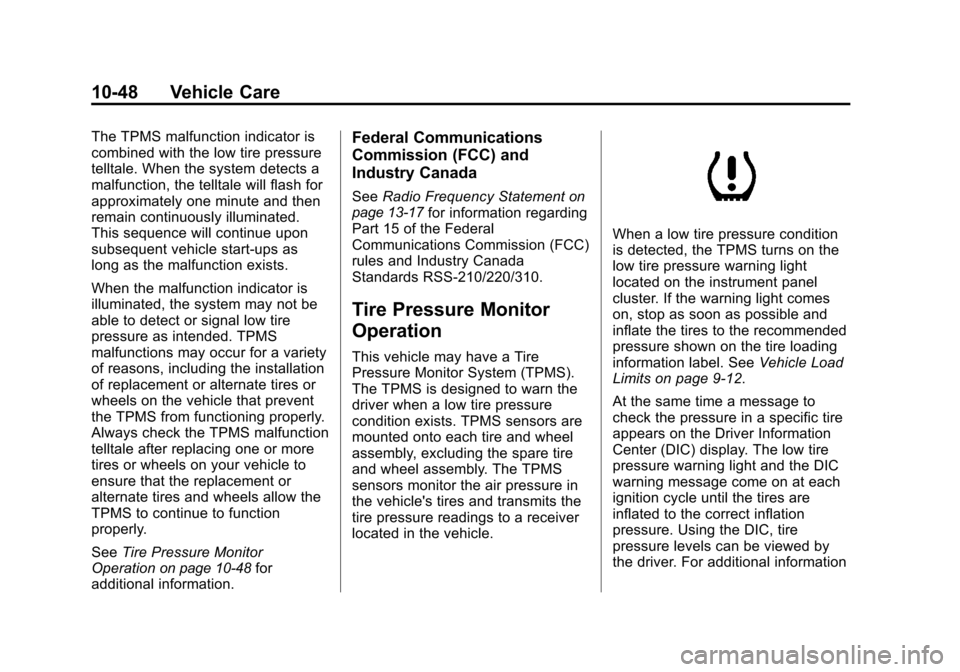
When a low tire pressure condition
is detected, the TPMS turns on the
low tire pressure warning light
located on the instrument panel
cluster. If the warning light comes
on, stop as soon as possible and
inflate the tires to the recommended
pressure shown on the tire loading
information label. See Vehicle Load
Limits on page 9‑12.
At the same time a message to
check the pressure in a specific tire
appears on the Driver Information
Center (DIC) display. The low tire
pressure warning light and the DIC
warning message come on at each
ignition cycle until the tires are
inflated to the correct inflation
pressure. Using the DIC, tire
pressure levels can be viewed by
the driver. For additional information
Page 292 of 382
Black plate (50,1)Chevrolet Malibu Owner Manual - 2011
10-50 Vehicle Care
.The TPMS sensor matching
process was started but not
completed or not completed
successfully after rotating the
vehicle's tires. The DIC message
and TPMS malfunction light
should go off once the TPMS
sensor matching process is
performed successfully. See
“TPMS Sensor Matching
Process”later in this section.
.One or more TPMS sensors are
missing or damaged. The DIC
message and the TPMS
malfunction light should go off
when the TPMS sensors are
installed and the sensor
matching process is performed
successfully. See your dealer for
service.
.Replacement tires or wheels do
not match your vehicle's original
equipment tires or wheels. Tires
and wheels other than those
recommended for your vehicle
could prevent the TPMS from
functioning properly. See Buying
New Tires on page 10‑54.
.Operating electronic devices or
being near facilities using radio
wave frequencies similar to the
TPMS could cause the TPMS
sensors to malfunction.
If the TPMS is not functioning it
cannot detect or signal a low tire
condition. See your dealer for
service if the TPMS malfunction
light and DIC message comes on
and stays on.
TPMS Sensor Matching
Process
Each TPMS sensor has a unique
identification code. Any time you
replace one or more of the TPMS
sensors or rotate the vehicle's tires,
the identification codes need to be
matched to the new tire/wheel
location. The sensors are matched,
to the tire/wheel locations, in the
following order: driver side front tire,
passenger side front tire, passenger
side rear tire, and driver side rear
tire using a TPMS diagnostic tool.
See your dealer for service. The TPMS sensors can also be
matched to each tire/wheel position
by increasing or decreasing the
tire's air pressure. When increasing
the tire's pressure, do not exceed
the maximum inflation pressure
indicated on the tire's sidewall. To
decrease the tire's air-pressure use
the pointed end of the valve cap, a
pencil-style air pressure gage,
or a key.
You have two minutes to match
each tire and wheel position. If it
takes longer than two minutes to
match any tire and wheel position,
the matching process stops and you
need to start over.
The TPMS matching process is
outlined below:
1. Set the parking brake.
2. Turn the ignition switch to
ON/RUN with the engine off.
3. Press and hold the Remote Keyless Entry (RKE)
transmitter's LOCK and
UNLOCK buttons, at the same
Page 293 of 382
Black plate (51,1)Chevrolet Malibu Owner Manual - 2011
Vehicle Care 10-51
time, for about five seconds to
start the TPMS learn mode. The
horn sounds twice indicating the
TPMS receiver is ready and in
learn mode.
4. Start with the driver side front tire. The driver side front turn
signal also comes on to indicate
that corner's sensor is ready to
be learned.
5. Remove the valve cap from the tire's valve stem. Activate the
TPMS sensor by increasing or
decreasing the tire's air pressure
for about eight seconds. The
horn chirp, can take up to
30 seconds to sound. It chirps
one time and then all the turn
signals flash one time to confirm
the sensor identification code
has been matched to the tire/
wheel position. 6. The passenger side front turn
signal comes on to indicate that
corner sensor is ready to be
learned. Proceed to the
passenger side front tire and
repeat the procedure in Step 5.
7. The passenger side rear turn signal comes on to indicate that
corner sensor is ready to be
learned. Proceed to the
passenger side rear tire and
repeat the procedure in Step 5.
8. The driver side rear turn signal comes on to indicate that corner
sensor is ready to be learned.
Proceed to the driver side rear
tire, and repeat the procedure in
Step 5.
9. After hearing the single horn chirp for the driver side rear tire,
two additional horn chirps sound
to indicate the tire learning
process is done. Turn the
ignition switch to LOCK/OFF. If no tires are learned after
entering the TPMS learn mode,
or if communication with the
receiver stops, or if the time limit
has expired, turn the ignition
switch to LOCK/OFF and start
over beginning with Step 2.
10. Set all four tires to the recommended air pressure
level as indicated on the Tire
and Loading Information label.
11. Put the valve caps back on the valve stems.
Tire Inspection
We recommend that you
regularly inspect your vehicle's
tires, including the spare tire,
if the vehicle has one, for signs
of wear or damage at least once
a month.
Page 372 of 382

Black plate (2,1)Chevrolet Malibu Owner Manual - 2011
i-2 INDEX
B
Battery . . . . . . . . . . . . . . . . . . . . . . . 10-25Jump Starting . . . . . . . . . . . . . . . 10-78
Load Management . . . . . . . . . . . . . 6-6
Power Protection . . . . . . . . . . . . . . 6-7
Blade Replacement, Wiper . . . 10-27
Bluetooth . . . . . . . . . . . . . . . . . . . . . . 7-23
Brakes . . . . . . . . . . . . . . . . . . . . . . . . 10-22 Antilock . . . . . . . . . . . . . . . . . . . . . . . 9-28
Assist . . . . . . . . . . . . . . . . . . . . . . . . . 9-30
Fluid . . . . . . . . . . . . . . . . . . . . . . . . 10-23
Parking . . . . . . . . . . . . . . . . . . . . . . . 9-29
System Messages . . . . . . . . . . . . 5-27
Braking . . . . . . . . . . . . . . . . . . . . . . . . . 9-3
Break-In, New Vehicle . . . . . . . . . 9-17
Bulb Replacement . . . . . . . . . . . . 10-29 Fog Lamps . . . . . . . . . . . . . . . . . . . . 6-5
Halogen Bulbs . . . . . . . . . . . . . . 10-28
Headlamp Aiming . . . . . . . . . . . 10-27
Headlamps . . . . . . . . . . . . . . . . . 10-28
License Plate Lamps . . . . . . . 10-29
Taillamps, Turn Signaland Stoplamps . . . . . . . . . . . . 10-28
Buying New Tires . . . . . . . . . . . . . 10-54
C
Calibration . . . . . . . . . . . . . . . . . . . . . . 5-5
California Fuel Requirements . . . . . . . . . . . 9-38
Perchlorate MaterialsRequirements . . . . . . . . . . . . . . . 10-3
Warning . . . . . . . . . . . . . . . . . . . . . . 10-3
Canadian Vehicle Owners . . . . . . . . iii
Capacities and Specifications . . . . . . . . . . . . . . . . 12-2
Carbon Monoxide
Engine Exhaust . . . . . . . . . . . . . . . 9-24
Trunk . . . . . . . . . . . . . . . . . . . . . . . . . 2-10
Winter Driving . . . . . . . . . . . . . . . . . 9-9
Cautions, Danger, and Warnings . . . . . . . . . . . . . . . . . . . . . . . . iv
CD Player . . . . . . . . . . . . . . . . . . . . . 7-14
Center Console Storage . . . . . . . . 4-2
Chains, Tire . . . . . . . . . . . . . . . . . . 10-59
Charging System Light . . . . . . . . 5-15
Check Engine Light . . . . . . . . . . . . . . . . . . 5-16
IgnitionTransmission Lock . . . . . . . . 10-26 Child Restraints
Infants and Young
Children . . . . . . . . . . . . . . . . . . . . . 3-40
Lower Anchors and Tethers for Children . . . . . . . . . 3-47
Older Children . . . . . . . . . . . . . . . . 3-38
Securing . . . . . . . . . . . . . . . . 3-54, 3-57
Systems . . . . . . . . . . . . . . . . . . . . . . 3-43
Where to Put the Restraint . . . 3-45
Cleaning Exterior Care . . . . . . . . . . . . . . . 10-85
Interior Care . . . . . . . . . . . . . . . . 10-89
Climate Control Systems . . . . . . . 8-1 Automatic . . . . . . . . . . . . . . . . . . . . . . 8-5
Clock . . . . . . . . . . . . . . . . . . . . . . . . . . . 5-6
Cluster, IP . . . . . . . . . . . . . . . . . . . . . 5-10
Collision Damage Repair . . . . . 13-11
Compact Spare Tire . . . . . . . . . . 10-77
Compass . . . . . . . . . . . . . . . . . . . . . . . 5-5
Compressor Kit, Tire Sealant . . . . . . . . . . . . . . . . . . . . . . 10-61
Control of a Vehicle . . . . . . . . . . . . . 9-3
Convenience Net . . . . . . . . . . . . . . . 4-2
Convex Mirrors . . . . . . . . . . . . . . . . 2-14
Page 380 of 382

Black plate (10,1)Chevrolet Malibu Owner Manual - 2011
i-10 INDEX
Service (cont.)Maintenance Records . . . . . . . . 11-9
Maintenance, General
Information . . . . . . . . . . . . . . . . . . 11-1
Parts Identification Label . . . . . 12-1
Publications Ordering Information . . . . . . . . . . . . . . . . 13-13
Scheduling Appointments . . . . . 13-9
Vehicle Messages . . . . . . . . . . . . 5-30
Servicing the Airbag-Equipped Vehicle . . . . . 3-35
Shift Lock Control Function Check, Automatic
Transmission . . . . . . . . . . . . . . . . 10-26
Shifting Into Park . . . . . . . . . . . . . . . . . . . . . . 9-22
Out of Park . . . . . . . . . . . . . . . . . . . 9-23
Signals, Turn and
Lane-Change . . . . . . . . . . . . . . . . . 6-4
Spare Tire Compact . . . . . . . . . . . . . . . . . . . . 10-77
Specifications and Capacities . . . . . . . . . . . . . . . . . . . . 12-2 Speedometer . . . . . . . . . . . . . . . . . . 5-11
Start Vehicle, Remote . . . . . . . . . . 2-5
Starter Switch Check . . . . . . . . . 10-25
Starting the Engine . . . . . . . . . . . . 9-20
Steering . . . . . . . . . . . . . . . . . . . . . . . . 9-4
Fluid, Power . . . . . . . . . . . . . . . . 10-21
Wheel Adjustment . . . . . . . . . . . . . 5-2
Wheel Controls . . . . . . . . . . . . . . . . 5-2
Storage Areas Center Console . . . . . . . . . . . . . . . . 4-2
Convenience Net . . . . . . . . . . . . . . 4-2
Front . . . . . . . . . . . . . . . . . . . . . . . . . . 4-2
Glove Box . . . . . . . . . . . . . . . . . . . . . 4-1
Instrument Panel . . . . . . . . . . . . . . 4-1
Storing the Tire Sealant and Compressor Kit . . . . . . . . . 10-68
Stuck Vehicle . . . . . . . . . . . . . . . . . . 9-11
Sun Visors . . . . . . . . . . . . . . . . . . . . . 2-19
Sunroof . . . . . . . . . . . . . . . . . . . . . . . . 2-19
Symbols . . . . . . . . . . . . . . . . . . . . . . . . . . ivT
Tachometer . . . . . . . . . . . . . . . . . . . . 5-11
Taillamps Turn Signal, andStoplamps . . . . . . . . . . . . . . . . 10-28
Text Telephone (TTY) Users . . . 13-6
Theft-Deterrent Systems . . . . . . . 2-13 Immobilizer . . . . . . . . . . . . . . . . . . . 2-13
Time . . . . . . . . . . . . . . . . . . . . . . . . . . . . 5-6
Tires Buying New Tires . . . . . . . . . . . 10-54
Chains . . . . . . . . . . . . . . . . . . . . . . 10-59
Changing . . . . . . . . . . . . . . . . . . . 10-68
Compact Spare . . . . . . . . . . . . . 10-77
Designations . . . . . . . . . . . . . . . 10-42
Different Size . . . . . . . . . . . . . . . 10-56
If a Tire Goes Flat . . . . . . . . . . 10-59
Inflation Monitor System . . . . 10-48
Inspection . . . . . . . . . . . . . . . . . . 10-51
Low Profile . . . . . . . . . . . . . . . . . 10-39
Messages . . . . . . . . . . . . . . . . . . . . 5-30
Pressure . . . . . . . . . . . . . . . . . . . . 10-46