2011 CHEVROLET MALIBU high beam
[x] Cancel search: high beamPage 5 of 382

Black plate (5,1)Chevrolet Malibu Owner Manual - 2011
Introduction v
Vehicle Symbol Chart
Here are some additional symbols
that may be found on the vehicle
and what they mean. For more
information on the symbol, refer to
the Index.
9:Airbag Readiness Light
#:Air Conditioning
!:Antilock Brake System (ABS)
g:Audio Steering Wheel Controls
or OnStar®
$: Brake System Warning Light
":Charging System
I:Cruise Control
B: Engine Coolant Temperature
O:Exterior Lamps
#:Fog Lamps
.: Fuel Gauge
+:Fuses
3: Headlamp High/Low-Beam
Changer
j: LATCH System Child
Restraints
*: Malfunction Indicator Lamp
::Oil Pressure
}:Power
/:Remote Vehicle Start
>:Safety Belt Reminders
7:Tire Pressure Monitor
F:Traction Control
M:Windshield Washer Fluid
Page 32 of 382
Black plate (4,1)Chevrolet Malibu Owner Manual - 2011
2-4 Keys, Doors and Windows
The high‐beam headlamps, parking
lamps, and back‐up lamps may
come on each time
Kis pressed.
See “EXT (Exterior) LIGHTS” under
Vehicle Personalization
on
page 5‑31for additional
information.
Pressing
Kon the RKE transmitter
disarms the anti-theft alarm system.
See Anti-Theft Alarm System
on
page 2‑12.
V(Remote Trunk Release):
Press and hold for about
one second to unlock the trunk.
The trunk can be opened with the
transmitter when the vehicle speed
is less than 3 km/h (2 mph) or when
the ignition is off.
L(Vehicle Locator/Panic
Alarm): Press and release to
locate the vehicle. The horn sounds
three times and the headlamps and
turn signals flash three times.
Press and hold
Lfor more than
two seconds to initiate the panic
alarm. The horn sounds and the headlamps and turn signals flash
for 30 seconds. Press
Lagain to
cancel the panic alarm.
Programming Transmitters to
the Vehicle
Only RKE transmitters programmed
to the vehicle will work. If a
transmitter is lost or stolen, a
replacement can be purchased and
programmed through your dealer.
When the replacement transmitter is
programmed to the vehicle, all
remaining transmitters must also be
programmed. Any lost or stolen
transmitters no longer work once the
new transmitter is programmed.
Each vehicle can have up to four
transmitters programmed to it.
Battery Replacement
Replace the battery if the KEY FOB
BATT (Battery) LOW message
displays in the DIC. See “KEY FOB
BATT (Battery) LOW” underKey
and Lock Messages
on page 5‑28for additional information. Notice:
When replacing the
battery, do not touch any of the
circuitry on the transmitter. Static
from your body could damage the
transmitter.
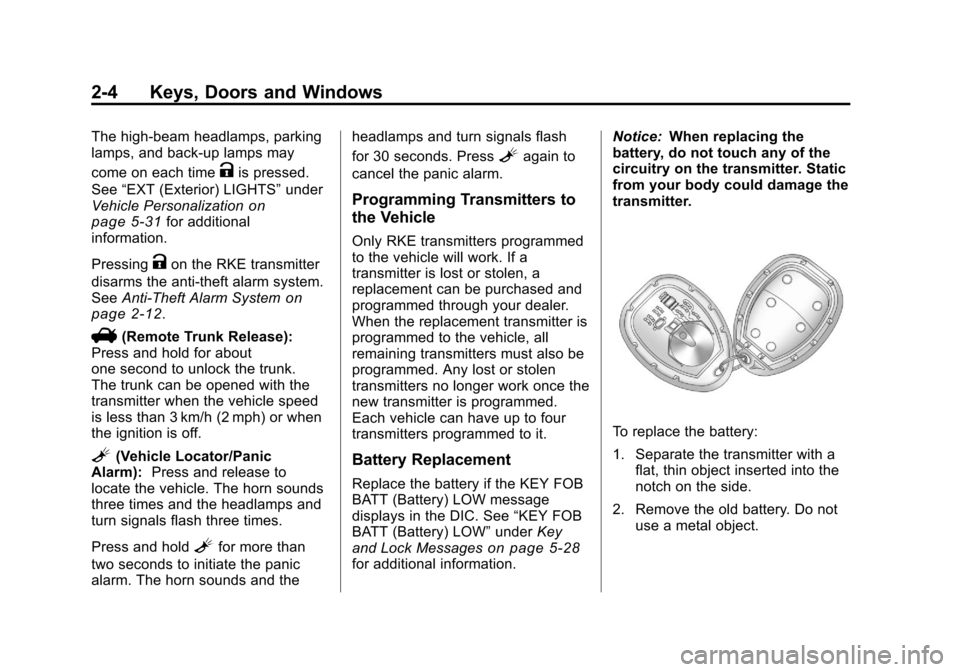
To replace the battery:
1. Separate the transmitter with a flat, thin object inserted into the
notch on the side.
2. Remove the old battery. Do not use a metal object.
Page 111 of 382
Black plate (1,1)Chevrolet Malibu Owner Manual - 2011
Instruments and Controls 5-1
Instruments and
Controls
Controls
Steering Wheel Adjustment . . . 5-2
Steering Wheel Controls . . . . . . 5-2
Horn . . . . . . . . . . . . . . . . . . . . . . . . . . 5-3
Windshield Wiper/Washer . . . . . 5-4
Compass . . . . . . . . . . . . . . . . . . . . . 5-5
Clock . . . . . . . . . . . . . . . . . . . . . . . . . 5-6
Power Outlets . . . . . . . . . . . . . . . . . 5-7
Warning Lights, Gauges, and
Indicators
Warning Lights, Gauges, andIndicators . . . . . . . . . . . . . . . . . . . . 5-9
Instrument Cluster . . . . . . . . . . . 5-10
Speedometer . . . . . . . . . . . . . . . . 5-11
Odometer . . . . . . . . . . . . . . . . . . . . 5-11
Trip Odometer . . . . . . . . . . . . . . . 5-11
Tachometer . . . . . . . . . . . . . . . . . . 5-11
Fuel Gauge . . . . . . . . . . . . . . . . . . 5-11
Engine Coolant Temperature Gauge . . . . . . . . . . . . . . . . . . . . . . 5-12 Safety Belt Reminders . . . . . . . 5-13
Airbag Readiness Light . . . . . . 5-14
Passenger Airbag Status
Indicator . . . . . . . . . . . . . . . . . . . . 5-14
Charging System Light . . . . . . 5-15
Malfunction
Indicator Lamp . . . . . . . . . . . . . 5-16
Brake System Warning Light . . . . . . . . . . . . . . . . . . . . . . . 5-18
Antilock Brake System (ABS) Warning Light . . . . . . . . . . . . . . 5-19
Electronic Stability Control (ESC)/Traction Control
System (TCS) Indicator/
Warning Light . . . . . . . . . . . . . . 5-20
Engine Coolant Temperature Warning Light . . . . . . . . . . . . . . 5-20
Tire Pressure Light . . . . . . . . . . 5-21
Engine Oil Pressure Light . . . . 5-22
Security Light . . . . . . . . . . . . . . . . 5-22
High-Beam on Light . . . . . . . . . 5-23
Cruise Control Light . . . . . . . . . 5-23
Information Displays
Driver Information Center (DIC) . . . . . . . . . . . . . . . 5-23
Vehicle Messages
Vehicle Messages . . . . . . . . . . . 5-26
Brake System Messages . . . . 5-27
Cruise Control Messages . . . . 5-27
Door Ajar Messages . . . . . . . . . 5-27
Engine Oil Messages . . . . . . . . 5-27
Engine Power Messages . . . . 5-27
Fuel System Messages . . . . . . 5-28
Key and Lock Messages . . . . . 5-28
Lamp Messages . . . . . . . . . . . . . 5-28
Ride Control SystemMessages . . . . . . . . . . . . . . . . . . 5-28
Airbag System Messages . . . . 5-30
Service Vehicle Messages . . . 5-30
Tire Messages . . . . . . . . . . . . . . . 5-30
Vehicle Reminder Messages . . . . . . . . . . . . . . . . . . 5-31
Washer Fluid Messages . . . . . 5-31
Vehicle Personalization
Vehicle Personalization . . . . . . 5-31
Page 133 of 382
Black plate (23,1)Chevrolet Malibu Owner Manual - 2011
Instruments and Controls 5-23
High-Beam on Light
The high-beam on light comes on
when the high-beam headlamps are
in use.
SeeHeadlamp High/Low-Beam
Changer
on page 6‑2for more
information.
Cruise Control Light
The cruise control light comes on
whenever the cruise control is set.
The light goes out when the cruise
control is turned off. See Cruise
Control
on page 9‑34for more
information.
Information Displays
Driver Information
Center (DIC)
Your vehicle has a Driver
Information Center (DIC). The DIC
display gives you the status of many
of your vehicle's systems. The DIC
is also used to display driver
personalization menu modes and
warning/status messages. All
messages will appear in the DIC
display, located at the bottom of the
instrument panel cluster.
Page 147 of 382
Black plate (1,1)Chevrolet Malibu Owner Manual - 2011
Lighting 6-1
Lighting
Exterior Lighting
Exterior Lamp Controls . . . . . . . . 6-1
Exterior Lamps OffReminder . . . . . . . . . . . . . . . . . . . . 6-2
Headlamp High/Low-Beam Changer . . . . . . . . . . . . . . . . . . . . . 6-2
Flash-to-Pass . . . . . . . . . . . . . . . . . 6-3
Daytime Running Lamps (DRL) . . . . . . . . . . . . . . . . 6-3
Automatic Headlamp System . . . . . . . . . . . . . . . . . . . . . . 6-3
Delayed Headlamps . . . . . . . . . . 6-4
Hazard Warning Flashers . . . . . 6-4
Turn and Lane-Change Signals . . . . . . . . . . . . . . . . . . . . . . 6-4
Fog Lamps . . . . . . . . . . . . . . . . . . . . 6-5
Interior Lighting
Instrument Panel Illumination Control . . . . . . . . . . . . . . . . . . . . . . 6-5
Dome Lamps . . . . . . . . . . . . . . . . . 6-5
Reading Lamps . . . . . . . . . . . . . . . 6-5
Lighting Features
Entry/Exit Lighting . . . . . . . . . . . . . 6-6
Parade Dimming . . . . . . . . . . . . . . 6-6
Battery Load Management . . . . 6-6
Battery Power Protection . . . . . . 6-7
Exterior Lighting
Exterior Lamp Controls
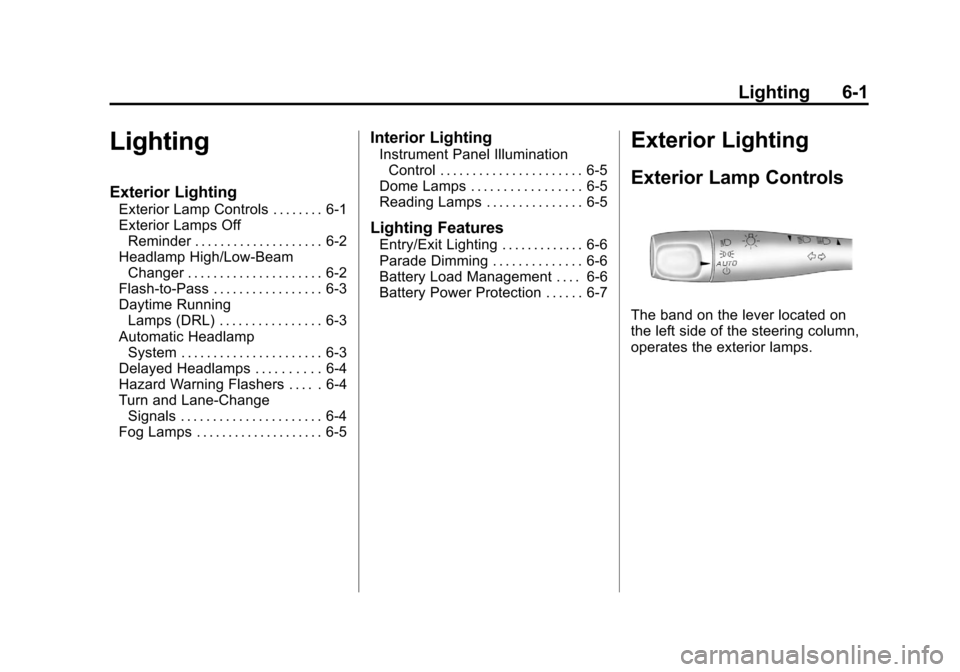
The band on the lever located on
the left side of the steering column,
operates the exterior lamps.
Page 148 of 382
Black plate (2,1)Chevrolet Malibu Owner Manual - 2011
6-2 Lighting
The exterior lamp control has the
following four positions:
2(Headlamps):Turns on the
headlamps, parking lamps, and
taillamps.
;(Parking Lamps): Turns on the
parking lamps and taillamps only.
AUTO (Automatic Headlamp
System): Automatically turns on
the Daytime Running Lamps during
daytime, and the headlamps,
parking lamps, and taillamps at
night.
P(Off/On): Turn the band to this
position to turn on the Automatic
Headlamp System. In Canada, this
position only works when a vehicle
is in the P (Park) position.
To turn on the Automatic Headlamp
System, turn the switch to off/on.
To turn them off, turn the switch to
off/on again. This is a momentary
control switch that springs back
when released. The Automatic
Headlamp System always turns on
at the beginning of an ignition cycle.
Exterior Lamps Off
Reminder
If the drivers door is opened and the
ignition is turned off while leaving
the lamps on, a warning chime will
sound.
Headlamp High/
Low-Beam Changer
To change the headlamps from low
beam to high beam, push the turn
signal/multifunction lever away
from you.
This instrument panel cluster light
3comes on if the high beam
lamps are turned on while the
ignition is in ON/RUN.
To change the headlamps from high
beam to low beam, pull the turn
signal lever toward you.
Page 149 of 382
Black plate (3,1)Chevrolet Malibu Owner Manual - 2011
Lighting 6-3
Flash-to-Pass
This feature lets the high-beam
headlamps be used to signal a
driver in front of you that you want
to pass.
Pull the turn signal/multifunction
lever toward you until the high-beam
headlamps come on, then release
the lever to turn them off.
Daytime Running
Lamps (DRL)
Daytime Running Lamps (DRL) can
make it easier for others to see the
front of your vehicle during the day.
Fully functional DRL are required on
all vehicles first sold in Canada. The
vehicle has a light sensor on top of
the instrument panel that controls
the DRL. Do not cover this sensor
or the head lamps will be on when
they are not needed.The DRL system makes the
low-beam headlamps come on at a
reduced brightness when the
following conditions are met:
.The ignition is on.
.The exterior lamps control is
in AUTO.
.The exterior lamps control is in
the parking lamps only position
(This applies only to vehicles
that are first sold in Canada).
.The light sensor detects daytime
light.
.The parking brake is released or
the vehicle is not in P (Park).
When the DRL system is on, the
taillamps, sidemarker lamps,
parking lamps, and instrument panel
lights are not on unless you turn the
exterior lamps control to the parking
lamp position.
The regular headlamp system
should be turned on when they are
needed.
Automatic Headlamp
System
When it is dark enough outside, the
automatic headlamp system turns
on the headlamps at the normal
brightness along with other lamps
such as the taillamps, sidemarker,
parking lamps, and the instrument
panel lights. The radio lights will
also be dim.
The vehicle has a light sensor on
top of the instrument panel that
controls the automatic headlamp
system. Do not cover the sensor or
the automatic headlamp system will
turn on when it is not needed.
There is a delay in the transition
between the daytime and nighttime
operation of the DRL and the
automatic headlamp systems so
that driving under bridges or bright
overhead street lights does not
affect the system. The DRL and
automatic headlamp systems will
only be affected when the light
sensor sees a change in lighting
lasting longer than this delay.
Page 151 of 382
Black plate (5,1)Chevrolet Malibu Owner Manual - 2011
Lighting 6-5
Have the bulbs replaced. If the bulb
is not burned out, check the fuse.
SeeFuses on page 10‑30.
Fog Lamps
For vehicles with fog lamps, the
button for this feature is located on
the instrument panel, to the left of
the steering wheel.
The ignition must be on for the fog
lamps to work.
#:Press to turn the fog lamps on
or off. An indicator light comes on
when the fog lamps are on.
The parking lamps automatically
turn on and off when the fog lamps
are turned on and off.
The fog lamps turn off while the
high-beam headlamps are
turned on.
Some localities have laws that
require the headlamps to be on
along with the fog lamps.
Interior Lighting
Instrument Panel
Illumination Control
The knob for this control is located
on the instrument panel to the left of
the steering column.
D (Instrument Panel
Brightness): Turn the knob
clockwise or counterclockwise to
brighten or dim the lights. Turn the
knob completely clockwise to turn
on the interior lamps.
Dome Lamps
The dome lamps come on when any
door is opened. They turn off after
all the doors are closed.
The dome lamps can also be turned
on by turning the instrument panel
brightness knob, located on the
instrument panel to the left of the
steering column, clockwise to the
farthest position. In this position, the
dome lamps remain on whether a
door is opened or closed.
Reading Lamps
For vehicles with front and rear
reading lamps, press the lens to
turn the lamp on and off, while the
doors are closed. These lamps
come on automatically when any
door is opened.