2011 CHEVROLET MALIBU turn signal
[x] Cancel search: turn signalPage 147 of 382
Black plate (1,1)Chevrolet Malibu Owner Manual - 2011
Lighting 6-1
Lighting
Exterior Lighting
Exterior Lamp Controls . . . . . . . . 6-1
Exterior Lamps OffReminder . . . . . . . . . . . . . . . . . . . . 6-2
Headlamp High/Low-Beam Changer . . . . . . . . . . . . . . . . . . . . . 6-2
Flash-to-Pass . . . . . . . . . . . . . . . . . 6-3
Daytime Running Lamps (DRL) . . . . . . . . . . . . . . . . 6-3
Automatic Headlamp System . . . . . . . . . . . . . . . . . . . . . . 6-3
Delayed Headlamps . . . . . . . . . . 6-4
Hazard Warning Flashers . . . . . 6-4
Turn and Lane-Change Signals . . . . . . . . . . . . . . . . . . . . . . 6-4
Fog Lamps . . . . . . . . . . . . . . . . . . . . 6-5
Interior Lighting
Instrument Panel Illumination Control . . . . . . . . . . . . . . . . . . . . . . 6-5
Dome Lamps . . . . . . . . . . . . . . . . . 6-5
Reading Lamps . . . . . . . . . . . . . . . 6-5
Lighting Features
Entry/Exit Lighting . . . . . . . . . . . . . 6-6
Parade Dimming . . . . . . . . . . . . . . 6-6
Battery Load Management . . . . 6-6
Battery Power Protection . . . . . . 6-7
Exterior Lighting
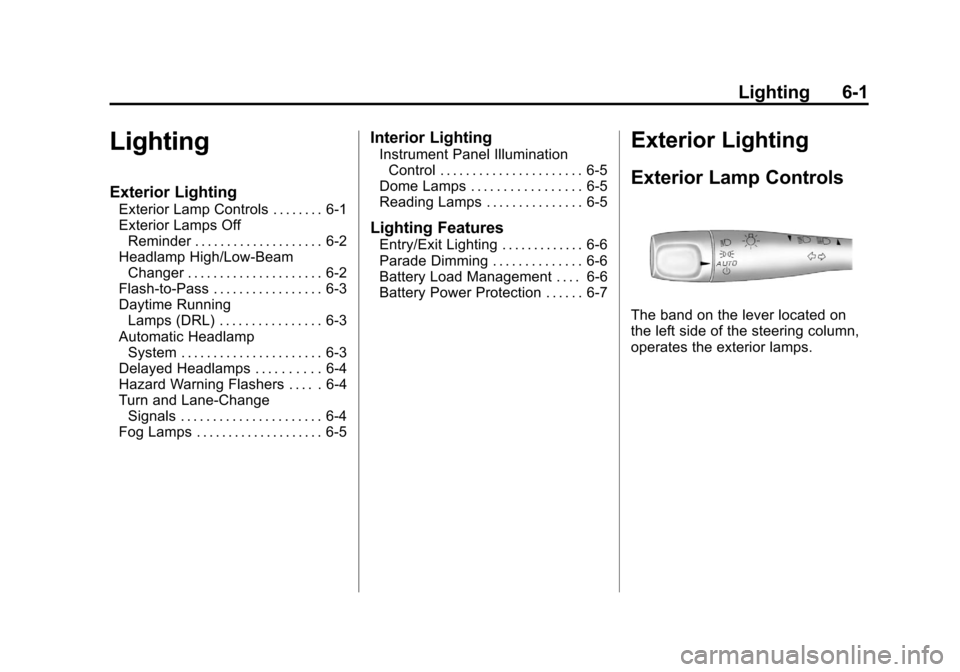
Exterior Lamp Controls
The band on the lever located on
the left side of the steering column,
operates the exterior lamps.
Page 148 of 382
Black plate (2,1)Chevrolet Malibu Owner Manual - 2011
6-2 Lighting
The exterior lamp control has the
following four positions:
2(Headlamps):Turns on the
headlamps, parking lamps, and
taillamps.
;(Parking Lamps): Turns on the
parking lamps and taillamps only.
AUTO (Automatic Headlamp
System): Automatically turns on
the Daytime Running Lamps during
daytime, and the headlamps,
parking lamps, and taillamps at
night.
P(Off/On): Turn the band to this
position to turn on the Automatic
Headlamp System. In Canada, this
position only works when a vehicle
is in the P (Park) position.
To turn on the Automatic Headlamp
System, turn the switch to off/on.
To turn them off, turn the switch to
off/on again. This is a momentary
control switch that springs back
when released. The Automatic
Headlamp System always turns on
at the beginning of an ignition cycle.
Exterior Lamps Off
Reminder
If the drivers door is opened and the
ignition is turned off while leaving
the lamps on, a warning chime will
sound.
Headlamp High/
Low-Beam Changer
To change the headlamps from low
beam to high beam, push the turn
signal/multifunction lever away
from you.
This instrument panel cluster light
3comes on if the high beam
lamps are turned on while the
ignition is in ON/RUN.
To change the headlamps from high
beam to low beam, pull the turn
signal lever toward you.
Page 149 of 382
Black plate (3,1)Chevrolet Malibu Owner Manual - 2011
Lighting 6-3
Flash-to-Pass
This feature lets the high-beam
headlamps be used to signal a
driver in front of you that you want
to pass.
Pull the turn signal/multifunction
lever toward you until the high-beam
headlamps come on, then release
the lever to turn them off.
Daytime Running
Lamps (DRL)
Daytime Running Lamps (DRL) can
make it easier for others to see the
front of your vehicle during the day.
Fully functional DRL are required on
all vehicles first sold in Canada. The
vehicle has a light sensor on top of
the instrument panel that controls
the DRL. Do not cover this sensor
or the head lamps will be on when
they are not needed.The DRL system makes the
low-beam headlamps come on at a
reduced brightness when the
following conditions are met:
.The ignition is on.
.The exterior lamps control is
in AUTO.
.The exterior lamps control is in
the parking lamps only position
(This applies only to vehicles
that are first sold in Canada).
.The light sensor detects daytime
light.
.The parking brake is released or
the vehicle is not in P (Park).
When the DRL system is on, the
taillamps, sidemarker lamps,
parking lamps, and instrument panel
lights are not on unless you turn the
exterior lamps control to the parking
lamp position.
The regular headlamp system
should be turned on when they are
needed.
Automatic Headlamp
System
When it is dark enough outside, the
automatic headlamp system turns
on the headlamps at the normal
brightness along with other lamps
such as the taillamps, sidemarker,
parking lamps, and the instrument
panel lights. The radio lights will
also be dim.
The vehicle has a light sensor on
top of the instrument panel that
controls the automatic headlamp
system. Do not cover the sensor or
the automatic headlamp system will
turn on when it is not needed.
There is a delay in the transition
between the daytime and nighttime
operation of the DRL and the
automatic headlamp systems so
that driving under bridges or bright
overhead street lights does not
affect the system. The DRL and
automatic headlamp systems will
only be affected when the light
sensor sees a change in lighting
lasting longer than this delay.
Page 150 of 382
Black plate (4,1)Chevrolet Malibu Owner Manual - 2011
6-4 Lighting
If the vehicle is started in a dark
garage, the automatic headlamp
system comes on immediately.
Once the vehicle leaves the garage,
it takes about one minute for the
automatic headlamp system to
change to DRL if it is light outside.
During that delay, the instrument
panel cluster may not be as bright
as usual. Make sure the instrument
panel brightness control is in the full
bright position. SeeInstrument
Panel Illumination Control
on
page 6‑5.
To idle the vehicle with the
automatic headlamp system off, turn
the ignition on and set the exterior
light switch to the off/on position.
For vehicles first sold in Canada,
the transmission must stay in
P (Park) for this function.
The regular headlamps should be
used when needed.
Delayed Headlamps
The delayed headlamps feature
keeps the headlamps on for
20 seconds after the key is turned to
LOCK/OFF, then the headlamps
automatically turn off.
To override the 20 second delayed
headlamp feature while it is active
turn the turn signal/multifunction
lever up one position and then back
to AUTO.
Hazard Warning Flashers
|
(Hazard Warning Flasher):
Press this button located on the
instrument panel, to make the front
and rear turn signal lamps flash on
and off. This warns others that you
are having trouble.
Press
|again to turn the
flashers off.
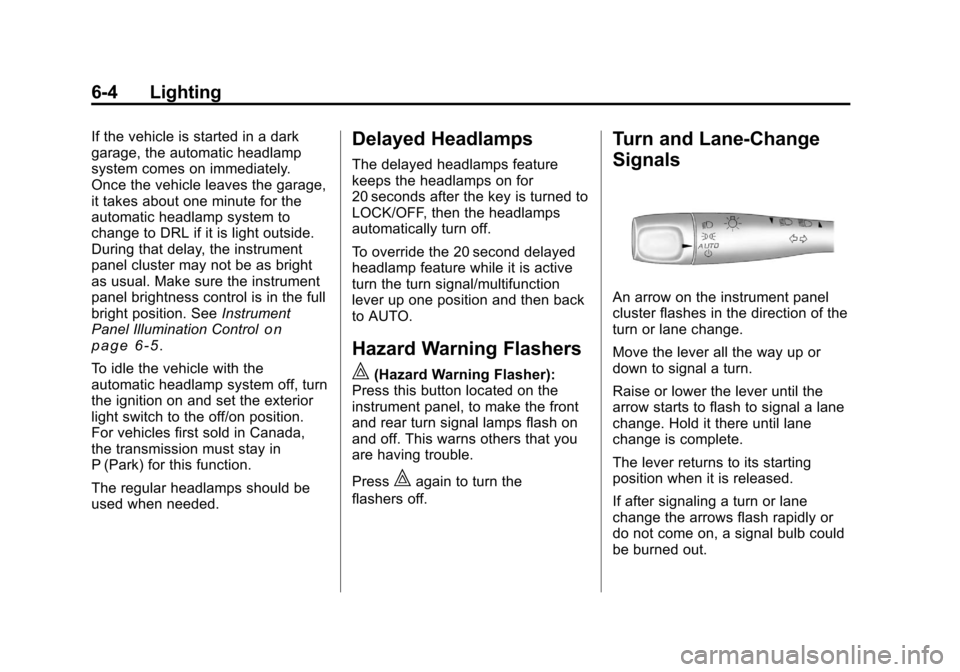
Turn and Lane-Change
Signals
An arrow on the instrument panel
cluster flashes in the direction of the
turn or lane change.
Move the lever all the way up or
down to signal a turn.
Raise or lower the lever until the
arrow starts to flash to signal a lane
change. Hold it there until lane
change is complete.
The lever returns to its starting
position when it is released.
If after signaling a turn or lane
change the arrows flash rapidly or
do not come on, a signal bulb could
be burned out.
Page 161 of 382
Black plate (7,1)Chevrolet Malibu Owner Manual - 2011
Infotainment System 7-7
Finding a Station
BAND:Press to choose between
FM1, FM2, AM, or XM™ (if
equipped) on the Radio with CD
(Base). Press to choose between
FM, AM, XM (if equipped) on the
Radio with CD (MP3) and USB
Port, or the Radio with CD (MP3).
f(Tune): Turn to select radio
stations.
©SEEK: Press to seek or scan
stations with a strong signal in the
selected band.
.To seek stations, press and
release
©SEEK to go to the
previous station and stay there.
.To scan stations, press and hold©SEEK for a few seconds until
the radio beeps once. The radio
goes to a station, plays for a few
seconds, then goes to the next
station. Press
©SEEK again to
stop scanning.
.To scan preset stations in the
selected band, press and hold
©SEEK for four seconds until a
double beep sounds. The radio
goes to a stored preset, plays
for a few seconds, then goes to
the next stored preset. Press
©SEEK again to stop scanning
preset stations.
¨SEEK: Press to seek or scan
stations with a strong signal in the
selected band.
.To seek stations, press and
release
¨SEEK to go to the
next station and stay there.
.To scan stations, press and hold¨SEEK for a few seconds until
the radio beeps once. The radio
goes to a station, plays for a few
seconds, then goes to the next
station. Press
¨SEEK again to
stop scanning.
.To scan preset stations in the
selected band, press and hold
¨SEEK for four seconds until a double beep sounds. The radio
goes to a stored preset, plays
for a few seconds, then goes to
the next stored preset. Press
¨SEEK again to stop scanning
preset stations.
Storing Radio Stations
Drivers are encouraged to store
radio station while the vehicle is
parked, see Defensive Driving
on
page 9‑2. Tune to stored radio
stations using the presets, favorites
button, and steering wheel controls,
if the vehicle has this feature.
Radios that have a FAV button store
radio stations as favorites, up to
36 stations can be programmed as
favorites using the 6 softkeys below
the radio station frequency tabs and
by using the FAV button. Press the
FAV button to go through up to
6 pages of favorites, each having
6 favorite stations available per
page. Each page of favorites can
contain any combination of AM, FM,
or XM, if equipped, stations.
Page 165 of 382

Black plate (11,1)Chevrolet Malibu Owner Manual - 2011
Infotainment System 7-11
4. Press the FAV button, or let themenu time out, to return to the
original main radio screen
showing the radio station
frequency tabs and to begin
the process of programming
favorites.
XM Radio Messages
XL (Explicit Language
Channels): These channels, or
any others, can be blocked at a
customer's request, by calling
1-800-929-2100 in the U.S. and
1-877-438-9677 in Canada.
XM Updating: The encryption code
in the receiver is being updated, and
no action is required. This process
should take no longer than
30 seconds.
No XM Signal: The system is
functioning correctly, but the vehicle
is in a location that is blocking the
XM™ signal. When the vehicle is
moved into an open area, the signal
should return. Loading XM:
The audio system is
acquiring and processing audio and
text data. No action is needed. This
message should disappear shortly.
Channel Off Air: This channel is
not currently in service. Tune in to
another channel.
Channel Unauth : This channel is
blocked or cannot be received with
your XM Subscription package.
Channel Unavail: This previously
assigned channel is no longer
assigned. Tune to another station.
If this station was one of the
presets, choose another station for
that preset button.
No Artist Info: No artist
information is available at this time
on this channel. The system is
working properly.
No Title Info: No song title
information is available at this time
on this channel. The system is
working properly. No CAT Info:
No category
information is available at this time
on this channel. The system is
working properly.
No Information: No text or
informational messages are
available at this time on this
channel. The system is working
properly.
No Subscription Please Renew:
XM subscription needs to be
reactivated. Contact XM at
www.xmradio.com or call
1-800-929-2100 in the U.S. and
www.xmradio.ca or call
1-877-438-9677 in Canada.
CAT Not Found: There are no
channels available for the selected
category. The system is working
properly.
Page 205 of 382
Black plate (11,1)Chevrolet Malibu Owner Manual - 2011
Driving and Operating 9-11
Run the engine for short periods
only as needed to keep warm, but
be careful.
To save fuel, run the engine for only
short periods as needed to warm
the vehicle and then shut the engine
off and close the window most of
the way to save heat. Repeat this
until help arrives but only when you
feel really uncomfortable from the
cold. Moving about to keep warm
also helps.
If it takes some time for help to
arrive, now and then when you run
the engine, push the accelerator
pedal slightly so the engine runs
faster than the idle speed. This
keeps the battery charged to restart
the vehicle and to signal for help
with the headlamps. Do this as little
as possible to save fuel.If the Vehicle is Stuck
Slowly and cautiously spin the
wheels to free the vehicle when
stuck in sand, mud, ice, or snow.
If the vehicle has a traction system,
it can often help to free a stuck
vehicle. Refer to the vehicle's
traction system in the Index. If stuck
too severely for the traction system
to free the vehicle, turn the traction
system off and use the rocking
method.
{WARNING
If the vehicle's tires spin at high
speed, they can explode, and you
or others could be injured. The
vehicle can overheat, causing an
engine compartment fire or other
damage. Spin the wheels as little
as possible and avoid going
above 55 km/h (35 mph) as
shown on the speedometer.For information about using tire
chains on the vehicle, see
Tire
Chains on page 10‑59.
Rocking the Vehicle to Get
it Out
Turn the steering wheel left and
right to clear the area around the
front wheels. Turn off any traction or
stability system. Shift back and forth
between R (Reverse) and a forward
gear, spinning the wheels as little as
possible. To prevent transmission
wear, wait until the wheels stop
spinning before shifting gears.
Release the accelerator pedal while
shifting, and press lightly on the
accelerator pedal when the
transmission is in gear. Slowly
spinning the wheels in the forward
and reverse directions causes a
rocking motion that could free the
vehicle. If that does not get the
vehicle out after a few tries, it might
need to be towed out. If the vehicle
does need to be towed out, see
Towing the Vehicle on page 10‑83.
Page 239 of 382
Black plate (45,1)Chevrolet Malibu Owner Manual - 2011
Driving and Operating 9-45
Making Turns
Notice:Making very sharp turns
while trailering could cause the
trailer to come in contact with the
vehicle. The vehicle could be
damaged. Avoid making very
sharp turns while trailering.
When turning with a trailer, make
wider turns than normal so the
trailer will not strike soft shoulders,
curbs, road signs, trees or other
objects. Use the turn signal well in
advance and avoid jerky or sudden
maneuvers.
Turn Signals When Towing a
Trailer
The turn signal indicators on the
instrument panel flash whenever
signaling a turn or lane change.
Properly hooked up, the trailer
lamps also flash, telling other
drivers the vehicle is turning,
changing lanes or stopping.
When towing a trailer, the arrows on
the instrument panel flash for turns
even if the bulbs on the trailer are burned out. Check occasionally to
be sure the trailer bulbs are still
working.
Driving On Grades
Reduce speed and shift to a lower
gear before starting down a long or
steep downgrade. If the
transmission is not shifted down, the
brakes might have to be used so
much that they would get hot and no
longer work well.
The vehicle can tow in D (Drive).
Use a lower gear if the transmission
shifts too often.
When towing at high altitude on
steep uphill grades, engine coolant
boils at a lower temperature than at
normal altitudes. If the engine is
turned off immediately after towing
at high altitude on steep uphill
grades, the vehicle could show
signs similar to engine overheating.
To avoid this, let the engine run
while parked, preferably on level
ground, with the transmission in
P (Park) for a few minutes before
turning the engine off. If the
overheat warning comes on, see
Engine Overheating on page 10‑19.
Parking on Hills
{WARNING
Parking the vehicle on a hill with
the trailer attached can be
dangerous. If something goes
wrong, the rig could start to move.
People can be injured, and both
the vehicle and the trailer can be
damaged. When possible, always
park the rig on a flat surface.
If parking the rig on a hill:
1. Press the brake pedal, but do not shift into P (Park) yet. Turn
the wheels into the curb if facing
downhill or into traffic if facing
uphill.
2. Have someone place chocks under the trailer wheels.