Page 209 of 302

Automatic car wash
The vehicl e can b e washed in almost any
modern automatic car wash .
The vehicle paint is so durable that t he vehicle
can n ormally be washed without p roblems in
a n automatic car wash . H owever, the effect on
the paint depends to a large extent on the de
sig n of the fac ility, the filte ring of the wash
water, the type of wash and care mater ial , etc.
If the pa int h as a dull appearance afte r go ing
through the car wash or is scratched, bring
this to the attention of the operator immedi
ately. If necessary, use a different car wash.
Before going through a ca r wash, be s ure to
take the usual precautions such as clos ing the
windows and power roof. Factor y installed an
tennas m ust not be removed.
If yo u have installed additional accessor ies on
the vehicle -such as spoilers, roof rack, etc. -
it is best to ask the car was h operator if these
should be removed .
When driv ing through an automatic ca r wash,
firs t se lect the
N posit ion and then sw itch the
engine off. If you switch the eng ine off when
N is engaged, the transmission remains in N
for approximate ly 30 m inutes and then Pis
engaged.
F u rther information for automatic gearboxes
~ page 112.
A WARNING
Always read and heed a ll WARNINGS and
other information
¢ page 206.
(D Note
- Fo ld the exterior mir ro rs -flat the re is a
r isk of damaging the exterio r mirrors .
Power folding exterior mirrors must not
be fo lded in or out by hand. Use the pow
er function!
- Compare the track of your vehicle w it h
the distance between the guide ra ils of
the facility- there is a risk of damage to
t h e wheels and tires .
-
Cleaning and protec tion 207
- Compa re the height and w idth of your
vehicle with t he height and width of the
t u nnel at the facility .
Washing the vehicle by hand
A lot of water is needed when washing a vehi
cle by hand.
.,. Before yo u start washing, make s ure you
have read and unders tood the WARNINGS
¢ .&. in General information an page 206.
.,. First soak a ll dried d irt unt il it is soft, then
r inse it off.
.,. As you clean yo ur vehicle, start wit h the roof
and work your way down to t he bottom, us
ing a sponge, a sponge glove or a clean
brush .
.,. Rinse the sponge o r th e sponge g love often,
flushi ng it cl ean ea ch time.
.,. Use spec ial car shampoo only fo r very persis
tent di rt.
.,. Rinse the ca r thorough ly w ith water.
.,. Use a chamo is leather to gently w ipe the ex-
ter ior dry.
Use a separate sponge for cleaning the
whee ls , door sills and othe r regions exposed
to road dirt. In this way, yo u wi ll not scratch
the pa int with coarse particles imbedded in
the sponge the next time you wash the car.
A WARNING
- Do not clean the unde rside of the chas
sis, fenders, wheel covers, or oth er ha rd
to rea ch parts witho ut p rotect ing you r
hands a nd ar ms . You may cut you rsel f on
sha rp-edge d meta l pa rts.
- Always read a nd heed a ll WA RNIN GS and
o ther info rmation
¢ page 206.
@ Note
- Never try to remove dirt, mud or dust if
th e su rface of the ve hicle is dry. Never
use a d ry cloth o r sponge, s in ce th is
co uld scra tch you r vehi cle's pain t or win -
-
dows. .,..
•
•
Page 210 of 302

208 Cleaning and protection
-Never wash your car in bright sunlight.
Drops of water act as magnifying lenses
and may damage your paint.
- When you wash your car in the winter: if
you rinse your vehicle with a hose, be
careful not to aim the stream of water
directly at locks, or at door or hatch
openings - they can freeze shut.
- Never use sponges des igned to remove
i nsects, or any kitchen scouring sponges
or similar products . They can damage
your paint finish .
- Never use a dry cloth or sponge to clean
the headlights. Only use wet cloths or
sponges to prevent scratches .
It is best
to use soapy water.
- You should remove debris (such as in
sects) from the headlight lenses on a
regular basis, fo r example when refuel
ing your vehicle. Never clean the head
lig hts w ith a dry cloth or sponge. Use a
wet cloth or sponge . It is best to use
soapy water.
@ For the sake of the environment
I n the interest of the environment, the ve
hicle should only be washed in special
wash bays.
Washing your vehicle with a power
washer
Cleaning the exterior of your car with a high
pressure power washer is safe as long as you observe a few simple rules.
• Before using the power washer, make sure
you have read and understood the WARN
INGS
c:> A in General information on
page 206 .
• Always follow the operating instructions for
the power washer .
• Make sure that the jet on the spray hose pro
duces a "fan shaped spray".
• Do
not hold the spray nozzle too close to
soft materia ls.
When cleaning the vehicle wit h a power wash
er
always follow the operating instructions. T
his applies particu larly to the
operating
pressure
and the spraying distance. Keep a
distance from soft materials such as rubber
hoses or insulating material as well as sensors
and camera lenses.
Do not use a jet which sprays water in a
di rect
stream
or one that has a rotating jet .
Water temperature should not exceed 140 °F
(60 °().
A WARNING
Never wash tires with a jet that sprays wa
ter in a direct stream . This could cause in
v is ible damage to the t ires and weaken
them, even if the spray is from
a relatively
long distance and for a short time. Dam
aged and weakened tires can fail and cause
accidents and personal injury .
(D Note
To avoid damaging your vehicle, always
make sure that there is suffic ient d istance
between the spray head and soft materials
like rubber hoses, plast ic parts and sound
deadening materials as well as sensors
and camera lenses. Never aim the sp ray
head at the same point for a long time.
This also applies to cleaning headlights
and painted bumpers. Remember: the
closer the nozzle is to the surface of the
mater ia l, the greater the stress on the ma
terial.
Sensors and camera lenses
- Remove snow with a hand brush and remove
ice with a de-icing spray that does not con
tain solvents .
- Clean the sensors (adaptive cruise control*,
pa rking system*) w ith a cleaning so lution
that does not contain so lvents and a soft
cloth.
- The camera lens or the area in front of the
camera lens is normally cleaned by the
w indshie ld w ipers (Audi lane assist*) or
headlight wipers (night vision system*) . If
the lens or the area is exceptionally dirty,
111-
Page 211 of 302

clean the area with glass cleaner and a soft,
dry cloth.
(D Note
- If you wash your vehicle wi th a pressure
washer,
- make sure there is enough d istance to
sensors in the rear bumper,
- do not clean the camera lenses and the
area around them with the pressure
washer .
- Never use warm or hot water to remove
snow or ice from the camera lens. Th is
could cause the lens to c rack.
- Never clean the camera lens w ith abra
s ive products .
Waxing
Wax protects the vehicle's paint.
~ Use a manually app lied car wax occasiona lly
to protect the paint.
A good wax coating protects the vehicle paint
to a large extent against the environmental
factors listed under ¢ page 206, Washing and
even against slight scratches.
You can use a liquid car wax to p rotect your
paint as soon as one week after your ve hicle
has been de livered.
E ven if yo u regularly use a
waxing process in
automatic ca r washes, we recommend that
you man ua lly app ly a coat of wax to give the
pa int extra protection, particularly if water no
l onger beads on the clean paint.
Protect p lastic body pa rts with car wax in the
same way as the vehicle body.
D uring wa rm weat her dead insec ts tend to
collect on the front bumper and on the for
ward area o f the hood. They are much easier
to remove from paint that is waxed o~en.
A WARNING
Always read and heed a ll WARNINGS and
other information
c> page 206.
Cleaning and protec tion 209
@ Note
Do not use car wax on
- matte o r anodized meta l trim
- rubber or ru bber- lik e t rim.
Polishing
Polishing restores the gloss to the paint.
Polish your vehicle o nly if the paint has lost its
sh ine and the gloss cannot be brought back
with wax.
If the polis h used does not conta in preserva
tive compounds, the paint must be waxed af
te rwards ¢page 209, Waxing .
_&. WARNING
Always read and heed all WARNI NGS and
other info rmation
c> page 206.
(D Note
Do not treat matte anodized metal trim,
plastic o r rubbe r parts with polish or wax.
Trim strips
Metal trim needs special care.
For environmental reasons, Audi fabricates
the bright trim strips and trim p ieces from
pure chromium-free aluminum.
Dirt and ma rks on the trim strips sho uld be
removed with a
pH -balan ced cleaning agent
(do not use a chrome cleaner). A udi dealers
carry clea ning products w hich have been test
ed for use on your vehicle and are not harmf ul
to the environment.
To avoid corrosion on the exter ior trim st rips,
only a pH-ba lanced solution should be used
for the windsh ield washer .
_&. WARNING
Always read and heed all WARNI NGS and
other info rmat ion
c> page 206.
•
•
Page 212 of 302

210 Cleaning and protection
Plastic and vinyl
Plastic needs special care .
Use a clean, damp cloth or sponge to remove
dust and light surface dirt. For other soil, use
a lukewarm all-purpose clean ing solution or a
mild saddle soap for vinyl trim. Remove water
spots and traces of soap w ith a clean, damp
clot h or sponge. Use a clean, soft clot h to rub
dry.
Grease, tar or o il stains can be removed w ith a
clean cloth or sponge soaked w ith all-purpose
cleane r or with a solvent designed especially
to clea n viny l.
Occasionally apply a colorless vinyl or leather preservat ive to retain the material's luster
and pliability.
.&_ WARNING
Always read and heed all WARNINGS and
other information ¢ page 206.
Aluminum trim
Use only neutral-pH produc ts to remove spots
and deposits from aluminum surfaces.
C hr ome care products and alkaline cleaners
will attack aluminum surfaces and can dam
age them over time.
.&_ WARNING
, -
Always read and heed all WARNINGS and
other information ¢ page 206.
Touch-up paint
Minor paint damages should be touched up
immediately.
.. Use either a touch-up paint stick or spray
paint to cover minor scratches and nicks .
Your Audi dea ler has touch-up paint for minor
scratches and stone chips. Scratches s hou ld
be touched up soon after they occur to pre
vent corrosion.
If a spot starts to rust, however, a simple
touch-up job will not be enough. The affected
surface must be sanded smooth and coated
with an anti-rust primer before the painted
finish can be restored.
The number for the original vehicle paint can
be fo und on the vehicle identification label
¢ page
279.
.&_ WARNING
Always read and heed all WARNINGS and
other information¢ page 206.
Windows '
Clear vision to all sides .
Clean all windows regularly to remove road
film and car wash wax buildup .
.. Remove snow from w indows using a brush.
.. Use a plastic ice scraper to remove ice from
windows and mirrors .
.. Remove other residue on the windows with
a spray •on glass cleaner.
.. Wipe the w indows dry with a clean piece of
cloth or kitchen paper towel.
T he best way to remove snow from windows
and mirrors is to use a brush. Use a non-abra
sive
plastic ice scraper -better still, a spray
deicer - to remove
ice from windows and mir
rors.
Oil, grease or s ilicone residue can be removed
with
glass cleaner or silicone remover . How
ever, wax res idue requires the use of a spec ial
ly formulated solvent. Please contact your Au
di dealer for adv ice on safe products for wax
removal.
Windows should also be cleaned on the inside at regular intervals .
Never dry windows with the same chamo is
that you use to dry painted surfaces. Wax resi
due on the chamois can impair vis ion through
the windows . ..,_
Page 213 of 302

A WARNING ,~
- Always read and heed all WAR NINGS and
other information
c:> pag e 206.
- The w indshield must not be treated with
water -repe llent materials. They can in
creas e glare under poor visibility condi
t ions such as wetness, darkness, or when
the sun is low on the horizon. In addi
ti on, they can cause the windshield wip
ers to cha tter.
(D Note
- Never use warm or hot water to remove
snow and ice from windows and m irrors.
This cou ld cause the g lass to c rack.
- To prevent damage to the wires of the
r ear defogger, do not place a ny ad hesive
stickers on the inside of the rear wi ndow
ove r the wires .
- To he lp prevent di rt from sc ratching the
window, always scr ape in a forw ard d i
rection - p ush ing the scraper away from
you - never back and fo rth.
Weatherstrips
Complete car care includes the weatherstrips
as well .
.,. Apply a suitab le rubber condi tioner to the
weathe rstrips from time to time.
To be able seal p roperly, the weatherstr ips
a round the hood, doors, rear lid, e tc. m ust re
main pliable . Spray the weatherstrips w ith sil
i cone or coat them with talcum powder or
g lycerine to retain the flexibility of the rubber
and to protect them against freezing in the
winter .
A WARNING
Always read and heed all WARNINGS and other information
c:> page 206.
Keep s ilicone sprays off the windsh ield to
avoid wiper smear in ra in.
Cleaning and protec tion
Cast (light) alloy wheels
Cast (light) alloy wheels require special care.
.,. Wash the wheels with a sponge or hose
brush every other week.
.,. For deep clean ing afterwards, use o nly a
ded icated acid-fr ee cast alloy wheel cleaner .
.,. Rub a coat of liquid wax onto the rims every
three month. Be sure to reach and treat all
pa rts of the rim.
To preserve the decorative appearance of the cast alloy wheels, som e special care is neces
sa ry. In addi tion to road d irt and salt, brake
dust is a lso co rrosive . If left on fo r too long,
brake d ust can cause pitt ing.
Use only spec ia l
acid-free cleaners formulated
fo r alloy r ims. Safe produc ts are ava ilab le at
yo ur Audi dealer. Never leave the cleane r on
the rims longer than specified on the label. If
not rinsed off prompt ly, the acid con tained in
some cleaners can attack the threads on the
whee l bolts .
Never use abrasive o r metal po lis hi ng clean
ing agents .
If the protective coating has been
c h ipped, e.g . by kicked up road dirt, to uch it
u p as soon as possible .
A WARNING
--Moisture and ice o n brakes may affect
brak ing eff ic iency
c:> page 192, General
information.
Test the brakes ca refully
each time you wash the vehicle.
- Always read and heed a ll WARNINGS and
other info rmation
¢ page 206.
Body cavity sealing
The body cavity sealing does not need to be
checked.
A ll body cavities which could be affected by
corros ion have been thorough ly protected at
the factory.
T his sealing does not require any inspection or
additional treatment. If any wax should seep
o ut of the cavity when the ambient
Iii>-
21 1
•
•
Page 214 of 302

212 Cleaning and protection
tem pera ture is high, it can be removed with a
p lastic scraper and a suitable solvent.
A WARNING
So lvents can be dangerous.
- Benzine is flammable and toxic. If you
use benzine for removing the wax, keep
sparks, f lame and lighted cigarettes
away. Never dump benzine on the
ground, into ope n streams or down sew
age drains .
- Be sure to observe all safety and env iron
menta l regulations. Follow all instruc
t ions on the container.
- Always read and heed all WARNINGS and
ot her information ¢
page 206.
Chassis
Have the undercoating checked for damage
from time to time.
The lower body shell of your Audi is a lso thor
ough ly protected against corrosion.
Any damage to the under coating caused by
road hazards shou ld be repaired promptly.
A WARNING
Too much undercoating in the wrong pla
ces can cause a f ire.
- Do not apply additional undercoating or
rustproofing on o r near the exha ust
man ifold, exhaust p ipes, catalytic con
verter or heat shie lds. W hile driving, the
substance used for undercoating cou ld
over heat and cause a fire .
- Always read and heed all WARNINGS and
ot her information ¢
page 206.
Exhaust tail pipes
Road salt and other cor ros ive ma ter ials wi ll
damage th e material in the exha ust ta il p ipes
if they are no t cleaned reg ula rly. Do no t clean
the tail p ipes with whee l cleaner, p aint po lish ,
ch rome polish or ot her abrasive cleaners .
C lean the tail p ipes with car care prod ucts
that are s uita ble for stain less stee l. Your a
uthorized Audi dea ler can provide clean
ing products that have been tested and ap
proved for yo ur vehicle.
Care of interior
Infotainment components
T he M MI/RS E* display may be cleaned wit h a
soft clot h and commerci ally-available " LCD
cl eaner". The clot h should be co ated lightly
whe n the cleaning solution when clea ning t he
display.
T he M MI/RS E* con trols m ust be cleaned first
with a b rush so tha t d irt does not en ter the
u nit or enter between the buttons and the
ho using. T hen wiping the cont ro ls with a cloth
dampened with dish detergent and water is
recommended.
(D Note
To prevent scratches, only clean the dis
p lay when it is dry.
- To prevent damage, make sure fluids do
not enter the contro ls .
· Aluminum trim
U se only neutral -pH products to remove spots
and deposits from a luminum surfaces.
Chrome care products and a lkaline cleaners
will attack a luminum surfaces and can dam
age t hem over t ime.
A WARNING
A lways rea d and heed all WAR NIN GS an d
o ther in fo rmation
¢page 206 .
Fabrics and fabric coverings
Fabr ics and fab ric cover ings (e.g . seats, door
trim pa ne ls, etc.) sho uld be cleaned at regular
intervals wit h a vacuum cleaner . This removes
s ur face dirt particles which cou ld become em
bedded in the fabric throug h use. Steam
cleaners should not be used, because the
steam tends to push the dir t deeper into the
fabric a nd lock it the re . ..,_
Page 215 of 302

Normal cleaning
Generally, we recommend using a soft sponge
or a lint -free microfiber cloth to the clean fab
ric . Brushes should only be used for carpets
and floor mats, since other fabric surfaces
could be harmed by brushes.
Normal surface stains can be cleaned using a
commercially available foam cleaner. Spread
the foam on the surface of the fabric with a
soft sponge and work it in gent ly. Do not sat u
rate the fabric. Then pat the foam dry using
absorbent, dry cloths (e.g . microfiber cloth)
and vacuum it after it has dr ied completely.
Cleaning st ain s
Stains caused by beverages (e.g. coffee, fruit
juice, etc.) can be treated with a mild deter
gent solution. Apply the detergent solution
with a sponge. In the case of stubbor n stains,
a detergent paste can be applied directly to
the stain and worked into the fabric. After
wards, use copio us amounts of clea n water to
remove t he remain ing detergent. Apply the
water with a damp cloth or 5ponge and pat
the fabric d ry with an absorbent, dry cloth.
Stains from chocolate o r make up s hou ld have
dete rgent paste (e.g . ox-gall soap) r ubbed in
to them. Afterwards, remove the soap w ith
water (damp sponge).
A lcohol can be used to t reat stains from
grease, oi l, lipstic k or a ballpo int pen. Me lted
grease or dye must be patted
off using ab
sorbent materia l. It may be necessary to re
treat the areas with dete rgent paste and wa
ter.
I n the case of genera l so iling of the uphols
tery and cover materia l, we recommend hiring
a specialist that has the equ ipment to clean
the seat covers and other fabric surfaces by
shampooing and spray extraction.
A WARNING
Always read and heed all WARNINGS and
the information
c> page 206.
Cleaning and protec tion 213
(D Tips
Open Ve lcro fasteners on yo ur clothing can
damage the seat cover . Please ma ke su re
that Ve lcro fasteners are closed.
Plastic parts and instrument panel
Always use a clean cloth moistened in clear
water to clean these areas. For pe rsistent d irt
u se an Aud i app roved
solvent-free plastic
cleaner/p rotectant.
A WARNING
Solven ts can change the proper ties of
some p las tics and make it harde r fo r the
a ir bag to deploy .
-
-Never clean the inst rument panel or the
surface of airbag modu les with cleaning
prod ucts that contain solvents .
- P roducts con tain ing solvents will make
the s urface of this part poro us.
- Ser ious i njuries ca n resu lt if p lastic parts
come loose when the ai rbag is deployed.
- Always read and heed a ll WAR NINGS a nd
o ther info rm ation
c> page 206.
(D Note
C leaning age nts conta ining so lvents w ill
attack the mate rial and can cha nge t he
way it beh aves.
Trim and molding
T rim and molding in the vehicle interior can
be cleaned wi th a dry microfiber cloth. To pre
vent scratches, do not use any cleaning so lu
tions.
Natural leather
Applies to vehicles : wit h natural leather
Audi makes great efforts to maintain the
properties, natural look and feel of interior
leather.
General
We offe r ma ny d iffe ren t types o f leathe r o n
our vehicles. Most are diffe rent types o f nappa
1J1>
•
•
Page 216 of 302

214 Cleaning and protection
leathe r, whi ch has a smooth surface and
comes in various co lors .
The intensity of the color determines the v is u
a l charac ter istics and appearance. If the sur
face of the leather has a typical natu ral look,
then the leather is a nappa leather that has been left in a relatively natural cond ition. This
leather offers particularly good comfort and
breathes well. F ine veins, closed grains, insect
b ites, skin folds , and subtle var iations in co lor
remain visible . These c haracteristics demon
strate that the mater ia l is natural.
Natural nappa leather is not covered by a col
or fi nish . It is therefore more sensitive to soil
i ng and wear, w hich is something you need to
consider if ch ild ren , an ima ls or othe r factors
might prove to be particular ly hard on the
l eathe r.
By contrast, leat her types that are covered by
a co lored finish layer a re mor e durable . This
has a posit ive effect o n the leather's resist
a nce to wear and soil ing in daily use. On the
o ther hand , the typical characteris tics of na tu
ra l leather a re barely or not apparent. Howev
e r, this does not mean that the leather itself
is of infer ior quality.
Care and handling
Because of the exclusive na ture of the types of
l eather that Audi uses and the ir unique prop
erties (such as sensitivity to oils, grease, soi l
ing, etc.), you will need to be somewhat care
fu l w ith these leathers, and a ce rtain type of
care is required. For examp le, dark clot hing
materials can d iscolor leather sea ts (especial
ly if such clot hing is damp and was not dyed
correctly) . Dust and d irt part icles in po res,
folds , and seams can have a n ab ras ive effect
and can damage the leathe r sur face as well as
weaken seams.
The leather should be cleaned regula rly as
needed. After havi ng been used for a re lative ly
l ong time, yo ur leather sea ts will acqui re a
ri ch aged finish. This is a charac ter istic of n at
u ra l lea ther and a sign o f true quality . In order to maintain the val
ue of this nat ural
product over the life of your vehicle, you
sho uld follow the recommendat ions be low :
(D Note
- To keep your leather from b leaching o ut,
do not allow it to be exposed to b right
sunlight for long periods of time . If you
have to leave the ve hicle parked outside
for long per iods, cover the leather to
protect it from direct exposure to sun
light .
- Sharp objects on cloth ing, such as zip
pers, rivets or sharp pieces on belts can
leave permane nt sc ratches or sc rape
ma rks on the su rface of the leather.
(0 Tips
- After each time you clean the leather and
at regular intervals, use a leathe r preser
vative c reme that contains UV-b locke rs
and tha t works into the leat he r. Thi s
c reme will nour ish a nd moistu rize the
leather, helping it to breathe and stay
supple. It a lso helps to build up a p rotec
tive coating on the surface.
- Clean the leat her every 2 -3 months,
and clean any a reas that get soi led .
- Remove fresh ma rks made by ballpo int
pe ns, ink, lipstick, shoe polish, etc. as
soon as poss ible.
- P reserve the color o f the leather as need
ed by using a specia l co lore d leathe r care
creme to touch up areas of uneven color .
Cleaning and caring for leather
upholstery and trim
Applies to vehicles: with natural leather
Natural lea ther requires special care and at
tention .
Normal cleaning
.. Clean soiled areas with a slightly moistened
cotton or woolen cloth . .,.
 1
1 2
2 3
3 4
4 5
5 6
6 7
7 8
8 9
9 10
10 11
11 12
12 13
13 14
14 15
15 16
16 17
17 18
18 19
19 20
20 21
21 22
22 23
23 24
24 25
25 26
26 27
27 28
28 29
29 30
30 31
31 32
32 33
33 34
34 35
35 36
36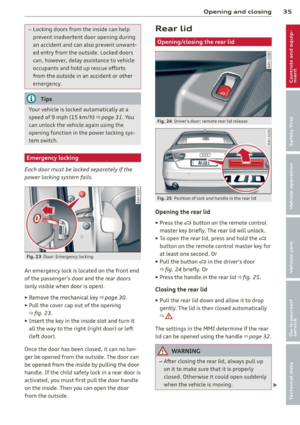 37
37 38
38 39
39 40
40 41
41 42
42 43
43 44
44 45
45 46
46 47
47 48
48 49
49 50
50 51
51 52
52 53
53 54
54 55
55 56
56 57
57 58
58 59
59 60
60 61
61 62
62 63
63 64
64 65
65 66
66 67
67 68
68 69
69 70
70 71
71 72
72 73
73 74
74 75
75 76
76 77
77 78
78 79
79 80
80 81
81 82
82 83
83 84
84 85
85 86
86 87
87 88
88 89
89 90
90 91
91 92
92 93
93 94
94 95
95 96
96 97
97 98
98 99
99 100
100 101
101 102
102 103
103 104
104 105
105 106
106 107
107 108
108 109
109 110
110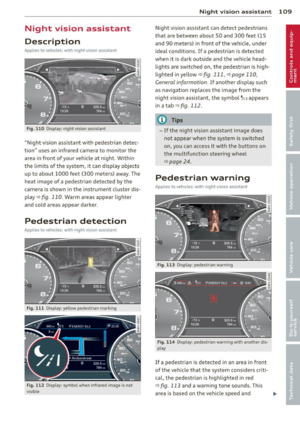 111
111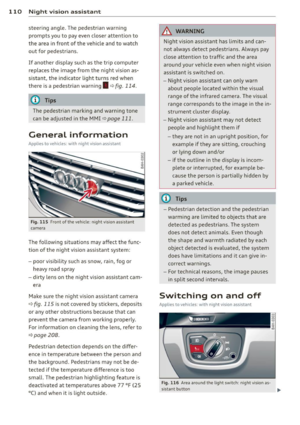 112
112 113
113 114
114 115
115 116
116 117
117 118
118 119
119 120
120 121
121 122
122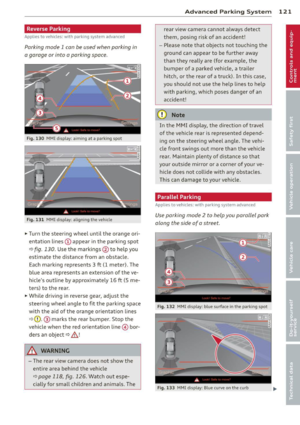 123
123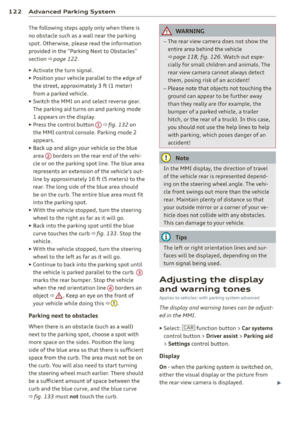 124
124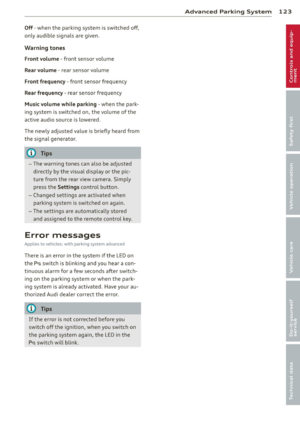 125
125 126
126 127
127 128
128 129
129 130
130 131
131 132
132 133
133 134
134 135
135 136
136 137
137 138
138 139
139 140
140 141
141 142
142 143
143 144
144 145
145 146
146 147
147 148
148 149
149 150
150 151
151 152
152 153
153 154
154 155
155 156
156 157
157 158
158 159
159 160
160 161
161 162
162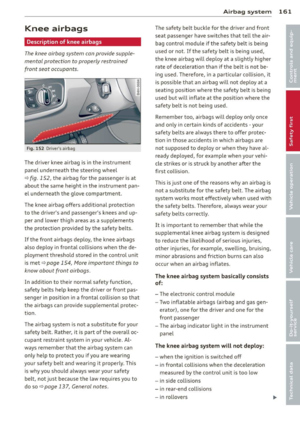 163
163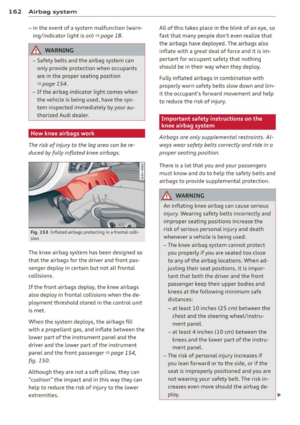 164
164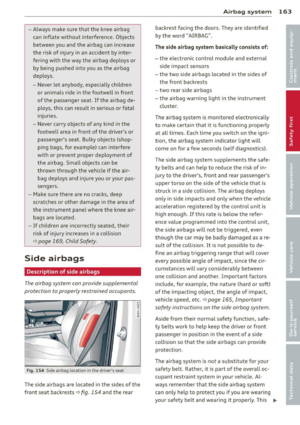 165
165 166
166 167
167 168
168 169
169 170
170 171
171 172
172 173
173 174
174 175
175 176
176 177
177 178
178 179
179 180
180 181
181 182
182 183
183 184
184 185
185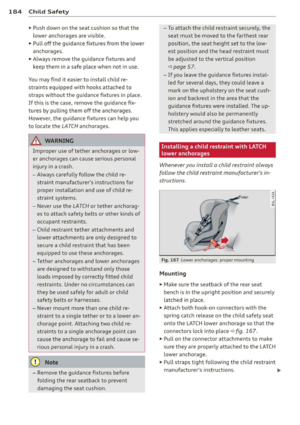 186
186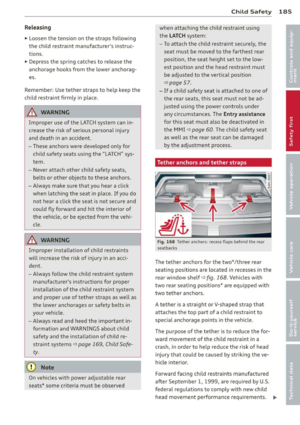 187
187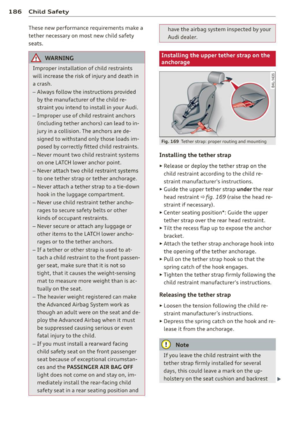 188
188 189
189 190
190 191
191 192
192 193
193 194
194 195
195 196
196 197
197 198
198 199
199 200
200 201
201 202
202 203
203 204
204 205
205 206
206 207
207 208
208 209
209 210
210 211
211 212
212 213
213 214
214 215
215 216
216 217
217 218
218 219
219 220
220 221
221 222
222 223
223 224
224 225
225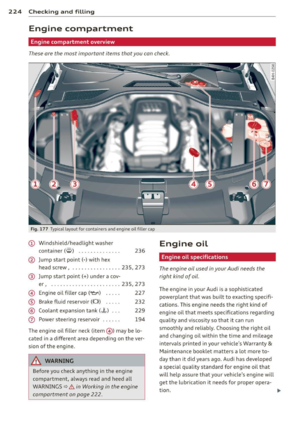 226
226 227
227 228
228 229
229 230
230 231
231 232
232 233
233 234
234 235
235 236
236 237
237 238
238 239
239 240
240 241
241 242
242 243
243 244
244 245
245 246
246 247
247 248
248 249
249 250
250 251
251 252
252 253
253 254
254 255
255 256
256 257
257 258
258 259
259 260
260 261
261 262
262 263
263 264
264 265
265 266
266 267
267 268
268 269
269 270
270 271
271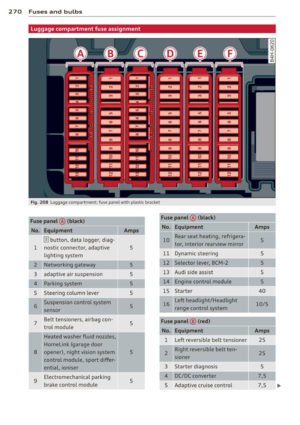 272
272 273
273 274
274 275
275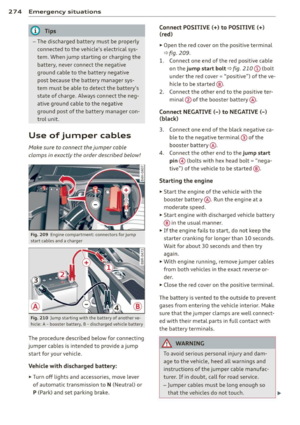 276
276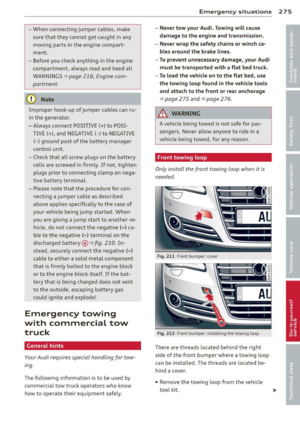 277
277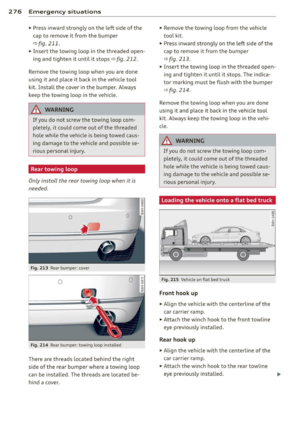 278
278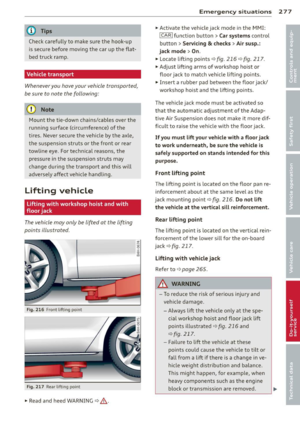 279
279 280
280 281
281 282
282 283
283 284
284 285
285 286
286 287
287 288
288 289
289 290
290 291
291 292
292 293
293 294
294 295
295 296
296 297
297 298
298 299
299 300
300 301
301