Page 81 of 297

77
GETTING
TO KNOW
YOUR CAR
SAFETY
STARTING
AND DRIVING
IN AN
EMERGENCY
SERVICING AND
MAINTENANCE
TECHNICAL
SPECIFICATIONS
CONTENTS
Move the stalk up (unstable position) to limit operation to the time
for which the stalk is held in this position. When released, the stalk
will return to its default position and the wiper will be automati-
cally stopped.WINDOW CLEANING
The right stalk controls windscreen wiper/washer and heated rear
windscreen wiper/washer operation.
WINDSCREEN WIPER/WASHER fig. 41
This only operates with the ignition turned to MAR. The ring nut A
can have the following positions::
Owindscreen wiper off;
≤intermittent operation (low speed);
AUTO rain sensor activation (for versions/markets, where pro-
vided) (the windscreen wiper speed is automatically adapt-
ed to the intensity of the rain)
nintermittent operation;
≥slow operation;
¥fast operation.
fig. 41A0K0097m
Do not use the windscreen wipers to remove lay-
ers of snow or ice from the windscreen. In such con-
ditions, the windscreen wipers may be subjected to
excessive stress, prompting intervention from the motor
protection which prevents operation for a few seconds. If
operation is not restored, even after turning the key and
restarting the engine, contact Alfa Romeo Authorized Ser-
vices.
Do not operate the windscreen wiper with the
blades lifted from the windscreen.
“Smart washing” function
Pull the stalk towards the steering wheel (unstable position) to op-
erate the windscreen washer jet. Keep the stalk pulled for more
than half a second, with just one movement, to operate windscreen
washer/wiper jet at the same time.
The wiper stops working three strokes after the stalk is released.
A further stroke after approximately six seconds completes the wip-
ing cycle.
Page 82 of 297

78
GETTING
TO KNOW
YOUR CAR
SAFETY
STARTING
AND DRIVING
IN AN
EMERGENCY
SERVICING AND
MAINTENANCE
TECHNICAL
SPECIFICATIONS
CONTENTS
If the engine is switched off with the stalk in the automatic posi-
tion, no wiping cycle will take place when the engine is started
again even if it is raining. This prevents accidental activation of the
rain sensor when the engine is started (i.e. when the windscreen
is being washed by hand or the wipers are stuck to the windscreen
by ice).
To restore automatic operation of the rain sensor, turn the ring on
the right A stalk fig. 41 from automatic position (AUTO) to
Opo-
sition and then turn A ring back to the AUTO position.
When the rain sensor is reactivated using any of the manoeuvres
described above, reactivation is indicated by a single stroke of
the windscreen wipers, regardless of the condition of the wind-
screen. If the sensitivity of the rain sensor is adjusted whilst it is
in operation, a single stroke of the windscreen wiper takes place
to confirm the changed setting.
In the event of the malfunction of the rain sensor whilst it is ac-
tive, the windscreen wiper operates intermittently at a speed con-
sistent with the sensitivity setting of the rain sensor, regardless of
whether it is raining or not (the sensor fault is indicated on the
instrument panel display). The sensor continues to operate and it
is possible to set the windscreen wiper to continuous mode (1
stor
2ndspeed). The fault indication remains for as long as the sensor
is active.
RAIN SENSOR fig. 42
(for versions/markets, where provided)
This is an infrared LED sensor fitted on the windscreen. It can de-
tect the presence of rain and consequently manage windscreen wip-
ing in accordance with the amount of water on the windscreen.
Activation
The sensor is activated by turning the A ring fig. 41 to the
“automatic” position (“AUTO”): the frequency of the windscreen
wiper strokes is automatically adjusted depending on the amount
of water on the windscreen. This frequency can vary from no stroke
(no rain - windscreen dry) up to the 2
ndconstant speed operation
(heavy rain - windscreen wet).
The sensitivity of the rain sensor can be adjusted through the Set
Up menu (see “Display” paragraph in this chapter).
fig. 42A0K0111m
Page 83 of 297

79
GETTING
TO KNOW
YOUR CAR
SAFETY
STARTING
AND DRIVING
IN AN
EMERGENCY
SERVICING AND
MAINTENANCE
TECHNICAL
SPECIFICATIONS
CONTENTS
CRUISE CONTROL
(for versions/markets, where provided)
GENERAL INFORMATION
This is an electronic driving aid that allows you to drive at a speed
of above 30 km/h on long and straight dry roads (e.g. motor-
ways), at a preset speed without having to press the accelerator
pedal. It is therefore not recommended to use this device on coun-
try roads with traffic. Do not use it in town.
TURNING THE DEVICE ON
Turn ring A-fig. 43 to ON. The device cannot be turned on in 1stor
reverse gear. It is advisable to engage it in 5thgear or higher.
When travelling downhill with the device engaged, the car may
slightly exceed the preset speed. When the device is activated,
Ü
light comes on together with the relevant message on the instru-
ment panel (for versions/markets, where provided).
REAR WINDOW WIPER/WASHER
(for versions/markets, where provided)
Activation
This only operates with the ignition turned to MAR.
Turn B ring fig. 41 from position
Oto position 'to turn on the
rear window wiper as follows:
❍intermittent operation if the windscreen wiper is off;
❍synchronised operation (but with half-stroke frequency) when
the windscreen wiper is on;
❍continuous operation with reverse engaged and windscreen
wiper on.
With reverse gear engaged and windscreen wiper on, the rear win-
dow wiper is activated in continuous mode. Pushing the stalk to-
wards the dashboard (temporary position) the rear window wash-
er jet will activate.
Keeping the stalk pushed for more than half a second also the rear
window wiper will activate. Releasing the stalk will activate the
smart washing function, as described for the windscreen wiper.
fig. 43A0K0098m
Page 84 of 297

80
GETTING
TO KNOW
YOUR CAR
SAFETY
STARTING
AND DRIVING
IN AN
EMERGENCY
SERVICING AND
MAINTENANCE
TECHNICAL
SPECIFICATIONS
CONTENTS
INCREASING THE STORED SPEED
Press the accelerator and store the new speed or move the stalk
upwards (+). Each movement of the stalk will correspond to an
increase in speed of about 1 km/h, while keeping the stalk held
upwards the speed will continuously increase.
REDUCING THE STORED SPEED
Deactivate the device and store the new speed or move the stalk
downwards (–) until the new speed is reached. It will then auto-
matically be stored. Each movement of the stalk will correspond
to a reduction in speed of about 1 km/h, while keeping the stalk
held downwards will continuously reduce the speed.
TURNING THE DEVICE OFF
To release:
❍turn the A ring fig. 43 to OFF;
or
❍stop the engine;
or
❍press the brake pedal, the clutch or the accelerator; in this
last case the system is not actually turned off but the system
gives priority to the acceleration request. The device still re-
mains active, without the need to press the RES button to re-
turn to the previous condition once acceleration is concluded.
STORING THE SPEED
Proceed as follows:
❍turn A ring fig. 43 to ON and press the accelerator until the
car reaches the desired speed;
❍move the stalk upwards (+) for at least one second, then re-
lease it. The speed is now stored and you can therefore release
the accelerator pedal.
If needed (when overtaking for instance), you can accelerate sim-
ply by pressing the accelerator pedal; when you come off the ped-
al, the car will return to the speed memorised previously.
RESTORING STORED SPEED
If the device was disengaged - for example by pressing the brake
or clutch pedal - the stored speed can be reset as follows:
❍accelerate gradually until reaching a speed approaching the one
stored;
❍engage the gear selected at the time of speed storing;
❍press RES button (B-fig. 43).
Page 85 of 297
81
GETTING
TO KNOW
YOUR CAR
SAFETY
STARTING
AND DRIVING
IN AN
EMERGENCY
SERVICING AND
MAINTENANCE
TECHNICAL
SPECIFICATIONS
CONTENTS
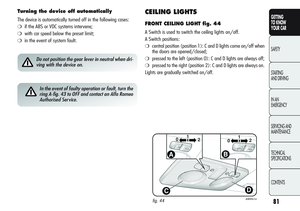
CEILING LIGHTS
FRONT CEILING LIGHT fig. 44
A Switch is used to switch the ceiling lights on/off.
A Switch positions:
❍central position (position 1): C and D lights come on/off when
the doors are opened/closed;
❍pressed to the left (position 0): C and D lights are always off;
❍pressed to the right (position 2): C and D lights are always on.
Lights are gradually switched on/off.
Turning the device off automatically
The device is automatically turned off in the following cases:
❍if the ABS or VDC systems intervene;
❍with car speed below the preset limit;
❍in the event of system fault.
Do not position the gear lever in neutral when dri-
ving with the device on.
In the event of faulty operation or fault, turn the
ring A-fig. 43 to OFF and contact an Alfa Romeo
Authorised Service.
fig. 44A0K0061m
Page 86 of 297

82
GETTING
TO KNOW
YOUR CAR
SAFETY
STARTING
AND DRIVING
IN AN
EMERGENCY
SERVICING AND
MAINTENANCE
TECHNICAL
SPECIFICATIONS
CONTENTS
B switch operates the map reading light.
B switch positions:
❍central position (position 1): C and D lights are always off;
❍pressed to the left (position 0): C light on;
❍pressed to the right (position 2): D light on.
IMPORTANT Before getting out of the car, make sure that both
switches are in the central position: closing the doors the lights will
go out avoiding to drain the battery.
In any case, if the switch is left inadvertently in the On position,
the ceiling lights will turn off automatically 15 minutes after turn-
ing the engine off.
CEILING LIGHT TIMING
On certain versions, two different timed switching-on modes have
been provided to facilitate getting in/out of the car at night or with
poor lighting.
Timing while getting into the car
The ceiling lights switch on according to the following modes:
❍for about 10 seconds when the front doors are unlocked;
❍for about 3 minutes when one of the doors is opened;
❍for about 10 seconds when the doors are closed.
The timing is interrupted when the ignition is turned to MAR.
Timing while getting out of the car
After removing the key from the ignition switch, the courtesy lights
will turn on as follows:
❍within 2 minutes from turning the engine off for about 10
seconds;
❍for about 3 minutes when one of the doors is opened;
❍when one of the doors is closed for about 10 seconds.
Timing will stop automatically when locking the doors.
Page 87 of 297
83
GETTING
TO KNOW
YOUR CAR
SAFETY
STARTING
AND DRIVING
IN AN
EMERGENCY
SERVICING AND
MAINTENANCE
TECHNICAL
SPECIFICATIONS
CONTENTS
REAR CEILING LIGHT
Press the A lens fig. 45 to turn the light on/off.
The light will stay on for a few seconds after the doors are closed
and will then go off automatically. The light will go out when the
ignition is turned to MAR.
IMPORTANT The light will go out automatically after a few minutes
if a door is forgotten open. Open another door or close and reopen
the concerned door.
fig. 45A0K0092mfig. 46A0K0114m
COURTESY LIGHTS fig. 46
(for versions/markets, where provided)
Two B courtesy lights are present behind the sun visors. Lift the A
cover to turn the lights on.
Page 88 of 297
84
GETTING
TO KNOW
YOUR CAR
SAFETY
STARTING
AND DRIVING
IN AN
EMERGENCY
SERVICING AND
MAINTENANCE
TECHNICAL
SPECIFICATIONS
CONTENTS
PUDDLE LIGHTS fig. 47
These lights are located in the front and rear doors. They are turned
on/off when any door is opened regardless of the position of the
ignition switch.
BOOT LIGHT fig. 48
This is located on the left-hand side of the boot. This light comes
on automatically when the boot is opened and switches off when
it is closed.
The light will be turned on/off regardless of the position of the
ignition key.
fig. 47A0K0221m
GLOVE COMPARTMENT LIGHT fig. 49
This light comes on automatically when the glove compartment is
opened and switches off when it is closed.
The light will be turned on/off regardless of the position of the
ignition key.
fig. 49A0K0171m
fig. 48A0K0141m