Page 105 of 297
101
GETTING
TO KNOW
YOUR CAR
SAFETY
STARTING
AND DRIVING
IN AN
EMERGENCY
SERVICING AND
MAINTENANCE
TECHNICAL
SPECIFICATIONS
CONTENTS
BOOT
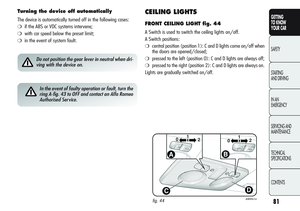
The boot is unlocked electrically operated and this is deactivated
when the car is in motion.
OPENING
When unlocked, the boot can be opened from outside by pressing
the electric logo fig. 69 until a click is heard or by pressing
Rbut-
ton on the remote control.
The direction indicators and internal light will blink twice when
the boot is opened: the light will go out automatically when the
boot is closed. If the boot is left open, the light will go out auto-
matically after several minutes.
fig. 69A0K0068m
Emergency opening from the inside
Proceed as follows:
❍remove the rear head restraints and completely fold back the
seats (see the paragraph on “Expanding the boot”);
❍press lever A-fig. 70.
fig. 70A0K0069m
Page 106 of 297
102
GETTING
TO KNOW
YOUR CAR
SAFETY
STARTING
AND DRIVING
IN AN
EMERGENCY
SERVICING AND
MAINTENANCE
TECHNICAL
SPECIFICATIONS
CONTENTS
BOOT INITIALISATION
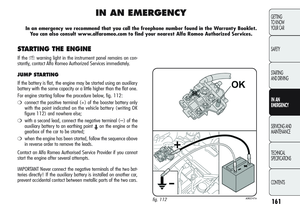
IMPORTANT If the battery is disconnected or the protection fuse
blows, the boot opening/closing mechanism must be reinitialised
as follows:
❍close all the doors and the boot;
❍press button Áon the remote control;
❍press button Ëon the remote control.
CLOSING
To close, lower the tailgate and press down near the lock until
you hear it click. Handles A-fig. 71 are provided on the inside of
the tailgate to help grasping to close the tailgate.
IMPORTANT Before closing the boot make sure that you have the
keys with you because the boot will be locked automatically.
fig. 71A0K0181m
Page 107 of 297
103
GETTING
TO KNOW
YOUR CAR
SAFETY
STARTING
AND DRIVING
IN AN
EMERGENCY
SERVICING AND
MAINTENANCE
TECHNICAL
SPECIFICATIONS
CONTENTS
fig. 72A0K0070m
EXPANDING THE BOOT
The boot can be partially (1/3 or 2/3) or totally extended by
splitting the rear seat. See the descriptions in “Removing the
parcel shelf” and “Folding back the seats” paragraphs for how to
expand the boot.
fig. 73A0K0182m
Removing the parcel shelf
Proceed as follows:
❍free the ends of the two links A-fig. 72 supporting the parcel
shelf B, releasing eyelets C from supporting pins D;
❍release the pins A-fig. 73 on the outer side of the shelf, and then
remove the shelf B by pulling it outwards.
❍after removal, the parcel shelf can be loaded sideways into the
boot or placed between the front seat backrests and the fold-
ed-back rear seats (with the luggage compartment complete-
ly expanded).
Page 108 of 297

104
GETTING
TO KNOW
YOUR CAR
SAFETY
STARTING
AND DRIVING
IN AN
EMERGENCY
SERVICING AND
MAINTENANCE
TECHNICAL
SPECIFICATIONS
CONTENTS
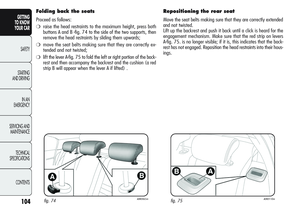
Folding back the seats
Proceed as follows:
❍raise the head restraints to the maximum height, press both
buttons A and B -fig. 74 to the side of the two supports, then
remove the head restraints by sliding them upwards;
❍move the seat belts making sure that they are correctly ex-
tended and not twisted;
❍lift the lever A-fig. 75 to fold the left or right portion of the back-
rest and then accompany the backrest and the cushion (a red
strip B will appear when the lever A if lifted) .
fig. 74A0K0065mfig. 75A0K0110m
Repositioning the rear seat
Move the seat belts making sure that they are correctly extended
and not twisted.
Lift up the backrest and push it back until a click is heard for the
engagement mechanism. Make sure that the red strip on levers
A-fig. 75. is no longer visible; if it is, this indicates that the back-
rest has not engaged. Reposition the head restraints into their hous-
ings.
Page 109 of 297
105
GETTING
TO KNOW
YOUR CAR
SAFETY
STARTING
AND DRIVING
IN AN
EMERGENCY
SERVICING AND
MAINTENANCE
TECHNICAL
SPECIFICATIONS
CONTENTS
Heavy, unsecured baggage may cause severe injury
to passengers in case of an accident.
If you are travelling in areas with few refuelling
stations and you want to transport fuel in a spare
tank, comply with the law by using only an ap-
proved, suitably secured tank. In the event of a collision
the fire risk is increased all the same.
SECURING YOUR LOAD
Two hooks A-fig. 76 are provided in the boot for firmly securing the
load and two hooks are provided on the rear crossmember B.
IMPORTANT The maximum load which can be secured to a single
hook is 100 kg.
fig. 76A0K0169m
BAG HOOKS
Bag hooks are also provided inside the boot.
CARGO NET (for versions/markets, where provided)
This is useful for correctly arranging the load and/or transporting
light materials. The cargo net is available in Lineaccessori Alfa
Romeo.
Page 110 of 297

106
GETTING
TO KNOW
YOUR CAR
SAFETY
STARTING
AND DRIVING
IN AN
EMERGENCY
SERVICING AND
MAINTENANCE
TECHNICAL
SPECIFICATIONS
CONTENTS
BONNET
OPENING
Proceed as follows:
❍pull lever A-fig. 77 in the direction indicated by the arrow;
❍operate lever B in the sense indicated by the arrow and open the
bonnet.
IMPORTANT Two side gas shock absorbers are provided to assist
opening the bonnet. Do not tamper with the shock absorber and
accompany the bonnet while lifting it.
IMPORTANT Before lifting up the bonnet make sure that the wind-
screen wipers are in the rest position and not operational.
fig. 77A0K0116m
CLOSING
Lower the bonnet to approximately 20 centimetres from the en-
gine compartment and let it drop. Make sure that the bonnet is
completely closed and not only fastened by the safety catch by try-
ing to open it. If it is not perfectly closed, open the bonnet and
repeat the procedure. Do not simply press it.
IMPORTANT Always check that the bonnet is closed properly to avoid
it opening while the car is travelling.
For safety reasons, the bonnet must always be per-
fectly closed while travelling. Make sure that the
bonnet is perfectly closed and that the lock is en-
gaged. If you discover whilst driving that the lock is not
fully engaged, stop immediately and close the bonnet in
the correct manner.
Perform these operations only when the car is sta-
tionary.
Page 111 of 297
107
GETTING
TO KNOW
YOUR CAR
SAFETY
STARTING
AND DRIVING
IN AN
EMERGENCY
SERVICING AND
MAINTENANCE
TECHNICAL
SPECIFICATIONS
CONTENTS
ROOF RACK/SKI RACK
The attachments A-fig. 78 are located in the areas illustrated in the
figure and can only be reached with the doors open.
A roof rack/ski rack specific for the car is available from Lineac-
cessori Alfa Romeo.
fig. 78A0K0117m
After having travelled several kilometres check that
the attachment fixing screws are still securely fas-
tened.
Distribute the load uniformly and when driving
take into consideration the increased sensitivity
to cross winds.
Always obey local legislation regarding maximum
load size.
Never exceed the maximum permitted load
(see the “Technical Specifications” chapter) .
Page 112 of 297

108
GETTING
TO KNOW
YOUR CAR
SAFETY
STARTING
AND DRIVING
IN AN
EMERGENCY
SERVICING AND
MAINTENANCE
TECHNICAL
SPECIFICATIONS
CONTENTS
Adjusting headlight alignment
PressÒandto adjust (fig. 79). The display located on the in-
strument panel provides a visual indication of the adjusted position.
Position 0 – one or two passengers in the front seats.
Position 1 – 4 passengers.
Position 2 – 4 passengers + load in the boot.
Position 3 – driver + maximum permitted load in the boot.
IMPORTANT Check the adjustment every time the load carried
changes.
IMPORTANT If the vehicle is equipped with Bi-xenon headlights,
headlight alignment is carried out automatically and therefore but-
tons
Òandare not present.
FOG LIGHT ADJUSTMENT
(for versions/markets, where provided)
To check and, if necessary, adjust the alignment contact Alfa Romeo
Authorized Services.
ADJUSTING THE HEADLIGHTS WHEN ABROAD
The dipped beam headlights are aligned to comply with the regu-
lations of the country of purchase. When driving in countries with
a different driving direction, to avoid blinding the drivers travelling
in the opposite direction, it is necessary to cover the areas of the
beam according to the provisions of the Highway Code of the coun-
try you are driving in.
A0K0094mfig. 79
HEADLIGHTS
ADJUSTING THE LIGHT BEAM
The correct orientation of the headlights is important for the dri-
ver’s comfort and safety as well as for all other road users. It is al-
so a specific rule of the highway code.
The headlights must be correctly directed to ensure the best visi-
bility conditions for all drivers. To check and, if necessary, adjust
the alignment contact Alfa Romeo Authorized Services.
HEADLIGHT ALIGNMENT CORRECTOR
This device works with the ignition key in the MAR position and the
dipped headlights on.