Page 65 of 251

64
Operation, Safety
Front Axle Lift SystemThe front axle lift system enables the body to be
electropneumatically raised at the front by about
1.18 in. (30 mm) (front edge of front spoiler).
This in turn enables damage to the body to be
prevented, which e. g. may occur when driving
into multi-level parking garages with steep ramps
or over speed bumps.Readiness for operationThe front axle lift system is operational when the
engine is running and the vehicle is at a standstill
or up to a speed of approx. 30 mph (50 km/h).
The vehicle is automatically lowered to the basic
level again when a speed of approx. 30 mph
(50 km/h) is exceeded.
Raising front axle fPress button in the center console.
The vehicle is raised at the front axle within
approx. 3 seconds.
When the lift function is activated, the light-
emitting diode in the button is lit.The logo “LIFT” also appears next to the digital
speedometer when the front axle is fully raised.
Caution!
Risk of damage through uncontrolled
lowering of the front axle at engine standstill.
In this particular system, the retaining
position cannot be maintained in the upper
position over an extended period without
active replenishing of the pressure accumu-
lator or engine operation.
fAlways park the vehicle in the lowered position.
10_GT3_21.book Seite 64 Donnerstag, 4. Juni 2009 12:48 12
Page 66 of 251

Operation, Safety
65
Lowering front axle fPress button in the center console.
The vehicle is lowered to the basic level.
The light-emitting diode in the button and in the
tachometer goes out.
Caution!
Risk of damage through bottoming out the
vehicle.
fDo not lower the vehicle when it is positioned above an obstacle.
Notes on operation
Warning messageFront axle lift system faults are indicated by
a warning message on the on-board computer.
fPlease see the chapter “WARNINGS ON THE
INSTRUMENT PANEL AND THE ON-BOARD
COMPUTER” on Page 148.
– When raised, the damping properties of the
front axle change and noise may be heard in
the area of the front axle coil springs during
steering movements.
– The doors must be closed when lowering the
front axle.
–The blowing-off procedure may result in
system-related hissing noise. This does not
represent a malfunction in the lift system.– During extended vehicle immobilization, the
pressure accumulator may be completely
emptied. In this case, the first time the axle is
raised, a period of up to 2 minutes may elapse
before the vehicle height is reached and “LIFT”
is displayed.
– A flashing LED in the button indicates that the
system is currently not available. Possible
causes may be:
> Automatic overload protection is active.
The system will be available again
following a brief cooling-down phase.
The cooling-down phase may be
extended when outside temperatures
are very high.
> The speed threshold of 30 mph
(50 km/h) has been exceeded. The
system will be available again once the
speed falls below the threshold.
> If automatic lowering is actuated by
exceeding a speed of approx. 30 mph
(50 km/h) in combination with hard
acceleration, the required lowering
duration may mean that “LIFT not
lowered” is displayed. The display goes
out again as soon as the front axle has
been completely lowered.
10_GT3_21.book Seite 65 Donnerstag, 4. Juni 2009 12:48 12
Page 67 of 251

66
Operation, Safety
A, C - Switch for reading light on driver/passenger side
B- Switch for interior light and footwell lights
D-Orientation lightInterior LightsfPlease see the chapter “LOAD SWITCH-OFF
AFTER 2 HOURS OR 7 DAYS” on Page 208.For vehicles with automatic anti-dazzle
mirrors
fSwitch off the automatic anti-dazzle operation
of the mirrors before you switch on the interior
light.
Otherwise the mirrors may accidentally swivel
into the anti-dazzle position.
Interior lights, reading lightsSwitching off
fPress left half of switch.
Switching to continuous illumination
fPress right half of switch.
Switching on and off automatically
fMove switch to center position.
The interior and footwell lights are switched
on when a door is unlocked or opened or when
the ignition key is withdrawn from the ignition
lock.
The lights are switched off with a delay of
approx. 2 minutes after the doors are closed.
The light goes out immediately as soon as the
ignition is switched on or the vehicle is locked.
Orientation lightA light-emitting diode at the bottom of the interior
mirror improves orientation in the passenger
compartment when it is dark.
Note on operation
On vehicles with the Sport Chrono Package Plus,
the brightness of the orientation light can be
changed in PCM.
fPlease see the chapter “Individual Memory” in
the separate PCM Owner’s Manual.
10_GT3_21.book Seite 66 Donnerstag, 4. Juni 2009 12:48 12
Page 68 of 251

Operation, Safety
67
O - Initial position
1 - Ignition on
2 - Start engine
3 - Ignition offIgnition/Starter Switch with
anti-theft Steering Lock
Caution!
Risk of damage. If extra weight has been
added to the inserted ignition key such as,
e. g. a heavy bunch of keys and/or a key
fob, the ignition lock may be damaged.
fDo not attach any extra weight to the inserted ignition key.The ignition lock has a total of four ignition lock
positions.
The ignition key rebounds to the initial position
from every ignition lock position.
fFor your safety, fasten safety belts.
fPlease see the chapter “IMMOBILIZER” on
Page 18.
fPlease see the chapter “KEY WITH RADIO
REMOTE CONTROL” on Page 19.
Before starting the enginefApply the footbrake.
fMove the gearshift lever into neutral.
The clutch pedal must be depressed fully
before the starter will engage.Switch position 0 Initial position
The ignition key cannot be withdrawn when the
ignition is switched on or when the engine has
been started.
To withdraw the ignition key:
fStop the vehicle.
fSwitch ignition off.
fRemove ignition key.
Switch position 1 Ignition on
fTurn ignition key to position 1.
Ignition is switched on.
Note on operation
All electrical equipment can be switched on.
fPlease see the chapter “WARNINGS ON THE
INSTRUMENT PANEL AND THE ON-BOARD
COMPUTER” on Page 148.
10_GT3_21.book Seite 67 Donnerstag, 4. Juni 2009 12:48 12
Page 69 of 251

68
Operation, Safety
Switch position 2Start engine
fTurn ignition key to ignition lock position 2.
fPlease see the chapter “STARTING PROCE-
DURES” on Page 70.Switch position 3Ignition off
fTurn ignition key to ignition lock position 3.
Note on operation
The vehicle battery discharges if the ignition key is
left inserted.
If the vehicle battery is dead, the key can only be
pulled out of the ignition lock if the emergency
operation is performed:
fPlease see the chapter “EMERGENCY OPERA-
TION – PULLING OUT THE IGNITION KEY” on
Page 69.
Locking the steering columnAutomatic locking
The steering column is automatically locked when
the ignition key is withdrawn from the ignition lock.
Warning!
Risk of an accident, resulting in serious
personal injury or death.
The steering wheel will lock and will cause
loss of steering.
fNever remove key from the ignition lock or turn
the key off while the vehicle is moving.
fAlways withdraw the ignition key when leaving the vehicle.Automatic unlocking
The steering column is unlocked when the vehicle
is unlocked with the radio remote control.
Note
fTo avoid discharging the battery, always
remove the ignition key from the ignition lock.
Please see the chapter “BATTERY” on
Page 211.
Gong If you leave the key in the ignition/steering lock, a
gong will sound when the driver’s door is opened.
This is a reminder to remove the key.
10_GT3_21.book Seite 68 Donnerstag, 4. Juni 2009 12:48 12
Page 70 of 251
Operation, Safety
69
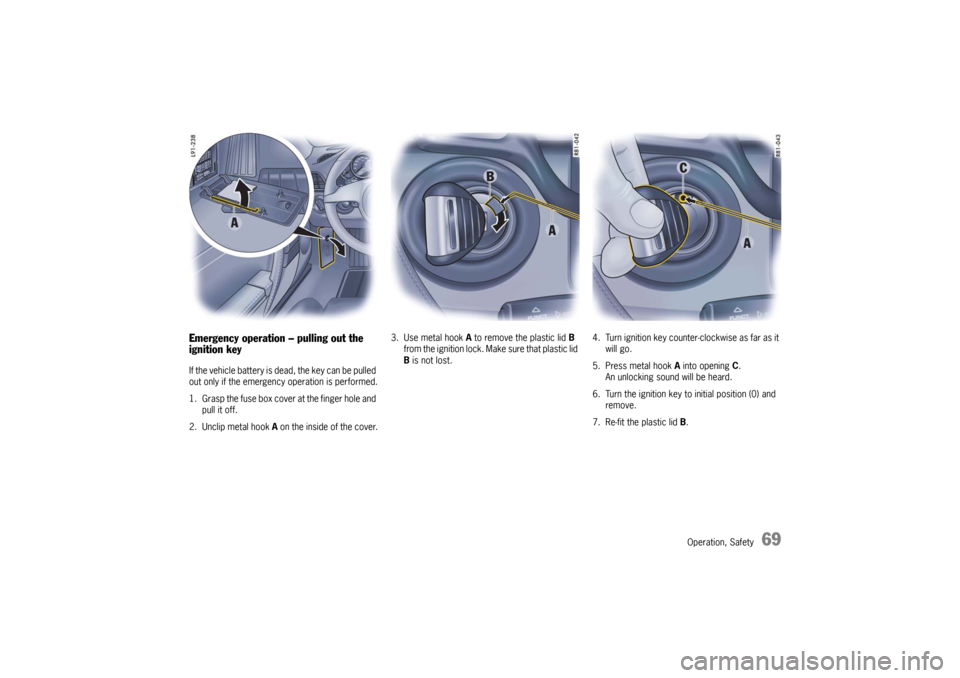
Emergency operation – pulling out the
ignition keyIf the vehicle battery is dead, the key can be pulled
out only if the emergency operation is performed.
1. Grasp the fuse box cover at the finger hole and
pull it off.
2. Unclip metal hook A on the inside of the cover.3. Use metal hook A to remove the plastic lid B
from the ignition lock. Make sure that plastic lid
B is not lost.4. Turn ignition key counter-clockwise as far as it
will go.
5. Press metal hook A into opening C.
An unlocking sound will be heard.
6. Turn the ignition key to initial position (0) and
remove.
7. Re-fit the plastic lid B.
10_GT3_21.book Seite 69 Donnerstag, 4. Juni 2009 12:48 12
Page 71 of 251

70
Operation, Safety
Starting Procedures fPlease see the chapter “IMMOBILIZER” on
Page 18.
fPlease see the chapter “EMISSION CONTROL
SYSTEM” on Page 168.
Warning!
Serious injury or death may result if you are
involved in a collision without having
fastened the safety belts.
fFasten safety belts before driving away. Before starting the engine fApply the footbrake.
fMove the gearshift lever into neutral.
The clutch pedal must be depressed fully
before the starter will engage.
Temperature sensors on the engine automatically
provide the correct fuel/air mixture required for
starting.
Therefore, it is not necessary to depress the
accelerator pedal while starting a cold or a
warm engine.
Starting the enginefTurn ignition key to ignition lock position 2.
fAs soon as the engine starts, release the
ignition key.
The first operation of the starter is ended
automatically when the engine starts.
If the engine does not start, subsequent starter
operations will not be ended automatically.
If the engine fails to start after 10 or 15 seconds
of cranking:
fWait about 10 seconds before engaging the
starter again.
fWhen starting the engine, be ready to drive
immediately.
Drive vehicle at moderate speeds and avoid
engine speeds above 4,200 rpm during the
first 5 minutes.
fDo not let the engine idle to warm up.
Danger!
Engine exhaust fumes have many compon-
ents which you can smell. They also contain
carbon monoxide (CO), which is a colorless
and odorless gas.
Carbon monoxide can cause unconscious-
ness and even death if inhaled.
fNever start or let the engine run in an
enclosed, unventilated area.
It is not recommended to sit in your car for
prolonged periods with the engine on and the
car not moving.
An unattended vehicle with a running engine
is potentially hazardous.
If warning lights should come on to indicate
improper operation, they would go
unnoticed.
fNever leave the engine idling unattended.
Risk of fire due to hot exhaust system.
fDo not park or operate the vehicle in areas
where the hot exhaust system may come in
contact with dry grass, brush, fuel spill or
other flammable material.
fIf your car catches on fire for any reason, call
the fire department.
Do not endanger your life by attempting to put out the fire.
10_GT3_21.book Seite 70 Donnerstag, 4. Juni 2009 12:48 12
Page 72 of 251

Operation, Safety
71
Stopping Engine fTurn key back to position 3.
fDo not stop engine immediately after hard or
extended driving.
Keep engine running at increased idle for
about two minutes to prevent excessive heat
build-up before turning off engine.
fTo avoid discharging the battery, always
remove the ignition key from the ignition lock.
fWhen leaving the vehicle always remove the
ignition key, apply the parking brake and
engage the 1st gear or reverse gear.
fEngage the steering lock by moving the
steering wheel to the left or right.
Turn the steering wheel to the locking position
before you switch off the engine so that you
don’t have to exert yourself when locking or
unlocking the steering.
Warning!
Danger of injury. Hot engine compartment
components can burn skin on contact.
fBefore working on any part in the engine
compartment, turn the engine off and let it cool down sufficiently.
Engine-compartment blower,
radiator fan The radiator and radiator fan are in the front of the
car.
The engine-compartment blower is mounted on
the engine compartment lid.
Warning!
Risk of injury.
After the engine is switched off, the engine-
compartment temperature is monitored for
approx. 30 minutes.
During this period, and depending on tempe-
rature, the engine-compartment blower may
continue to run or start to run.
fCarry out work in these areas only with the
engine off, the ignition off, and exercise
extreme caution.
Risk of injury. The radiator fan in the front
end of the car may be operating or unexpec-
tedly start operating when the engine is
switched on.
fCarry out work in these areas only with the engine switched off.
Automatic garage door The ignition system in your Porsche may interfere
with your electronically operated garage door.
fTo check this, drive your Porsche close to the
garage door. Make sure not to interfere with
the operating range of the door.
fRun the engine at different speeds.
fIf the garage door opens or closes without you
operating the garage door unit in your car,
contact the dealer who installed the automatic
garage door to have the frequency and/or
coding of the garage door signal changed or
modified.
10_GT3_21.book Seite 71 Donnerstag, 4. Juni 2009 12:48 12