Page 857 of 3745

BRAKE FLUIDBR-9
< SERVICE INFORMATION >
C
DE
G H
I
J
K L
M A
B
BR
N
O P
BRAKE FLUID
On Board InspectionINFOID:0000000005396980
CHECKING BRAKE FLUID LEVEL
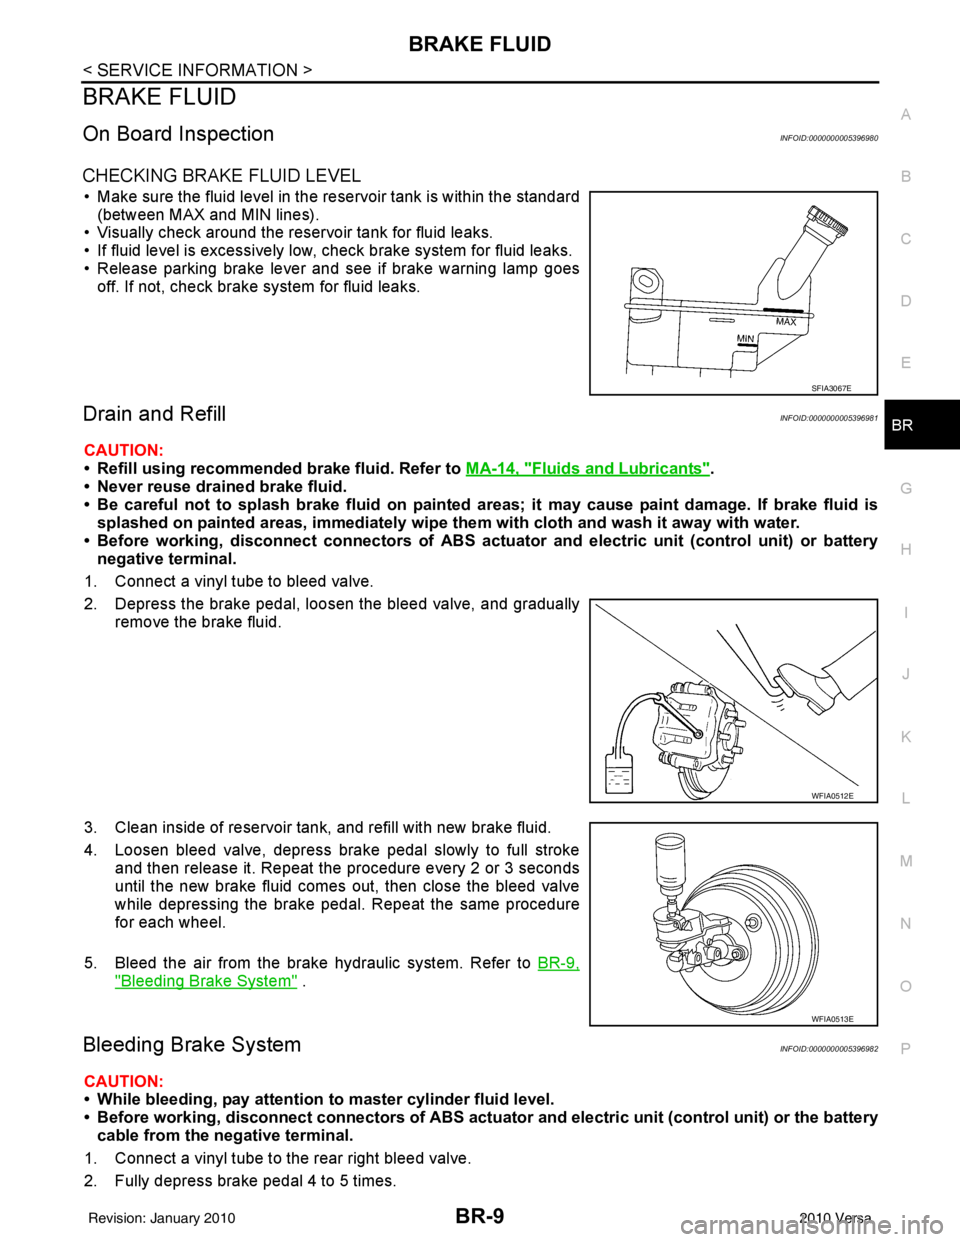
• Make sure the fluid level in the reservoir tank is within the standard (between MAX and MIN lines).
• Visually check around the reservoir tank for fluid leaks.
• If fluid level is excessively low, check brake system for fluid leaks.
• Release parking brake lever and see if brake warning lamp goes off. If not, check brake system for fluid leaks.
Drain and RefillINFOID:0000000005396981
CAUTION:
• Refill using recommended brake fluid. Refer to MA-14, "
Fluids and Lubricants".
• Never reuse drained brake fluid.
• Be careful not to splash brake fluid on painted areas; it may cause paint damage. If brake fluid is
splashed on painted areas, immediately wipe th em with cloth and wash it away with water.
• Before working, disconnect connect ors of ABS actuator and electric unit (control unit) or battery
negative terminal.
1. Connect a vinyl tube to bleed valve.
2. Depress the brake pedal, loosen the bleed valve, and gradually remove the brake fluid.
3. Clean inside of reservoir tank, and refill with new brake fluid.
4. Loosen bleed valve, depress brake pedal slowly to full stroke and then release it. Repeat the procedure every 2 or 3 seconds
until the new brake fluid comes out, then close the bleed valve
while depressing the brake pedal . Repeat the same procedure
for each wheel.
5. Bleed the air from the brake hydraulic system. Refer to BR-9,
"Bleeding Brake System" .
Bleeding Brake SystemINFOID:0000000005396982
CAUTION:
• While bleeding, pay attention to master cylinder fluid level.
• Before working, disconnect connectors of ABS actuator and electri c unit (control unit) or the battery
cable from the negative terminal.
1. Connect a vinyl tube to the rear right bleed valve.
2. Fully depress brake pedal 4 to 5 times.
SFIA3067E
WFIA0512E
WFIA0513E
Revision: January 20102010 Versa
Page 858 of 3745
BR-10
< SERVICE INFORMATION >
BRAKE FLUID
3. With brake pedal depressed, loosen bleed valve to let the air out, and then tighten it immediately.
4. Repeat steps 2, 3 until no more air comes out.
5. Tighten bleed valve to specified torque. Refer to BR-25, "
Component" (front disc brake), BR-35, "Compo-
nent" (rear drum brake).
6. Following the steps 1 to 5 above, with master cylinder reservoir tank filled at least half way, bleed air from
the rear right, front left, rear left, and front right brake, in that order.
Revision: January 20102010 Versa
Page 859 of 3745
BRAKE TUBE AND HOSEBR-11
< SERVICE INFORMATION >
C
DE
G H
I
J
K L
M A
B
BR
N
O P
BRAKE TUBE AND HOSE
Hydraulic CircuitINFOID:0000000005396983
With ABS only or VDC/TCS/ABS
Without ABS
CAUTION:
SFIA3068E
1. Front disc brake 2. Brake master cylinder3. Brake booster
4. Rear drum brake 5. Connector6.ABS actuator and electric unit
(control unit)
7. Brake tube 8. Brake hose
: Union bolt
:Connector bolt
:Flare nut
18.2 N.m (1.9 kg-m, 13.0 ft-lb) 10.0 N.m (1.0 kg-m, 87.0 in-lb) 16.2 N.m (1.7 kg-m, 12.0 ft-lb)
AWFIA0525ZZ
1. Front disc brake 2. Brake master cylinder3. Brake booster
4. Rear drum brake 5. Connector6. Dual proportioning valve
7. Brake tube 8. Brake hose
: Union bolt
18.2 N.m (1.9 kg-m, 13.0 ft-lb) :
Connector bolt
10.0 N.m (1.0 kg-m, 87.0 in-lb) :
Flare nut (including connections
at dual proportioning valve)
16.2 N.m (1.7 kg-m, 12.0 ft-lb)
Revision: January 20102010 Versa
Page 862 of 3745

BR-14
< SERVICE INFORMATION >
DUAL PROPORTIONING VALVE
DUAL PROPORTIONING VALVE
Removal and InstallationINFOID:0000000005396987
Removal
1. Remove cowl top . Refer to EI-22, "Removal and Installation".
2. Disconnect brake lines from dual proportioning valve. • Mark brake lines for installation.
3. Remove dual proportioning valve bolt and dual proportioning valve.
4. Remove two bolts and bracket.
Installation
Installation is in the reverse order of removal.
• When installing brake lines to the dual proportioning valve, tighten to specifications. Refer to BR-11,
"Hydraulic Circuit".
InspectionINFOID:0000000005396988
CAUTION:
• Carefully monitor brake fluid level at master cylinder.
• Use the recommended new brake fluid. Refer to MA-14, "
Fluids and Lubricants".
• Be careful not to splash brake fluid on painted areas; it may cause paint damage. If brake fluid is
splashed on paint areas, wash it away with water immediately.
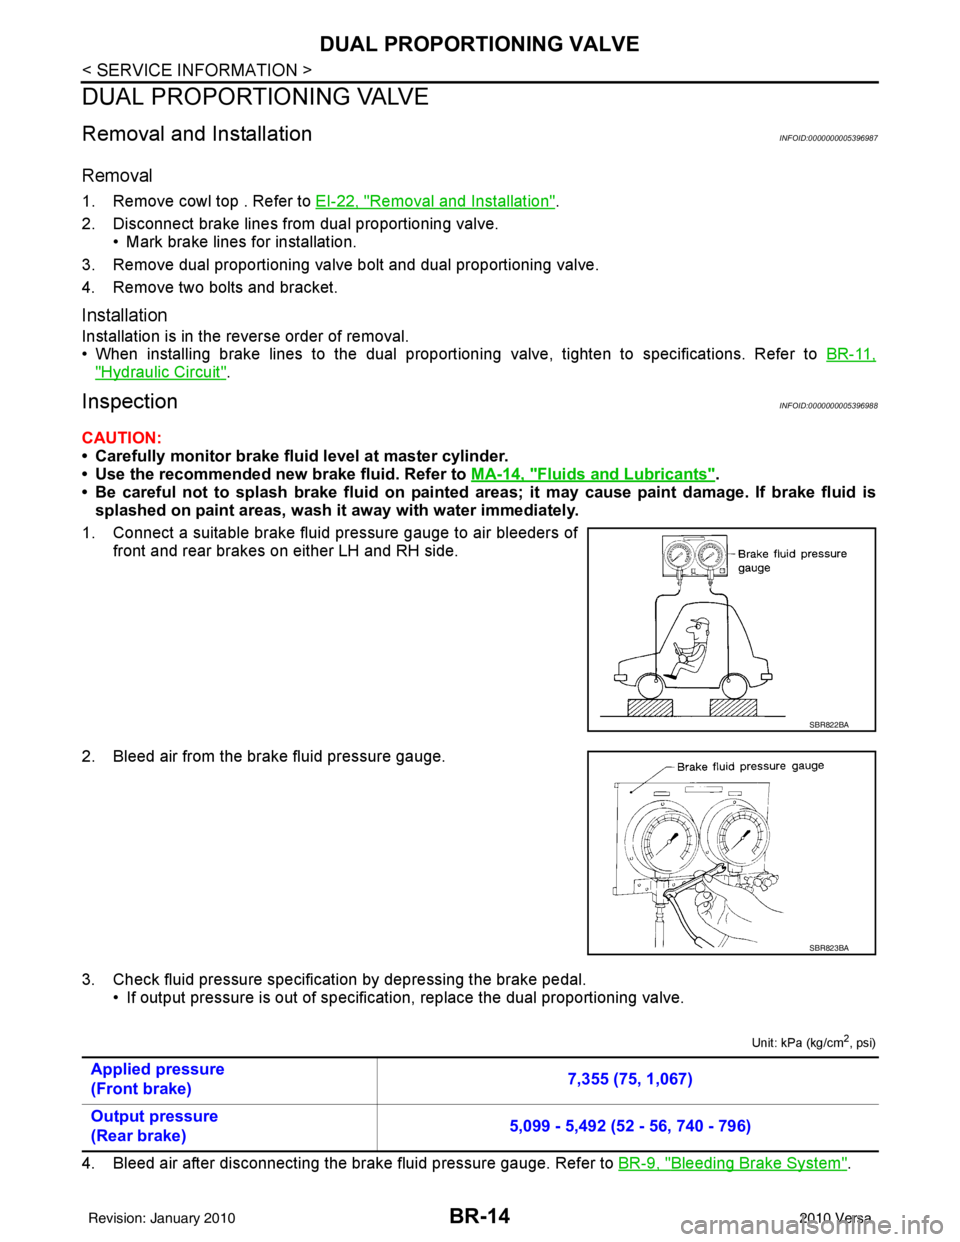
1. Connect a suitable brake fluid pressure gauge to air bleeders of front and rear brakes on either LH and RH side.
2. Bleed air from the brake fluid pressure gauge.
3. Check fluid pressure specific ation by depressing the brake pedal.
• If output pressure is out of specification, replace the dual proportioning valve.
Unit: kPa (kg/cm2, psi)
4. Bleed air after disconnecting the brake fluid pressure gauge. Refer to BR-9, "Bleeding Brake System".
SBR822BA
SBR823BA
Applied pressure
(Front brake) 7,355 (75, 1,067)
Output pressure
(Rear brake) 5,099 - 5,492 (52 - 56, 740 - 796)
Revision: January 20102010 Versa
Page 871 of 3745

VACUUM LINESBR-23
< SERVICE INFORMATION >
C
DE
G H
I
J
K L
M A
B
BR
N
O P
VACUUM LINES
ComponentINFOID:0000000005396994
Removal and InstallationINFOID:0000000005396995
REMOVAL
1. Disconnect the vacuum hose from the intake manifold.
2. Disconnect the vacuum hose from the brake booster.
3. Disconnect the vacuum hose from the clip and re move the vacuum hose and vacuum tube assembly.
INSTALLATION
Installation is in the reverse order of removal.
CAUTION:
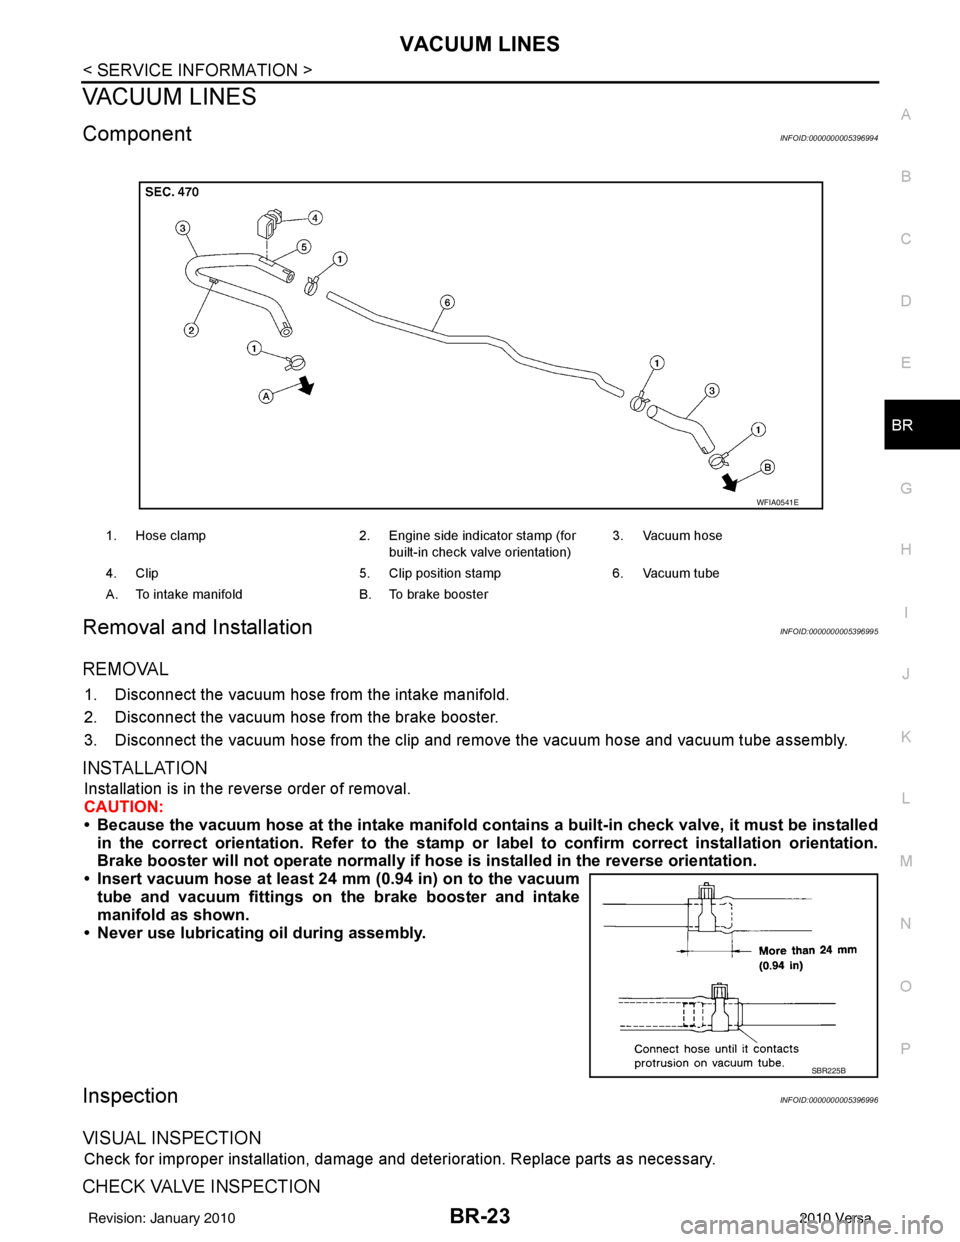
• Because the vacuum hose at the intake manifold contains a built-in check valve, it must be installed
in the correct orientation. Refer to the stamp or label to confirm correct installation orientation.
Brake booster will not operate normally if ho se is installed in the reverse orientation.
• Insert vacuum hose at least 24 mm (0.94 in) on to the vacuum tube and vacuum fittings on the brake booster and intake
manifold as shown.
• Never use lubricating oil during assembly.
InspectionINFOID:0000000005396996
VISUAL INSPECTION
Check for improper installation, damage and deterioration. Replace parts as necessary.
CHECK VALVE INSPECTION
1. Hose clamp 2. Engine side indicator stamp (for
built-in check valve orientation) 3. Vacuum hose
4. Clip 5. Clip position stamp6. Vacuum tube
A. To intake manifold B. To brake booster
WFIA0541E
SBR225B
Revision: January 20102010 Versa
Page 872 of 3745
BR-24
< SERVICE INFORMATION >
VACUUM LINES
Use a hand vacuum pump to check the built-in valve.
Replace the vacuum hose with the built-in check valve as an assem-
bly if the vacuum hose is out of specifications.When connected to booster side (1) : Refer to BR-41,
"Check Valve".
When connected to engine side (2) : Refer to BR-41,
"Check Valve".
SFIA0210E
Revision: January 20102010 Versa
Page 873 of 3745
FRONT DISC BRAKEBR-25
< SERVICE INFORMATION >
C
DE
G H
I
J
K L
M A
B
BR
N
O P
FRONT DISC BRAKE
On Board InspectionINFOID:0000000005396997
PAD WEAR INSPECTION
• Check pad thickness from check hole on cylinder body.
ComponentINFOID:0000000005396998
AD22VK
Standard thickness : Refer to BR-42, "Front
Disc Brake".
Repair limit thickness : Refer to BR-42, "
Front
Disc Brake".
BRA0010D
AWFIA0640GB
1. Union bolt2. Brake hose 3. Copper washer
4. Cap 5. Bleed valve 6. Sliding pin bolt
7. Cylinder body 8. Piston seal 9. Piston
10. Piston boot 11. Inner shim 12. Inner pad
13. Pad return spring 14. Pad retainer 15. Outer pad
16. Outer shim 17. Sliding pin 18. Sliding pin boot
19. Bushing 20. Torque member bolt 21. Torque member
22. Pad wear sensor : Front: Brake fluid
1:Molykote 7439 grease 2: Rubber grease 3: Molykote AS-880N grease
Revision: January 20102010 Versa
Page 874 of 3745

BR-26
< SERVICE INFORMATION >
FRONT DISC BRAKE
CLZ25VF
CAUTION:
• Clean dust on caliper and brake pad with a vacuum dust collector. Do not blow with compressed air.
• While removing brake pad or cylinder body, do not depress brake pedal because piston will pop out.
• It is not necessary to remove torque member mounting bolts and brake hose except for disassembly
or replacement of caliper assembly. In this case, hang cylinder body with a wire so that brake hose is
not under tension.
• Do not damage piston boot.
• If any shim is subject to serious corrosion, replace it with a new one.
• Keep rotor free from brake fluid.
• When replacing brake pad, replace shim with a new one.
Removal and Installation of Brake PadINFOID:0000000005396999
AD22VK
Removal
1. Partially drain brake fluid reservoir. Refer to BR-9, "Drain and Refill".
2. Remove front wheel and tire using power tools.
AWFIA0641GB
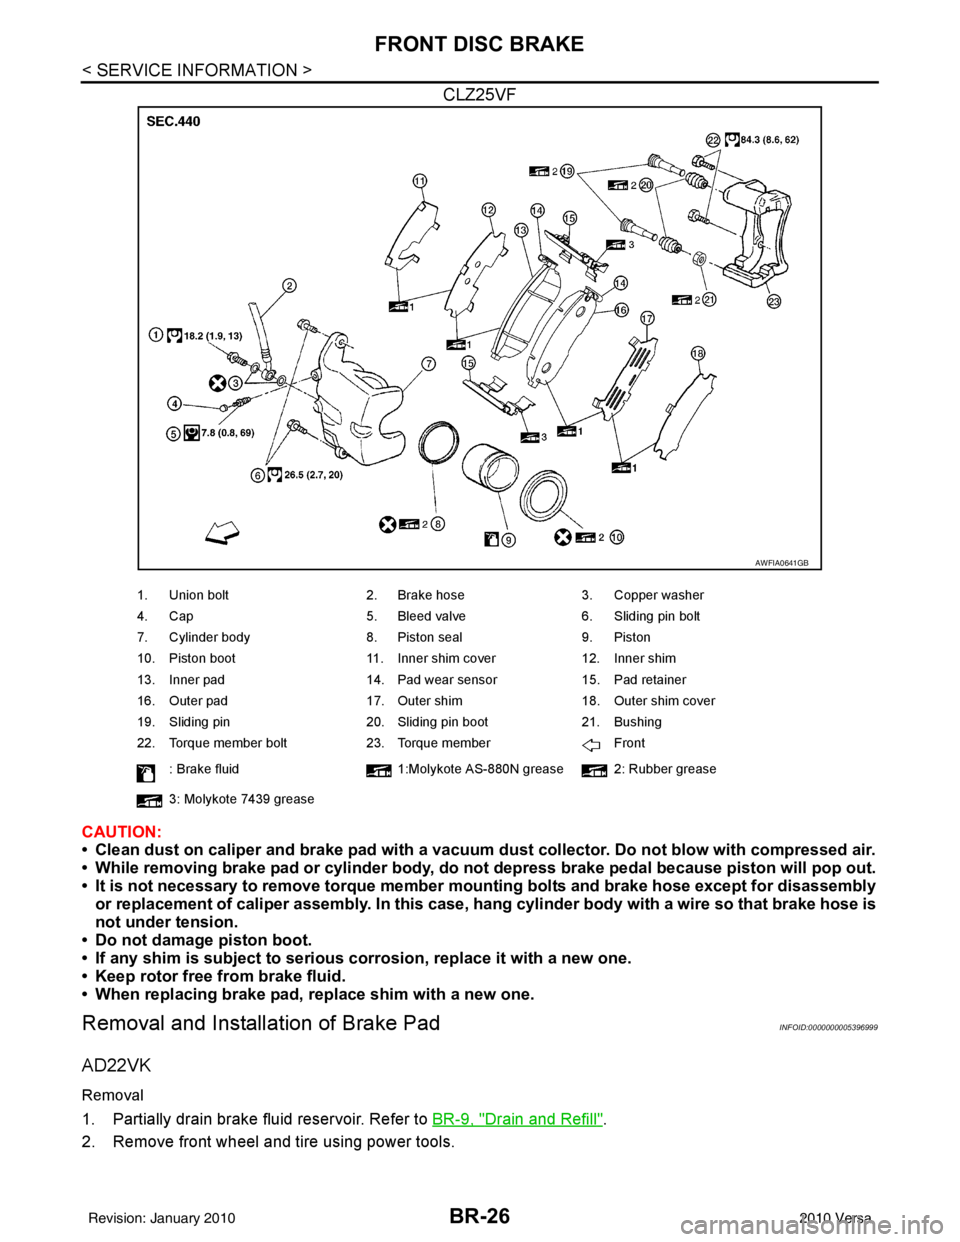
1. Union bolt 2. Brake hose3. Copper washer
4. Cap 5. Bleed valve6. Sliding pin bolt
7. Cylinder body 8. Piston seal9. Piston
10. Piston boot 11. Inner shim cover12. Inner shim
13. Inner pad 14. Pad wear sensor15. Pad retainer
16. Outer pad 17. Outer shim18. Outer shim cover
19. Sliding pin 20. Sliding pin boot21. Bushing
22. Torque member bolt 23. Torque member Front
: Brake fluid 1:Molykote AS-880N grease 2: Rubber grease
3: Molykote 7439 grease
Revision: January 20102010 Versa