Page 529 of 658

6-20 For emergencies
6
Towing manual transaxle vehicles with rear wheels off
the ground (Type B)Place the gearshift lever in the “Neutral” position.
Turn the ignition switch to the “ACC” position and secure the
steering wheel in a straight-ahead position with a rope or tie-
down strap. Never place the ignition switch in the “LOCK”
position when towing.Towing with front wheels off the ground (Type C)Release the parking brake.
Place the gearshift lever in the “Neutral” position (manual tran-
saxle) or the selector lever in the “N” (NEUTRAL) position
(CVT).
Operation under adverse driving conditions
N00837200604
If your vehicle becomes stuck in sand, mud or
snow If your vehicle becomes stuck in snow, sand, or mud, it can
often be moved by a rocking motion. Rock your vehicle back
and forth to free it.
Do not rev the engine or spin the wheels. Constant efforts to
free a stuck vehicle can cause overheating and transaxle fail-
ure. Let the engine idle for a few minutes to cool the transaxle
before trying again.
If your vehicle is still stuck after several rocking attempts, call
for a commercial tow truck service.
�
[For front-wheel drive vehicle equipped with the
active stability control (ASC)]
If the vehicle is towed with the ignition switch in the
“ON” position and only the front wheels raised off
the ground (Type C), the ASC may operate, result-
ing in an accident. When towing the vehicle with the
front wheels raised, keep the ignition switch in the
“LOCK” or “ACC” position.WA R N I N G
!�
To prevent entry of exhaust gas from the towing
vehicle, set the selection switch to the recirculation
position.CAUTION
!
WA R N I N G
!�
When trying to rock your vehicle out of a stuck posi-
tion, make sure that there are no people nearby. The
rocking motion can make your vehicle suddenly
lurch forward or backward, and injure any
bystanders.
BK0103001US.book 20 ページ 2009年8月20日 木曜日 午前10時45分
Page 530 of 658
For emergencies
6-21
6
On wet roads On snowy or icy roads
�
When driving on a road covered with snow or ice, use
snow tires. Tire chains cannot be used on your vehicle.
There may be state or local regulations about using snow
tires. Always check the regulations in your local area
before using them. Refer to the section entitled “Snow
tires” on page 7-38 and “Tire chains” on page 7-38.
�
Drive slowly. Do not make sudden starts or stops, sharp
turns, or slam on the brakes.
�
Allow extra distance between your vehicle and the vehicle
in front of you, and avoid sudden braking.
�
If a skid occurs when the accelerator pedal is depressed,
take your foot off the pedal. Steer gently in the direction
of the skid.
�
Your vehicle is equipped with an anti-lock braking system
(ABS). Hold the brake pedal down firmly and keep it
depressed. Do not pump the brake pedal which will result
in reduced braking performance.
�
After parking on snowy or icy road, it may be difficult to
move your vehicle due to freeze-up of the brake. Depress
the accelerator pedal little by little to move the vehicle
after confirming safety of the vehicle.
CAUTION
!�
Avoid flooded roads. Water is often deeper than it
looks, and you could be seriously hurt by driving
into flood water.
�
When driving in rain, on water-covered roads, or
through a car wash, water could get into the brake
discs and make them fail temporarily. In such cases,
lightly press the brake pedal to see if they are work-
ing properly. If they are not, press the pedal lightly
several times while driving to dry the brake pads or
linings, then check them again.
�
When driving in rain, a layer of water may form
between the tires and the road surface (aquaplan-
ing). This loosens your tires’ grip on the road, mak-
ing it difficult to steer or brake properly. When
driving on a wet road: Drive your vehicle at a safe speed.
Do not drive on worn tires.
Always keep the tires at the correct inflation pres-
sures.
CAUTION
!�
Do not depress the accelerator pedal rapidly. The
vehicle could start moving when it breaks free from
the ice, possibly resulting in an accident.
BK0103001US.book 21 ページ 2009年8月20日 木曜日 午前10時45分
Page 533 of 658
7-2 Vehicle care and maintenance
7Service precautions
N00937300299
Taking regular care of your vehicle will preserve its value and
appearance as long as possible.
You can do some of the maintenance work yourself, and the
rest should only be performed by an authorized Mitsubishi
Motors dealer or a repair facility of your choice.
If you discover a malfunction or other problem, have it cor-
rected by an authorized Mitsubishi Motors dealer or a repair
facility of your choice.
This section describes the maintenance inspections that you
can do yourself, if you so desire. Follow the instructions and
precautions for each procedure.
Have you purchased the Mitsubishi Motors Diamond Care Pro-
tection Plan? The Plan supplements your new vehicle warran-
ties. See your authorized Mitsubishi Motors dealer for details.
WA R N I N G
!�
When checking or servicing the inside of the engine
compartment, be sure the engine is stopped and has
had a chance to cool down.
�
If you need to work in the engine compartment with
the engine running, be especially careful that your
clothing, hair, etc. does not get caught in the fan,
drive belts, or other moving parts.
�
The fan can turn on automatically even if the engine
is not running. Turn the ignition switch to the
“LOCK” position to be safe while you work in the
engine compartment.
�
Do not smoke or allow open flames around fuel or
the battery. The fumes are flammable.
�
Be extremely careful when working around the bat-
tery. It contains poisonous and corrosive sulfuric
acid.
�
Do not get under your vehicle while it is on a jack.
Always use properly rated automotive jack stands.
�
Handling your vehicle’s parts and materials in the
wrong way can injure you. Ask an authorized Mit-
subishi Motors dealer or a repair facility of your
choice if you have questions. WA R N I N G
!
BK0103001US.book 2 ページ 2009年8月20日 木曜日 午前10時45分
Page 535 of 658
7-4 Vehicle care and maintenance
7Engine hood
N00937500451
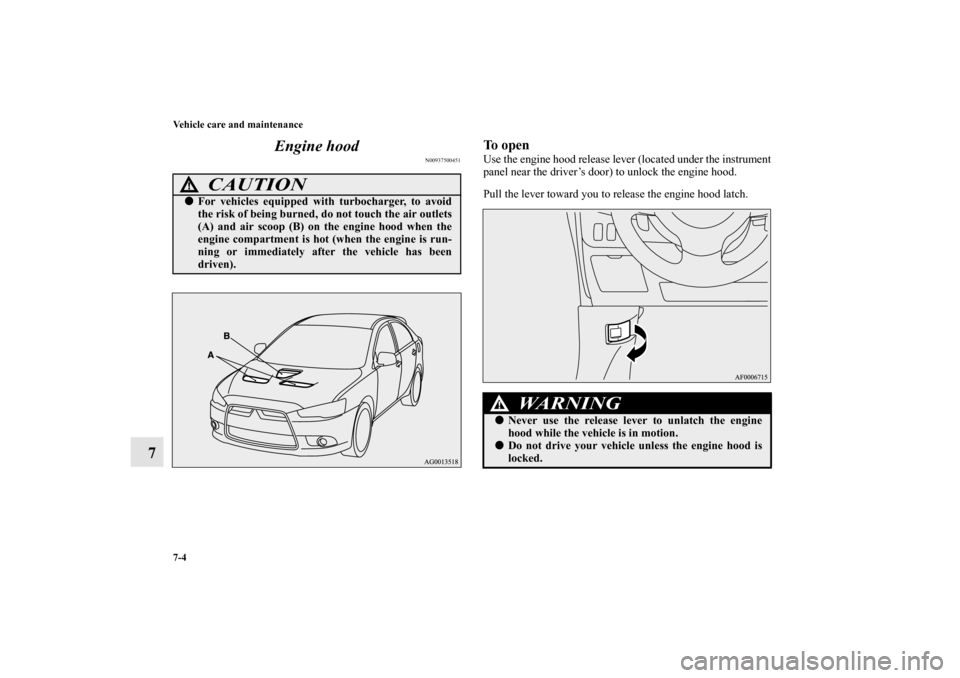
To openUse the engine hood release lever (located under the instrument
panel near the driver’s door) to unlock the engine hood.
Pull the lever toward you to release the engine hood latch.
CAUTION
!�
For vehicles equipped with turbocharger, to avoid
the risk of being burned, do not touch the air outlets
(A) and air scoop (B) on the engine hood when the
engine compartment is hot (when the engine is run-
ning or immediately after the vehicle has been
driven).
WA R N I N G
!�
Never use the release lever to unlatch the engine
hood while the vehicle is in motion.
�
Do not drive your vehicle unless the engine hood is
locked.
BK0103001US.book 4 ページ 2009年8月20日 木曜日 午前10時45分
Page 543 of 658
7-12 Vehicle care and maintenance
7
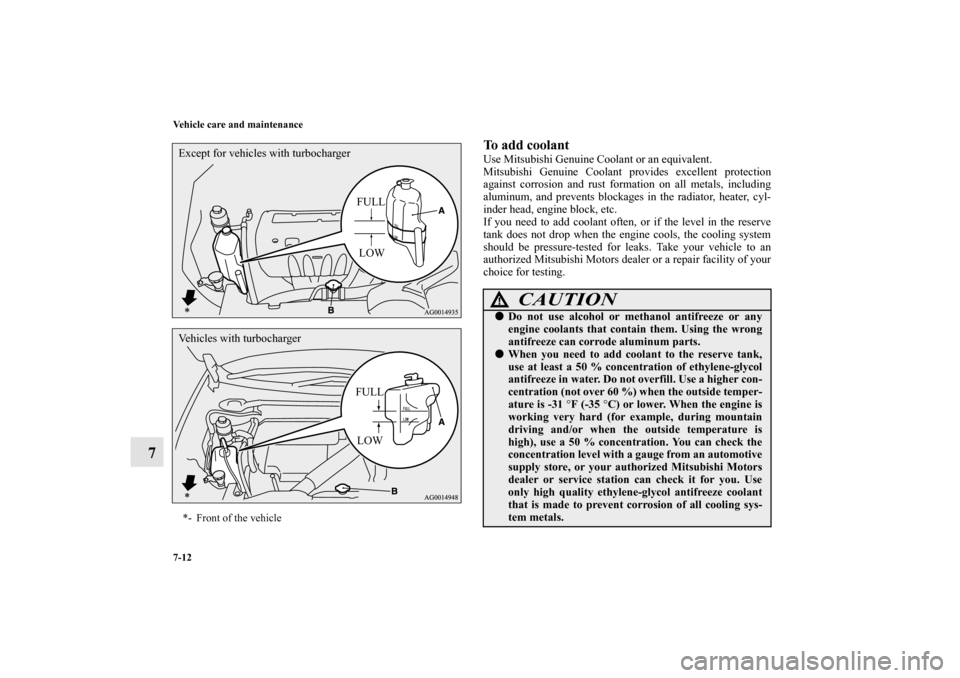
To add coolant Use Mitsubishi Genuine Coolant or an equivalent.
Mitsubishi Genuine Coolant provides excellent protection
against corrosion and rust formation on all metals, including
aluminum, and prevents blockages in the radiator, heater, cyl-
inder head, engine block, etc.
If you need to add coolant often, or if the level in the reserve
tank does not drop when the engine cools, the cooling system
should be pressure-tested for leaks. Take your vehicle to an
authorized Mitsubishi Motors dealer or a repair facility of your
choice for testing.
*- Front of the vehicle
FULL
LOW Except for vehicles with turbocharger
Vehicles with turbocharger
FULL
LOW
CAUTION
!�
Do not use alcohol or methanol antifreeze or any
engine coolants that contain them. Using the wrong
antifreeze can corrode aluminum parts.
�
When you need to add coolant to the reserve tank,
use at least a 50 % concentration of ethylene-glycol
antifreeze in water. Do not overfill. Use a higher con-
centration (not over 60 %) when the outside temper-
ature is -31 °F (-35 °C) or lower. When the engine is
working very hard (for example, during mountain
driving and/or when the outside temperature is
high), use a 50 % concentration. You can check the
concentration level with a gauge from an automotive
supply store, or your authorized Mitsubishi Motors
dealer or service station can check it for you. Use
only high quality ethylene-glycol antifreeze coolant
that is made to prevent corrosion of all cooling sys-
tem metals.
BK0103001US.book 12 ページ 2009年8月20日 木曜日 午前10時45分
Page 550 of 658
Vehicle care and maintenance
7-19
7 Rear axle oil (All-wheel drive models)
N00915200201
Whenever the oil level is checked, add oil as necessary to
maintain the proper level.
Fill or change oil according to the table.Oil type
AW C c o n t r o l f l u i d
(if so equipped)
N00915300042
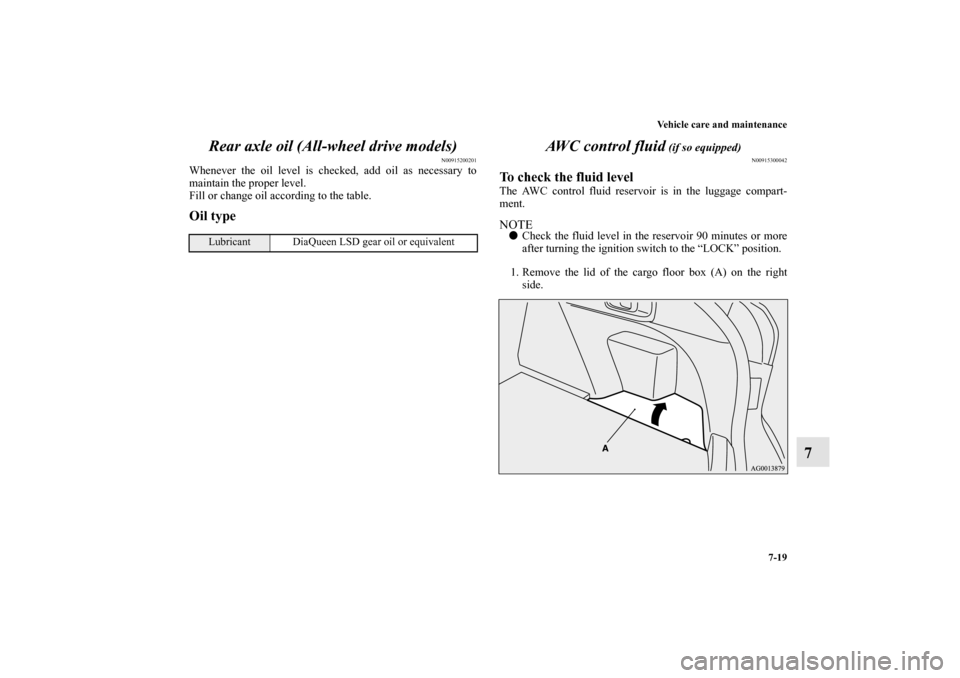
To check the fluid levelThe AWC control fluid reservoir is in the luggage compart-
ment.NOTE�
Check the fluid level in the reservoir 90 minutes or more
after turning the ignition switch to the “LOCK” position.
1. Remove the lid of the cargo floor box (A) on the right
side.
Lubricant DiaQueen LSD gear oil or equivalent
BK0103001US.book 19 ページ 2009年8月20日 木曜日 午前10時45分
Page 554 of 658
Vehicle care and maintenance
7-23
7 Battery
N00939100826
The condition of the battery is very important for quick starting
and to keep the vehicle’s electrical system working properly.
Check the battery regularly. Removing and installing the battery upper cover
(vehicles equipped with turbocharger)
N00901300025
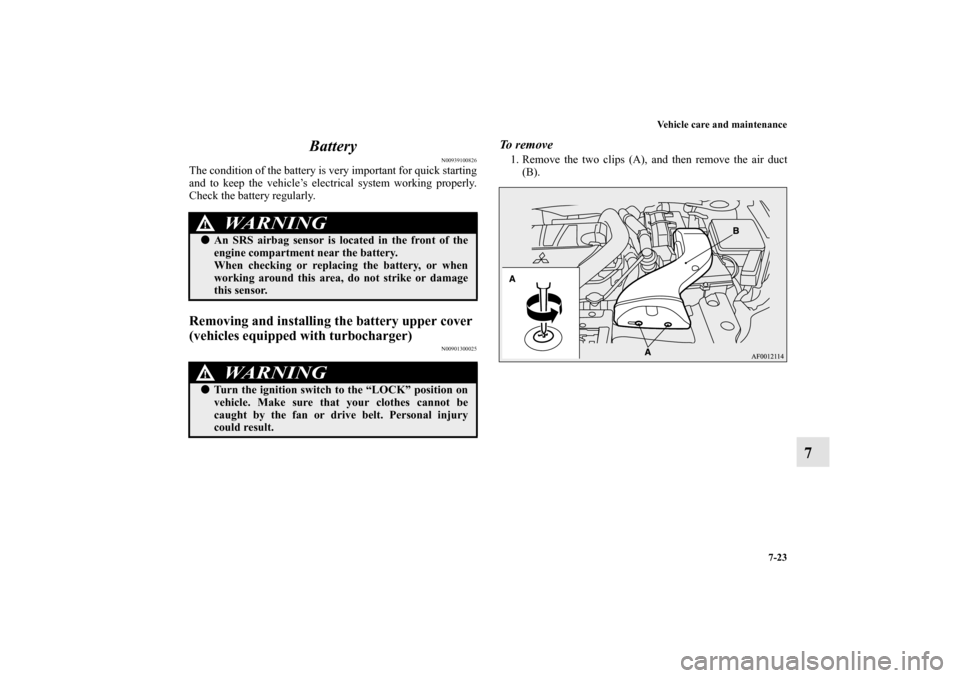
To r e m o v e1. Remove the two clips (A), and then remove the air duct
(B).
WA R N I N G
!�
An SRS airbag sensor is located in the front of the
engine compartment near the battery.
When checking or replacing the battery, or when
working around this area, do not strike or damage
this sensor.WA R N I N G
!�
Turn the ignition switch to the “LOCK” position on
vehicle. Make sure that your clothes cannot be
caught by the fan or drive belt. Personal injury
could result.
BK0103001US.book 23 ページ 2009年8月20日 木曜日 午前10時45分
Page 555 of 658
7-24 Vehicle care and maintenance
7
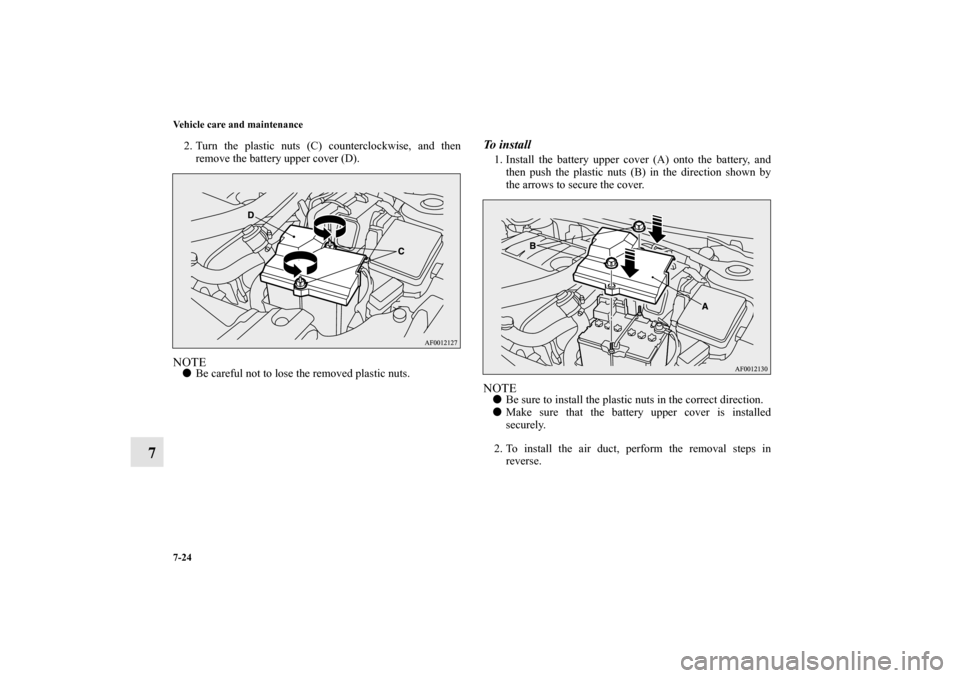
2. Turn the plastic nuts (C) counterclockwise, and then
remove the battery upper cover (D).NOTE�
Be careful not to lose the removed plastic nuts.
To i n s t a l l1. Install the battery upper cover (A) onto the battery, and
then push the plastic nuts (B) in the direction shown by
the arrows to secure the cover.NOTE�
Be sure to install the plastic nuts in the correct direction.
�
Make sure that the battery upper cover is installed
securely.
2. To install the air duct, perform the removal steps in
reverse.
BK0103001US.book 24 ページ 2009年8月20日 木曜日 午前10時45分