2010 MERCEDES-BENZ SLS COUPE fuse
[x] Cancel search: fusePage 12 of 361
F
Fast forward/rewind ................176, 194
Faul tmessage
see Display message .....................289
Fire extinguisher ............................... 289
First-aid kit ......................................... 289
Flat tyre Equipment ..................................... 325
Preparing the vehicle .....................325
TIREFIT kit ...................................... 326
Floormat ............................................ .264
Folders Selecting (MP3 mode )................... 176
Fording ............................................... 278
Frequencies Telephone ...................................... 347
Frequency entry
Manual .......................................... .162
Front airbag ......................................... 38
Front-passenger airbag ....................... 38
Fron tpassenge rkneebag ................... 39
Fuel ..................................................... 349
Loss ............................................... 314
Petrol ............................................. 267
Fuel consumption
Current (on-board computer) .........233
Notes ............................................. 349
Fuel filler flap
Opening/closing ............................ 266
Fuel gauge ............................................ 25
Fuel level Calling up the range (on-board
computer) ...................................... 233
Gauge .............................................. 25
Fuel line
Malfunction ................................... .314
Fuel tank
Defect ............................................ 314
Function restrictions
Addres sbook ........................ 151, 154
Music Register ............................... 183
Using the telephone ....................... 128
Video DVD mode ........................... 191
Fuse allocation chart ........................342
Fuse box Front-passenger footwell ...............342
Rea r............................................... 342Fuses
.................................................. 342 G
Garage door Opening/closing (with the remote
control) .......................................... 263
Garage door opener ..........................262
Clearing the memory .....................264
Programming the remote control ...262
Gear indicator .................................... 227
Gearshift program SETUP (on-board computer) ..........241
Genuine parts .................................... 346
Glove compartment ..........................257
Locking and unlocking (sepa-
rately) ............................................ 257
Gracenote ®
Media Database ............177 H
Hands-free microphone Switching on/off ........................... 146
Headbag ............................................... 40
Headlamp cleaning system ..............270
Headlamps Cleaning ......................................... 283
Cleaning system ............................ 217
Misting up ...................................... 317
Heating
see Air conditioning
High-pressure cleaners ....................282
Hill start assist .................................. 221
Home address see My address
HomeLink ®
see Garage door opener
House number
Entering ........................................... 99 I
Ignition lock ............................... 203, 258
Immobiliser .......................................... 49
Indicator and warning lamps ...........308
Air conditioning (malfunction) ........307
Automatic child sea trecognition
(malfunction) ................................. 307
Engine diagnostics .........................310 Index
9 BA 197 ECE RE 2010/6a; 1; 2, en-GB
sabbae uV ersion: 3.0.3.6
2010-05-07T14:19:43+02:00 - Seite 9
Page 283 of 361
shop, for example a Mercedes-Benz Service
Centre, they can inform you of the costs the
service will incur.
The ASSYST PLUS service interval display
does not take into account any periods of
time during which the battery is disconnec-
ted.
Maintaining the time-dependent service
schedule:
X Note down the service due date displayed
before disconnecting the battery.
or
X Subtract the battery disconnection periods
from the service date shown on the display
after reconnecting the battery.
Hiding aservice message If the service due date has no
tyet been
exceeded, the service message disappears
automatically after a few seconds. You can
also hide the service message yourself.
X Press 0001or000A on the steering wheel.
Service overdue Ad
isplay message is shown in the multifunc-
tion display, for example:
Service A overdue by ... days
Service A overdue by .. km
i If you fail to have the service performed
by the specified date, you may be violating
applicable laws. Your warranty may be inva-
lidated and goodwill settlements may be
refused. Calling up a service due date X
Switch on the ignition.
X Press the 0008or000E button to selec tthe
Serv. menu.
X Press the 000For000C button to select the
ASSYST PLUS submenu and confirm with
000A.
The service due date appears in the multi-
function display. Care
Care and cleaning products
Regular care of your vehicle is a condition for
retaining the quality in the long term. Use care
products and cleaning agents recommended
and approved by Mercedes-Benz.
! For cleaning your vehicle, do not use any
of the following:
R dry, rough or hard cloths
R abrasive cleaning agents
R solvents
R cleaning agents containing solvents
Do not scrub.
Do not touch the surfaces and protective
films with hard objects, e.g. rings or ice
scrapers. You could otherwise scratch or
damage the surfaces and protective film. H
Environmental note
Dispose of empty packaging, cleaning cloths
and polishing wads in an environmentally
responsible manner.
! Do not park the vehicle for a long period
of time directly after cleaning, especially if
the wheels have just been cleaned with a
wheel cleaner. Wheel cleaners could cause
rapid corrosion of the brake discs and
brake pads/linings. After cleaning, park
the vehicle when it is at normal operating
temperature. 280
CareOperation
BA 197 ECE RE 2010/6a; 1; 2, en-GB
sabbaeu
Version: 3.0.3.6 2010-05-07T14:19:43+02:00 - Seite 280
Page 290 of 361
Where will I find...?
...........................288
Display messages ............................. 289
Troubleshooting ................................ 306
Locking/unlocking in an emer-
gency ................................................. 321
Changing batteries (key) ..................323
Changing bulbs ................................. 323
Replacing the wiper blades ..............325
Flat tyre ............................................. 325
Battery ............................................... 334
Jump-starting .................................... 338
Towing and tow-starting ..................339
Fuses .................................................. 342 287Practical advice
BA 197 ECE RE 2010/6a; 1; 2, en-GB
sabbaeu
Version: 3.0.3.6 2010-05-07T14:19:43+02:00 - Seite 287
Page 345 of 361
Fuses
Notes on changing fuses
The fuses in your vehicle serve to close down
faulty circuits. If afuse blows, all the compo-
nents on the circuit and their functions will
fail.
Blown fuses must be replace dwith fuses of
the same rating, which you can recognise by
the colour and value. The fuse ratings are lis-
ted in the fuse allocation chart. AMercedes-
BenzS ervice Centre will be happy to advise
you. G
Risk of fire
Only use fuses that have been approved for
Mercedes-Benz vehicles and which have the
correct fuse rating for the systems con-
cerned. Do not attempt to repair or bridge
faulty fuses. Otherwise, a circuit overload
could cause a fire. Have the cause traced and
rectified at a qualified specialist workshop,
e.g. a Mercedes-Benz Service Centre.
If the newly inserted fuse also blows, have the
cause traced and rectified at a qualified spe-
cialist workshop, e.g. a Mercedes-Benz
Service Centre.
! Only use fuses that have been approved
for Mercedes-Benzv ehicles and which
have the correct fuse rating for the system
concerned. Otherwise, components or sys-
tems could be damaged.
The fuses are in the fuse boxes in the front-
passenger footwell and in the rear compart-
ment.
Fuse allocation chart The "Relay and fuse information sheet" is
located with the wheel-changing tools
(Y page 288) in the boot. Before changing a fuse
X Park the vehicle.
X Switch off all electrical consumers.
X Select key position 0with the Start/Stop
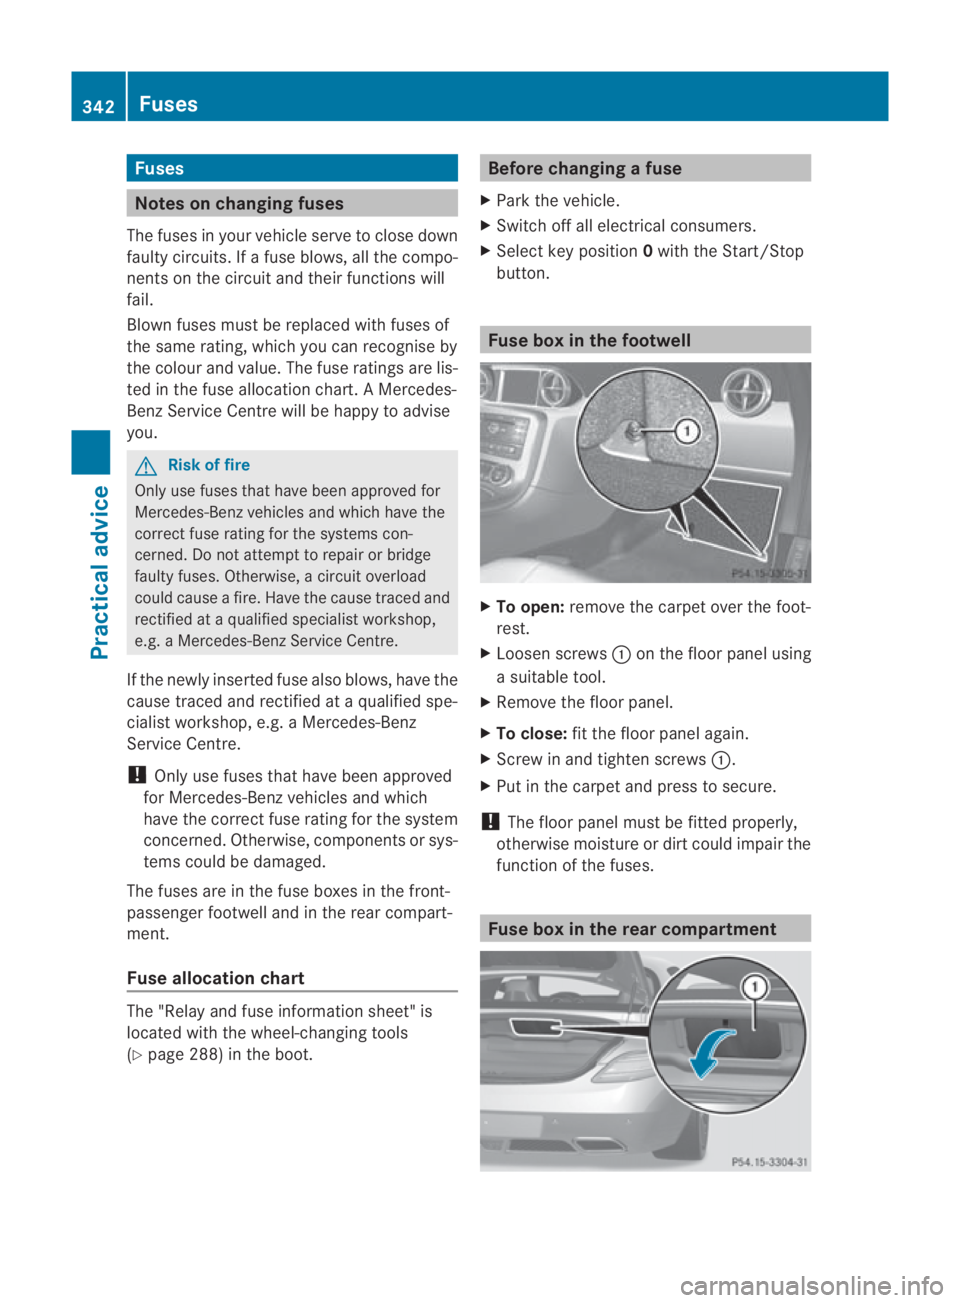
button. Fuse box in the footwell
X
To open: remove the carpet over the foot-
rest.
X Loosen screws 0001on the floor panel using
a suitable tool.
X Remove the floor panel.
X To close: fit the floor panel again.
X Screw in and tighten screws 0001.
X Put in the carpet and press to secure.
! The floor panel must be fitted properly,
otherwise moisture or dirt could impair the
function of the fuses. Fuse box in the rear compartment342
FusesPractical advice
BA 197 ECE RE 2010/6a; 1; 2, en-GB
sabbaeu
Version: 3.0.3.6 2010-05-07T14:19:43+02:00 - Seite 342
Page 346 of 361
X
To open: open the boot.
X Fold cover 0001in the centre of the rea rwall
down in the direction of the arrow.
X To close: fold cover 0001up in the opposite
direction to the arrow and press to secure.
! The cover must be fitte dproperly, other-
wise moisture or dirt could impair the func-
tion of the fuses. Fuses
343Practical advice
BA 197 ECE RE 2010/6a; 1; 2, en-GB
sabbaeu Version: 3.0.3.6
2010-05-07T14:19:43+02:00 - Seite 343 Z