2010 MERCEDES-BENZ SLS COUPE service
[x] Cancel search: servicePage 332 of 361
the work required. Mercedes-Benz recom-
mends tha
tyou use a Mercedes-Benz Service
Centre for this purpose. In particular, work
relevant to safety or on safety-related sys-
tems must be carried out at a qualified spe-
cialist workshop.
X Correct the tyre pressure if it is at least
130 kPa (1.3 bar) (see fuel filler flap for val-
ues).
To increase the tyre pressure: switch on
the tyre inflation compressor.
To reduce the tyre pressure: open
release screw 000A.
! The manufacturer does not guarantee
that all tyre damage can be repaired using
the TIREFIT kit, particularly in the case of
cuts and punctures with a diameter of more
than four millimetres or on the sidewall. The
manufacturer is not responsible for dam-
age caused by inappropriate use of the
TIREFIT kit.
X Drive to the nearest workshop and have the
tyre changed there.
X Have the TIREFIT kit replaced as soon as
possible at a qualified specialist workshop,
e.g. at a Mercedes-Benz Service Centre. H
Environmental note
Have the used TIREFIT kit disposed of profes-
sionally, e.g. at a Mercedes-Benz Service
Centre.
X Have the TIREFIT kit replaced every four
years at a qualified specialist workshop,
e.g. a Mercedes-Benz Service Centre. Changing
awheel
Preparing the vehicle i
You rvehicle is not fitted with wheel-
changing tools at the factory. Some of the
tools required to perform awheel change, e.g. wheel chock, jack, centring pin or
wheel wrench are vehicle-specific. For
more information on which tools are
required to perform a wheel change on your
vehicle, consult a Mercedes-Ben
zService
Centre.
X Prepare the vehicle as described
(Y page 325).
X Bring the wheels into the straight-ahead
position.
X Take the following objects from the left-
hand stowage compartment and the left-
hand stowage space in the boot:
R
the jack 24
R the wheel-changing tools*
R the folding wheel chock 24
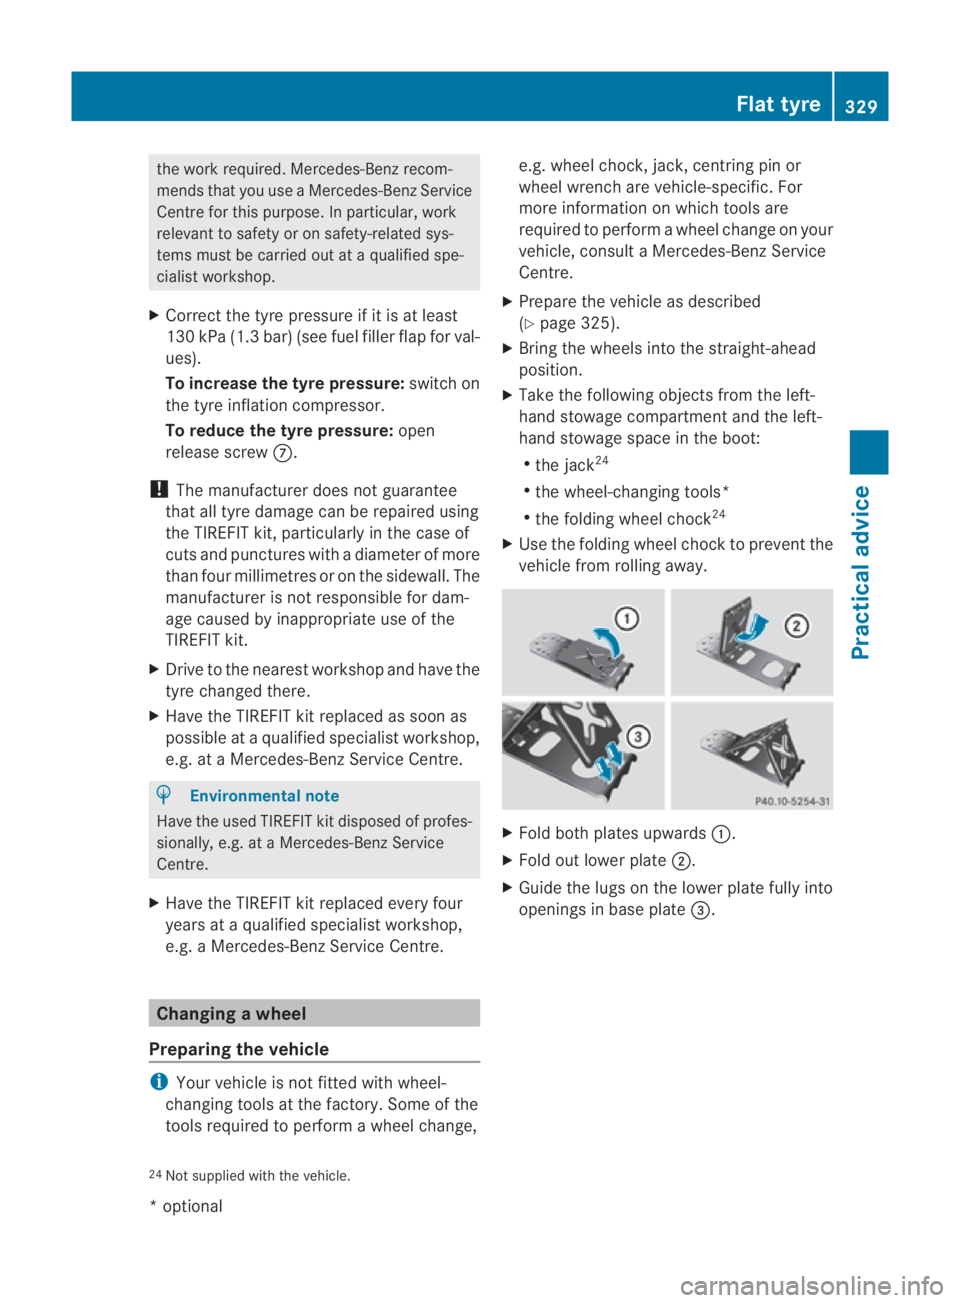
X Use the folding wheel choc kto prevent the
vehicle from rolling away. X
Fold both plates upwards 0001.
X Fold out lower plate 0002.
X Guide the lugs on the lower plate fully into
openings in base plate 0015.
24 Not supplied with the vehicle. Flat tyre
329Practical advice
*optional
BA 197 ECE RE 2010/6a; 1; 2, en-GB
sabbaeu
Version: 3.0.3.6 2010-05-07T14:19:43+02:00 - Seite 329 Z
Page 334 of 361
X
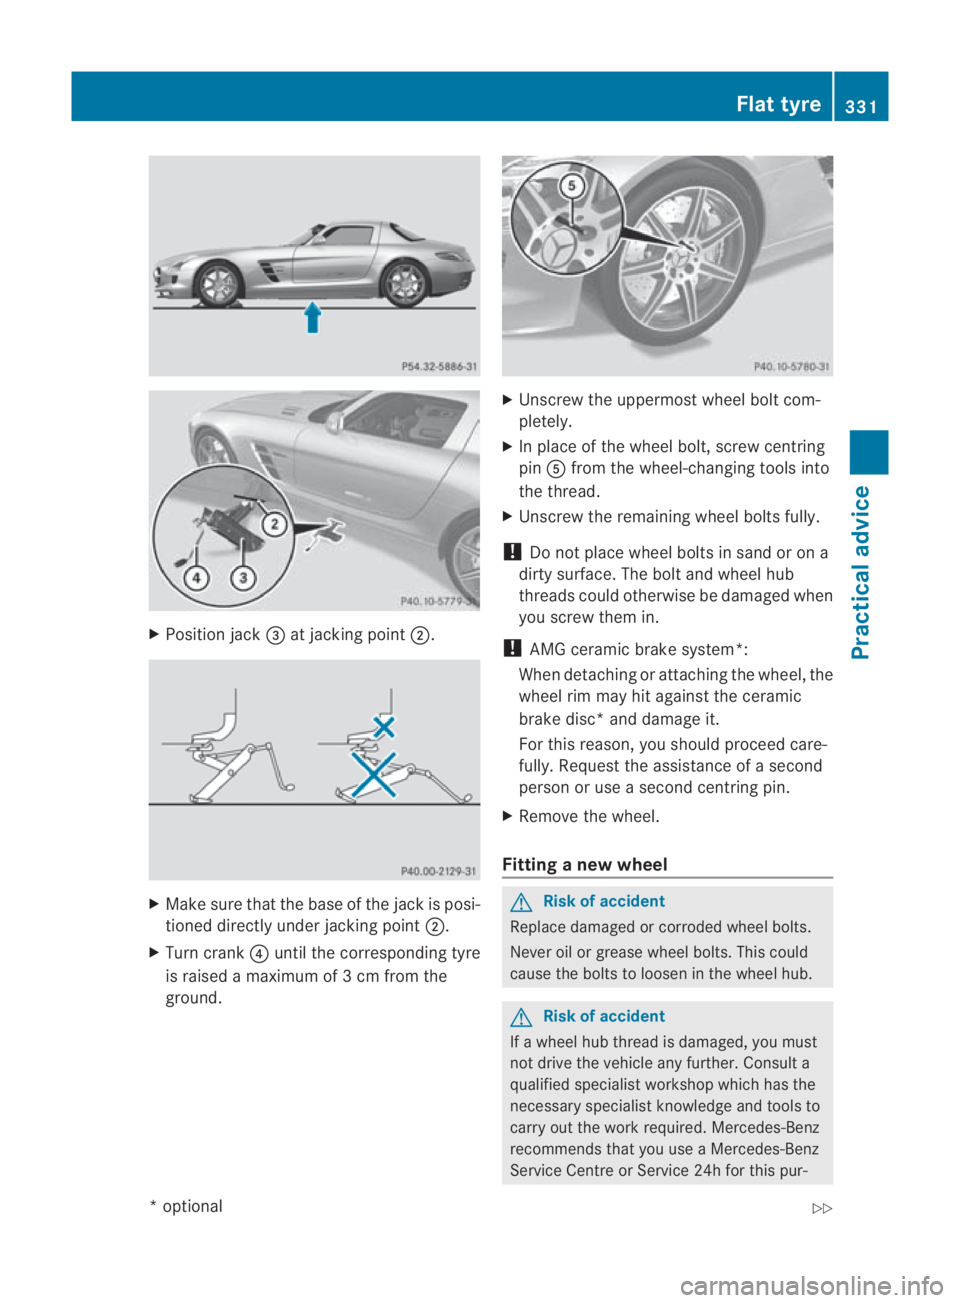
Position jack 0015at jacking point 0002. X
Make sure that the base of the jack is posi-
tioned directly under jacking point 0002.
X Turn crank 0014until the corresponding tyre
is raised a maximum of 3 cm from the
ground. X
Unscrew the uppermost wheel bolt com-
pletely.
X In place of the wheel bolt, screw centring
pin 0012from the wheel-changing tools into
the thread.
X Unscrew the remaining wheel bolts fully.
! Do not place wheel bolts in sand or on a
dirty surface. The bolt and wheel hub
threads could otherwise be damaged when
you screw them in.
! AMG ceramic brake system*:
When detaching or attaching the wheel, the
wheel rim may hit against the ceramic
brake disc* and damage it.
For this reason, you should proceed care-
fully. Request the assistanc eofasecond
person or use a second centring pin.
X Remove the wheel.
Fitting anew wheel G
Risk of accident
Replace damaged or corroded wheel bolts.
Never oil or grease wheel bolts. This could
cause the bolts to loose ninthe wheel hub. G
Risk of accident
If a wheel hub thread is damaged, you must
not drive the vehicle any further. Consult a
qualified specialist workshop which has the
necessary specialist knowledge and tools to
carry out the work required. Mercedes-Benz
recommends that you use aMercedes-Benz
Service Centre or Service 24h for this pur- Flat tyre
331Practical advice
*optional
BA 197 ECE RE 2010/6a; 1; 2, en-GB
sabbaeu
Version: 3.0.3.6 2010-05-07T14:19:43+02:00 - Seite 331 Z
Page 336 of 361
X
Turn the jack back to the out-of-use posi-
tion and stow it in the boot again with the
rest of the wheel-changing tools. Emergency spare wheel*
G
Risk of accident
The wheel dimensions and tyre size of the
emergency spare wheel differ from those of
the standard wheels.
Your vehicle's handling characteristics will
change when driving with a collapsible emer-
gency spare wheel. Adapt your style of driving
accordingly.
The collapsible emergency spare wheel may
only be used for a short time. Do not exceed
the maximum speed of 80 km/h and do not
deactivate ESP ®
. G
Risk of accident
Have the collapsible emergenc yspare wheel
replaced as soon as possible at a qualified
specialist workshop which has the necessary
specialist knowledge and tools to carry out
the work required. Mercedes-Benz recom-
mends that you use a Mercedes-Benz Service
Centre for this purpose. In particular, work
relevant to safety or on safety-related sys-
tems must be carried out at a qualified spe-
cialist workshop.
Never drive the vehicle with more than one
collapsible emergency spare wheel fitted.
Inflating the collapsible emergency
spare wheel 25 G
Risk of accident
Pump up the collapsible emergency spare
wheel before lowering the vehicle. You could
otherwise damage the wheel rim.
X Remove the electric air pump from the boot
(Y page 288). Comply with the manufacturer’s safety
instructions on the sticker on the electric air
pump and on the TIREFIT filler bottle.
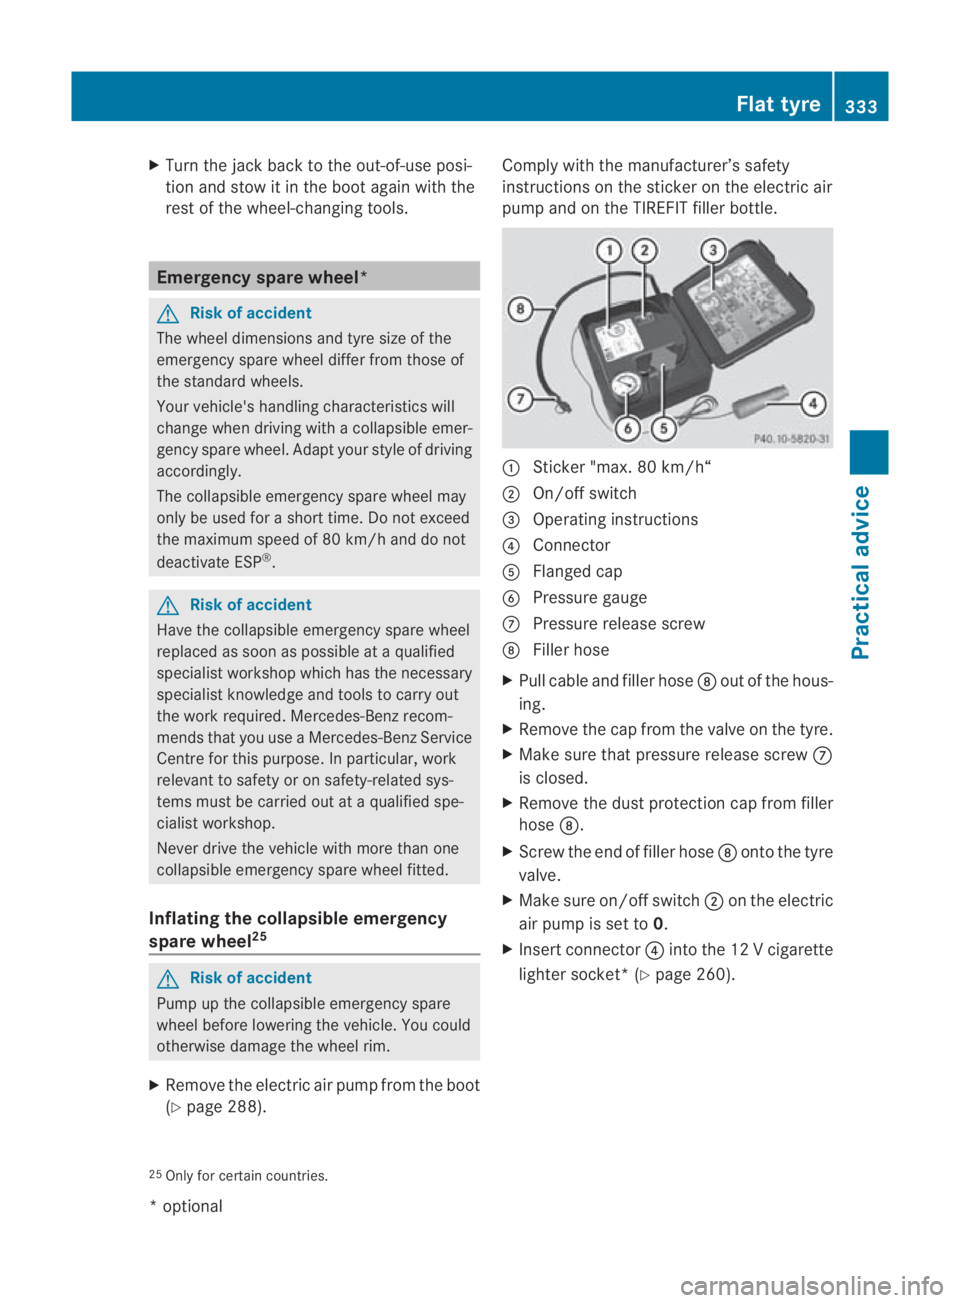
0001
Sticker "max. 80 km/h“
0002 On/off switch
0015 Operating instructions
0014 Connector
0012 Flanged cap
0013 Pressure gauge
000A Pressure release screw
000B Filler hose
X Pull cable and filler hose 000Bout of the hous-
ing.
X Remove the cap from the valve on the tyre.
X Make sure that pressure release screw 000A
is closed.
X Remove the dust protection cap from filler
hose 000B.
X Screw the end of filler hose 000Bonto the tyre
valve.
X Make sure on/off switch 0002on the electric
air pump is set to 0.
X Insert connector 0014intothe 12 V cigarette
lighter socket*( Ypage 260).
25 Only for certain countries. Flat tyre
333Practical advice
*optional
BA 197 ECE RE 2010/6a; 1; 2, en-GB
sabbaeu Version: 3.0.3.6 2010-05-07T14:19:43+02:00 - Seite 333 Z
Page 337 of 361
X
Select key position 2with the Start/Stop
button (Y page 202).
X Press on/of fswitch 0002on the electric air
pump to I.
The electric air pump is switched on. The
tyre is inflated.
X When the specified tyre pressure (see
Emergency spare wheel (Y page 355)) has
been reached, press on/off switch 0002on
the electric air pump to 0.
The electric air pump is switched off.
! Do not operate the electric air pump for
longer than ten minutes at a time without
a break .Itmay otherwise overheat.
The air pump can be operated again once
it has cooled down.
If the tyre pressure is higher than the value
specified:
X Open pressure release screw 000Auntil the
tyre pressure is correct.
X Remove fille rhose 000Bfrom the tyre valve.
X Stow the electric air pump in a safe and
accessible place in the vehicle.
Stowing aused collapsible emergency
spare wheel 25 If you want to store a collapsible emergency
spare wheel in the vehicle again, follow the
procedure described below. Otherwise, it will
not be possible to store it. We recommend
that this work is carried out at a specialist
workshop.
! Only place the collapsible emergency
spare wheel in the vehicle when it is dry.
Otherwise, moisture may remain in the
vehicle interior.
X Unscrew the valve cap with integrated
valve extractor from the valve.
X Unscrew the valve insert from the valve and
release the air. i
Fully deflating the tyres can take a few
minutes.
X Screw the valve insert back into the valve.
X Screw the valve cap back on.
X Put the tyre cover provided over the col-
lapsible emergency spare wheel.
X Store the collapsible emergency spare
wheel behind the front-passenger seat. Battery
Notes on the vehicle battery
In order for the battery to achieve the maxi-
mum possible service life, it must always be
sufficiently charged.
Have the battery charge checked more fre-
quently if you use the vehicle mainly for short
trips or if you leave it standing idle for a
lengthy period.
To preven tdamage from corrosion, only
replace the battery with one that has a central
ventilation cover.
Consult a Mercedes-Ben zService Centre if
you wish to leave your vehicle parked up for
a long period of time. G
Risk of injury
Comply with safety precautions and take pro-
tective measures when handling batteries. Risk of explosion
Fire, naked flames and
smoking are prohibited
when handling the battery.
Avoid creating sparks.
Battery acid is caustic.
Avoid contact with the skin,
eyes or clothing.
Wear suitable protective
clothing, in particular
25 Only for certain countries. 334
BatteryPractical advice
BA 197 ECE RE 2010/6a; 1; 2, en-GB
sabbaeu Version: 3.0.3.6 2010-05-07T14:19:43+02:00 - Seite 334
Page 338 of 361
gloves, an apron and a face
mask.
Immediately rinse acid
splashes off with clean
water. Consult a doctor if
necessary.
Wear eye protection.
Keep children away.
Observe this Owner's Man-
ual.
H
Environmental note
Do not dispose of batteries in the household
rubbish. Dispose of defective batteries in an
environmentally responsible manner. Take
them to a Mercedes-Benz Service Centre or
to a special collection point for old batteries. G
Risk of injury
For safety reasons, Mercedes-Benz recom-
mends that you only use batteries which have
been tested and approved for your vehicle by
Mercedes-Benz. These batteries provide
increased impact protection to prevent vehi-
cle occupants from suffering acid burns
should the battery be damaged in the event
of an accident.
To prevent acid burns, observe the following
safety notes when handling batteries:
R do not lean over the battery.
R do not place any metal objects on a battery.
Otherwise, you could cause a short circuit
and the battery's gas mixture could ignite.
R make sure that you do not create an elec-
trostatic charge, e.g. by wearing synthetic
clothing or as a result of friction on fabrics.
Therefore, you should not pull or slide the
battery over carpets or other synthetic
materials. R
never touch the battery first. To discharge
a possible electrostatic charge, step out of
the vehicle first and touch the bodywork.
R do not wipe the battery using a cloth. The
battery may explode as a result of electro-
static charge or due to flying sparks.
! Switch off the engine and ensure that no
ignition position has been selected before
detaching the battery terminals. All indica-
tor lights must be off in the instrument
cluster. Otherwise, you may destroy elec-
tronic components such as the alternator.
i Mercedes-Benz recommends that you
have work involving the battery, e.g.
removal, charging and replacement, car-
ried out at a qualified specialist workshop,
e.g. a Mercedes-Benz Service Centre.
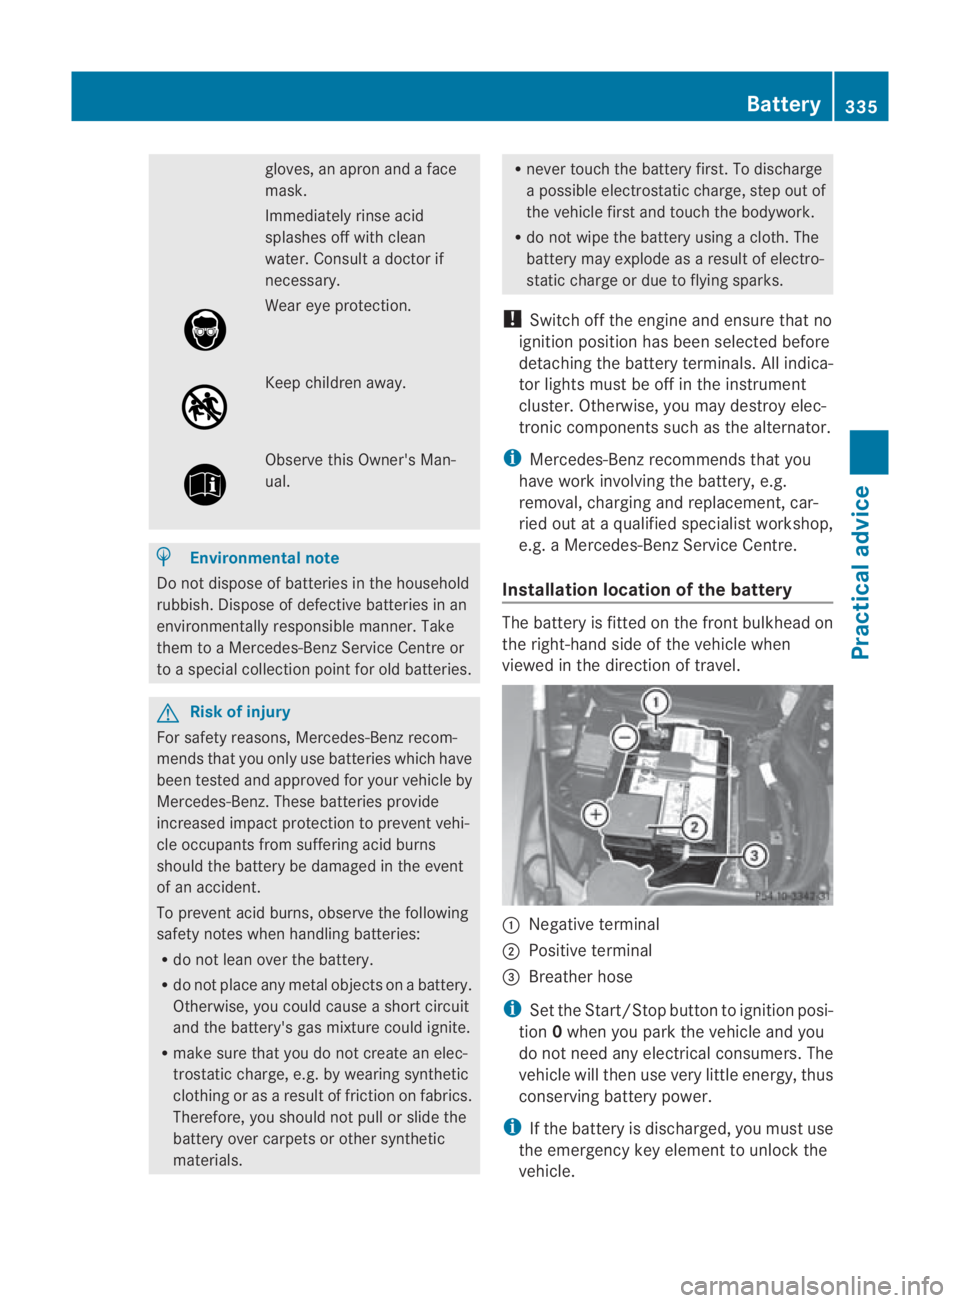
Installation location of the battery The battery is fitted on the front bulkhead on
the right-hand side of the vehicle when
viewed in the direction of travel.
0001
Negative terminal
0002 Positive terminal
0015 Breather hose
i Set the Start/Stop button to ignition posi-
tion 0when you park the vehicle and you
do not need any electrical consumers .The
vehicle will then use very little energy, thus
conserving battery power.
i If the battery is discharged, you must use
the emergency key element to unlock the
vehicle. Battery
335Practical advice
BA 197 ECE RE 2010/6a; 1; 2, en-GB
sabbaeu Version: 3.0.3.6 2010-05-07T14:19:43+02:00 - Seite 335 Z
Page 339 of 361
Disconnecting the battery
G
Risk of accident
If the battery is disconnected:
R the brake boosting effect will no tbe avail-
able. Greater braking force will then be
required and brake pedal travel will be lon-
ger. If necessary, depress the brake pedal
with full force.
R the transmission is locked in position P.
! Always disconnect the battery in the
order described below. Never mix up the
terminal clamp disconnection/connection
order and never mix up the terminal
clamps. You may otherwise damage the
vehicle electronics.
Disconnecting the battery X
Press the electric parking brake handle.
X Shift the transmission to Pwith the button
in the centre console.
X Switch off all electrical consumers (e.g.
radio, blower etc.).
X Set the Start/Stop button to key position
0(Y page 202).
X To disconnect the battery: open the bon-
net.
X Remove the negative terminal clamp from
the battery.
X Remove the cover from the positive termi-
nal clamp.
X Remove the positive terminal clamp from
the battery.
X Disconnect the breather hose. Removing the battery
X Disconnect the batter y(Ypage 336).
The bar over the battery prevents it from slip-
ping.
X Loosen the screw on the bar.
X Remove the bar. X
Loosen and remove the two screws on the
clamping plate.
X Remove the clamping plate.
X Remove the battery. Charging and fitting the battery
G
Risk of injury
Only charge the battery in a well-ventilated
area. As the battery is being charged, gases
can escape and generate minor explosions.
This could injure you and other persons or
cause damage to the paintwor koracid cor-
rosion on the vehicle.
You can obtain information abou tbattery
chargers which allow the battery to be
charged while still installed from a qualified
specialist workshop, e.g .aMercedes-Benz
Service Centre. G
Risk of injury
There is a risk of acid burns during the charg-
ing process due to the gases which escape
from the battery. Do not lean over the battery
during the charging process. G
Risk of injury
Battery acid is caustic. Avoid contact with the
skin, eyes or clothing.
! Never charge the batter ywhen it is instal-
led unless the battery charger has been
tested and approved by Mercedes-Benz.
These battery chargers allow the battery to
be charged while it is still installed.
! Only use battery chargers with a maxi-
mum charging voltage of 14.8 V.
X Charge the battery. Observe the notes in
the operating instructions for your battery
charger.
X Refit the charged battery.
To do this, follow the steps described in
"Removing the battery" (Y page 336) in
reverse order. 336
BatteryPractical advice
BA 197 ECE RE 2010/6a; 1; 2, en-GB
sabbaeu
Version: 3.0.3.6 2010-05-07T14:19:43+02:00 - Seite 336
Page 341 of 361
Jump-starting
If your vehicle's battery is discharged, the engine can be jump-started from another vehicle
or from an external battery using jump leads.
Observe the following points:
R you may only jump-start the vehicle when the engine and catalytic converter are cold.
R do not start the engine if the battery is frozen. Let the battery thaw first.
R jump-starting may only be performed from batteries with a nominal voltage of 12 V.
R only use jump leads which have a sufficient cross-section and insulated terminal clamps.
i Jump leads and further information about jump-starting can be obtained from any
Mercedes-Benz Service Centre.
! Avoid repeated and lengthy starting attempts. Only use the jump-starting procedure for
the battery in the engine compartment.
Do not use a rapid-charging device to start the engine. G
Risk of injury
There is a risk of acid burns when jump-starting a vehicle due to the gases which escape from
the battery. Do not lean over the battery while the engine is being jump-started. G
Risk of explosion
Gases escaping from the battery during jump-starting may cause minor explosions. Avoid cre-
ating sparks. Keep naked flames away from the battery, and do not smoke.
Comply with safety precautions and take protective measures when handling batteries. You will
find these under "Battery" in the index.
X Make sure that the two vehicles do not touch.
X Press the electric parking brake handle.
X Shift the transmission to Pwith the button in the centre console.
X Switch off all electrical consumers (e.g. radio, blower etc.).
X Open the bonnet (Y page 267).338
Jump-startingPractical advice
BA 197 ECE RE 2010/6a; 1; 2, en-GB
sabbaeu
Version: 3.0.3.6 2010-05-07T14:19:43+02:00 - Seite 338
Page 342 of 361
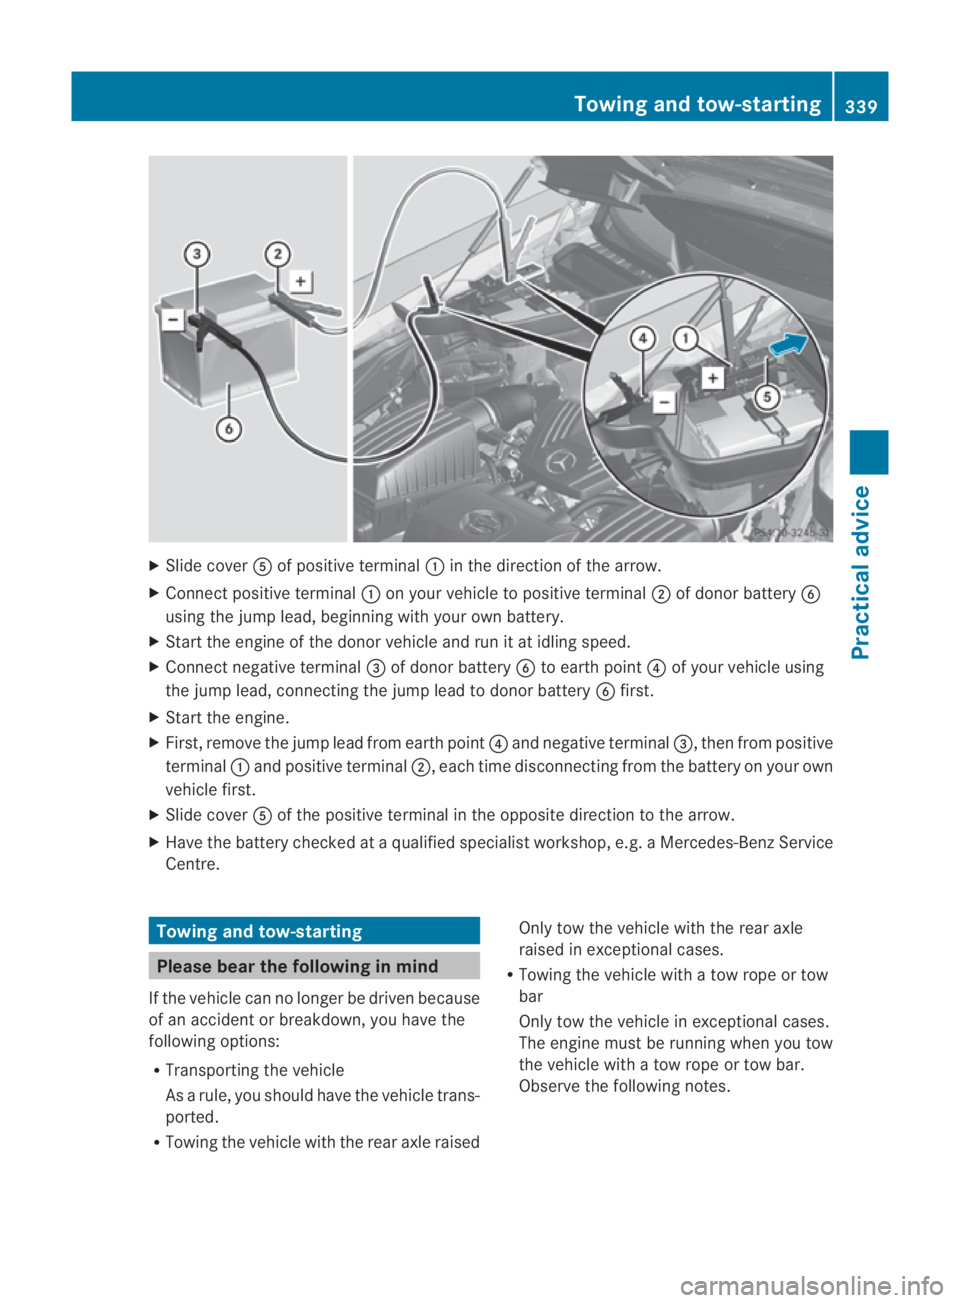
X
Slide cover 0012of positive terminal 0001in the direction of the arrow.
X Connect positive terminal 0001on your vehicle to positive terminal 0002of donor battery 0013
using the jump lead, beginning with your ow nbattery.
X Start the engine of th edonor vehicle and run it at idling speed.
X Connect negative terminal 0015of donor battery 0013to earth point 0014of your vehicle using
the jump lead, connectingt he jump lead to donor battery 0013first.
X Start the engine.
X First, remove the jump lead from earth point 0014and negative terminal 0015, then from positive
terminal 0001and positive terminal 0002, each time disconnecting from the battery on your own
vehicle first.
X Slide cover 0012of the positive terminal in the opposite direction to the arrow.
X Have the battery checked at a qualified specialist workshop, e.g. a Mercedes-Ben zService
Centre. Towing and tow-starting
Please bear the following in mind
If the vehicle can no longer be driven because
of an acciden torbreakdown, you have the
following options:
R Transporting the vehicle
As a rule, you should have the vehicle trans-
ported.
R Towing the vehicle with the rear axle raised Only tow the vehicle with the rear axle
raised in exceptional cases.
R Towing the vehicle with a tow rope or tow
bar
Only tow the vehicle in exceptional cases.
The engine must be running when you tow
the vehicle with a tow rope or tow bar.
Observe the following notes. Towing and tow-starting
339Practical advice
BA 197 ECE RE 2010/6a; 1; 2, en-GB
sabbaeu Version: 3.0.3.6
2010-05-07T14:19:43+02:00 - Seite 339 Z