2010 MERCEDES-BENZ R320 ECU
[x] Cancel search: ECUPage 199 of 364
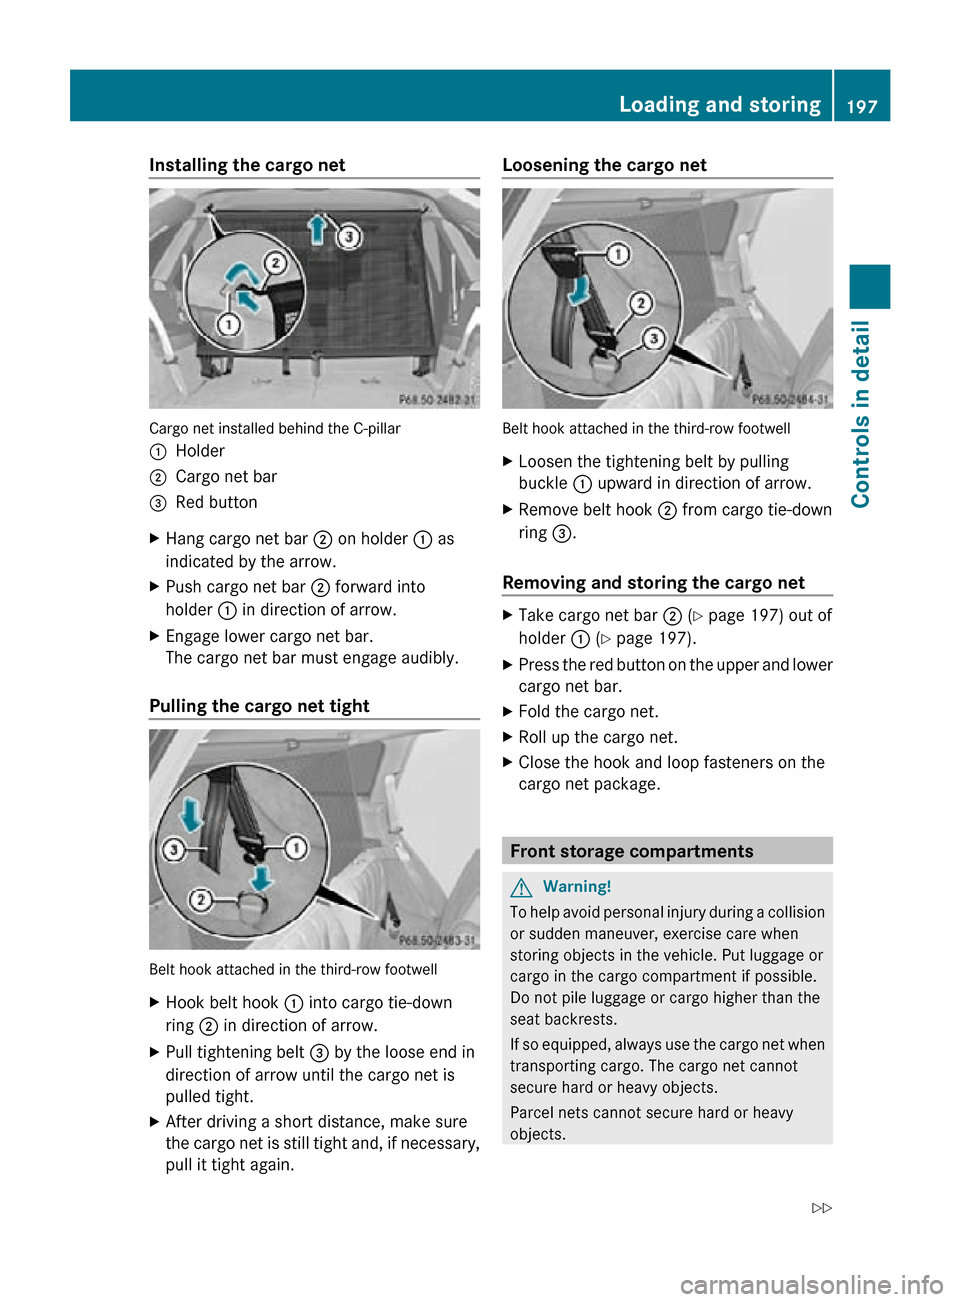
Installing the cargo net
Cargo net installed behind the C-pillar
:
Holder
; Cargo net bar
= Red button
X Hang cargo net bar ; on holder : as
indicated by the arrow.
X Push cargo net bar ; forward into
holder : in direction of arrow.
X Engage lower cargo net bar.
The cargo net bar must engage audibly.
Pulling the cargo net tight Belt hook attached in the third-row footwell
X
Hook belt hook : into cargo tie-down
ring ; in direction of arrow.
X Pull tightening belt = by the loose end in
direction of arrow until the cargo net is
pulled tight.
X After driving a short distance, make sure
the cargo net is still tight and, if necessary,
pull it tight again. Loosening the cargo net
Belt hook attached in the third-row footwell
X
Loosen the tightening belt by pulling
buckle : upward in direction of arrow.
X Remove belt hook ; from cargo tie-down
ring =.
Removing and storing the cargo net X
Take cargo net bar ; (Y page 197) out of
holder : (Y page 197).
X Press the red button on the upper and lower
cargo net bar.
X Fold the cargo net.
X Roll up the cargo net.
X Close the hook and loop fasteners on the
cargo net package. Front storage compartments
G
Warning!
To help avoid personal injury during a collision
or sudden maneuver, exercise care when
storing objects in the vehicle. Put luggage or
cargo in the cargo compartment if possible.
Do not pile luggage or cargo higher than the
seat backrests.
If so equipped, always use the cargo net when
transporting cargo. The cargo net cannot
secure hard or heavy objects.
Parcel nets cannot secure hard or heavy
objects. Loading and storing
197Controls in detail
251_AKB; 4; 52, en-US
d2ureepe, Version: 2.11.8.1 2009-03-23T09:22:52+01:00 - Seite 197 Z
Page 219 of 364
i
If your vehicle is not equipped with
AIRMATIC, the multifunction display will
show the compass only. Floormats
G
Warning!
Whenever you are using floormats, make sure
there is enough clearance and that the
floormats are securely fastened.
Floormats should always be securely fastened
using the fastening equipment.
Before driving off, check that the floormats
are securely in place and adjust them if
necessary. A loose floormat could slip and
hinder proper functioning of the pedals.
Do not place several floormats on top of each
other as this may impair pedal movement.
X Move the driver’s seat or front passenger
seat as far to the rear as possible. X
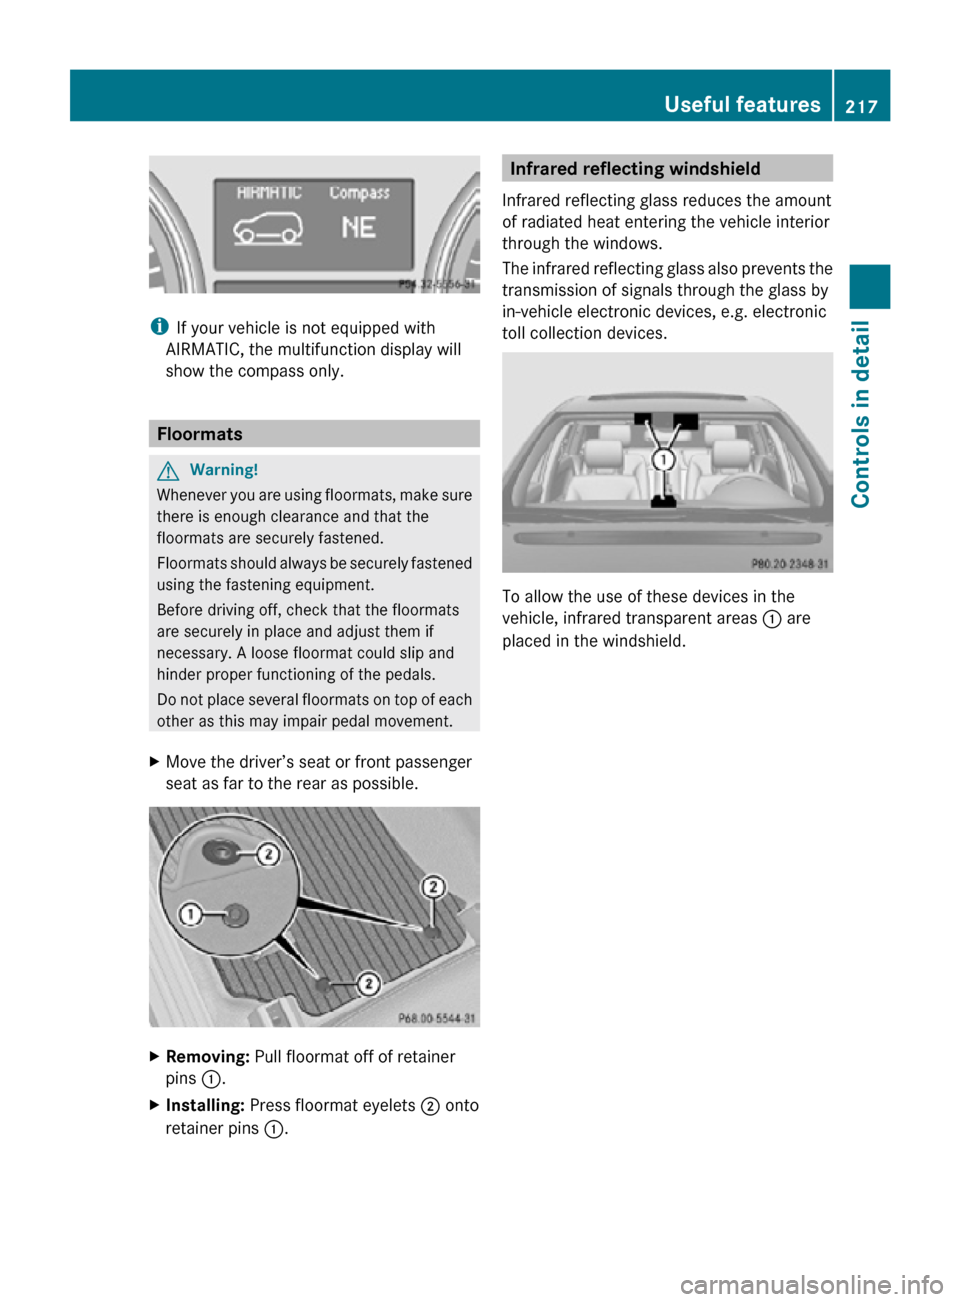
Removing: Pull floormat off of retainer
pins :.
X Installing: Press floormat eyelets ; onto
retainer pins :. Infrared reflecting windshield
Infrared reflecting glass reduces the amount
of radiated heat entering the vehicle interior
through the windows.
The infrared reflecting glass also prevents the
transmission of signals through the glass by
in-vehicle electronic devices, e.g. electronic
toll collection devices. To allow the use of these devices in the
vehicle, infrared transparent areas
: are
placed in the windshield. Useful features
217Controls in detail
251_AKB; 4; 52, en-US
d2ureepe, Version: 2.11.8.1 2009-03-23T09:22:52+01:00 - Seite 217 Z
Page 225 of 364
vehicle. Comply with all relevant safety
precautions.
G
Warning!
To help prevent personal injury, stay clear of
moving parts when the hood is open and the
engine is running.
The radiator fan may continue to run for
approximately 30 seconds or may even
restart after the engine has been turned off.
Stay clear of fan blades. G
Warning!
Vehicles with gasoline engine:
The engine is equipped with a transistorized
ignition system. Because of the high voltage
it is dangerous to touch any components
(ignition coils, spark plug sockets, diagnostic
socket) of the ignition system
R with the engine running
R while starting the engine
R when the ignition is switched on and the
engine is turned manually G
Warning!
Vehicles with diesel engine:
The engine is equipped with a high-voltage
electronic control unit for the injection
system. Because of the high voltage it is
dangerous to touch any components of the
injection system (injectors, electrical wires)
R with the engine running
R while starting the engine
R when the ignition is switched on X
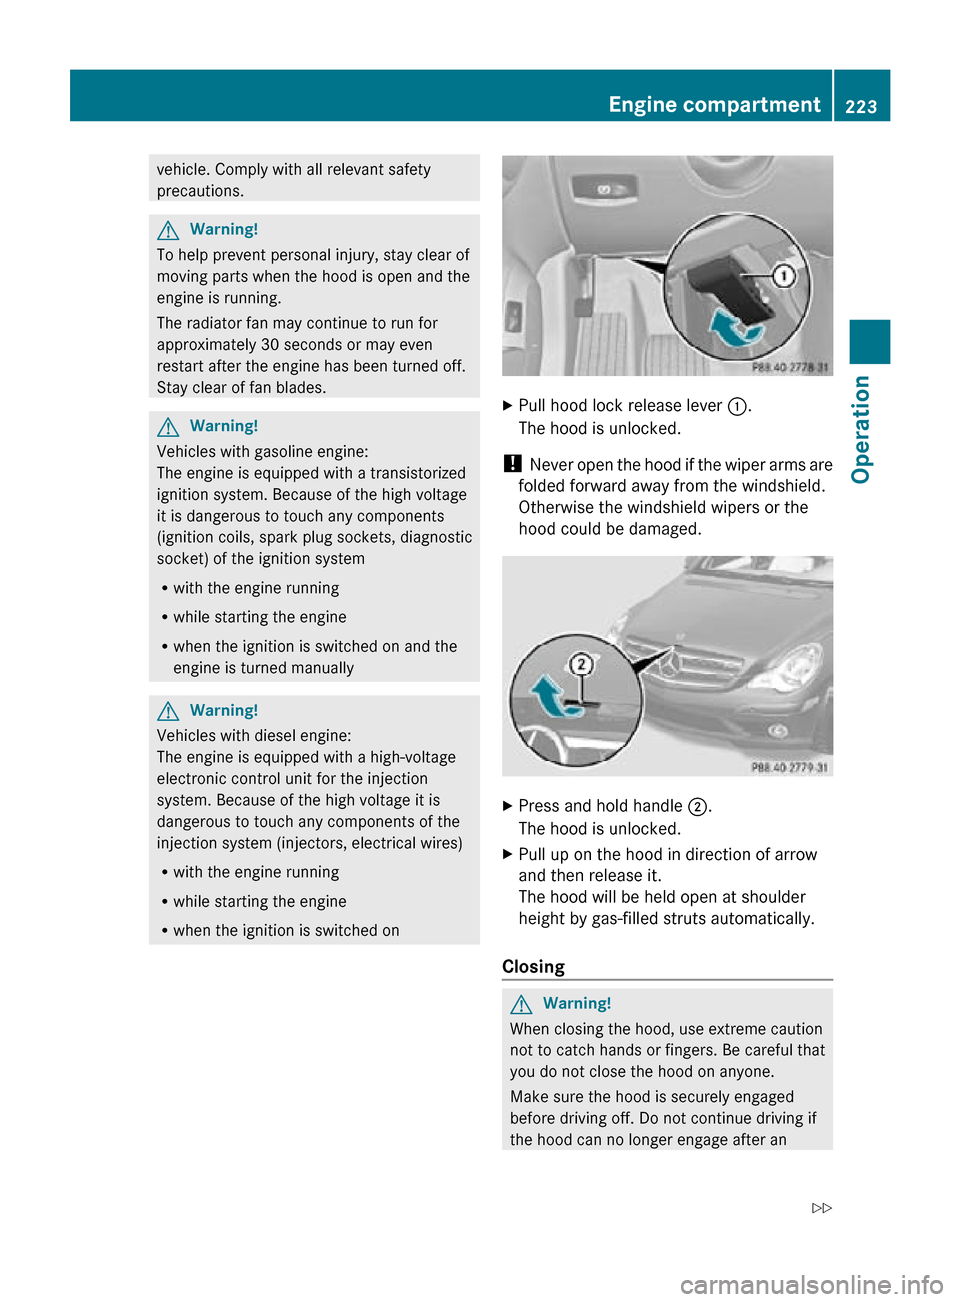
Pull hood lock release lever :.
The hood is unlocked.
! Never open the hood if the wiper arms are
folded forward away from the windshield.
Otherwise the windshield wipers or the
hood could be damaged. X
Press and hold handle ;.
The hood is unlocked.
X Pull up on the hood in direction of arrow
and then release it.
The hood will be held open at shoulder
height by gas-filled struts automatically.
Closing G
Warning!
When closing the hood, use extreme caution
not to catch hands or fingers. Be careful that
you do not close the hood on anyone.
Make sure the hood is securely engaged
before driving off. Do not continue driving if
the hood can no longer engage after an Engine compartment
223Operation
251_AKB; 4; 52, en-US
d2ureepe, Version: 2.11.8.1 2009-03-23T09:22:52+01:00 - Seite 223 Z
Page 260 of 364
X
Make sure the automatic transmission is in
park position P (Y page 116).
X Engage the parking brake for the vehicle
(Y page 114).
X Start the engine (Y page 110).
X Vehicles with AIRMATIC:
Set the vehicle level to highway
(Y page 154) and set the ADS to AUTO or
COMF (Y page 153).
X Turn off the engine ( Y page 114).
X Close all doors and the tailgate.
X Attach the trailer.
X Plug in all electrical connectors.
i Vehicles with AIRMATIC:
When you are towing a trailer, the vehicle
level
always remains in the highway setting.
The following applies additionally when
towing a trailer:
R The vehicle is lowered to the highway
level when it reaches a speed of 5 mph
(8 km/h) if not set to highway level.
R The highspeed level is not available.
The restrictions that apply to towing also
apply when using accessories that are
connected to the trailer power socket, such
as a bicycle rack.
Towing a trailer There are many different laws, including
speed limit restrictions, having to do with
trailer
towing. Make sure your rig will be legal,
not only for where you reside, but also for
where you will be driving. A good source for
this information can be the police or local
authorities.
Note the following, when driving with a trailer:
R In order to gain skill and an understanding
of the vehicle’s behavior, you should practice turning, stopping and backing up
in an area which is free of traffic.
R Before you start driving check the
-trailer hitch
- break-away switch
- safety chains
- electrical connections
- lighting
- tires
R Adjust the mirrors
(Y page 94) to permit
unobstructed view beyond rear of trailer.
R If the trailer has electric brakes, start your
vehicle and trailer moving slowly, and then
apply only the trailer brake controller by
hand to make sure the brakes are working
properly.
R Always secure items in the trailer to
prevent load shifts while driving.
R When towing a trailer, check occasionally
to make sure the load is secure, and that
trailer lighting and brakes (if so equipped)
are functioning properly.
R Take into consideration that when towing a
trailer, the handling characteristics are
different and less stable from those when
operating the vehicle without a trailer.
It is important to avoid sudden maneuvers.
R The vehicle and trailer combination is
heavier, and therefore limited in
acceleration and climbing ability, and has a
larger braking distance.
It is more prone to reacting to cross wind
gusts, and requires more sensitive steering
input.
R If possible, do not brake abruptly, but
rather engage the brake slightly at first to
permit the trailer to activate its brake. Then
increase the braking force.
! If the trailer should begin to sway, reduce
the vehicle’s speed immediately. 258
Driving instructions
Operation
251_AKB; 4; 52, en-US
d2ureepe,
Version: 2.11.8.1 2009-03-23T09:22:52+01:00 - Seite 258
Page 272 of 364
Vehicle equipment
i This Operator’s Manual describes all
features, standard or optional, potentially
available for your vehicle at the time of
purchase. Please be aware that your
vehicle might not be equipped with all
features described in this manual. Where will I find ...?
First aid kit
i Check expiration dates and contents for
completeness at least once a year and
replace missing/expired items.
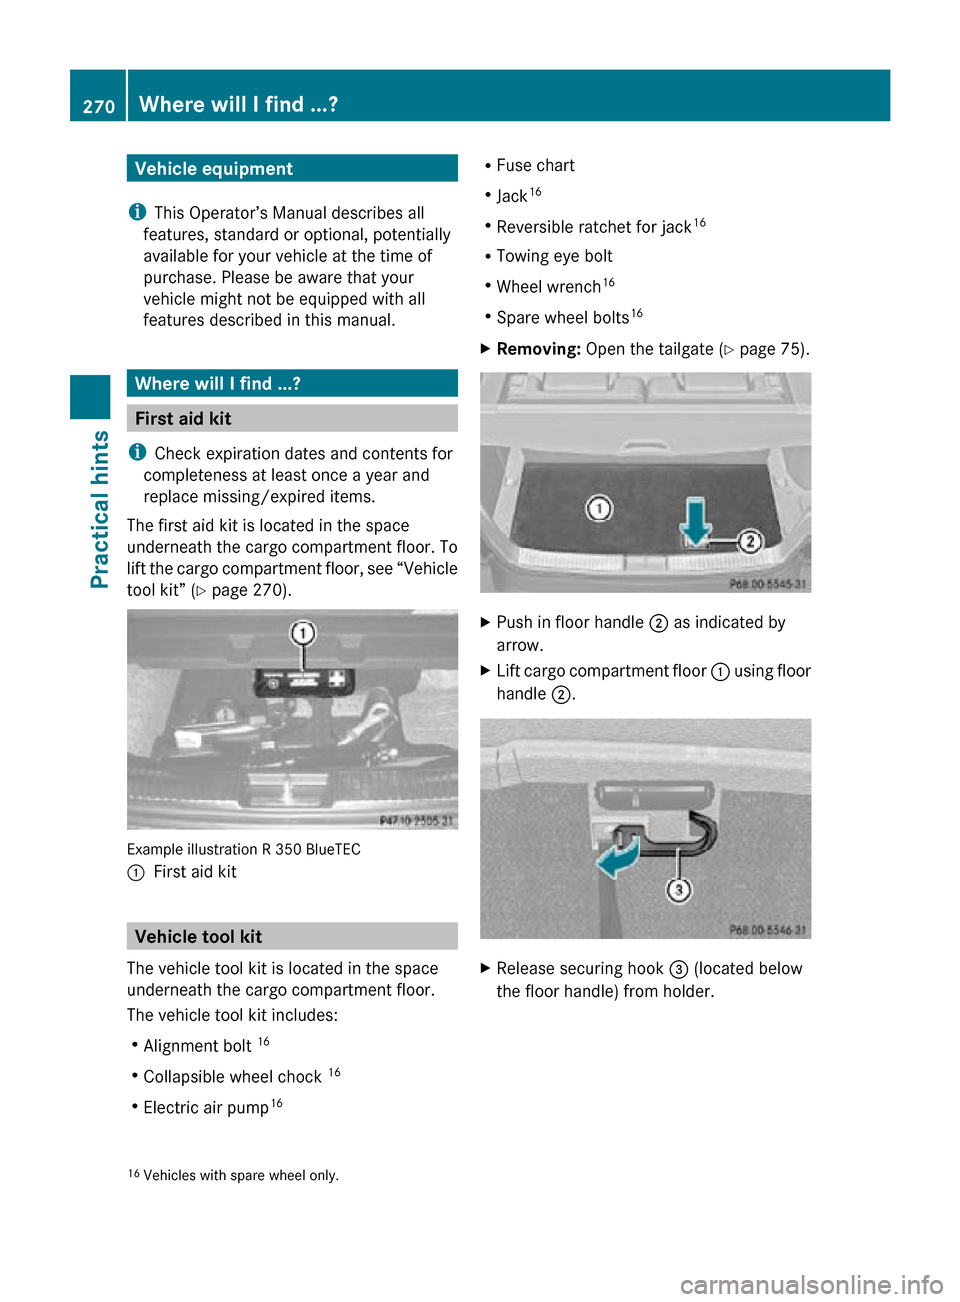
The first aid kit is located in the space
underneath the cargo compartment floor. To
lift the cargo compartment floor, see “Vehicle
tool kit” (Y page 270). Example illustration R 350 BlueTEC
:
First aid kit Vehicle tool kit
The vehicle tool kit is located in the space
underneath the cargo compartment floor.
The vehicle tool kit includes:
R Alignment bolt 16
R Collapsible wheel chock 16
R Electric air pump 16 R
Fuse chart
R Jack 16
R Reversible ratchet for jack 16
R Towing eye bolt
R Wheel wrench 16
R Spare wheel bolts 16
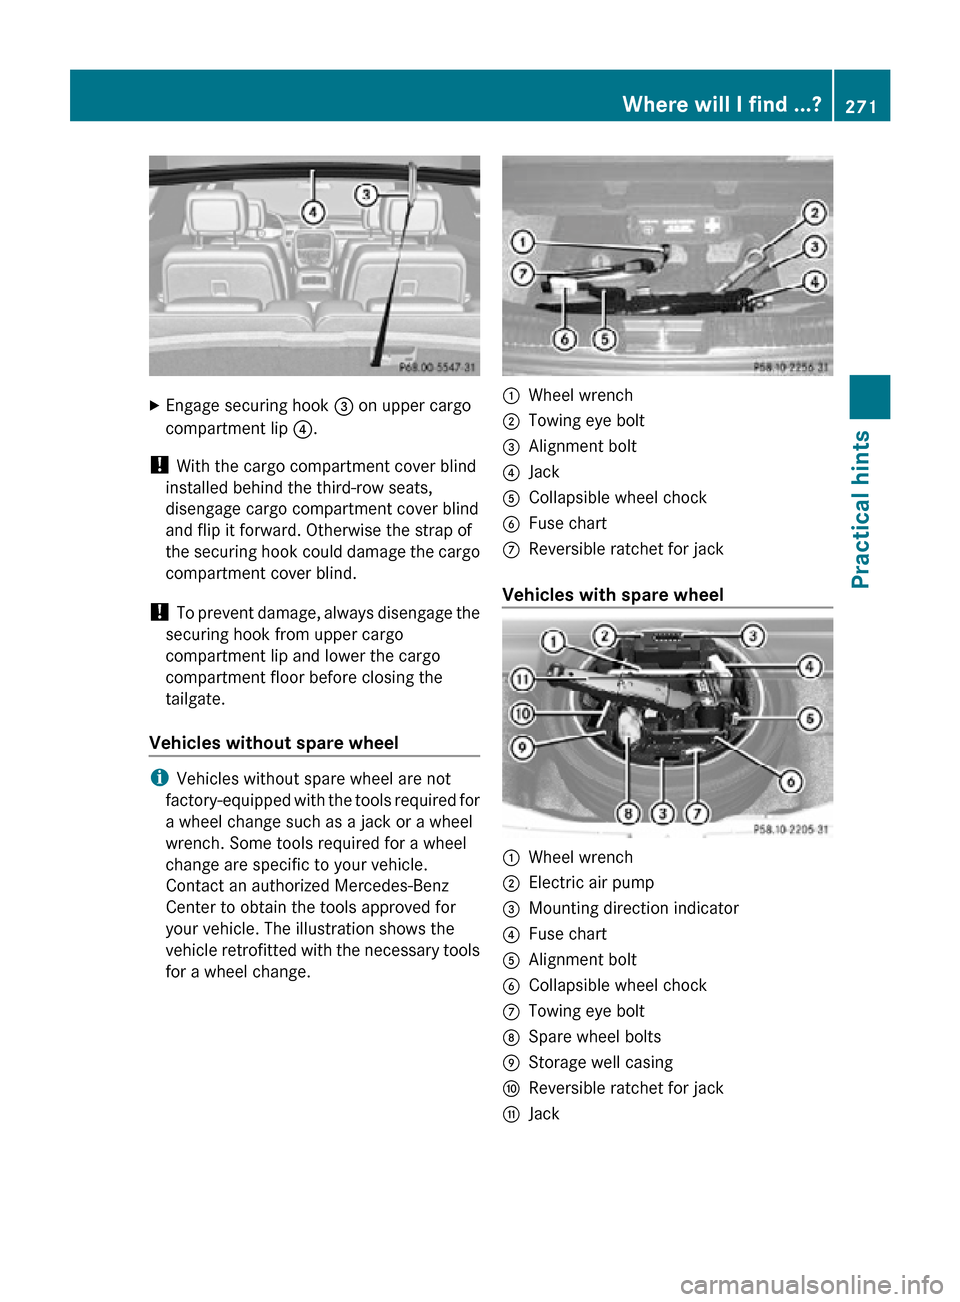
X Removing: Open the tailgate ( Y page 75). X
Push in floor handle ; as indicated by
arrow.
X Lift cargo compartment floor : using floor
handle ;. X
Release securing hook = (located below
the floor handle) from holder.
16 Vehicles with spare wheel only. 270
Where will I find ...?Practical hints
251_AKB; 4; 52, en-US
d2ureepe,
Version: 2.11.8.1 2009-03-23T09:22:52+01:00 - Seite 270
Page 273 of 364
X
Engage securing hook = on upper cargo
compartment lip ?.
! With the cargo compartment cover blind
installed behind the third-row seats,
disengage cargo compartment cover blind
and flip it forward. Otherwise the strap of
the securing hook could damage the cargo
compartment cover blind.
! To prevent damage, always disengage the
securing hook from upper cargo
compartment lip and lower the cargo
compartment floor before closing the
tailgate.
Vehicles without spare wheel i
Vehicles without spare wheel are not
factory-equipped with the tools required for
a wheel change such as a jack or a wheel
wrench. Some tools required for a wheel
change are specific to your vehicle.
Contact an authorized Mercedes-Benz
Center to obtain the tools approved for
your vehicle. The illustration shows the
vehicle retrofitted with the necessary tools
for a wheel change. :
Wheel wrench
; Towing eye bolt
= Alignment bolt
? Jack
A Collapsible wheel chock
B Fuse chart
C Reversible ratchet for jack
Vehicles with spare wheel :
Wheel wrench
; Electric air pump
= Mounting direction indicator
? Fuse chart
A Alignment bolt
B Collapsible wheel chock
C Towing eye bolt
D Spare wheel bolts
E Storage well casing
F Reversible ratchet for jack
G Jack Where will I find ...?
271Practical hints
251_AKB; 4; 52, en-US
d2ureepe, Version: 2.11.8.1 2009-03-23T09:22:52+01:00 - Seite 271 Z
Page 274 of 364
Collapsible wheel chock
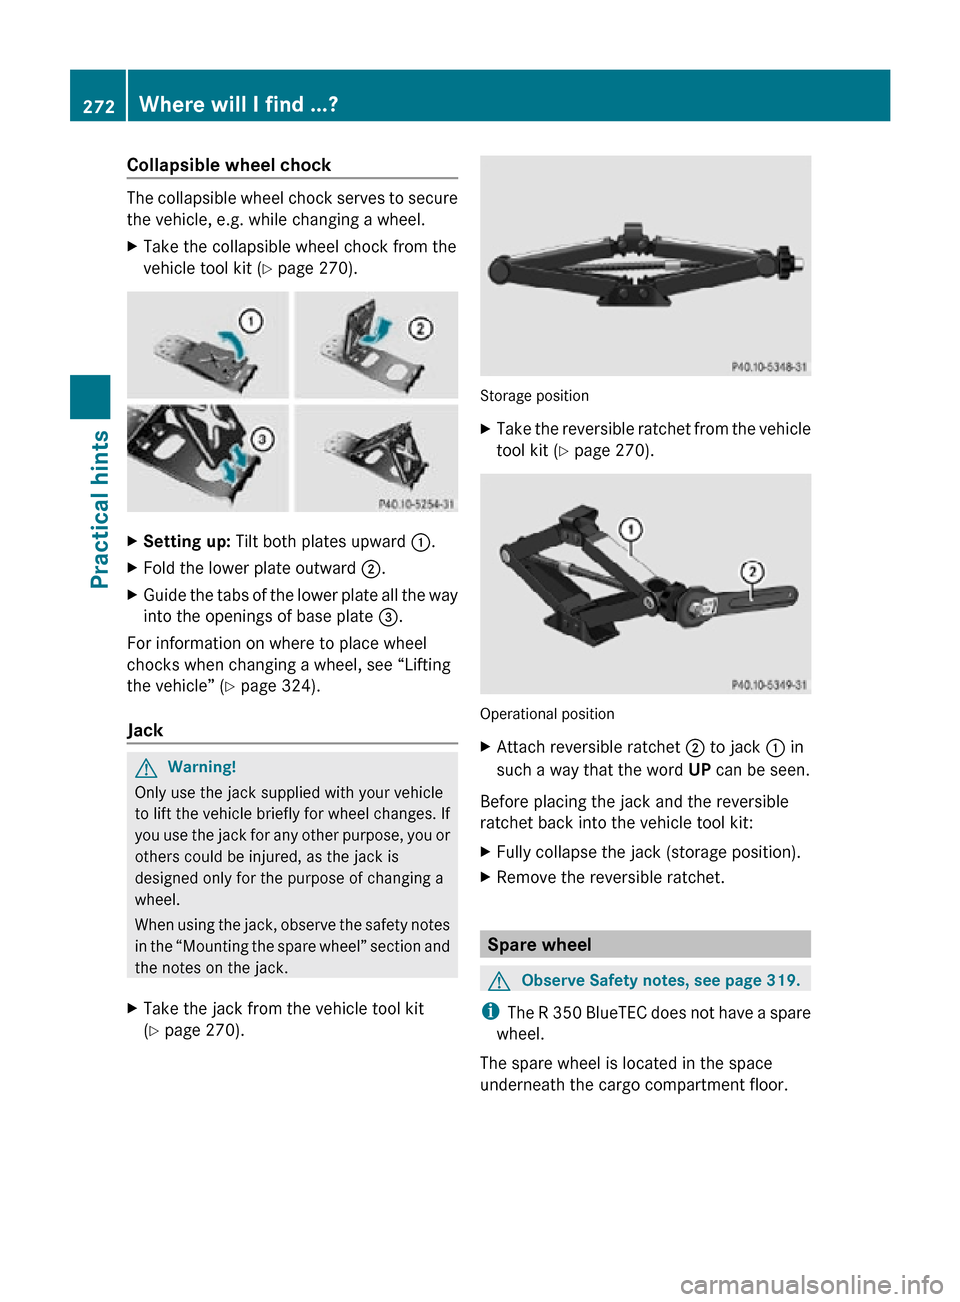
The collapsible wheel chock serves to secure
the vehicle, e.g. while changing a wheel.
X
Take the collapsible wheel chock from the
vehicle tool kit (Y page 270). X
Setting up: Tilt both plates upward :.
X Fold the lower plate outward ;.
X Guide the tabs of the lower plate all the way
into the openings of base plate =.
For information on where to place wheel
chocks when changing a wheel, see “Lifting
the vehicle” ( Y page 324).
Jack G
Warning!
Only use the jack supplied with your vehicle
to lift the vehicle briefly for wheel changes. If
you use the jack for any other purpose, you or
others could be injured, as the jack is
designed only for the purpose of changing a
wheel.
When using the jack, observe the safety notes
in the “Mounting the spare wheel” section and
the notes on the jack.
X Take the jack from the vehicle tool kit
(Y page 270). Storage position
X
Take the reversible ratchet from the vehicle
tool kit ( Y page 270). Operational position
X
Attach reversible ratchet ; to jack : in
such a way that the word UP can be seen.
Before placing the jack and the reversible
ratchet back into the vehicle tool kit:
X Fully collapse the jack (storage position).
X Remove the reversible ratchet. Spare wheel
G
Observe Safety notes, see page 319.
i The R 350 BlueTEC does not have a spare
wheel.
The spare wheel is located in the space
underneath the cargo compartment floor. 272
Where will I find ...?Practical hints
251_AKB; 4; 52, en-US
d2ureepe,
Version: 2.11.8.1 2009-03-23T09:22:52+01:00 - Seite 272
Page 275 of 364
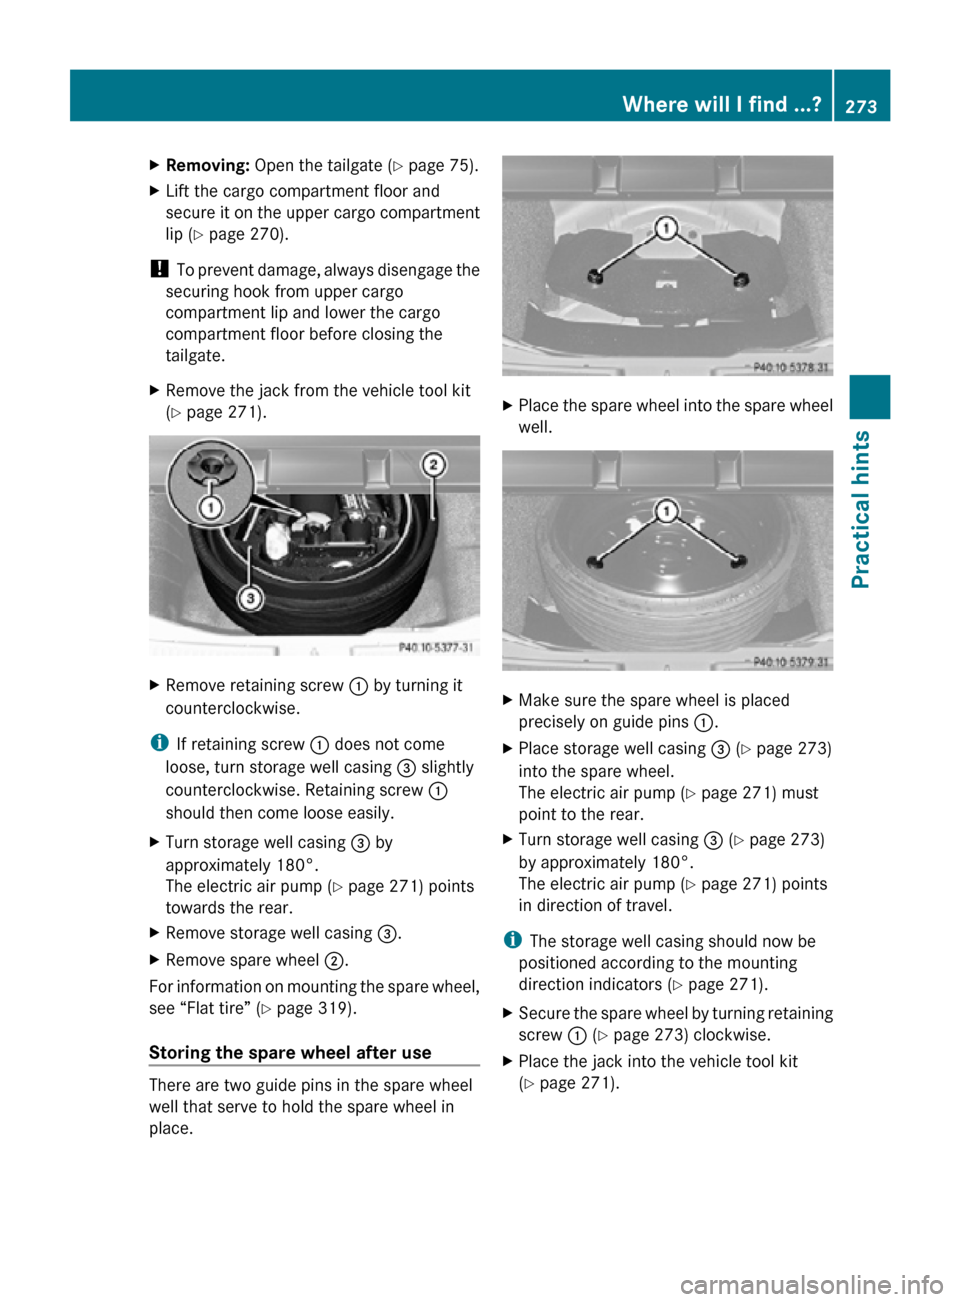
X
Removing: Open the tailgate ( Y page 75).
X Lift the cargo compartment floor and
secure it on the upper cargo compartment
lip ( Y page 270).
! To prevent damage, always disengage the
securing hook from upper cargo
compartment lip and lower the cargo
compartment floor before closing the
tailgate.
X Remove the jack from the vehicle tool kit
(Y page 271). X
Remove retaining screw : by turning it
counterclockwise.
i If retaining screw : does not come
loose, turn storage well casing = slightly
counterclockwise. Retaining screw :
should then come loose easily.
X Turn storage well casing = by
approximately 180°.
The electric air pump ( Y page 271) points
towards the rear.
X Remove storage well casing =.
X Remove spare wheel ;.
For information on mounting the spare wheel,
see “Flat tire” ( Y page 319).
Storing the spare wheel after use There are two guide pins in the spare wheel
well that serve to hold the spare wheel in
place. X
Place the spare wheel into the spare wheel
well. X
Make sure the spare wheel is placed
precisely on guide pins :.
X Place storage well casing = (Y page 273)
into the spare wheel.
The electric air pump ( Y page 271) must
point to the rear.
X Turn storage well casing = (Y page 273)
by approximately 180°.
The electric air pump ( Y page 271) points
in direction of travel.
i The storage well casing should now be
positioned according to the mounting
direction indicators (Y page 271).
X Secure the spare wheel by turning retaining
screw : (Y page 273) clockwise.
X Place the jack into the vehicle tool kit
(Y page 271). Where will I find ...?
273Practical hints
251_AKB; 4; 52, en-US
d2ureepe, Version: 2.11.8.1 2009-03-23T09:22:52+01:00 - Seite 273 Z