2010 MERCEDES-BENZ R320 wheel alignment
[x] Cancel search: wheel alignmentPage 6 of 364

1, 2, 3 ...
115V AC Socket .................................
206
3-zone automatic climate control see Climate control system
4-ETS (Electronic Traction System) ...65
4MATIC see All-wheel drive (4MATIC) A
ABS (Antilock Brake System) .............63
Indicator lamp ................................
300
Messages in the multifunction
display ................................... 275, 286
Accessory weight .............................. 248
Accidents ........................................... 113
Air bags ........................................... 37
Distance warning function .............152
Emergency calls (Tele Aid) ............. 209
NECK-PRO active front head
restraints ........................................ 53
Active Bi-Xenon headlamps
Messages in the multifunction
display ........................................... 295
see Headlamps
Adaptive Damping System
see ADS
AdBlue ®
...................................... 331, 354
Capacity, AdBlue ®
tank ................. 351
Refilling ......................................... 332
Additives
Engine oil ....................................... 352
Gasoline ......................................... 354
Address change ................................... 22
ADS (Adaptive Damping System) ..... 153
Advanced Tire Pressure
Monitoring System (Advanced
TPMS) ................................................. 232
Messages in the multifunction
display ................................... 283, 298
Air bags ................................................ 37
Emergency call upon deployment ..209
Front, driver and passenger ............. 40
Front passenger front air bag off
indicator lamp (Canada
only) ........................................ 45, 307Front passenger front air bag off
indicator lamp (USA only)
........42, 307
Messages in the multifunction
display
........................................... 277
OCS (Occupant Classification
System ............................................. 42
Safety guidelines ............................. 39
Side impact ...................................... 40
Window curtain ................................ 41
Air conditioning refrigerant and
lubricant ............................................. 352
Air distribution .......................... 168, 177
Air filter .............................................. 294
AIRMATIC
ADS (Adaptive Damping System) ...153
Introduction ................................... 153
Messages in the multifunction
display ........................................... 287
Vehicle level control ...................... 154
AIRMATIC/Compass menu ...............129
Air pressure see Tire inflation pressure
Air pressure (tires) ............................ 249
Air pump (electric) ............................ 328
Air recirculation mode ..............169, 179
Air volume ................................. 168, 178
Alarm system see Anti-theft systems
Alignment bolt (vehicle tool
kit) .............................................. 270, 327
All-wheel drive (4MATIC) ..................156
Alternator Messages in the multifunction
display ................................... 282, 292
Alternator (Technical data)
see Vehicle specification
Anticorrosion/antifreeze ..................356
Antilock Brake System see ABS
Anti-theft systems ............................... 67
Anti-theft alarm system ................... 67
Immobilizer ...................................... 67
Aquaplaning
see Hydroplaning
Armrest, front
Storage compartment ....................198
Telephone tray ............................... 1984
Index 251_AKB; 4; 52, en-US
d2ureepe,
Version: 2.11.8.1 2009-03-23T09:22:52+01:00 - Seite 4
Page 272 of 364
Vehicle equipment
i This Operator’s Manual describes all
features, standard or optional, potentially
available for your vehicle at the time of
purchase. Please be aware that your
vehicle might not be equipped with all
features described in this manual. Where will I find ...?
First aid kit
i Check expiration dates and contents for
completeness at least once a year and
replace missing/expired items.
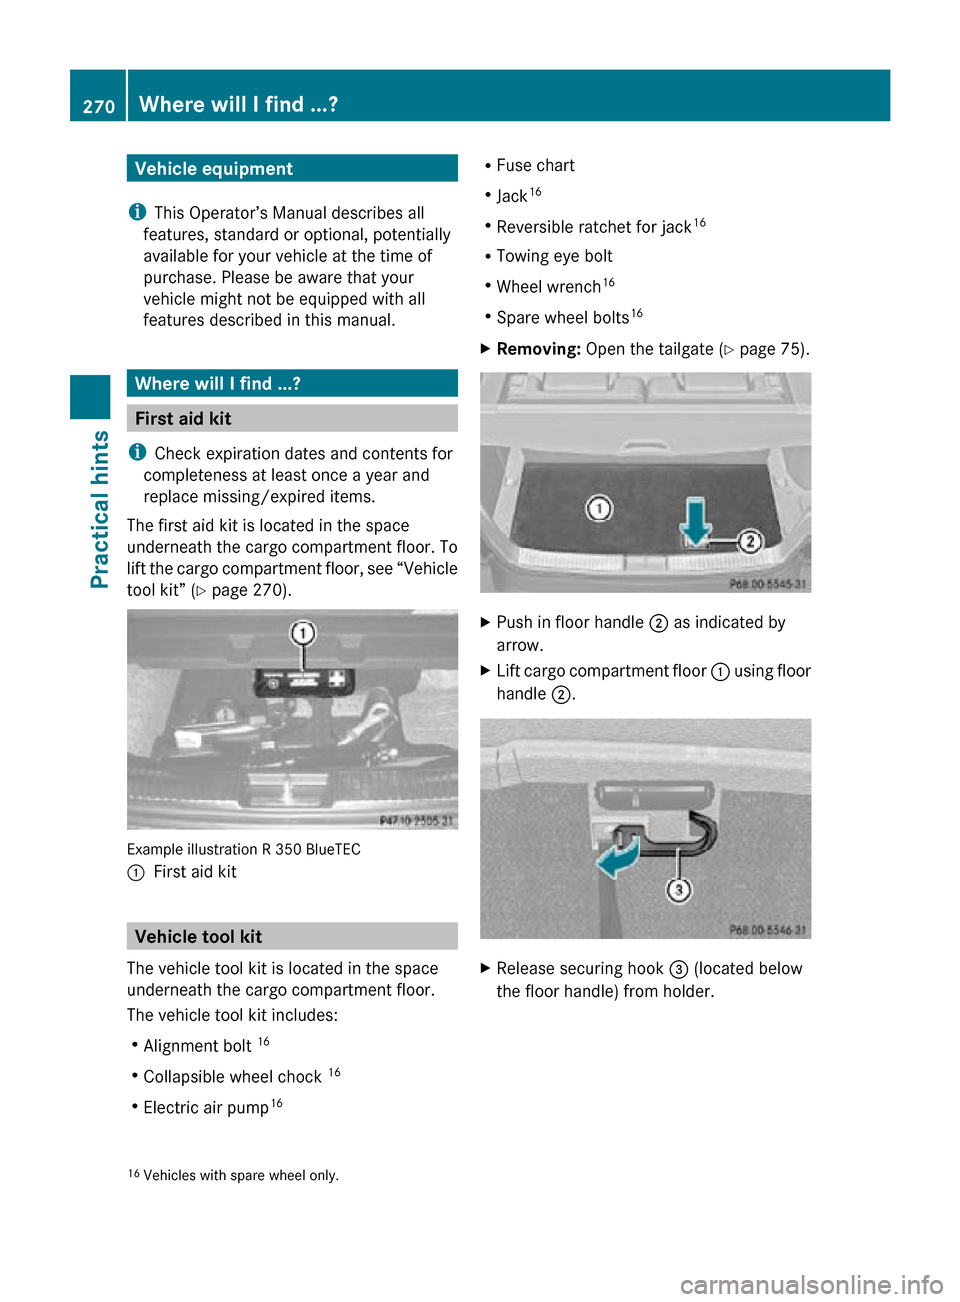
The first aid kit is located in the space
underneath the cargo compartment floor. To
lift the cargo compartment floor, see “Vehicle
tool kit” (Y page 270). Example illustration R 350 BlueTEC
:
First aid kit Vehicle tool kit
The vehicle tool kit is located in the space
underneath the cargo compartment floor.
The vehicle tool kit includes:
R Alignment bolt 16
R Collapsible wheel chock 16
R Electric air pump 16 R
Fuse chart
R Jack 16
R Reversible ratchet for jack 16
R Towing eye bolt
R Wheel wrench 16
R Spare wheel bolts 16
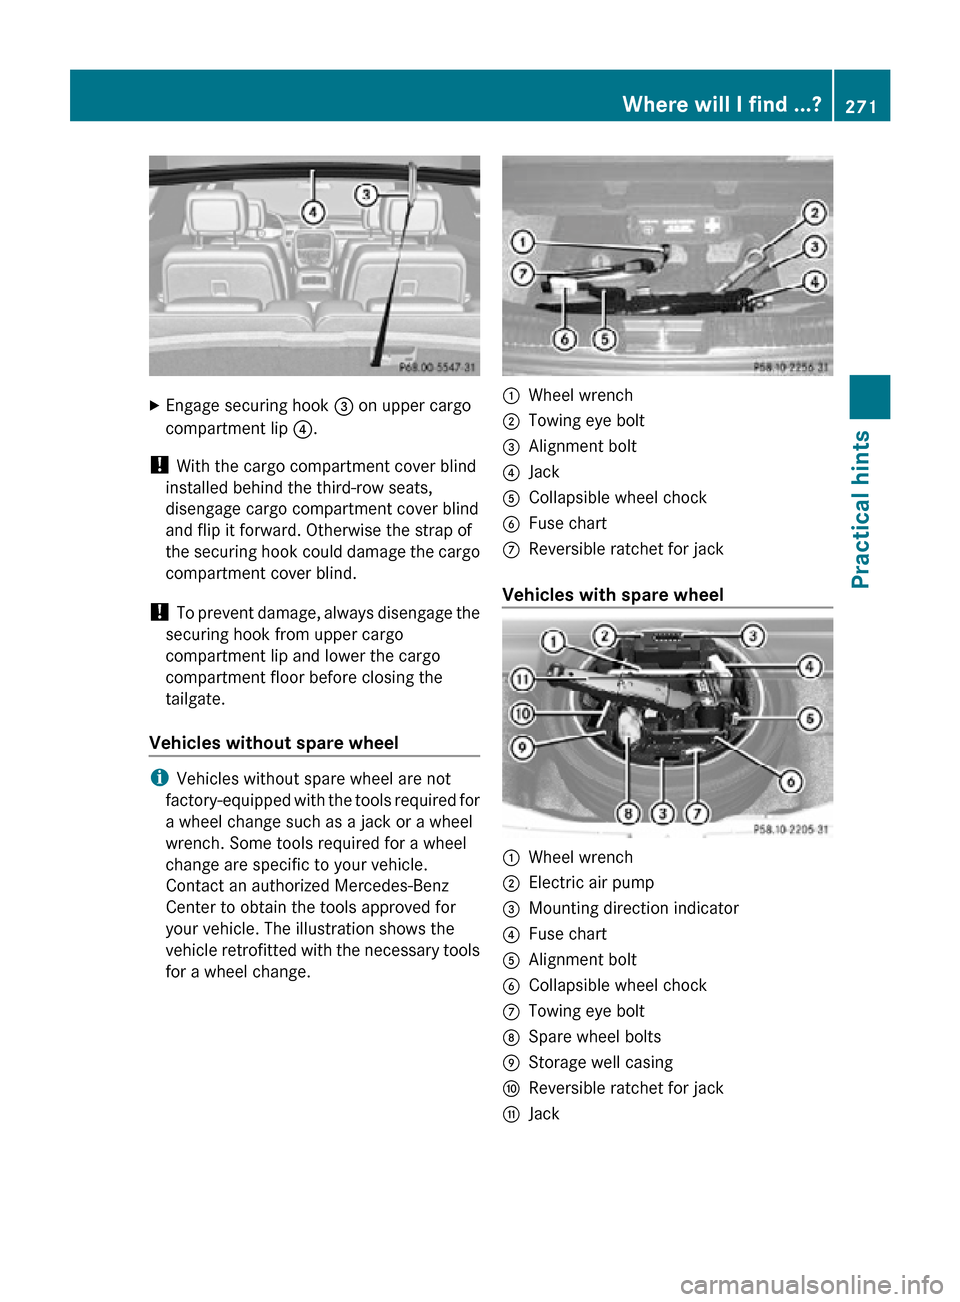
X Removing: Open the tailgate ( Y page 75). X
Push in floor handle ; as indicated by
arrow.
X Lift cargo compartment floor : using floor
handle ;. X
Release securing hook = (located below
the floor handle) from holder.
16 Vehicles with spare wheel only. 270
Where will I find ...?Practical hints
251_AKB; 4; 52, en-US
d2ureepe,
Version: 2.11.8.1 2009-03-23T09:22:52+01:00 - Seite 270
Page 273 of 364
X
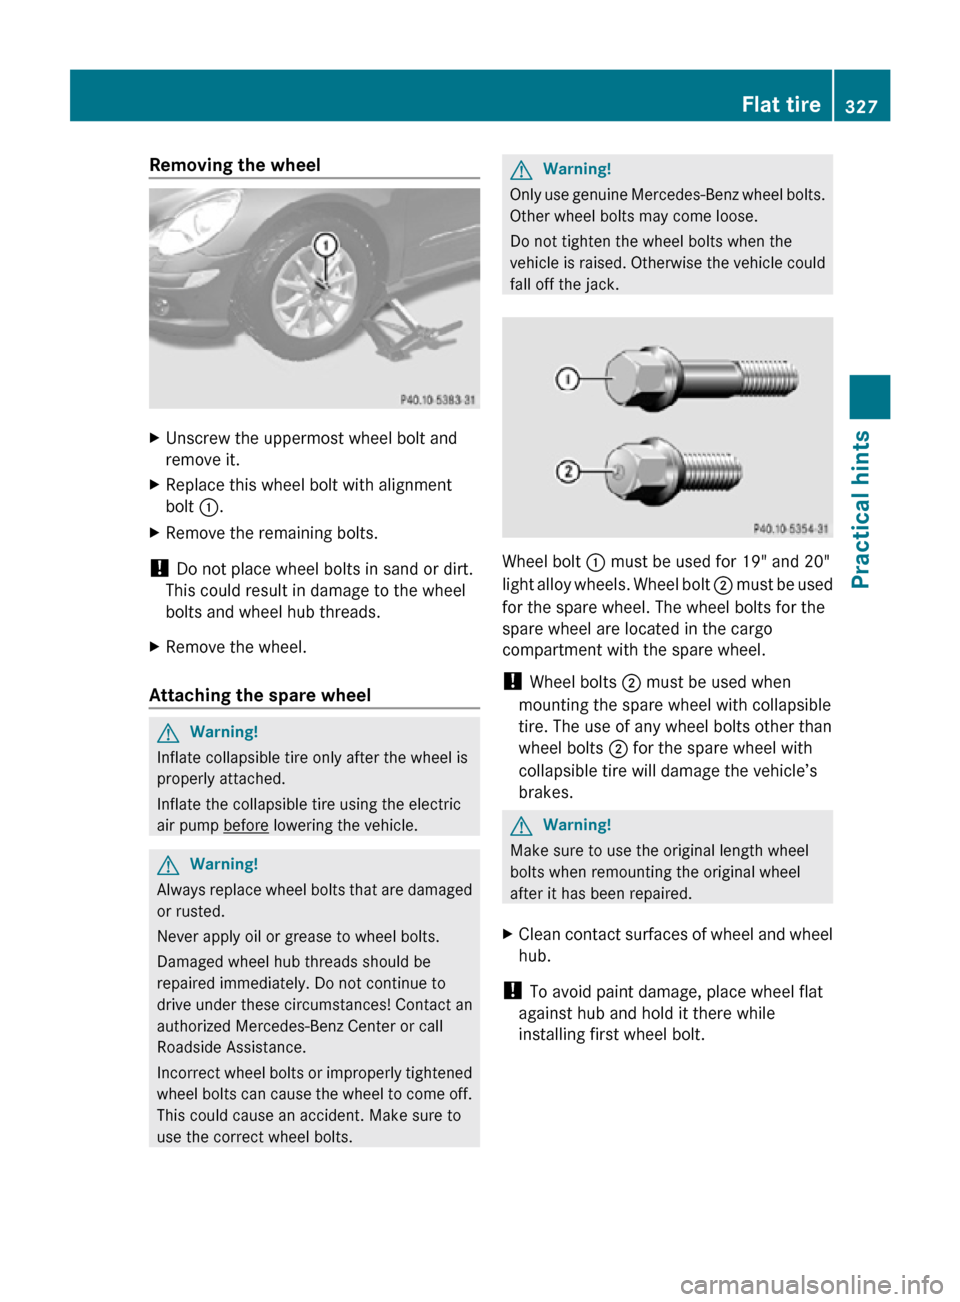
Engage securing hook = on upper cargo
compartment lip ?.
! With the cargo compartment cover blind
installed behind the third-row seats,
disengage cargo compartment cover blind
and flip it forward. Otherwise the strap of
the securing hook could damage the cargo
compartment cover blind.
! To prevent damage, always disengage the
securing hook from upper cargo
compartment lip and lower the cargo
compartment floor before closing the
tailgate.
Vehicles without spare wheel i
Vehicles without spare wheel are not
factory-equipped with the tools required for
a wheel change such as a jack or a wheel
wrench. Some tools required for a wheel
change are specific to your vehicle.
Contact an authorized Mercedes-Benz
Center to obtain the tools approved for
your vehicle. The illustration shows the
vehicle retrofitted with the necessary tools
for a wheel change. :
Wheel wrench
; Towing eye bolt
= Alignment bolt
? Jack
A Collapsible wheel chock
B Fuse chart
C Reversible ratchet for jack
Vehicles with spare wheel :
Wheel wrench
; Electric air pump
= Mounting direction indicator
? Fuse chart
A Alignment bolt
B Collapsible wheel chock
C Towing eye bolt
D Spare wheel bolts
E Storage well casing
F Reversible ratchet for jack
G Jack Where will I find ...?
271Practical hints
251_AKB; 4; 52, en-US
d2ureepe, Version: 2.11.8.1 2009-03-23T09:22:52+01:00 - Seite 271 Z
Page 326 of 364

(80 km/h) or below with the recommended
tire inflation pressure.
X Contact an authorized Mercedes-Benz
Center
as soon as possible to obtain a new
TIREFIT kit.
X Bring used TIREFIT materials to an
authorized Mercedes-Benz Center for
proper disposal.
X Replace your TIREFIT container every
4 years. Replacement containers are
available
at any authorized Mercedes-Benz
Center. Mounting the spare wheel
Introduction X
Prepare the vehicle as described
(Y page 320).
X Take the following out of the vehicle:
R
spare wheel
R jack
R wheel wrench
R collapsible wheel chock
R alignment bolt
R electric air pump
For information on where to find the
respective items, see “Where will I find ...?”
(Y page 270) and ( Y page 272).
i Vehicles without spare wheel are not
factory-equipped
with the tools required for
a wheel change such as a jack or a wheel
wrench. Some tools required for a wheel
change are specific to your vehicle.
Contact an authorized Mercedes-Benz
Center to obtain the tools approved for
your vehicle. This section describes the
wheel change using the tools approved and
recommended for your vehicle. Lifting the vehicle G
Warning!
When jacking up the vehicle, only use the jack
which has been specifically approved by
Mercedes-Benz for your vehicle.
The
jack is designed exclusively for jacking up
the vehicle at the jack take-up brackets built
into both sides of the vehicle. Make sure the
jack arm is fully seated in the jack take-up
bracket. The jack must always be vertical
when in use, especially on inclines or
declines.
The jack is intended only for lifting the vehicle
briefly for wheel changes. It is not suited for
performing maintenance work under the
vehicle. To help avoid personal injury, use the
jack only to lift the vehicle during a wheel
change.
Never get beneath the vehicle while it is
supported by the jack. Keep hands and feet
away from the area under the lifted vehicle.
Always lower the vehicle onto sufficient
capacity jackstands before working under the
vehicle.
Always engage the parking brake firmly and
block the wheels with wheel chocks or other
sizeable objects before raising the vehicle
with the jack. Do not disengage the parking
brake while the vehicle is raised.
Make sure that the ground on which the
vehicle is standing and where you place the
jack is solid, level and not slippery. If
necessary, use a large underlay. On slippery
surfaces, such as tiled floors, you should use
a non-slip underlay, for example a rubber mat.
Do not use wooden blocks or similar objects
to support the jack. Otherwise the jack may
not be able to achieve its load-bearing
capacity if it is not at its full height.
Never start the engine when the vehicle is
raised.
Also observe the notes on the jack. 324
Flat tire
Practical hints
251_AKB; 4; 52, en-US
d2ureepe,
Version: 2.11.8.1 2009-03-23T09:22:52+01:00 - Seite 324
Page 329 of 364
Removing the wheel
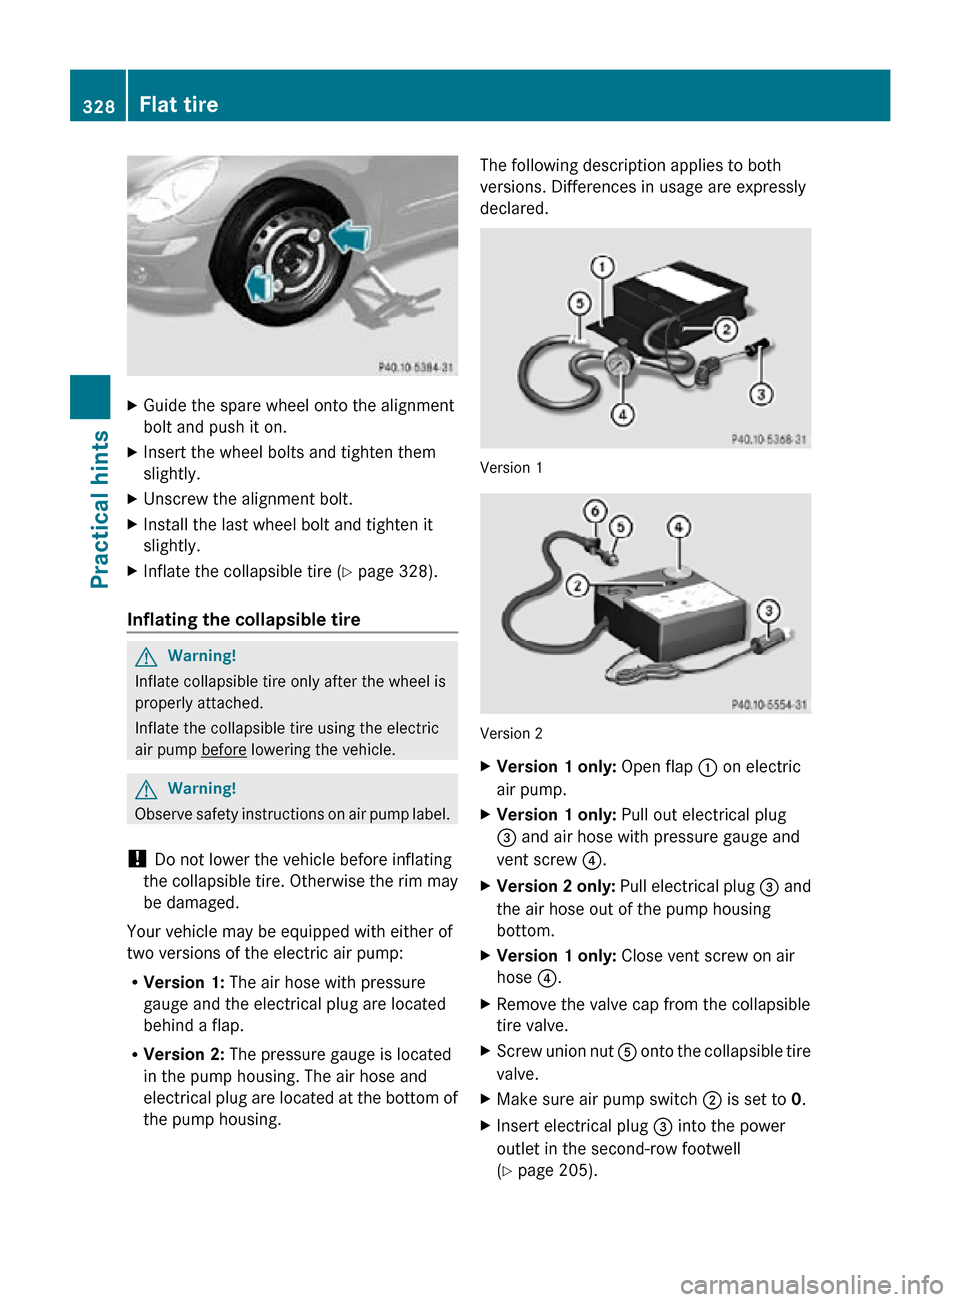
X
Unscrew the uppermost wheel bolt and
remove it.
X Replace this wheel bolt with alignment
bolt :.
X Remove the remaining bolts.
! Do not place wheel bolts in sand or dirt.
This could result in damage to the wheel
bolts and wheel hub threads.
X Remove the wheel.
Attaching the spare wheel G
Warning!
Inflate collapsible tire only after the wheel is
properly attached.
Inflate the collapsible tire using the electric
air pump before lowering the vehicle.
G
Warning!
Always replace wheel bolts that are damaged
or rusted.
Never apply oil or grease to wheel bolts.
Damaged wheel hub threads should be
repaired immediately. Do not continue to
drive under these circumstances! Contact an
authorized Mercedes-Benz Center or call
Roadside Assistance.
Incorrect wheel bolts or improperly tightened
wheel bolts can cause the wheel to come off.
This could cause an accident. Make sure to
use the correct wheel bolts. G
Warning!
Only use genuine Mercedes-Benz wheel bolts.
Other wheel bolts may come loose.
Do not tighten the wheel bolts when the
vehicle is raised. Otherwise the vehicle could
fall off the jack. Wheel bolt
: must be used for 19" and 20"
light alloy wheels. Wheel bolt ; must be used
for the spare wheel. The wheel bolts for the
spare wheel are located in the cargo
compartment with the spare wheel.
! Wheel bolts ; must be used when
mounting the spare wheel with collapsible
tire. The use of any wheel bolts other than
wheel bolts ; for the spare wheel with
collapsible tire will damage the vehicle’s
brakes. G
Warning!
Make sure to use the original length wheel
bolts when remounting the original wheel
after it has been repaired.
X Clean contact surfaces of wheel and wheel
hub.
! To avoid paint damage, place wheel flat
against hub and hold it there while
installing first wheel bolt. Flat tire
327Practical hints
251_AKB; 4; 52, en-US
d2ureepe, Version: 2.11.8.1 2009-03-23T09:22:52+01:00 - Seite 327 Z
Page 330 of 364
X
Guide the spare wheel onto the alignment
bolt and push it on.
X Insert the wheel bolts and tighten them
slightly.
X Unscrew the alignment bolt.
X Install the last wheel bolt and tighten it
slightly.
X Inflate the collapsible tire ( Y page 328).
Inflating the collapsible tire G
Warning!
Inflate collapsible tire only after the wheel is
properly attached.
Inflate the collapsible tire using the electric
air pump before lowering the vehicle.
G
Warning!
Observe safety instructions on air pump label.
! Do not lower the vehicle before inflating
the collapsible tire. Otherwise the rim may
be damaged.
Your vehicle may be equipped with either of
two versions of the electric air pump:
R Version 1: The air hose with pressure
gauge and the electrical plug are located
behind a flap.
R Version 2: The pressure gauge is located
in the pump housing. The air hose and
electrical plug are located at the bottom of
the pump housing. The following description applies to both
versions. Differences in usage are expressly
declared.
Version 1
Version 2
X
Version 1 only: Open flap : on electric
air pump.
X Version 1 only: Pull out electrical plug
= and air hose with pressure gauge and
vent screw ?.
X Version 2 only: Pull electrical plug = and
the air hose out of the pump housing
bottom.
X Version 1 only: Close vent screw on air
hose ?.
X Remove the valve cap from the collapsible
tire valve.
X Screw union nut A onto the collapsible tire
valve.
X Make sure air pump switch ; is set to 0.
X Insert electrical plug = into the power
outlet in the second-row footwell
(Y page 205). 328
Flat tirePractical hints
251_AKB; 4; 52, en-US
d2ureepe,
Version: 2.11.8.1 2009-03-23T09:22:52+01:00 - Seite 328
Page 340 of 364
X
Slide cover A back onto negative terminal
B.
X Have the battery checked at the nearest
authorized Mercedes-Benz Center. Towing the vehicle
Safety notes
Mercedes-Benz
recommends that the vehicle
be transported with all wheels off the ground
using flatbed or appropriate wheel lift/dolly
equipment. This method is preferable to other
types of towing.
! To prevent damage during transport, do
not tie down vehicle by its chassis or
suspension parts.
If circumstances do not permit the
recommended towing methods, the vehicle
may be towed with all wheels on the ground
only so far as necessary to have the vehicle
moved to a safe location where the
recommended towing methods can be
employed.
! Before towing the vehicle observe the
following instructions:
R Do not tow-start the vehicle. You could
otherwise seriously damage the
automatic transmission which is not
covered by the Mercedes-Benz Limited
Warranty.
R Do not tow with sling-type equipment.
Towing with sling-type equipment over
bumpy roads will damage radiator and
supports.
R Towing of the vehicle should only be
done using the properly installed towing
eye bolt. Never attach a tow cable, tow
rope or tow rod to the vehicle chassis,
frame or suspension parts.
! Do not tow with one axle raised. Doing so
could damage the transfer case, which is
not covered by the Mercedes-Benz Limited Warranty. All wheels must be on or off the
ground.
Observe instructions for towing the
vehicle with all wheels on the ground. G
Warning!
With the engine not running, there is no power
assistance for the brake and steering
systems. In this case, it is important to keep
in mind that a considerably higher degree of
effort is necessary to brake and steer the
vehicle. Adapt your driving accordingly.
! Avoid pulling the vehicle abruptly or
diagonally, since it could result in damage
to the chassis alignment.
! Do not use the towing eye bolt for
recovery,
as this could damage the vehicle.
If in doubt, recover the vehicle with a crane.
i If the battery is disconnected or
discharged
R the SmartKey will not turn in the starter
switch
R the automatic transmission will remain in
park position P
For more information see “Battery”
(Y page 333) or “Jump starting”
(Y page 336). Installing towing eye bolt
Depending on whether you are towing a
vehicle
or you are being towed, the towing eye
bolt can be screwed into threaded holes
which are located behind covers on each
bumper.
The towing eye bolt is supplied with the
vehicle tool kit, located in the cargo
compartment underneath the cargo
compartment floor (Y page 270).
X Take the towing eye bolt out of the space
underneath the cargo compartment floor. 338
Towing the vehicle
Practical hints
251_AKB; 4; 52, en-US
d2ureepe,
Version: 2.11.8.1 2009-03-23T09:22:52+01:00 - Seite 338
Page 342 of 364
Towing with all wheels on the ground
G
Warning!
If circumstances require towing the vehicle
with all wheels on the ground, always tow with
a tow bar if:
R the engine will not run
R there is a malfunction in the brake system
R there is a malfunction in the power supply
or in the vehicle’s electrical system
This is necessary to adequately control the
towed vehicle.
Prior to towing the vehicle with all wheels on
the ground, make sure the SmartKey is in
starter switch position 2.G
Warning!
With the engine not running, there is no power
assistance for the brake and steering
systems. In this case, it is important to keep
in mind that a considerably higher degree of
effort is necessary to brake and steer the
vehicle. Adapt your driving accordingly.
X Make sure the ignition is switched on.
X With the vehicle at a standstill, depress the
brake pedal and keep it pressed.
X Shift the automatic transmission into
neutral position N.
X Release the brake pedal.
X If engaged, release the parking brake.
X Switch on the hazard warning flasher
(Y page 101).
! Keep in mind that it is important to have
the ignition switched on. Removing the
SmartKey from the starter switch or
opening a front door with the ignition
switched off will automatically shift the
automatic transmission into park position
P.
! The vehicle may be towed only for
distances up to 30 miles (50 km) and at a
speed not to exceed 30 mph (50 km/h). i
While being towed with the hazard
warning
flasher in use, use the combination
switch in the usual manner to signal turns.
Only the selected turn signal will operate.
Upon canceling the turn signal, the hazard
warning flasher will operate again. Stranded vehicle
Freeing a stranded vehicle, on which the
wheels are dug into sand or mud, should be
done with the greatest of care, especially if
the vehicle is heavily loaded.
Note the following when freeing a stranded
vehicle:
R Avoid pulling the vehicle abruptly or
diagonally, since it could result in damage
to the chassis alignment.
R Never try to free a vehicle that is still
coupled to a trailer.
R If
possible, a vehicle equipped with a trailer
hitch receiver should be pulled backward in
its own previously made tracks. Fuses
Introduction
The electrical fuses in your vehicle serve to
switch off malfunctioning power circuits.
If a fuse is blown, the components and
systems secured by that fuse will stop
operating. G
Warning!
Only use fuses approved by Mercedes-Benz
with
the specified amperage for the system in
question and do not attempt to repair or
bridge a blown fuse. Using other than
approved fuses or using repaired or bridged
fuses may cause an overload leading to a fire,
and/or cause damage to electrical
components and/or systems. Have the cause
determined and remedied by an authorized
Mercedes-Benz Center. 340
Fuses
Practical hints
251_AKB; 4; 52, en-US
d2ureepe,
Version: 2.11.8.1 2009-03-23T09:22:52+01:00 - Seite 340