2010 MERCEDES-BENZ R320 windshield wipers
[x] Cancel search: windshield wipersPage 21 of 364
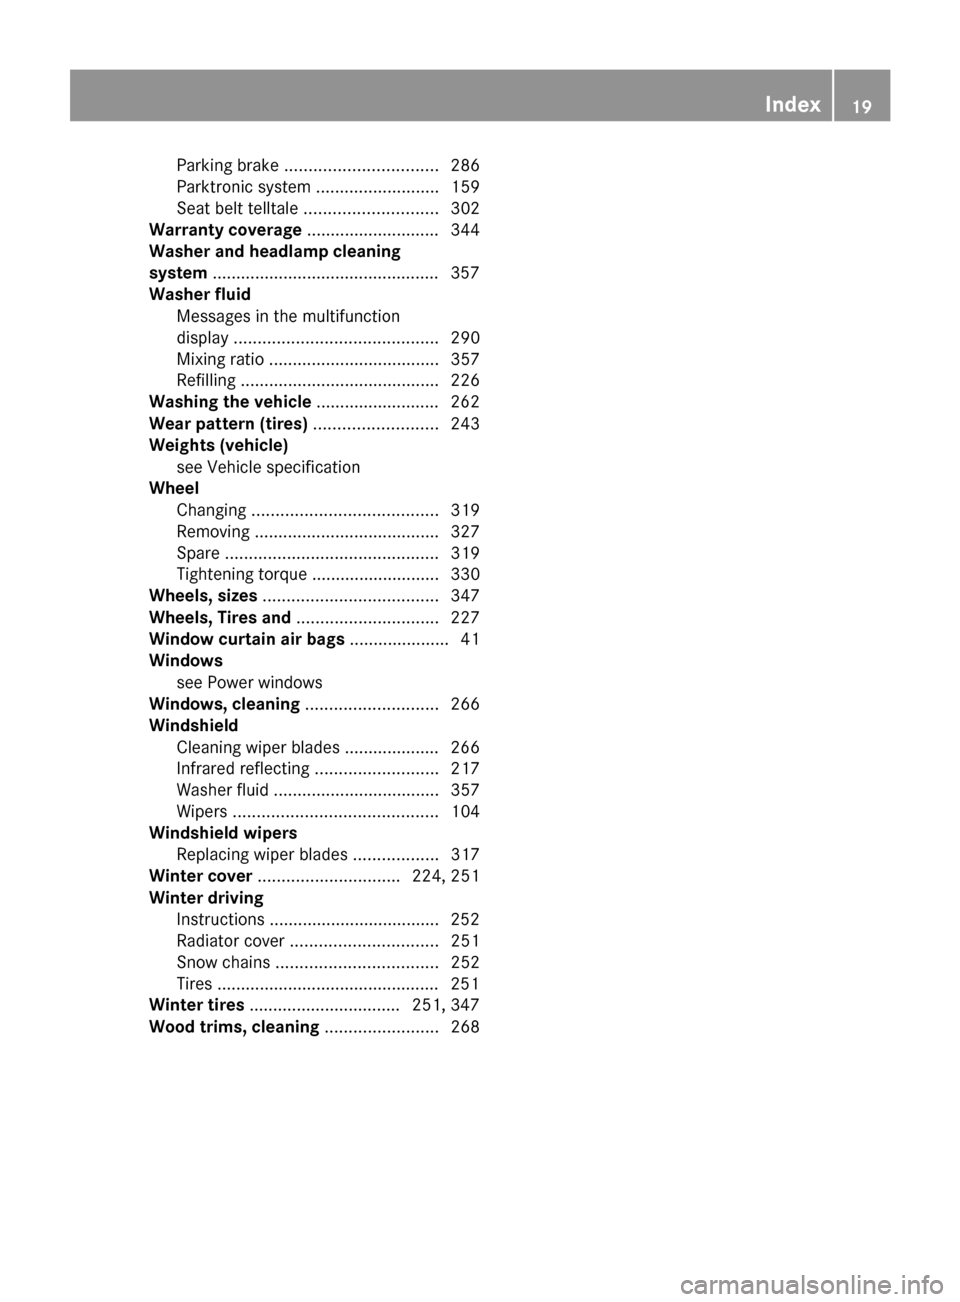
Parking brake ................................
286
Parktronic system ..........................159
Seat belt telltale ............................ 302
Warranty coverage ............................
344
Washer and headlamp cleaning
system ................................................ 357
Washer fluid
Messages in the multifunction
display ........................................... 290
Mixing ratio .................................... 357
Refilling .......................................... 226
Washing the vehicle .......................... 262
Wear pattern (tires) ..........................243
Weights (vehicle) see Vehicle specification
Wheel
Changing ....................................... 319
Removing ....................................... 327
Spare ............................................. 319
Tightening torque ........................... 330
Wheels, sizes ..................................... 347
Wheels, Tires and .............................. 227
Window curtain air bags ..................... 41
Windows see Power windows
Windows, cleaning ............................266
Windshield Cleaning wiper blades .................... 266
Infrared reflecting ..........................217
Washer fluid ................................... 357
Wipers ........................................... 104
Windshield wipers
Replacing wiper blades .................. 317
Winter cover .............................. 224, 251
Winter driving Instructions .................................... 252
Radiator cover ............................... 251
Snow chains .................................. 252
Tires ............................................... 251
Winter tires ................................ 251, 347
Wood trims, cleaning ........................ 268 Index
19 251_AKB; 4; 52, en-US
d2ureepe,
Version: 2.11.8.1 2009-03-23T09:22:52+01:00 - Seite 19
Page 28 of 364
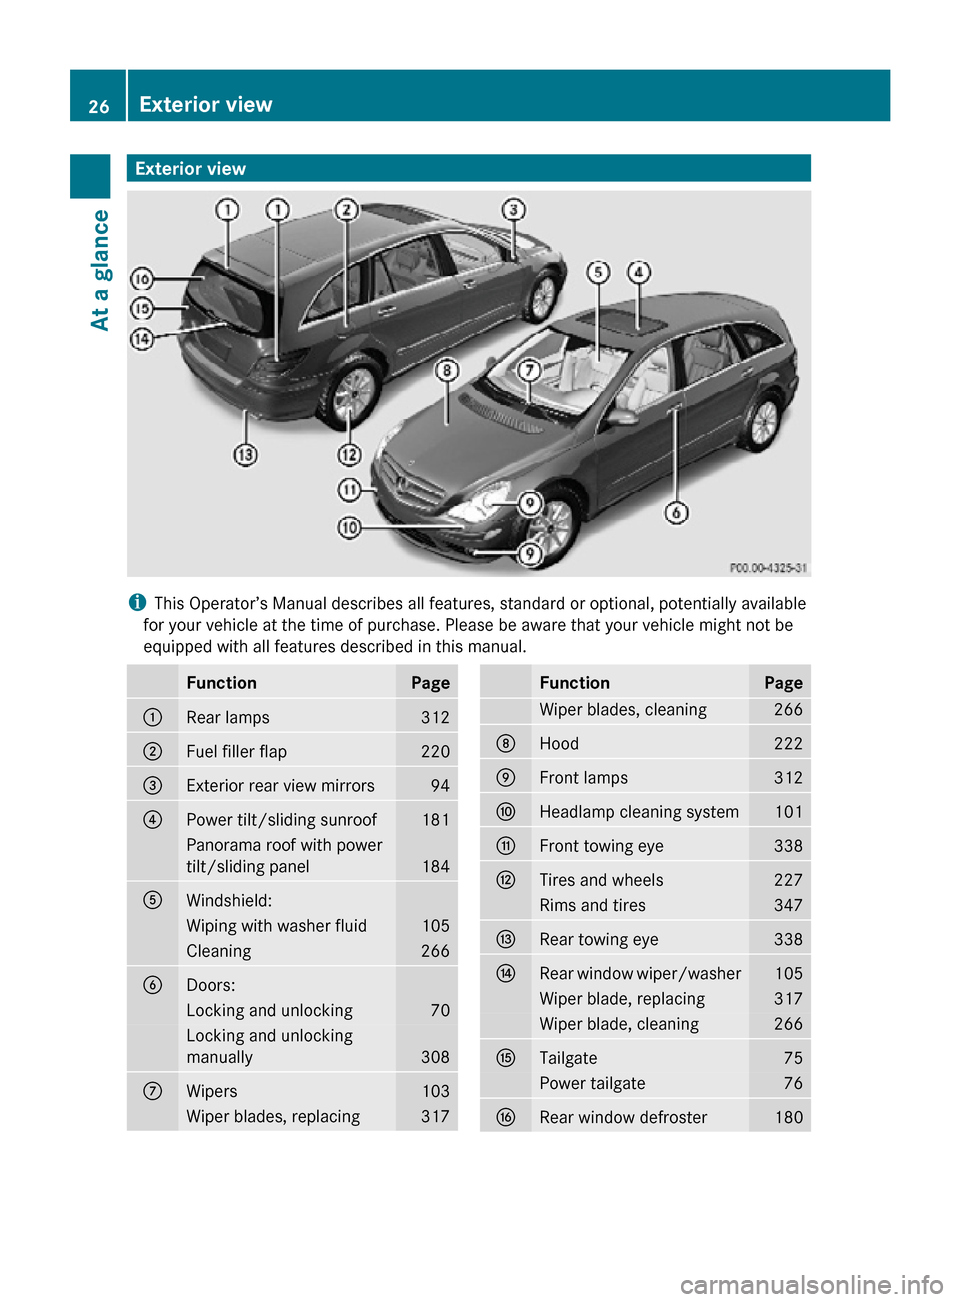
Exterior view
i
This Operator’s Manual describes all features, standard or optional, potentially available
for your vehicle at the time of purchase. Please be aware that your vehicle might not be
equipped with all features described in this manual. Function Page
:
Rear lamps 312
;
Fuel filler flap 220
=
Exterior rear view mirrors 94
?
Power tilt/sliding sunroof 181
Panorama roof with power
tilt/sliding panel
184
A
Windshield:
Wiping with washer fluid 105
Cleaning 266
B
Doors:
Locking and unlocking 70
Locking and unlocking
manually
308
C
Wipers 103
Wiper blades, replacing 317 Function Page
Wiper blades, cleaning 266
D
Hood 222
E
Front lamps 312
F
Headlamp cleaning system 101
G
Front towing eye 338
H
Tires and wheels 227
Rims and tires 347
I
Rear towing eye 338
J
Rear window wiper/washer 105
Wiper blade, replacing 317
Wiper blade, cleaning 266
K
Tailgate 75
Power tailgate 76
L
Rear window defroster 18026
Exterior viewAt a glance
251_AKB; 4; 52, en-US
d2ureepe,
Version: 2.11.8.1 2009-03-23T09:22:52+01:00 - Seite 26
Page 103 of 364
High-beam flasher
X
Switching on: Pull the combination switch
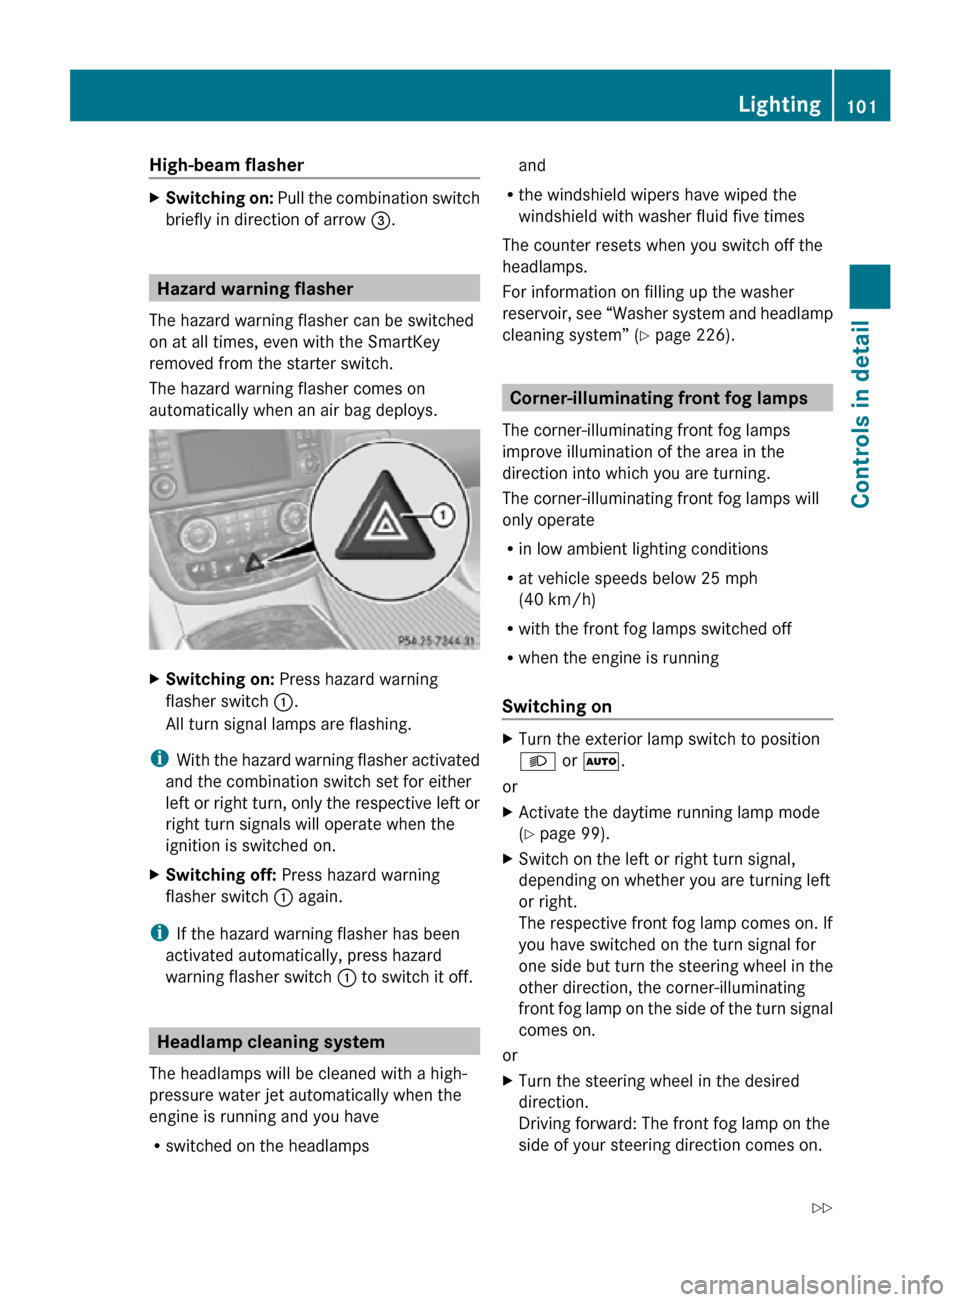
briefly in direction of arrow =.Hazard warning flasher
The hazard warning flasher can be switched
on at all times, even with the SmartKey
removed from the starter switch.
The hazard warning flasher comes on
automatically when an air bag deploys. X
Switching on: Press hazard warning
flasher switch :.
All turn signal lamps are flashing.
i With the hazard warning flasher activated
and the combination switch set for either
left or right turn, only the respective left or
right turn signals will operate when the
ignition is switched on.
X Switching off: Press hazard warning
flasher switch : again.
i If the hazard warning flasher has been
activated automatically, press hazard
warning flasher switch : to switch it off.Headlamp cleaning system
The headlamps will be cleaned with a high-
pressure water jet automatically when the
engine is running and you have
R switched on the headlamps and
R the windshield wipers have wiped the
windshield with washer fluid five times
The counter resets when you switch off the
headlamps.
For information on filling up the washer
reservoir, see “Washer system and headlamp
cleaning system” ( Y page 226). Corner-illuminating front fog lamps
The corner-illuminating front fog lamps
improve illumination of the area in the
direction into which you are turning.
The corner-illuminating front fog lamps will
only operate
R in low ambient lighting conditions
R at vehicle speeds below 25 mph
(40 km/h)
R with the front fog lamps switched off
R when the engine is running
Switching on X
Turn the exterior lamp switch to position
L or Ã.
or
X Activate the daytime running lamp mode
(Y page 99).
X Switch on the left or right turn signal,
depending on whether you are turning left
or right.
The respective front fog lamp comes on. If
you have switched on the turn signal for
one side but turn the steering wheel in the
other direction, the corner-illuminating
front fog lamp on the side of the turn signal
comes on.
or
X Turn the steering wheel in the desired
direction.
Driving forward: The front fog lamp on the
side of your steering direction comes on. Lighting
101Controls in detail
251_AKB; 4; 52, en-US
d2ureepe, Version: 2.11.8.1 2009-03-23T09:22:52+01:00 - Seite 101 Z
Page 105 of 364
i
If a door remains open, the interior lamps
go out automatically after approximately
5 minutes when the SmartKey is removed
or in starter switch position 0.
X Deactivating: Press button ~.
Button ~ engages.
Manual control !
An interior lamp switched on manually
does not go out automatically.
Leaving an interior lamp switched on for an
extended period of time with the engine
turned off could result in a discharged
battery.
X Switching front interior lighting on/
off: Press switch c.
X Switching rear interior lighting on/off:
Press switch v.
X Switching front reading lamps on/off:
Press respective switch p.
Emergency lighting The interior lighting comes on automatically
if the vehicle is involved in an accident.
Switching off:
X
Press button ~.
or
X Press hazard warning flasher switch
(Y page 101).
or
X Unlock the vehicle with the SmartKey. Interior lighting in the rear
! An interior lamp switched on manually
does not go out automatically.
Leaving an interior lamp switched on for an
extended period of time with the engine
turned off could result in a discharged
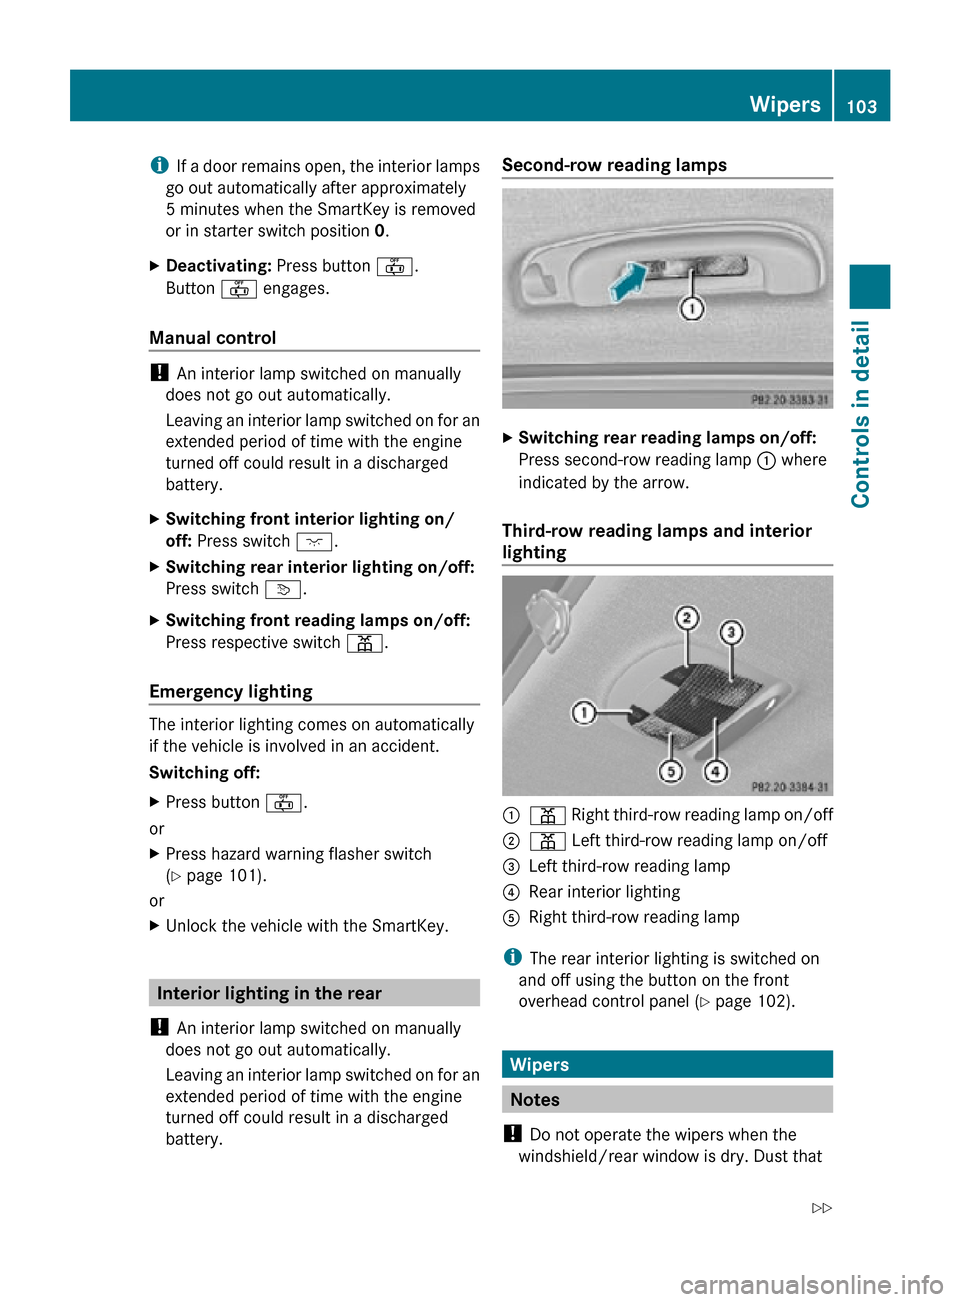
battery. Second-row reading lamps
X
Switching rear reading lamps on/off:
Press second-row reading lamp : where
indicated by the arrow.
Third-row reading lamps and interior
lighting :
p Right third-row reading lamp on/off
; p Left third-row reading lamp on/off
= Left third-row reading lamp
? Rear interior lighting
A Right third-row reading lamp
i The rear interior lighting is switched on
and off using the button on the front
overhead control panel ( Y page 102). Wipers
Notes
! Do not operate the wipers when the
windshield/rear window is dry. Dust that Wipers
103Controls in detail
251_AKB; 4; 52, en-US
d2ureepe, Version: 2.11.8.1 2009-03-23T09:22:52+01:00 - Seite 103 Z
Page 106 of 364
accumulates on a windshield/rear window
might scratch the glass and/or damage the
wiper blades when wiping occurs on a dry
windshield/rear window. If it is necessary
to operate the wipers in dry weather
conditions, always operate the wipers with
washer fluid.
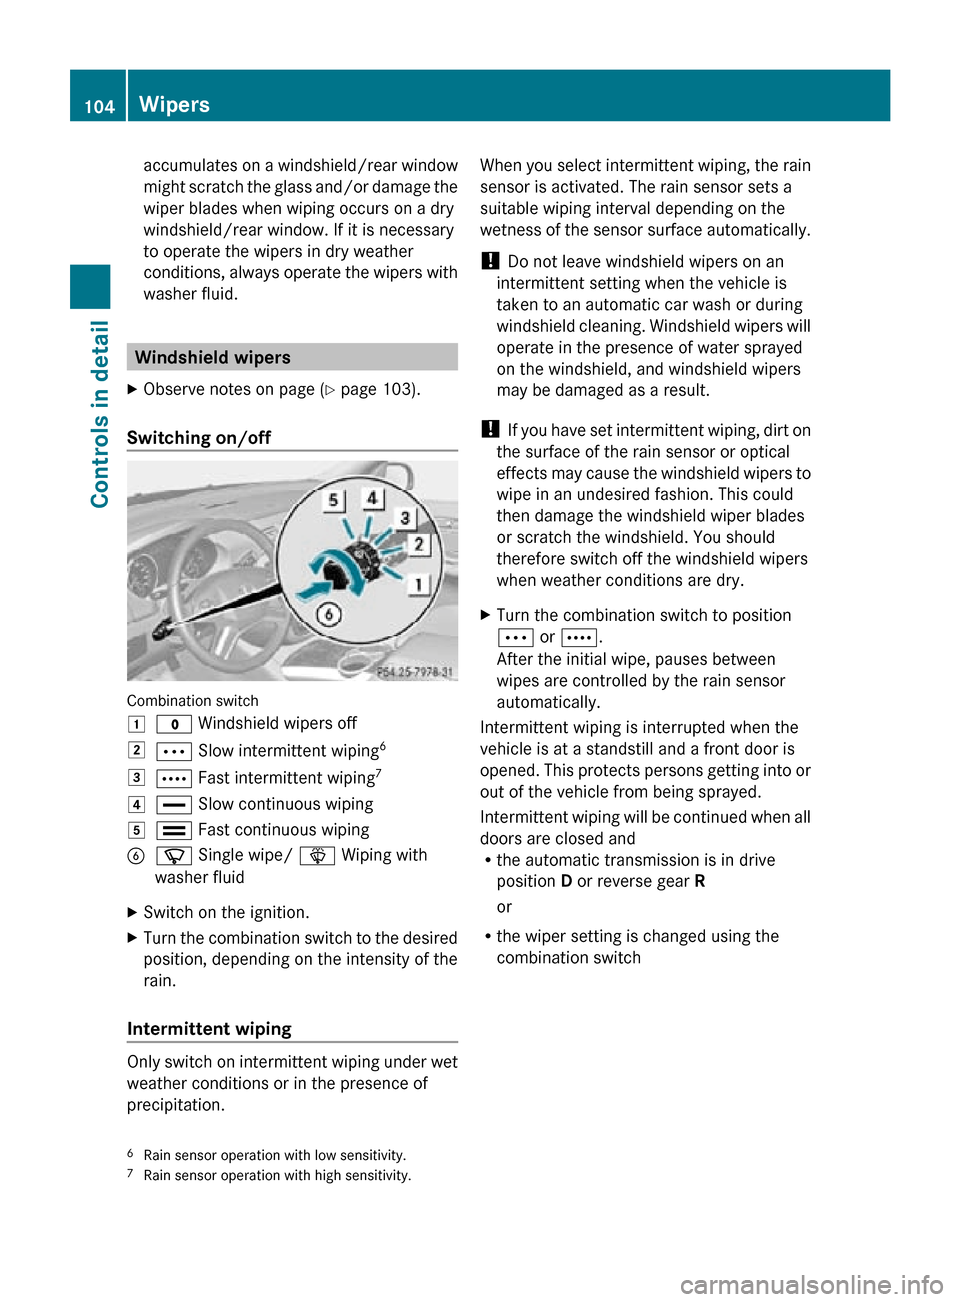
Windshield wipers
X Observe notes on page (Y page 103).
Switching on/off Combination switch
1
$ Windshield wipers off
2 Ä Slow intermittent wiping 6
3 Å Fast intermittent wiping 7
4 ° Slow continuous wiping
5 ¯ Fast continuous wiping
B í Single wipe/ î Wiping with
washer fluid
X Switch on the ignition.
X Turn the combination switch to the desired
position, depending on the intensity of the
rain.
Intermittent wiping Only switch on intermittent wiping under wet
weather conditions or in the presence of
precipitation. When you select intermittent wiping, the rain
sensor is activated. The rain sensor sets a
suitable wiping interval depending on the
wetness of the sensor surface automatically.
!
Do not leave windshield wipers on an
intermittent setting when the vehicle is
taken to an automatic car wash or during
windshield cleaning. Windshield wipers will
operate in the presence of water sprayed
on the windshield, and windshield wipers
may be damaged as a result.
! If you have set intermittent wiping, dirt on
the surface of the rain sensor or optical
effects may cause the windshield wipers to
wipe in an undesired fashion. This could
then damage the windshield wiper blades
or scratch the windshield. You should
therefore switch off the windshield wipers
when weather conditions are dry.
X Turn the combination switch to position
Ä or Å.
After the initial wipe, pauses between
wipes are controlled by the rain sensor
automatically.
Intermittent wiping is interrupted when the
vehicle is at a standstill and a front door is
opened. This protects persons getting into or
out of the vehicle from being sprayed.
Intermittent wiping will be continued when all
doors are closed and
R the automatic transmission is in drive
position D or reverse gear R
or
R the wiper setting is changed using the
combination switch
6 Rain sensor operation with low sensitivity.
7 Rain sensor operation with high sensitivity. 104
WipersControls in detail
251_AKB; 4; 52, en-US
d2ureepe,
Version: 2.11.8.1 2009-03-23T09:22:52+01:00 - Seite 104
Page 107 of 364
Single wipe
X
Press the combination switch briefly in
direction of arrow B to the resistance
point.
The windshield wipers wipe one time
without washer fluid.
Wiping with washer fluid X
Press the combination switch in direction
of arrow B past the resistance point.
The windshield wipers operate with washer
fluid.
i To prevent smears on the windshield or
noisy/chattering wiper blades, wipe with
washer fluid every now and then even when
it is raining.
For information on filling up the washer
reservoir, see “Washer system and headlamp
cleaning system” ( Y page 226).
For information on cleaning the headlamps
with washer fluid, see “Headlamp cleaning
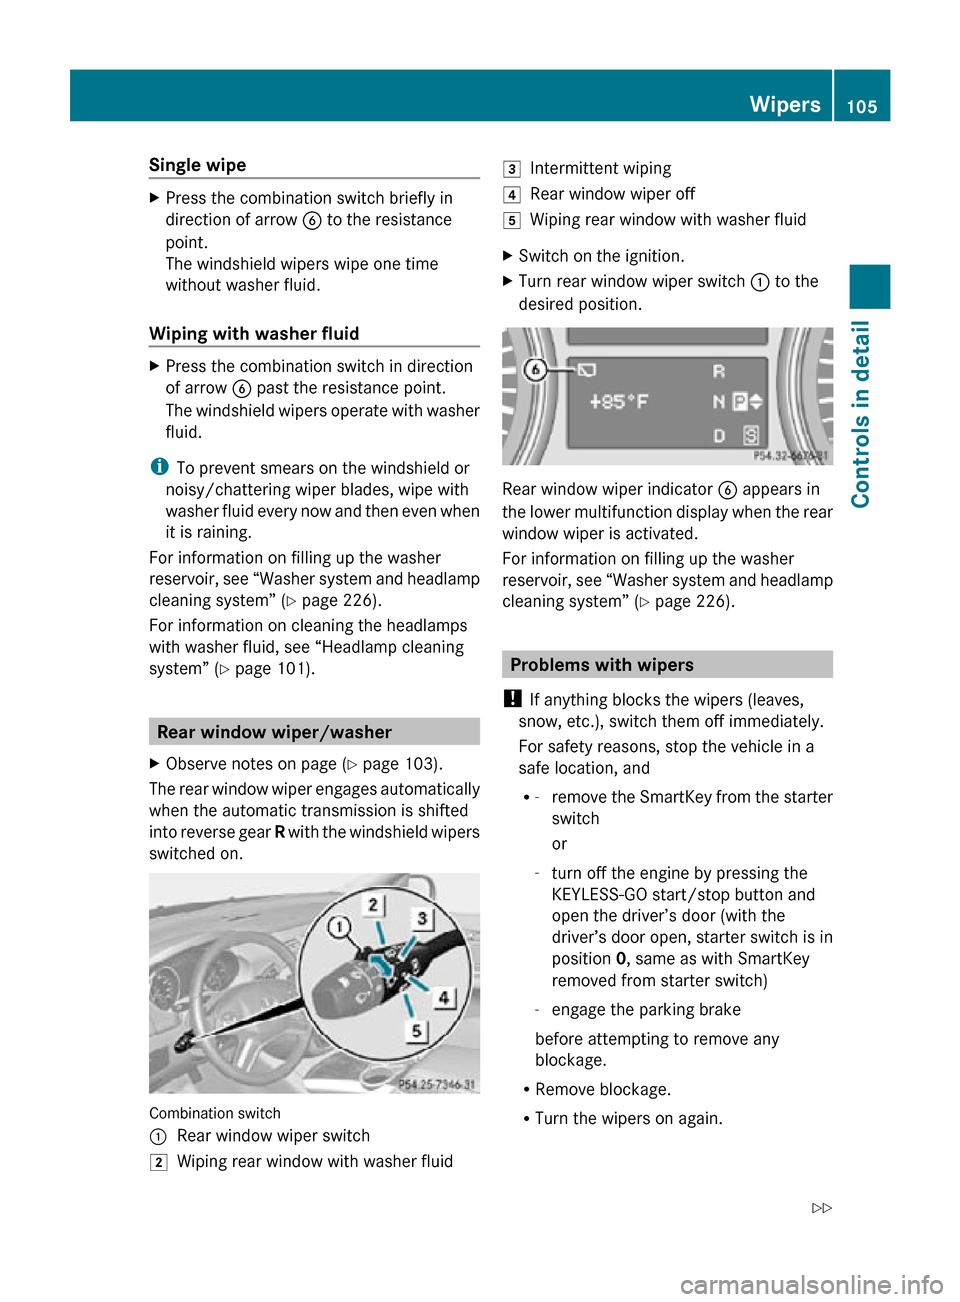
system” ( Y page 101). Rear window wiper/washer
X Observe notes on page (Y page 103).
The rear window wiper engages automatically
when the automatic transmission is shifted
into reverse gear R with the windshield wipers
switched on. Combination switch
:
Rear window wiper switch
2 Wiping rear window with washer fluid 3
Intermittent wiping
4 Rear window wiper off
5 Wiping rear window with washer fluid
X Switch on the ignition.
X Turn rear window wiper switch : to the
desired position. Rear window wiper indicator
B appears in
the lower multifunction display when the rear
window wiper is activated.
For information on filling up the washer
reservoir, see “Washer system and headlamp
cleaning system” ( Y page 226). Problems with wipers
! If anything blocks the wipers (leaves,
snow, etc.), switch them off immediately.
For safety reasons, stop the vehicle in a
safe location, and
R -
remove the SmartKey from the starter
switch
or
- turn off the engine by pressing the
KEYLESS-GO start/stop button and
open the driver’s door (with the
driver’s door open, starter switch is in
position 0, same as with SmartKey
removed from starter switch)
- engage the parking brake
before attempting to remove any
blockage.
R Remove blockage.
R Turn the wipers on again. Wipers
105Controls in detail
251_AKB; 4; 52, en-US
d2ureepe, Version: 2.11.8.1 2009-03-23T09:22:52+01:00 - Seite 105 Z
Page 108 of 364
If the windshield wipers fail to function at
all with the combination switch in position
Ä or Å,
R
set the combination switch to the next
higher wiper speed
R have the windshield wipers checked at
the nearest authorized Mercedes-Benz
Center Power windows
Opening and closing
The door windows and the hinged quarter
windows are opened and closed electrically.
The switches for all door windows and the
hinged quarter windows are located on the
driver’s door control panel. The switches for
the respective door windows are located on
the front passenger door and the rear doors.
The
hinged quarter windows can be operated
from the driver’s seat only.
i Operating the rear door windows from
the rear is not possible when you activate
the override switch (Y page 62). G
Observe Safety notes, see page 55. G
Warning!
When opening or closing the windows, make
sure there is no danger of anyone being
harmed by the opening/closing procedure.
The door windows are equipped with the
express operation and automatic reversal
function.
If in express operation mode a door
window encounters an obstruction that
blocks its path, the automatic reversal
function will stop the door window and open
it slightly.
The door windows operate differently when
the switch is pulled and held. See the “Closing
when a door window is blocked” section in
this chapter for details.
The closing of a door window can be
immediately halted by releasing the switch or, if the switch was pulled past the resistance
point and released, by either pressing or
pulling the respective switch.
The
closing of the hinged quarter windows can
be immediately halted by pressing or pulling
the switch.
If a window encounters an obstruction that
blocks its path in a circumstance where you
are closing the windows by pressing and
holding button & on the SmartKey or by
pressing and holding the lock button (vehicles
with KEYLESS-GO) on an outside door handle,
the automatic reversal function will not
operate.
Activate the override switch when children
are riding in the back seats of the vehicle. The
children may otherwise injure themselves,
e.g. by becoming trapped in the window
opening. G
Warning!
Do not keep any part of your body up against
the
window pane when opening a window. The
downward motion of the pane may pull that
part of your body down between the window
pane and the door frame and trap it there. If
there is a risk of entrapment, release the
switch and pull it to close the window.
i You can also open or close the windows
using the SmartKey, see “Summer opening
feature” ( Y page 108) and “Convenience
closing feature” ( Y page 108).
i After switching off the ignition or
removing the SmartKey from the starter
switch, you can operate the windows until
you open the driver’s or front passenger
door. If no door was opened you can
operate the windows for up to 5 minutes. 106
Power windows
Controls in detail
251_AKB; 4; 52, en-US
d2ureepe,
Version: 2.11.8.1 2009-03-23T09:22:52+01:00 - Seite 106
Page 171 of 364
X
Press button I to decrease or button
K to increase air volume to the desired
level.
The air volume decreases/increases to the
next lower/higher blower speed and
heating switches to the temperature that
was set before the front defroster was
switched on.
The indicator lamp in button ¦ goes out.
The indicator lamp in button Á comes
on.
or
X Turn temperature control : and/or C
(Y page 164) slightly in any direction.
Heating switches to the temperature that
was set before the front defroster was
switched on.
The
indicator lamp in button ¦ goes out.
The indicator lamp in button Á comes
on.
i The air conditioning compressor remains
on even if the indicator lamp in button
¦ goes out. This helps to prevent the
windshield from fogging.
Deactivating X
Press button ¦ again.
The indicator lamp in the button goes out.
Defrosting is turned off.
The previous settings are once again in
effect. The air conditioning compressor
remains switched on.
i To deactivate, you can also press button
^ or Ã.
Windshield fogged on the outside X
Switch the windshield wipers on
(Y page 104).
X Press air distribution button P
or O. Air recirculation mode
Switch to air recirculation mode to prevent
unpleasant odors from entering the vehicle
from the outside (e. g. before driving through
a tunnel). This setting cuts off the intake of
outside air and recirculates the air in the
passenger compartment. G
Warning!
Fogged windows impair visibility,
endangering you and others. If the windows
begin to fog on the inside, switching off the
air recirculation mode immediately should
clear interior window fogging. If interior
window fogging persists, make sure the air
conditioning is activated, or press button
¦.
X Activating: Press button d.
The
indicator lamp in the button comes on.
i The air recirculation mode is activated
automatically at high outside
temperatures.
The
indicator lamp in button d is not lit
when the air recirculation mode is switched
on automatically.
A quantity of outside air is added after
approximately 30 minutes.
If you have turned off the air conditioning
or the outside temperature is below 41‡
(5†), the air recirculation mode will not
switch on automatically.
X Deactivating: Press button d.
The indicator lamp in the button goes out. Climate control
169
Controls in detail
251_AKB; 4; 52, en-US
d2ureepe, Version: 2.11.8.1 2009-03-23T09:22:52+01:00 - Seite 169 Z