2010 MERCEDES-BENZ R320 tow bar
[x] Cancel search: tow barPage 7 of 364

Armrest, rear
Storage compartment .................... 199
Ashtrays ............................................. 204
Aspect ratio (tires) ............................ 249
Audio/DVD menu .............................. 128
Auto-dimming rear view mirrors ........ 94
Automatic central locking ..........74, 137
Automatic headlamp mode ................98
Automatic interior lighting control ..102
Automatic locking when driving ......137
Automatic shift program ..................120
Automatic transmission ................... 115
Automatic shift program ................120
Emergency operation (limp-home
mode) ............................................ 121
Gear range indicator ......................120
Gear ranges ................................... 119
Gear selector lever ........................116
Hill-start assist system .................. 153
Kickdown ....................................... 119
One-touch gearshifting ..................120
Program mode indicator ................120
Program mode selector switch
(automatic shift program) ..............120
Shifting procedure ......................... 118
Steering wheel gearshift control .... 121
Towing a trailer .............................. 119
Transmission position indicator ..... 118
Transmission positions .................. 118
AUX socket ........................................ 198
Axle oils .............................................. 351B
BabySmart™
Air bag deactivation system ............. 45
Self-test
........................................... 47
Backrest
see Seats
Backup lamps
Messages in the multifunction
display ........................................... 295
Bar (air pressure unit) ....................... 249
BAS (Brake Assist System) ................. 64
Batteries, SmartKey
Checking condition ..........................73
Replacing ....................................... 310Battery, Vehicle
................................. 333
Charging ........................................ 335
Jump starting ................................. 336
Messages in the multifunction
display
................................... 282, 292
Bead (tire) .......................................... 249
Beverage holders see Cup holders
Bleeding the fuel system (diesel
engine) ............................................... 331
BlueTEC
AdBlue ®
tank ................................. 331
AdBlue ®
tank capacity ................... 351
Brake fluid
Checking level ............................... 227
Messages in the multifunction
display ........................................... 286
Brake lamps
Cleaning lenses ............................. 265
Brake pads
Messages in the multifunction
display ........................................... 285
Brakes ................................................ 253
Parking brake ........................ 114, 255
Warning lamp ................................. 301
Break-in period .................................. 220
Bug cover (Radiator) ......................... 224
Bulbs see Replacing bulbs C
CAC (Customer Assistance Center) ...23
California retail buyers and
lessees, important notice for .............21
Calls (phone) ...................................... 140
Can holders see Cup holders
Capacities and recommended
fuel/lubricants .................................. 350
Cargo compartment
Cargo net ....................................... 196
Cargo volume, expanding ..............189
Cover blind .................................... 194
Fuse box ........................................ 342
Hooks ............................................ 189
Tie-down rings ............................... 188
Cargo compartment cover blind ...... 194 Index
5 251_AKB; 4; 52, en-US
d2ureepe,
Version: 2.11.8.1 2009-03-23T09:22:52+01:00 - Seite 5
Page 91 of 364

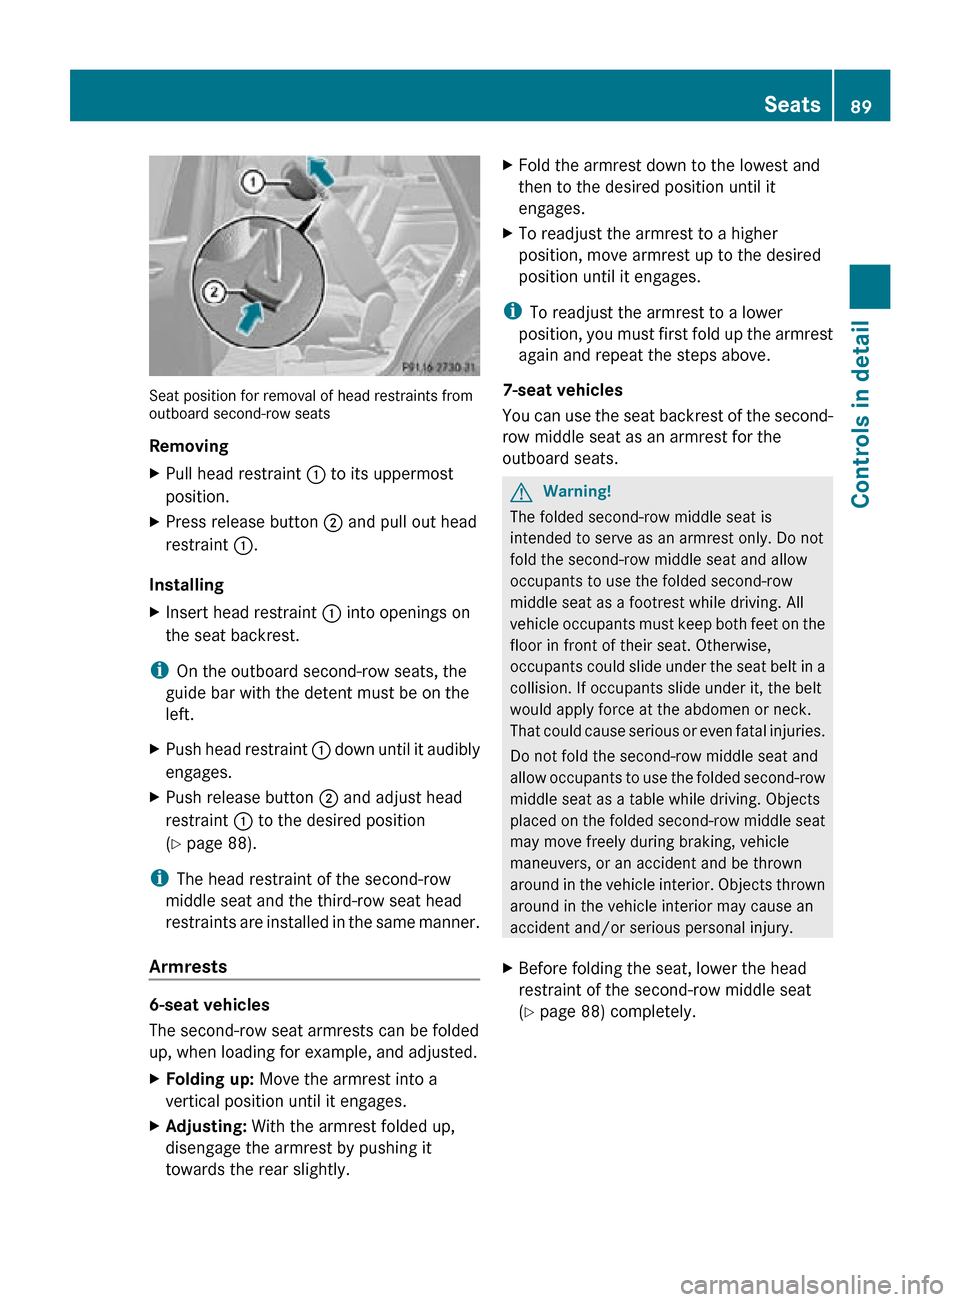
Seat position for removal of head restraints from
outboard second-row seats
Removing
X
Pull head restraint : to its uppermost
position.
X Press release button ; and pull out head
restraint :.
Installing
X Insert head restraint : into openings on
the seat backrest.
i On the outboard second-row seats, the
guide bar with the detent must be on the
left.
X Push head restraint : down until it audibly
engages.
X Push release button ; and adjust head
restraint : to the desired position
(Y page 88).
i The head restraint of the second-row
middle seat and the third-row seat head
restraints are installed in the same manner.
Armrests 6-seat vehicles
The second-row seat armrests can be folded
up, when loading for example, and adjusted.
X
Folding up: Move the armrest into a
vertical position until it engages.
X Adjusting: With the armrest folded up,
disengage the armrest by pushing it
towards the rear slightly. X
Fold the armrest down to the lowest and
then to the desired position until it
engages.
X To readjust the armrest to a higher
position, move armrest up to the desired
position until it engages.
i To readjust the armrest to a lower
position, you must first fold up the armrest
again and repeat the steps above.
7-seat vehicles
You can use the seat backrest of the second-
row middle seat as an armrest for the
outboard seats. G
Warning!
The folded second-row middle seat is
intended to serve as an armrest only. Do not
fold the second-row middle seat and allow
occupants to use the folded second-row
middle seat as a footrest while driving. All
vehicle occupants must keep both feet on the
floor in front of their seat. Otherwise,
occupants could slide under the seat belt in a
collision. If occupants slide under it, the belt
would apply force at the abdomen or neck.
That could cause serious or even fatal injuries.
Do not fold the second-row middle seat and
allow occupants to use the folded second-row
middle seat as a table while driving. Objects
placed on the folded second-row middle seat
may move freely during braking, vehicle
maneuvers, or an accident and be thrown
around in the vehicle interior. Objects thrown
around in the vehicle interior may cause an
accident and/or serious personal injury.
X Before folding the seat, lower the head
restraint of the second-row middle seat
(Y page 88) completely. Seats
89Controls in detail
251_AKB; 4; 52, en-US
d2ureepe, Version: 2.11.8.1 2009-03-23T09:22:52+01:00 - Seite 89 Z
Page 342 of 364

Towing with all wheels on the ground
G
Warning!
If circumstances require towing the vehicle
with all wheels on the ground, always tow with
a tow bar if:
R the engine will not run
R there is a malfunction in the brake system
R there is a malfunction in the power supply
or in the vehicle’s electrical system
This is necessary to adequately control the
towed vehicle.
Prior to towing the vehicle with all wheels on
the ground, make sure the SmartKey is in
starter switch position 2.G
Warning!
With the engine not running, there is no power
assistance for the brake and steering
systems. In this case, it is important to keep
in mind that a considerably higher degree of
effort is necessary to brake and steer the
vehicle. Adapt your driving accordingly.
X Make sure the ignition is switched on.
X With the vehicle at a standstill, depress the
brake pedal and keep it pressed.
X Shift the automatic transmission into
neutral position N.
X Release the brake pedal.
X If engaged, release the parking brake.
X Switch on the hazard warning flasher
(Y page 101).
! Keep in mind that it is important to have
the ignition switched on. Removing the
SmartKey from the starter switch or
opening a front door with the ignition
switched off will automatically shift the
automatic transmission into park position
P.
! The vehicle may be towed only for
distances up to 30 miles (50 km) and at a
speed not to exceed 30 mph (50 km/h). i
While being towed with the hazard
warning
flasher in use, use the combination
switch in the usual manner to signal turns.
Only the selected turn signal will operate.
Upon canceling the turn signal, the hazard
warning flasher will operate again. Stranded vehicle
Freeing a stranded vehicle, on which the
wheels are dug into sand or mud, should be
done with the greatest of care, especially if
the vehicle is heavily loaded.
Note the following when freeing a stranded
vehicle:
R Avoid pulling the vehicle abruptly or
diagonally, since it could result in damage
to the chassis alignment.
R Never try to free a vehicle that is still
coupled to a trailer.
R If
possible, a vehicle equipped with a trailer
hitch receiver should be pulled backward in
its own previously made tracks. Fuses
Introduction
The electrical fuses in your vehicle serve to
switch off malfunctioning power circuits.
If a fuse is blown, the components and
systems secured by that fuse will stop
operating. G
Warning!
Only use fuses approved by Mercedes-Benz
with
the specified amperage for the system in
question and do not attempt to repair or
bridge a blown fuse. Using other than
approved fuses or using repaired or bridged
fuses may cause an overload leading to a fire,
and/or cause damage to electrical
components and/or systems. Have the cause
determined and remedied by an authorized
Mercedes-Benz Center. 340
Fuses
Practical hints
251_AKB; 4; 52, en-US
d2ureepe,
Version: 2.11.8.1 2009-03-23T09:22:52+01:00 - Seite 340