2010 MERCEDES-BENZ R320 glove box
[x] Cancel search: glove boxPage 11 of 364

Parking position ...............................
95
Power folding ................................... 95
Exterior view of vehicle ......................26 F
Fastening the seat belts .....................49
First aid kit .........................................
270
Flat tire ............................................... 319
Lowering the vehicle ......................329
Mounting the spare wheel ............. 324
Preparing the vehicle .....................320
Spare wheel ........................... 319, 350
TIREFIT (tire repair kit) ................... 320
Floormats ........................................... 217
Fluids
AdBlue ®
......................................... 351
Automatic transmission fluid ......... 350
Brake fluid ..................................... 351
Capacities ...................................... 350
Engine coolant ............................... 351
Engine oil ....................................... 350
Power steering fluid ....................... 351
Washer and headlamp cleaning
system ........................................... 351
Fog lamps ............................................. 99
Messages in the multifunction
display ................................... 295, 296
Fold-in function for exterior rear
view mirrors ...................................... 138
Four-wheel drive see All-wheel drive (4MATIC)
Front air bags
see Air bags
Front axle oil ...................................... 351
Front lamps see Headlamps
Front passenger front air bag ............ 40
Messages in the multifunction
display ........................................... 277
Front passenger front air bag off
indicator lamp (Canada only) ..... 45, 307
Front passenger front air bag off
indicator lamp (USA only) ..........42, 307
Front seat head restraints see Head restraints
Fuel ............................................. 220, 353
Additives ........................................ 354Capacity, fuel tank .........................
351
Diesel fuel
............................. 351, 353
Drive sensibly–safe fuel .................253
Fuel consumption statistics ...........139
Fuel filler flap and cap ................... 221
Fuel tank reserve warning
lamp ........................................ 29, 305
Premium unleaded gasoline ... 351, 353
Refueling ........................................ 220
Requirements ................................ 353
Fuel filler flap ..................................... 221
Opening manually ..........................309
Fuels, coolants, lubricants etc.
Capacities ...................................... 350
Fuel system, bleeding (diesel
engine) ............................................... 331
Fuel tank Capacity ........................................ 351
Fuel filler flap and cap ................... 221
Refueling ........................................ 220
Fuses .................................................. 340 G
Garage door opener .................... 32, 213
Gasoline see Fuel
GAWR (Gross Axle Weight Rating) ...249
Gear range ......................................... 119
Indicator ........................................ 120
Limiting .......................................... 121
Shifting into optimal ......................121
Gear selector lever ............................116
Cleaning ......................................... 267
Gearshift pattern ........................... 116
Shifting procedure ......................... 118
Transmission position indicator ..... 118
Transmission positions .................. 118
Generator
see Alternator
Global locking/unlocking
see Key, SmartKey
Glove box ........................................... 198
Gross Axle Weight Rating see GAWR
Gross Trailer Weight
see GTW Index
9 251_AKB; 4; 52, en-US
d2ureepe,
Version: 2.11.8.1 2009-03-23T09:22:52+01:00 - Seite 9
Page 29 of 364

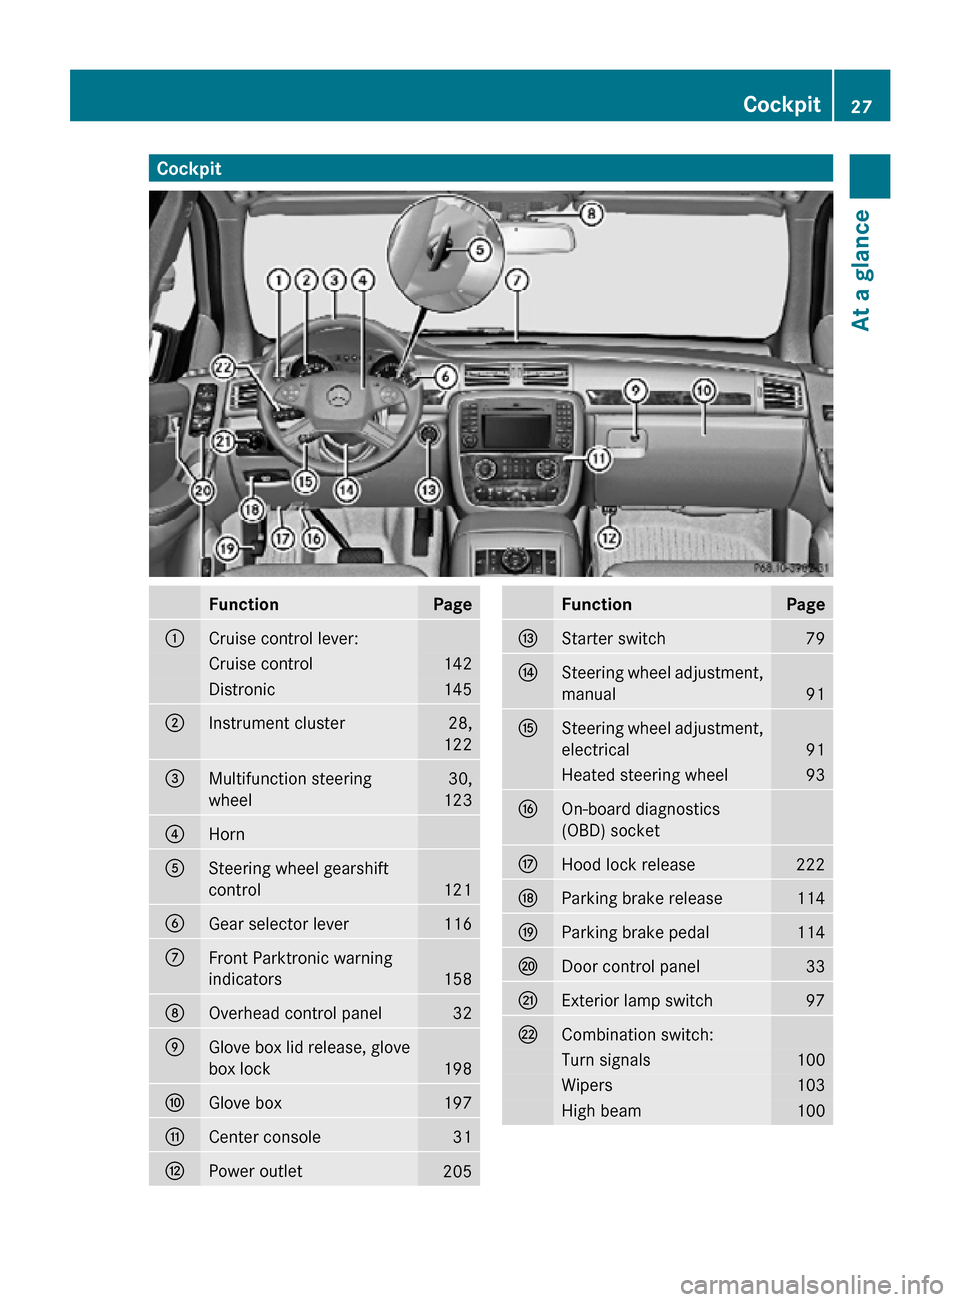
Cockpit
Function Page
:
Cruise control lever:
Cruise control 142
Distronic 145
;
Instrument cluster 28,
122 =
Multifunction steering
wheel 30,
123 ?
Horn
A
Steering wheel gearshift
control
121
B
Gear selector lever 116
C
Front Parktronic warning
indicators
158
D
Overhead control panel 32
E
Glove box lid release, glove
box lock
198
F
Glove box 197
G
Center console 31
H
Power outlet
205 Function Page
I
Starter switch 79
J
Steering wheel adjustment,
manual
91
K
Steering wheel adjustment,
electrical
91
Heated steering wheel 93
L
On-board diagnostics
(OBD) socket
M
Hood lock release 222
N
Parking brake release 114
O
Parking brake pedal 114
P
Door control panel 33
Q
Exterior lamp switch 97
R
Combination switch:
Turn signals 100
Wipers 103
High beam 100Cockpit
27At a glance
251_AKB; 4; 52, en-US
d2ureepe, Version: 2.11.8.1 2009-03-23T09:22:52+01:00 - Seite 27 Z
Page 60 of 364

Top tether straps enable an additional
connection to be made between child
restraint systems secured with LATCH-type
anchors and rear seats. This can further
reduce the risk of injury.
G
Observe Safety notes, see page 55.
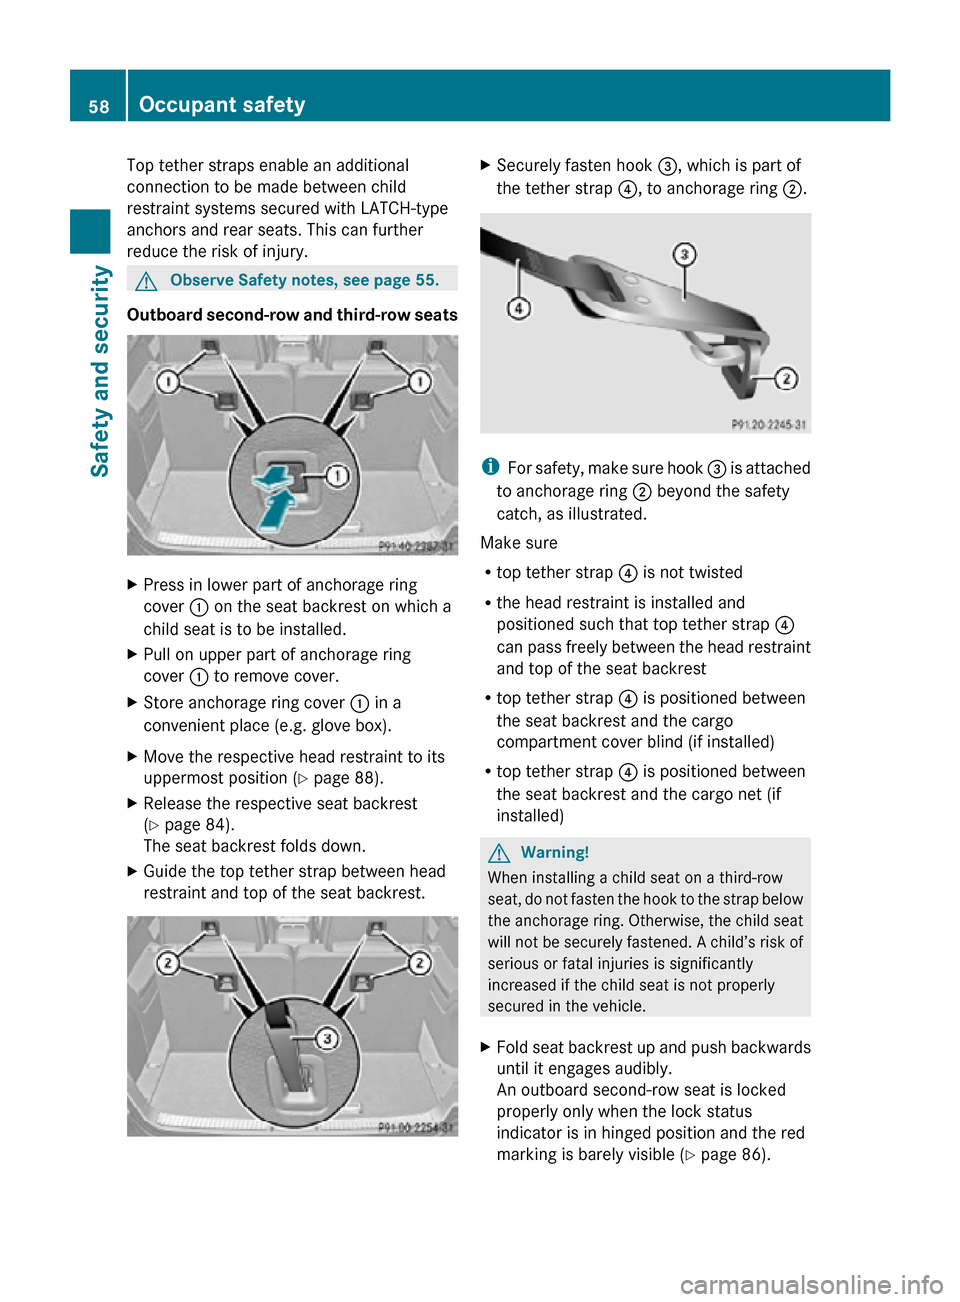
Outboard second-row and third-row seats X
Press in lower part of anchorage ring
cover : on the seat backrest on which a
child seat is to be installed.
X Pull on upper part of anchorage ring
cover : to remove cover.
X Store anchorage ring cover : in a
convenient place (e.g. glove box).
X Move the respective head restraint to its
uppermost position ( Y page 88).
X Release the respective seat backrest
(Y page 84).
The seat backrest folds down.
X Guide the top tether strap between head
restraint and top of the seat backrest. X
Securely fasten hook =, which is part of
the tether strap ?, to anchorage ring ;. i
For safety, make sure hook = is attached
to anchorage ring ; beyond the safety
catch, as illustrated.
Make sure
R top tether strap ? is not twisted
R the head restraint is installed and
positioned such that top tether strap ?
can pass freely between the head restraint
and top of the seat backrest
R top tether strap ? is positioned between
the seat backrest and the cargo
compartment cover blind (if installed)
R top tether strap ? is positioned between
the seat backrest and the cargo net (if
installed) G
Warning!
When installing a child seat on a third-row
seat, do not fasten the hook to the strap below
the anchorage ring. Otherwise, the child seat
will not be securely fastened. A child’s risk of
serious or fatal injuries is significantly
increased if the child seat is not properly
secured in the vehicle.
X Fold seat backrest up and push backwards
until it engages audibly.
An outboard second-row seat is locked
properly only when the lock status
indicator is in hinged position and the red
marking is barely visible ( Y page 86).58
Occupant safetySafety and security
251_AKB; 4; 52, en-US
d2ureepe,
Version: 2.11.8.1 2009-03-23T09:22:52+01:00 - Seite 58
Page 197 of 364

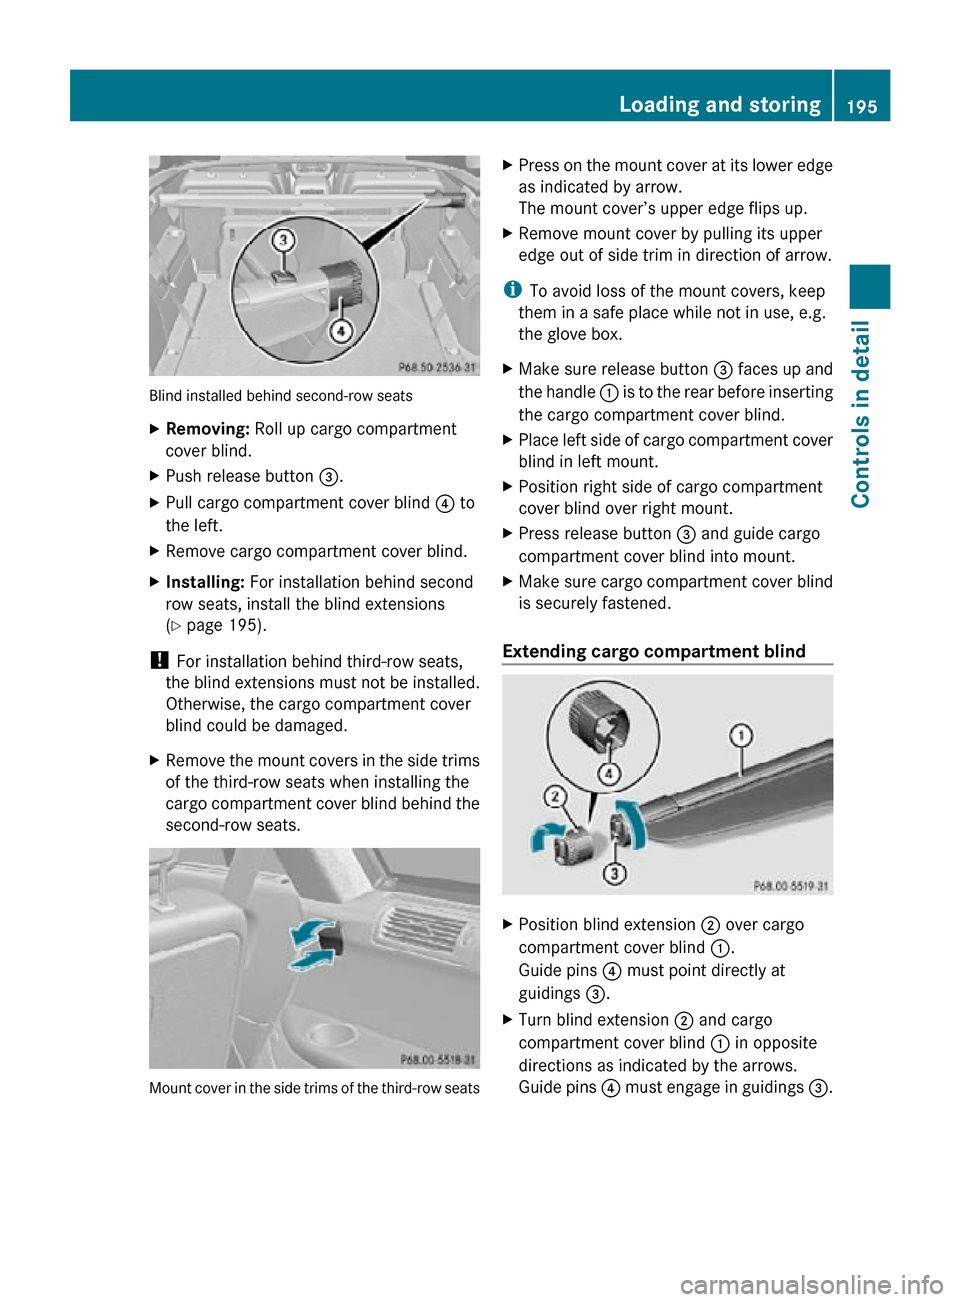
Blind installed behind second-row seats
X
Removing: Roll up cargo compartment
cover blind.
X Push release button =.
X Pull cargo compartment cover blind ? to
the left.
X Remove cargo compartment cover blind.
X Installing: For installation behind second
row seats, install the blind extensions
(Y page 195).
! For installation behind third-row seats,
the blind extensions must not be installed.
Otherwise, the cargo compartment cover
blind could be damaged.
X Remove the mount covers in the side trims
of the third-row seats when installing the
cargo compartment cover blind behind the
second-row seats. Mount cover in the side trims of the third-row seats X
Press on the mount cover at its lower edge
as indicated by arrow.
The mount cover’s upper edge flips up.
X Remove mount cover by pulling its upper
edge out of side trim in direction of arrow.
i To avoid loss of the mount covers, keep
them in a safe place while not in use, e.g.
the glove box.
X Make sure release button = faces up and
the handle : is to the rear before inserting
the cargo compartment cover blind.
X Place left side of cargo compartment cover
blind in left mount.
X Position right side of cargo compartment
cover blind over right mount.
X Press release button = and guide cargo
compartment cover blind into mount.
X Make sure cargo compartment cover blind
is securely fastened.
Extending cargo compartment blind X
Position blind extension ; over cargo
compartment cover blind :.
Guide pins ? must point directly at
guidings =.
X Turn blind extension ; and cargo
compartment cover blind : in opposite
directions as indicated by the arrows.
Guide pins ? must engage in guidings =. Loading and storing
195Controls in detail
251_AKB; 4; 52, en-US
d2ureepe, Version: 2.11.8.1 2009-03-23T09:22:52+01:00 - Seite 195 Z
Page 200 of 364

Keep compartment lids closed. This will help
to prevent stored objects from being thrown
about and injuring vehicle occupants during
R
braking
R vehicle maneuvers
R an accident
Glove box Depending on vehicle equipment, an AUX
socket or a media interface is located in the
glove box. For information on Audio AUX
mode or on media interface, see separate
COMAND system operating instructions.
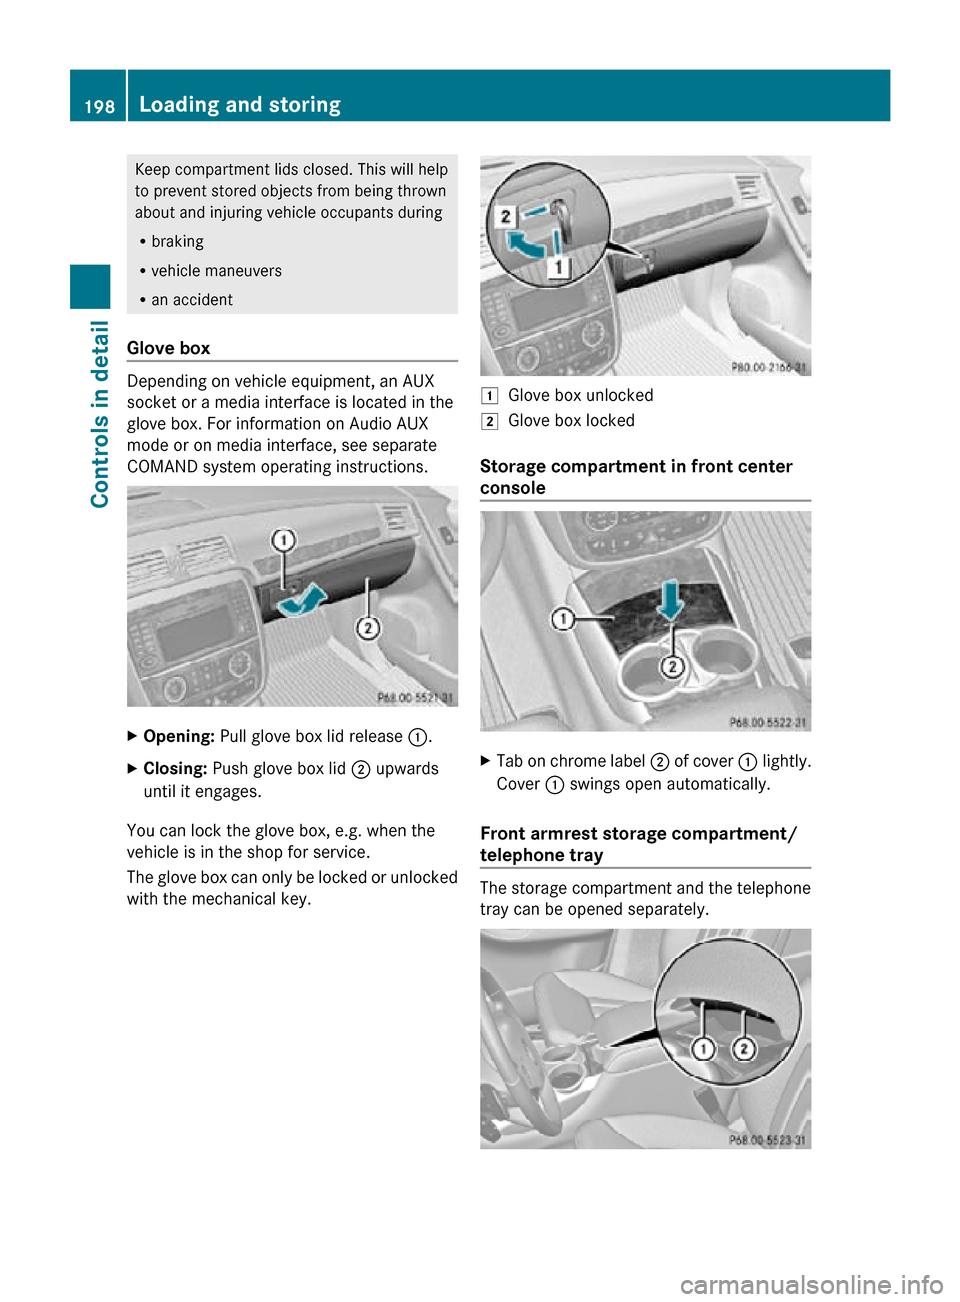
X
Opening: Pull glove box lid release :.
X Closing: Push glove box lid ; upwards
until it engages.
You can lock the glove box, e.g. when the
vehicle is in the shop for service.
The glove box can only be locked or unlocked
with the mechanical key. 1
Glove box unlocked
2 Glove box locked
Storage compartment in front center
console X
Tab on chrome label ; of cover : lightly.
Cover : swings open automatically.
Front armrest storage compartment/
telephone tray The storage compartment and the telephone
tray can be opened separately.198
Loading and storingControls in detail
251_AKB; 4; 52, en-US
d2ureepe,
Version: 2.11.8.1 2009-03-23T09:22:52+01:00 - Seite 198