2010 MERCEDES-BENZ R320 ignition
[x] Cancel search: ignitionPage 12 of 364

Gross Vehicle Weight
see GVW
Gross Vehicle Weight Rating
see GVWR
GTW (Gross Trailer Weight) ..............249
GVW (Gross Vehicle Weight) ............249
GVWR (Gross Vehicle Weight
Rating) ................................................ 249H
Halogen headlamps see Headlamps
Hard plastic trim items, cleaning ....267
Hazard warning flasher ....................101
Headlamp cleaning system .............. 101
Headlamps
Active Bi-Xenon headlamps ............. 97
Automatic headlamp mode .............. 98
Bi-Xenon .................................. 97, 313
Cleaning lenses ............................. 265
Cleaning system ............................ 101
Daytime running lamp mode ............99
Delayed shut-off ............................ 135
Halogen ......................................... 313
High-beam flasher .........................101
High-beam headlamps ...................100
Low-beam headlamps ...................... 98
Replacing bulbs ............................. 312
Switch .............................................. 97
Headliner, cleaning and care of .......267
Head restraints .................................... 81
Adjustment ................................ 81, 83
NECK-PRO active front head
restraints ......................................... 53
NECK-PRO active front head
restraints, resetting ....................... 310
Heated steering wheel ........................93
Height adjustment
Seat belt outlet ................................ 50
Seats ............................................... 81
Vehicle level control ...................... 154
High-beam flasher ............................. 101
High-beam headlamps ..............100, 313
Indicator lamp .................................. 29
Hill-start assist system ..................... 153
Hinged quarter windows .................. 107Hood ...................................................
222
Messages in the multifunction
display
........................................... 288
Hooks ................................................. 189
Horn ...................................................... 27
HVAC see Climate control system
Hydroplaning ..................................... 255 I
Identification labels ..........................344
Identification number, vehicle
(VIN) ................................................... 345
Ignition ................................... 79, 80, 111
Immobilizer .......................................... 67
Indicator lamps see Lamps, indicator and warning
Infant and child restraint systems
see Children in the vehicle
Inflation pressure
see Tires, Inflation pressure
Infrared reflecting windshield .........217
Inside door handle .............................. 74
Instrument cluster ......................28, 122
Illumination .................................... 123
Lamps ............................................ 299
Multifunction display .....................125
Instrument lighting
see Instrument cluster, Illumination
Instrument panel
see Instrument cluster
Instruments and controls
see Cockpit
Interior lighting
Delayed shut-off ............................ 136
Emergency lighting ........................ 103
Front .............................................. 102
Front reading lamps ....................... 102
Rear ............................................... 103
Rear reading lamps ........................ 103
Interior rear view mirror .....................94
Auto-dimming rear view mirrors ....... 94
Interior storage spaces
see Storage compartments
Intermittent wiping
Rain sensor .................................... 10410
Index 251_AKB; 4; 52, en-US
d2ureepe,
Version: 2.11.8.1 2009-03-23T09:22:52+01:00 - Seite 10
Page 30 of 364

Instrument cluster
Function Page
:
# Left turn signal
indicator lamp
;
To dim instrument cluster
illumination
123
=
Reset button for:
Trip odometer 123
Settings 131
?
To brighten instrument
cluster illumination
123
A
! Right turn signal
indicator lamp
B
Clock 133
C
Speedometer with:
! Antilock Brake
System (ABS) indicator
lamp
300
È Variable speed limiter
indicator lamp
2 Function Page
$ Brake warning lamp,
USA only
301
d ESP
®
warning lamp 303
· Distance warning
lamp
3
304
J Brake warning lamp,
Canada only
301
h Combination low tire
pressure/TPMS
malfunction telltale, USA
only
232,
306 2
Lamp without function. It illuminates when the ignition is on. It should go out when the engine is running.
3 Vehicles without Distronic: Warning lamp without function. It illuminates when the ignition is on. It should
go out when the engine is running. 28
Instrument clusterAt a glance
251_AKB; 4; 52, en-US
d2ureepe,
Version: 2.11.8.1 2009-03-23T09:22:52+01:00 - Seite 28
Page 38 of 364

Vehicle equipment
i This Operator’s Manual describes all
features, standard or optional, potentially
available for your vehicle at the time of
purchase. Please be aware that your
vehicle might not be equipped with all
features described in this manual. Occupant safety
Introduction
In this section you will learn the most
important facts about the restraint system
components of the vehicle.
The restraint systems are:
R Seat belts
R Child restraints
R Lower Anchors and Tethers for CHildren
(LATCH)
Additional
protection potential is provided by:
R Supplemental Restraint System (SRS) with
- Air bags
- Air bag control unit (with crash sensors)
- Emergency Tensioning Device (ETD) for
seat belts
- Seat belt force limiter
R NECK-PRO active front head restraints
R Preventive occupant safety (PRE-SAFE ®
)
R Air bag system components with
-Front passenger front air bag off
indicator lamp
- USA only: Front passenger seat with Occupant Classification System (OCS)
- Canada only: Front passenger seat with
BabySmart™
air bag deactivation system
Although the systems are independent, their
protective functions work in conjunction with
each other. G
Warning!
Modifications to or work improperly
conducted on restraint system components
or their wiring, as well as tampering with
interconnected electronic systems, can lead
to
the restraint systems no longer functioning
as intended.
Air bags or Emergency Tensioning Devices
(ETDs), for example, could deploy
inadvertently or fail to deploy in accidents
although the deceleration threshold for air
bag deployment is exceeded. Therefore,
never modify the restraint systems. Do not
tamper with electronic components or their
software.
i See “Children in the vehicle”
(Y page 55) for information on
R infants and children traveling with you in
the vehicle
R restraint systems for infants and children SRS indicator lamp
The SRS system conducts a self-test when
the ignition is switched on and in regular
intervals while the engine is running. This
facilitates detection of system malfunctions.
The SRS indicator lamp + in the
instrument cluster comes on when the
ignition is switched on. It goes out no later
than
a few seconds after the engine has been
started.
The SRS components are in operational
readiness when the SRS indicator lamp
+ is not lit while the engine is running.
A malfunction in the system has been
detected if the SRS indicator lamp +
R fails to go out after approximately
4 seconds after the engine was started
R does not come on at all
R comes on after the engine was started or
while driving 36
Occupant safety
Safety and security
251_AKB; 4; 52, en-US
d2ureepe,
Version: 2.11.8.1 2009-03-23T09:22:52+01:00 - Seite 36
Page 66 of 364

and significantly reduces braking
effectiveness.
The Antilock Brake System (ABS) regulates
the
brake pressure so that the wheels do not
lock during braking. This allows you to
maintain the ability to steer your vehicle.
The ABS is functional above a speed of
approximately 5 mph (8 km/h) independent
of road surface conditions.
On slippery road surfaces, the ABS will
respond even to light brake pressure.
The ABS indicator lamp ! indicator lamp
in the instrument cluster comes on when you
switch on the ignition. It goes out when the
engine is running.
Braking At the instant one of the wheels is about to
lock up, a slight pulsation can be felt in the
brake pedal. The pulsation indicates that the
ABS is in the regulating mode.
X
Keep firm and steady pressure on the brake
pedal while you feel the pulsation.
Continuous, steady brake pedal pressure
yields the advantages provided by the ABS,
namely
braking power and the ability to steer
the vehicle.
The pulsating brake pedal can be an
indication of hazardous road conditions and
functions as a reminder to take extra care
while driving.
Emergency brake maneuver X
Keep continuous full pressure on the brake
pedal. G
Warning!
If the ABS malfunctions, other driving safety
systems
such as the BAS or the ESP ®
are also
switched off. Observe indicator and warning
lamps that may come on as well as messages
in the multifunction display that may appear. If the ABS malfunctions, the wheels may lock
during hard braking, reducing steering
capability
and extending the braking distance. BAS
G
Observe Safety notes, see page 63.
The Brake Assist System (BAS) operates in
emergency
situations. If you apply the brakes
very quickly, the BAS provides full brake
boost automatically, thereby potentially
reducing the braking distance.
X Apply continuous full braking pressure until
the emergency braking situation is over.
The ABS will prevent the wheels from
locking.
When you release the brake pedal, the brakes
function again as normal. The BAS is then
deactivated. G
Warning!
If the BAS malfunctions, the brake system still
functions, but without the additional brake
boost available that the BAS would normally
provide in an emergency braking maneuver.
Therefore,
the braking distance may increase. EBP
G
Observe Safety notes, see page 63.
The Electronic Brake Proportioning (EBP)
enhances braking effectiveness by allowing
the
rear brakes to supply a greater proportion
of the braking effort in straight-line braking
without a loss of vehicle stability. G
Warning!
If the EBP malfunctions, the brake system will
still function with full brake boost. However,
the rear wheels could lock up during
emergency braking situations, for example.
You could lose control of the vehicle and
cause an accident.
Adapt your driving style to the changed
driving characteristics. 64
Driving safety systems
Safety and security
251_AKB; 4; 52, en-US
d2ureepe,
Version: 2.11.8.1 2009-03-23T09:22:52+01:00 - Seite 64
Page 67 of 364

ESP
® G
Observe Safety notes, see page 63.
The Electronic Stability Program (ESP ®
) is
operational as soon as the engine is running.
It monitors the vehicle’s traction (force of
adhesive friction between the tires and the
road surface) and handling.
The ESP ®
recognizes that the vehicle deviates
from the direction of travel as intended by the
driver. By applying brakes to individual
wheels and by limiting the engine output, the
ESP ®
works to stabilize the vehicle. The
ESP ®
is especially useful while driving off and
on wet or slippery road surfaces. The ESP ®
also stabilizes the vehicle during braking and
steering maneuvers.
The ESP ®
warning lamp d in the
instrument cluster comes on when you switch
on the ignition. It goes out when the engine
is running.
The ESP ®
warning lamp d in the
instrument cluster flashes when the ESP ®
is
engaged. G
Warning!
Never switch off the ESP ®
when you see the
ESP ®
warning lamp d flashing in the
instrument cluster. In this case proceed as
follows:
R When driving off, apply as little throttle as
possible.
R While driving, ease up on the accelerator
pedal.
R Adapt your speed and driving style to the
prevailing road conditions.
Failure to observe these guidelines could
cause the vehicle to skid. The ESP ®
cannot
prevent accidents resulting from excessive
speed.
! Only
conduct operational or performance
tests on a two-axle dynamometer. If such
tests are necessary, contact an authorized Mercedes-Benz Center. You could
otherwise seriously damage the brake
system or the transfer case which is not
covered by the Mercedes-Benz Limited
Warranty.
! Because the ESP ®
operates
automatically,
the engine and ignition must
be shut off (SmartKey in starter switch
position 0 or 1 or KEYLESS-GO start/stop
button in position 0 or 1) when the parking
brake is being tested on a brake test
dynamometer. Such testing should be no
longer than 10 seconds.
Active braking action through the ESP ®
may otherwise seriously damage the brake
system which is not covered by the
Mercedes-Benz Limited Warranty.
! The ESP ®
will only function properly if you
use wheels of the recommended tire size
as specified in the “Technical data” section
of this Operator’s Manual.
i The Distronic system and cruise control
switch off automatically when the ESP ®
engages.
Electronic Traction System (4-ETS) G
Observe Safety notes, see page 63.
The 4-ETS (four-wheel Electronic Traction
System) is a component of the ESP ®
. The
4-ETS
improves the vehicle’s ability to utilize
available traction, especially under slippery
road conditions by applying the brakes to a
spinning wheel. In addition, more power is
transferred to the wheel(s) with traction.
When you switch off the ESP ®
, the 4-ETS is
still enabled.
Switching off the ESP ® G
Warning!
The ESP ®
should not be switched off during
normal driving other than in the Driving safety systems
65
Safety and security
251_AKB; 4; 52, en-US
d2ureepe, Version: 2.11.8.1 2009-03-23T09:22:52+01:00 - Seite 65 Z
Page 69 of 364

The ESP
®
will assist you in such situations.
The ESP ®
recognizes when the trailer starts
swaying and will apply the brakes to reduce
the
vehicle speed to a non-critical speed that
allows the vehicle-trailer combination to
stabilize.
The ESP ®
trailer stabilization is functional at
vehicle speeds above approximately 40 mph
(65 km/h) when the ESP ®
is switched on. G
Warning!
The system will not be able to assist when the
trailer jackknifes
R if the ESP ®
has switched off due to a
malfunction
R on wet or icy roads
R on roads with slippery surface
R in sand or gravel
Trailers with a high center of gravity may tip
over
before the system recognizes swaying of
the trailer. Anti-theft systems
Immobilizer
The immobilizer prevents unauthorized
persons from starting your vehicle.
When leaving the vehicle, always take the
SmartKey with you and lock the vehicle. The
engine can be started by anyone with a valid
SmartKey that is left inside the vehicle.
Activating X
With SmartKey: Remove the SmartKey
from the starter switch.
X With KEYLESS-GO:
Turn off the engine and
open the driver’s door.
Deactivating X
Switch on the ignition.
i Starting the engine will also deactivate
the immobilizer. In the event that the engine cannot be
started (yet the vehicle’s battery is
charged), the system is not operational.
Contact an authorized Mercedes-Benz
Center
or call 1-800-FOR-MERCedes (in the
USA) or 1-800-387-0100 (in Canada). Anti-theft alarm system
Once the alarm system has been armed, a
visual and audible alarm is triggered when
someone opens
R a door
R the tailgate
R the hood
The alarm will stay on even if the activating
element, a door, for example, is closed
immediately.
The
alarm system will also be triggered when
R the vehicle is opened with the mechanical
key
R a door is opened from the inside
To cancel the alarm after it has been
triggered, see “Canceling the alarm”
(Y page 68).
i If the alarm stays on for more than
30 seconds, the Tele Aid system initiates a
call to the Response Center automatically.
The Tele Aid system will initiate the call
provided that
R you have subscribed to the Tele Aid
service
R the Tele Aid service has been activated
properly
R the necessary mobile phone, power
supply and GPS coverage are available Anti-theft systems
67
Safety and security
251_AKB; 4; 52, en-US
d2ureepe, Version: 2.11.8.1 2009-03-23T09:22:52+01:00 - Seite 67 Z
Page 74 of 364

Important notes on using KEYLESS-GO
R
You can also use the SmartKey with
KEYLESS-GO like a normal SmartKey
(Y page 70).
R You can combine KEYLESS-GO functions
with normal SmartKey functions (e.g.
unlocking with KEYLESS-GO and locking
with button &).
R Always carry the SmartKey with you.
R Never store the SmartKey together with:
-Electronic
items such as a mobile phone
or another SmartKey
- Metallic objects such as coins or metal
foil
Doing so could impair the function of the
KEYLESS-GO system.
R To lock or unlock the vehicle, the SmartKey
must be located outside the vehicle within
approximately 3 ft (1 m) of a door or the
tailgate.
R When the vehicle has been parked for more
than 72 hours, the KEYLESS-GO function is
deactivated. Pull an outside door handle
and switch on the ignition once to activate
the KEYLESS-GO function.
R If the SmartKey is positioned farther away
from the vehicle, the system may no longer
recognize the SmartKey. The vehicle
cannot be locked or the engine started via
the KEYLESS-GO system.
R If the SmartKey is removed from the vehicle
(e.g. if a passenger exits the vehicle with
the SmartKey)
-when pressing the KEYLESS-GO start/
stop button or trying to lock the vehicle
with the lock button on an outside door
handle the message Key Not
Detected appears in the multifunction
display
- with the engine running, the red message
Key Not Detected appears in the
multifunction display while driving off Find the SmartKey or change its present
location immediately (e.g. place it on the
front passenger seat or insert it in shirt
pocket).
R If you have started the engine with the
KEYLESS-GO start/stop button, you can
turn it off again by
-pressing the KEYLESS-GO start/stop
button
- inserting the SmartKey into the starter
switch
when the vehicle is at a standstill
and the automatic transmission is in park
position P
R The vehicle could be inadvertently
unlocked if the SmartKey is within 3 ft (1 m)
of the vehicle and
-an outside door handle is splashed with
water
or
- you attempt to clean an outside door
handle
R Remember that the engine can be started
by anyone with a SmartKey that is left
inside the vehicle.
Possibility 1 (One SmartKey in the vehicle,
one SmartKey outside the vehicle):
If you leave the SmartKey behind when
exiting and locking the vehicle, no message
appears in the multifunction display.
Possibility 2 (One SmartKey in the vehicle,
no SmartKey outside the vehicle):
When exiting and trying to lock the vehicle,
the message Key Detected In Vehicle
appears in the multifunction display. The
vehicle will not be locked.
Factory setting X
Global unlocking: Grasp an outside door
handle. 72
Locking and unlocking
Controls in detail
251_AKB; 4; 52, en-US
d2ureepe,
Version: 2.11.8.1 2009-03-23T09:22:52+01:00 - Seite 72
Page 76 of 364

Opening the doors from the inside
You can open a door from the inside even
when it is locked unless it is secured with the
child safety lock ( Y page 61).
Open door only when conditions are safe to
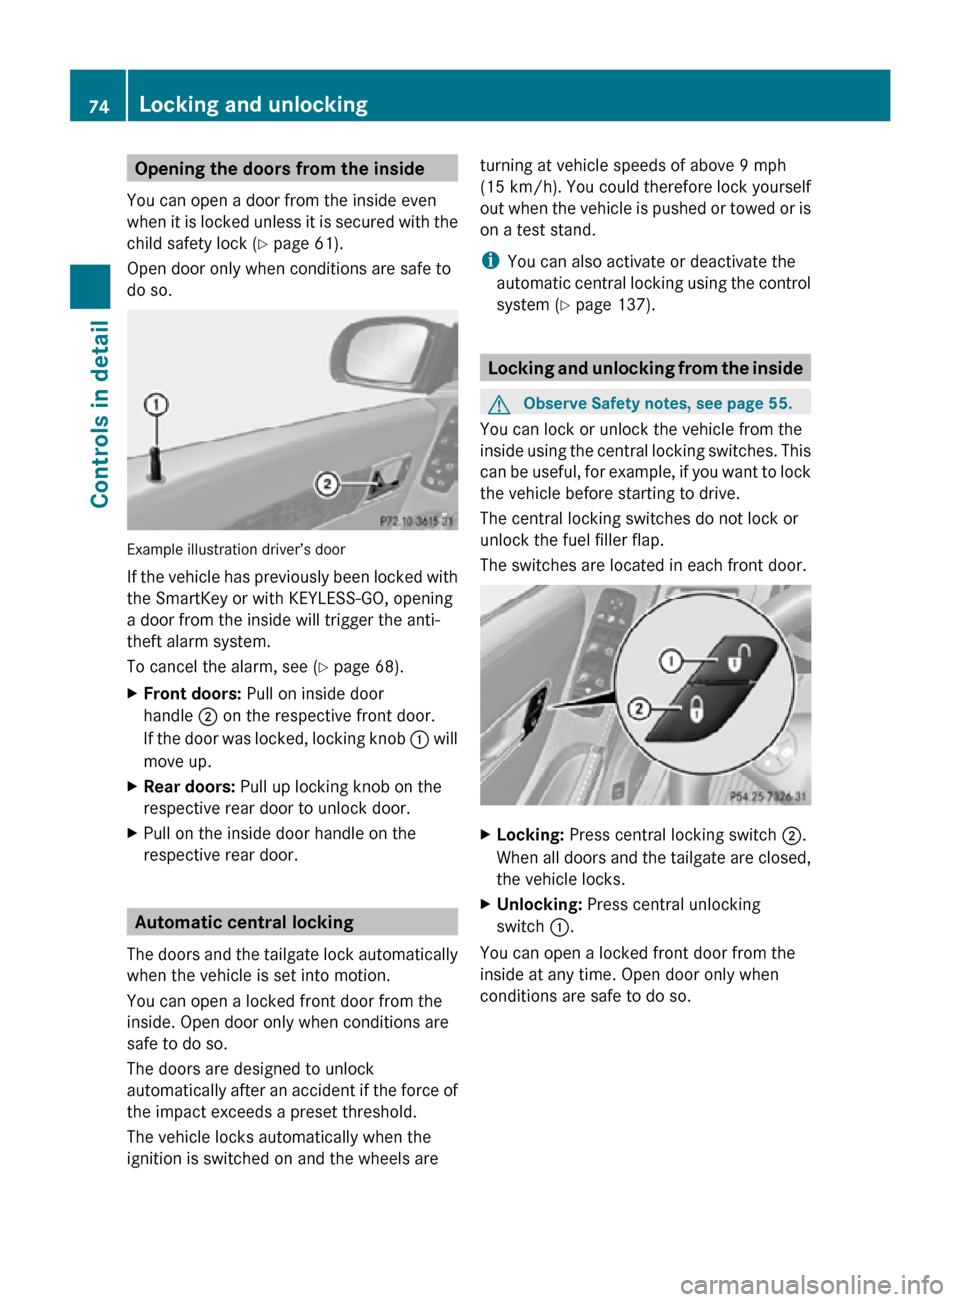
do so. Example illustration driver’s door
If the vehicle has previously been locked with
the SmartKey or with KEYLESS-GO, opening
a door from the inside will trigger the anti-
theft alarm system.
To cancel the alarm, see (
Y page 68).
X Front doors: Pull on inside door
handle ; on the respective front door.
If the door was locked, locking knob : will
move up.
X Rear doors: Pull up locking knob on the
respective rear door to unlock door.
X Pull on the inside door handle on the
respective rear door. Automatic central locking
The doors and the tailgate lock automatically
when the vehicle is set into motion.
You can open a locked front door from the
inside. Open door only when conditions are
safe to do so.
The doors are designed to unlock
automatically after an accident if the force of
the impact exceeds a preset threshold.
The vehicle locks automatically when the
ignition is switched on and the wheels are turning at vehicle speeds of above 9 mph
(15 km/h). You could therefore lock yourself
out when the vehicle is pushed or towed or is
on a test stand.
i
You can also activate or deactivate the
automatic central locking using the control
system (Y page 137). Locking and unlocking from the inside
G
Observe Safety notes, see page 55.
You can lock or unlock the vehicle from the
inside using the central locking switches. This
can be useful, for example, if you want to lock
the vehicle before starting to drive.
The central locking switches do not lock or
unlock the fuel filler flap.
The switches are located in each front door. X
Locking: Press central locking switch ;.
When all doors and the tailgate are closed,
the vehicle locks.
X Unlocking: Press central unlocking
switch :.
You can open a locked front door from the
inside at any time. Open door only when
conditions are safe to do so. 74
Locking and unlockingControls in detail
251_AKB; 4; 52, en-US
d2ureepe,
Version: 2.11.8.1 2009-03-23T09:22:52+01:00 - Seite 74