2010 MERCEDES-BENZ R320 ignition
[x] Cancel search: ignitionPage 140 of 364
X
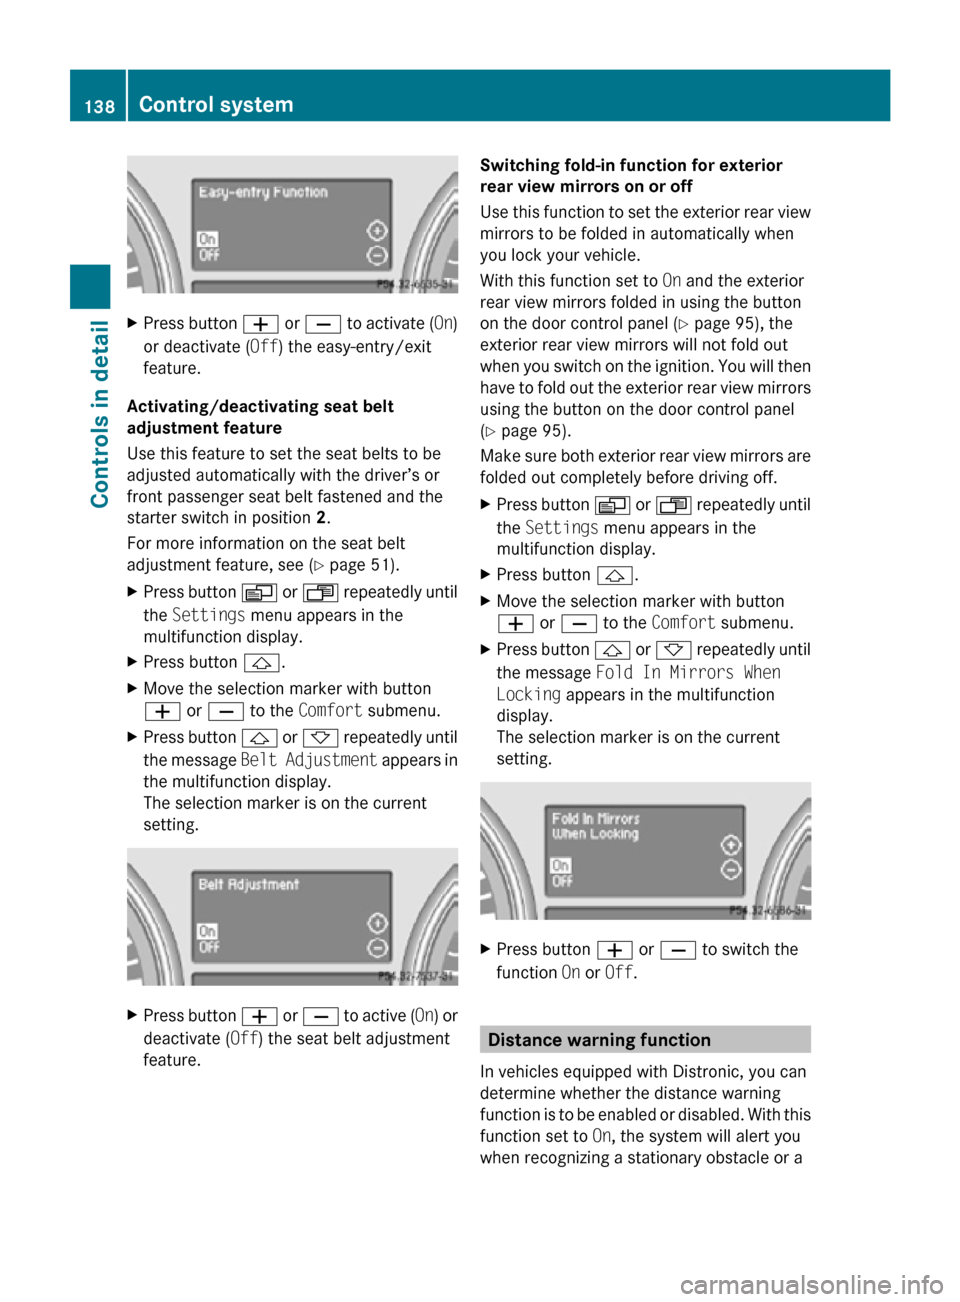
Press button W or X to activate ( On)
or deactivate (Off) the easy-entry/exit
feature.
Activating/deactivating seat belt
adjustment feature
Use this feature to set the seat belts to be
adjusted automatically with the driver’s or
front passenger seat belt fastened and the
starter switch in position 2.
For more information on the seat belt
adjustment feature, see ( Y page 51).
X Press button V or U repeatedly until
the Settings menu appears in the
multifunction display.
X Press button &.
X Move the selection marker with button
W or X to the Comfort submenu.
X Press button & or * repeatedly until
the message Belt Adjustment appears in
the multifunction display.
The selection marker is on the current
setting. X
Press button W or X to active ( On) or
deactivate (Off) the seat belt adjustment
feature. Switching fold-in function for exterior
rear view mirrors on or off
Use this function to set the exterior rear view
mirrors to be folded in automatically when
you lock your vehicle.
With this function set to
On and the exterior
rear view mirrors folded in using the button
on the door control panel ( Y page 95), the
exterior rear view mirrors will not fold out
when you switch on the ignition. You will then
have to fold out the exterior rear view mirrors
using the button on the door control panel
(Y page 95).
Make sure both exterior rear view mirrors are
folded out completely before driving off.
X Press button V or U repeatedly until
the Settings menu appears in the
multifunction display.
X Press button &.
X Move the selection marker with button
W or X to the Comfort submenu.
X Press button & or * repeatedly until
the message Fold In Mirrors When
Locking appears in the multifunction
display.
The selection marker is on the current
setting. X
Press button W or X to switch the
function On or Off. Distance warning function
In vehicles equipped with Distronic, you can
determine whether the distance warning
function is to be enabled or disabled. With this
function set to On, the system will alert you
when recognizing a stationary obstacle or a 138
Control systemControls in detail
251_AKB; 4; 52, en-US
d2ureepe,
Version: 2.11.8.1 2009-03-23T09:22:52+01:00 - Seite 138
Page 159 of 364
distance between the vehicle and an obstacle
visually and audibly.
The Parktronic system is activated
automatically when
R
you switch on the ignition
and
R you release the parking brake
and
R the automatic transmission is in drive
position D, reverse gear R, or neutral
position N
The Parktronic system deactivates at speeds
above approximately 11 mph (18 km/h). At
lower speeds, the Parktronic system
activates again.
The Parktronic system also deactivates when
you shift the automatic transmission into
park position P or engage the parking brake.
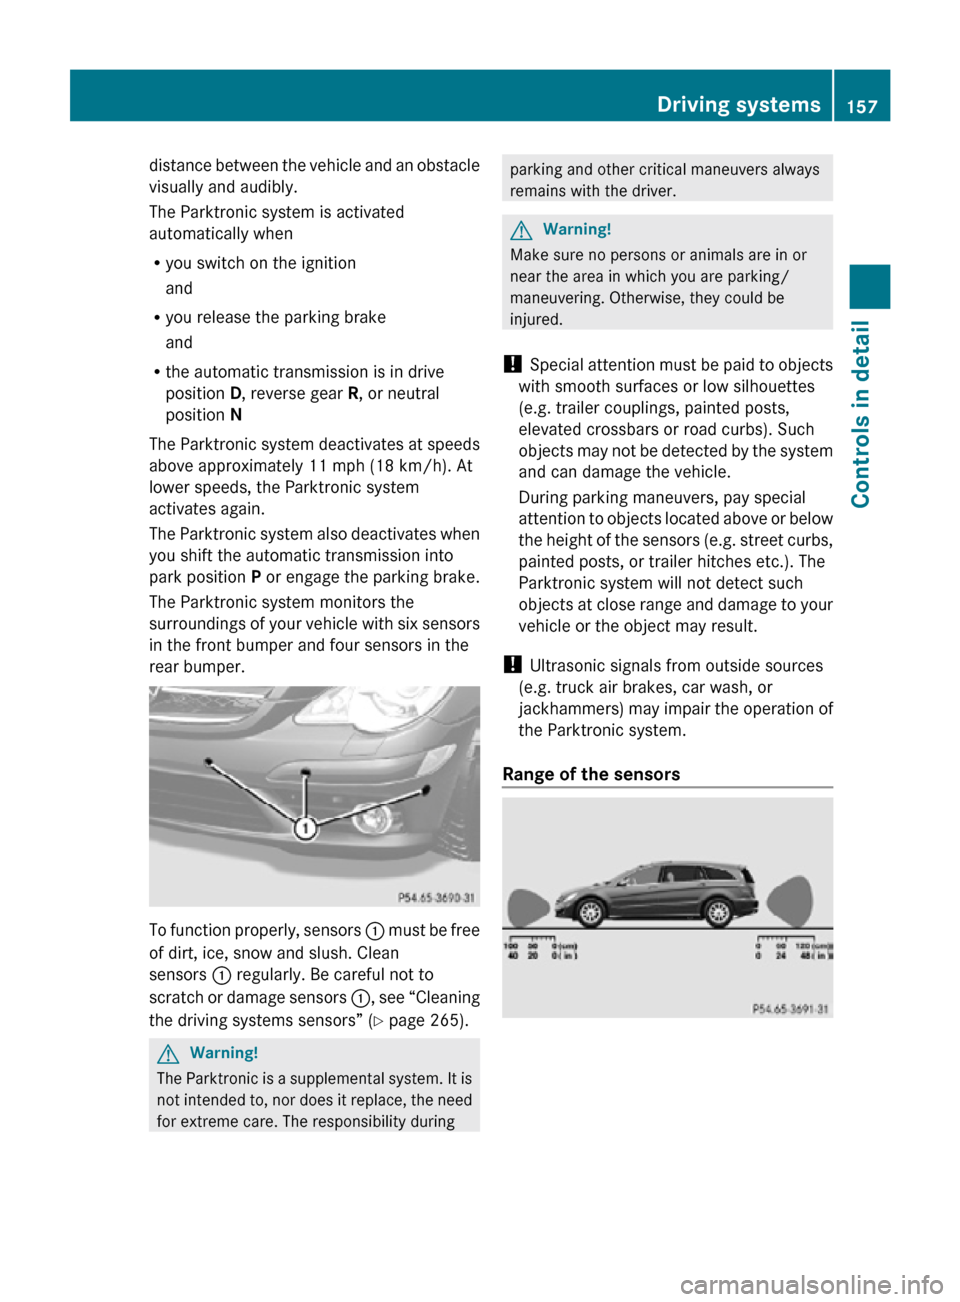
The Parktronic system monitors the
surroundings of your vehicle with six sensors
in the front bumper and four sensors in the
rear bumper. To function properly, sensors
: must be free
of dirt, ice, snow and slush. Clean
sensors : regularly. Be careful not to
scratch or damage sensors :, see “Cleaning
the driving systems sensors” (Y page 265). G
Warning!
The Parktronic is a supplemental system. It is
not intended to, nor does it replace, the need
for extreme care. The responsibility during parking and other critical maneuvers always
remains with the driver.
G
Warning!
Make sure no persons or animals are in or
near the area in which you are parking/
maneuvering. Otherwise, they could be
injured.
! Special attention must be paid to objects
with smooth surfaces or low silhouettes
(e.g. trailer couplings, painted posts,
elevated crossbars or road curbs). Such
objects may not be detected by the system
and can damage the vehicle.
During parking maneuvers, pay special
attention to objects located above or below
the height of the sensors (e.g. street curbs,
painted posts, or trailer hitches etc.). The
Parktronic system will not detect such
objects at close range and damage to your
vehicle or the object may result.
! Ultrasonic signals from outside sources
(e.g. truck air brakes, car wash, or
jackhammers) may impair the operation of
the Parktronic system.
Range of the sensors Driving systems
157Controls in detail
251_AKB; 4; 52, en-US
d2ureepe, Version: 2.11.8.1 2009-03-23T09:22:52+01:00 - Seite 157 Z
Page 161 of 364
R
Front area: An intermittent acoustic
warning lasting a maximum of 2 seconds
will sound as the first red distance segment
illuminates. A constant acoustic warning
lasting a maximum of 2 seconds will sound
for the second red distance segment. The
signal is canceled when the automatic
transmission is shifted into park
position P or the parking brake is engaged.
R Rear area: An intermittent acoustic
warning lasting a maximum of 2 seconds
will sound as the first red distance segment
illuminates. A constant acoustic warning
lasting a maximum of 2 seconds will sound
for the second red distance segment. The
signal is canceled when the automatic
transmission is shifted into drive
position D, or park position P, or the
parking brake is engaged.
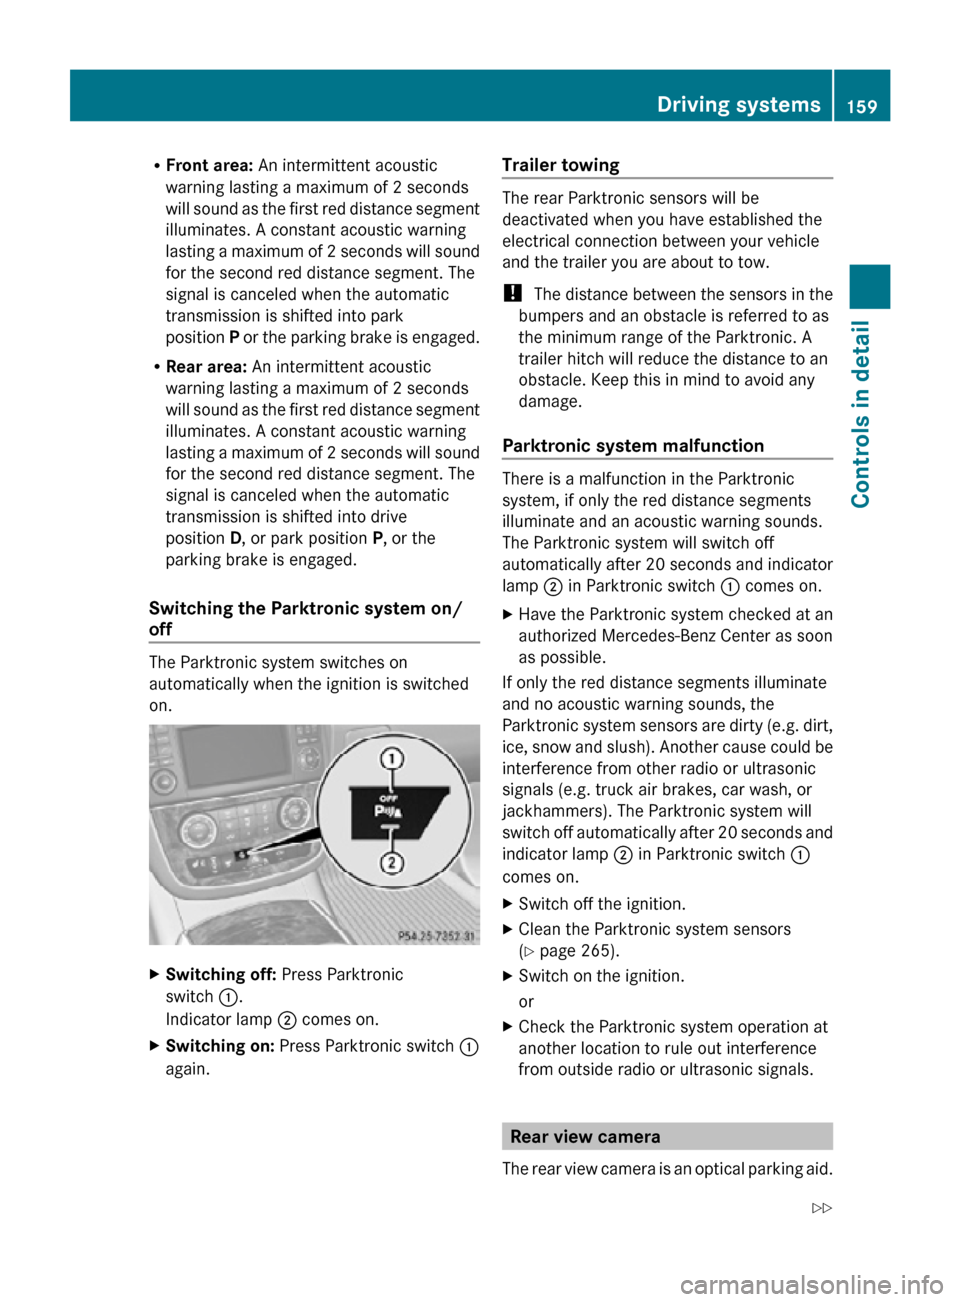
Switching the Parktronic system on/
off The Parktronic system switches on
automatically when the ignition is switched
on.
X
Switching off: Press Parktronic
switch :.
Indicator lamp ; comes on.
X Switching on: Press Parktronic switch :
again. Trailer towing The rear Parktronic sensors will be
deactivated when you have established the
electrical connection between your vehicle
and the trailer you are about to tow.
!
The distance between the sensors in the
bumpers and an obstacle is referred to as
the minimum range of the Parktronic. A
trailer hitch will reduce the distance to an
obstacle. Keep this in mind to avoid any
damage.
Parktronic system malfunction There is a malfunction in the Parktronic
system, if only the red distance segments
illuminate and an acoustic warning sounds.
The Parktronic system will switch off
automatically after 20 seconds and indicator
lamp
; in Parktronic switch : comes on.
X Have the Parktronic system checked at an
authorized Mercedes-Benz Center as soon
as possible.
If only the red distance segments illuminate
and no acoustic warning sounds, the
Parktronic system sensors are dirty (e.g. dirt,
ice, snow and slush). Another cause could be
interference from other radio or ultrasonic
signals (e.g. truck air brakes, car wash, or
jackhammers). The Parktronic system will
switch off automatically after 20 seconds and
indicator lamp ; in Parktronic switch :
comes on.
X Switch off the ignition.
X Clean the Parktronic system sensors
(Y page 265).
X Switch on the ignition.
or
X Check the Parktronic system operation at
another location to rule out interference
from outside radio or ultrasonic signals. Rear view camera
The rear view camera is an optical parking aid. Driving systems
159Controls in detail
251_AKB; 4; 52, en-US
d2ureepe, Version: 2.11.8.1 2009-03-23T09:22:52+01:00 - Seite 159 Z
Page 163 of 364
Switching on/off
X
Switching on: Switch on the ignition.
X Switch on the COMAND system.
X Shift the automatic transmission to reverse
gear R.
The COMAND system display will show the
area behind the vehicle with guidelines. G
Warning!
Please note that objects which do not touch
the ground may appear to be further away
than they actually are, for example:
R the bumper of a vehicle parked behind you
R a trailer hitch
R the back of a truck
In such cases, you should not use the
guidelines to judge the distance. You may
misjudge the distance which increases the
risk of impacting the objects.
Even when the object you approach is directly
on the ground do not approach the object any
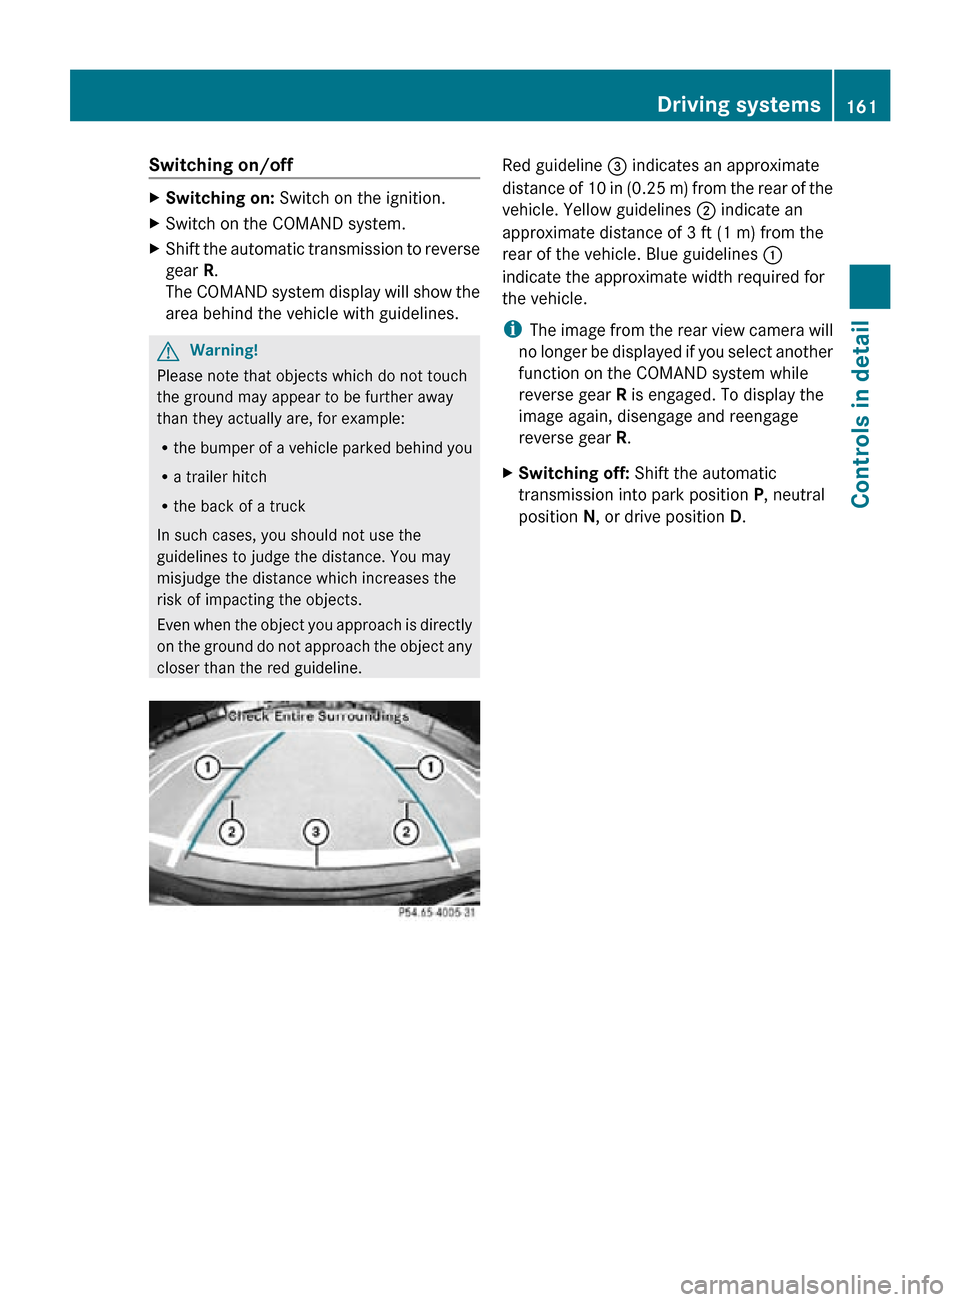
closer than the red guideline. Red guideline
= indicates an approximate
distance of 10 in (0.25 m) from the rear of the
vehicle. Yellow guidelines ; indicate an
approximate distance of 3 ft (1 m) from the
rear of the vehicle. Blue guidelines :
indicate the approximate width required for
the vehicle.
i The image from the rear view camera will
no longer be displayed if you select another
function on the COMAND system while
reverse gear R is engaged. To display the
image again, disengage and reengage
reverse gear R.
X Switching off: Shift the automatic
transmission into park position P, neutral
position N, or drive position D. Driving systems
161Controls in detail
251_AKB; 4; 52, en-US
d2ureepe, Version: 2.11.8.1 2009-03-23T09:22:52+01:00 - Seite 161 Z
Page 172 of 364
i
The manually selected air recirculation
mode is deactivated automatically:
R after 5 minutes if the outside
temperature is below approximately
41‡ (5†)
R after 5 minutes if the air conditioning and
air-drying are turned off
R after 30 minutes if the outside
temperature is above approximately
41‡ (5†) Residual heat and ventilation
With the engine switched off, it is possible to
continue to heat or ventilate the interior for
up to 30 minutes. This feature makes use of
the residual heat produced by the engine.
i How long the system will provide heating
depends on the coolant temperature and
the battery voltage. Regardless of the temperature and air
volume set on the climate control panel, an
interior temperature is aimed at by 72‡
(22†) and the blower runs on low speed to
protect the vehicle battery.
X Activating: Switch off the ignition.
X Press button Á.
The indicator lamp in the button comes on.
X Deactivating: Press button Á again.
The indicator lamp in the button goes out.
The residual heat is deactivated automatically
R when the ignition is switched on
R after approximately 30 minutes
R if the battery voltage drops
R if the coolant temperature is too low 3-zone automatic climate control
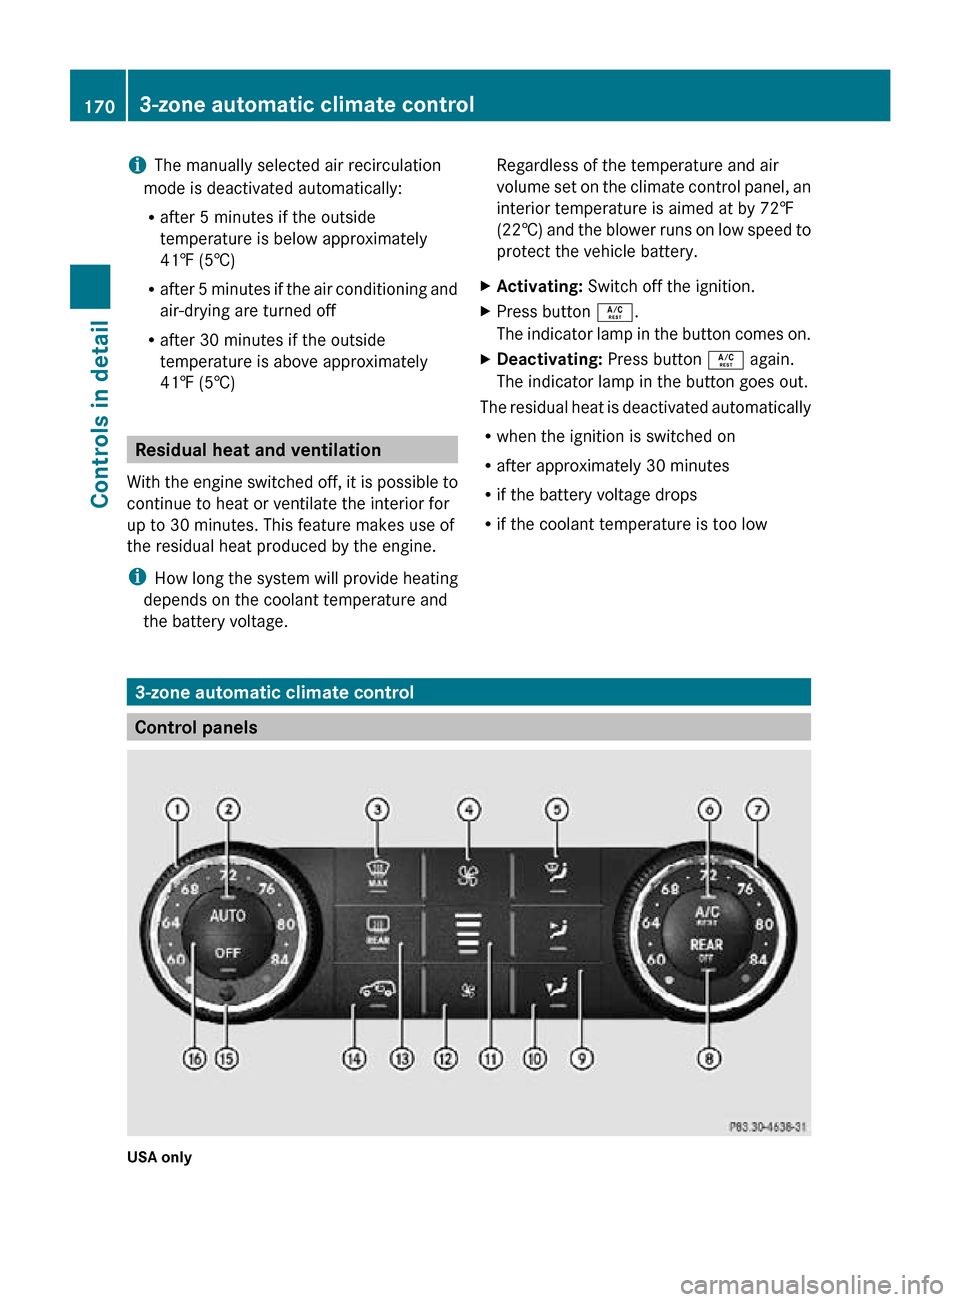
Control panels
USA only170
3-zone automatic climate controlControls in detail
251_AKB; 4; 52, en-US
d2ureepe,
Version: 2.11.8.1 2009-03-23T09:22:52+01:00 - Seite 170
Page 182 of 364
i
The manually selected air recirculation
mode is deactivated automatically:
R after 5 minutes if the outside
temperature is below approximately
41‡ (5†)
R after
5 minutes if the air conditioning and
air-drying are turned off
R after 30 minutes if the outside
temperature is above approximately
41‡ (5†)
At outside temperatures above 79‡ (26†)
the system will not automatically switch back
to outside air. A quantity of outside air is
added after approximately 30 minutes. Residual heat and ventilation
With
the engine switched off, it is possible to
continue to heat or ventilate the interior for
up to 30 minutes. This feature makes use of
the residual heat produced by the engine.
i How long the system will provide heating
depends on the coolant temperature and
the battery voltage.
Regardless of the temperature and air
volume set on the climate control panel, an
interior temperature is aimed at by 72‡
(22†) and the blower runs on low speed to
protect the vehicle battery.
X Activating: Switch off the ignition.
X Press button Á.
The
indicator lamp in the button comes on.
X Deactivating: Press button Á again.
The indicator lamp in the button goes out.
The residual heat is deactivated
automatically:
R when the ignition is switched on
R after approximately 30 minutes
R if the battery voltage drops
R if the coolant temperature is too low Using driver-side settings for all
temperature zones
This feature is only available in Canada
vehicles.
You can use the settings of the driver’s side,
such as temperature, air volume and air
distribution,
for all temperature zones. These
settings only need to be made once and the
climate control system will automatically
regulate the settings for all temperature
zones quickly and comfortably.
X Activating:
Adjust the air temperature, air
volume and air distribution.
X Press button ¸.
The
indicator lamp in the button comes on.
The driver-side settings are used for all
temperature zones.
X Deactivating: Press button ¸ again.
The indicator lamp in the button goes out.
i If you manually set the temperature, air
volume
or air distribution for the passenger
side or the rear passenger compartment
when the MONO setting is active, the
MONO setting will be switched off. Rear window defroster
G
Warning!
Any accumulation of snow and ice should be
removed
from the rear window before driving.
Visibility could otherwise be impaired,
endangering you and others.
The rear window defroster uses a large
amount of power. To keep the battery drain
to a minimum, switch off the defroster as
soon as the rear window is clear. The
defroster is switched off automatically after
some time of operation depending on the
outside temperature. 180
Rear window defroster
Controls in detail
251_AKB; 4; 52, en-US
d2ureepe,
Version: 2.11.8.1 2009-03-23T09:22:52+01:00 - Seite 180
Page 183 of 364
X
Switch on the ignition.
X Switching on: Press button ª on the
respective climate control panel.
The
indicator lamp in the button comes on.
X Switching off: Press button ª again.
The rear window defroster switches off when
the battery voltage is too low. The indicator
lamp in button ª flashes. Too many
electrical consumers may be operating
simultaneously.
X Switch off consumers that are currently not
needed if required. Power tilt/sliding sunroof
Opening and closing
G
Observe Safety notes, see page 55. G
Warning!
When opening or closing the tilt/sliding
sunroof, make sure there is no danger of
anyone
being harmed by the opening/closing
procedure.
The tilt/sliding sunroof is equipped with the
express operation and automatic reversal
function. If the movement of the tilt/sliding
sunroof is blocked during the closing
procedure, the tilt/sliding sunroof will stop
and open slightly.
The tilt/sliding sunroof operates differently
when the sunroof switch is pressed and held.
See the “Closing when the tilt/sliding sunroof
is blocked” section for details.
The opening/closing procedure of the tilt/
sliding sunroof can be immediately halted by
releasing the sunroof switch or, if the sunroof
switch was moved past the resistance point
and released, by moving the sunroof switch in
any direction. G
Warning!
The tilt/sliding sunroof is made out of glass.
In the event of an accident, the glass may shatter. This may result in an opening in the
roof.
In a vehicle rollover, occupants not wearing
their seat belts or not wearing them properly
may be thrown out of the opening. Such an
opening
also presents a potential for injury for
occupants wearing their seat belts properly as
entire body parts or portions of them may
protrude from the passenger compartment.
! To avoid damaging the seals, do not
transport any objects with sharp edges
which can stick out of the tilt/sliding
sunroof.
Do not open the tilt/sliding sunroof if there
is snow or ice on the roof, as this could
result in malfunctions.
If you cannot open or close the tilt/sliding
sunroof due to a malfunction contact
Roadside Assistance or an authorized
Mercedes-Benz Center.
! Please keep in mind that weather
conditions can sometimes change rapidly.
Make sure to close the tilt/sliding sunroof
when leaving the vehicle. If water enters
the vehicle interior, vehicle electronics
could be damaged which is not covered by
the Mercedes-Benz Limited Warranty.
i You can also open or close the tilt/sliding
sunroof using the SmartKey or the
KEYLESS-GO function, see “Summer
opening feature” ( Y page 108) and
“Convenience closing feature”
(Y page 108).
i After switching off the ignition or
removing the SmartKey from the starter
switch, you can operate the tilt/sliding
sunroof until you open the driver’s or front
passenger door. If no door was opened you
can operate the tilt/sliding sunroof for up
to 5 minutes. Power tilt/sliding sunroof
181
Controls in detail
251_AKB; 4; 52, en-US
d2ureepe, Version: 2.11.8.1 2009-03-23T09:22:52+01:00 - Seite 181 Z
Page 184 of 364
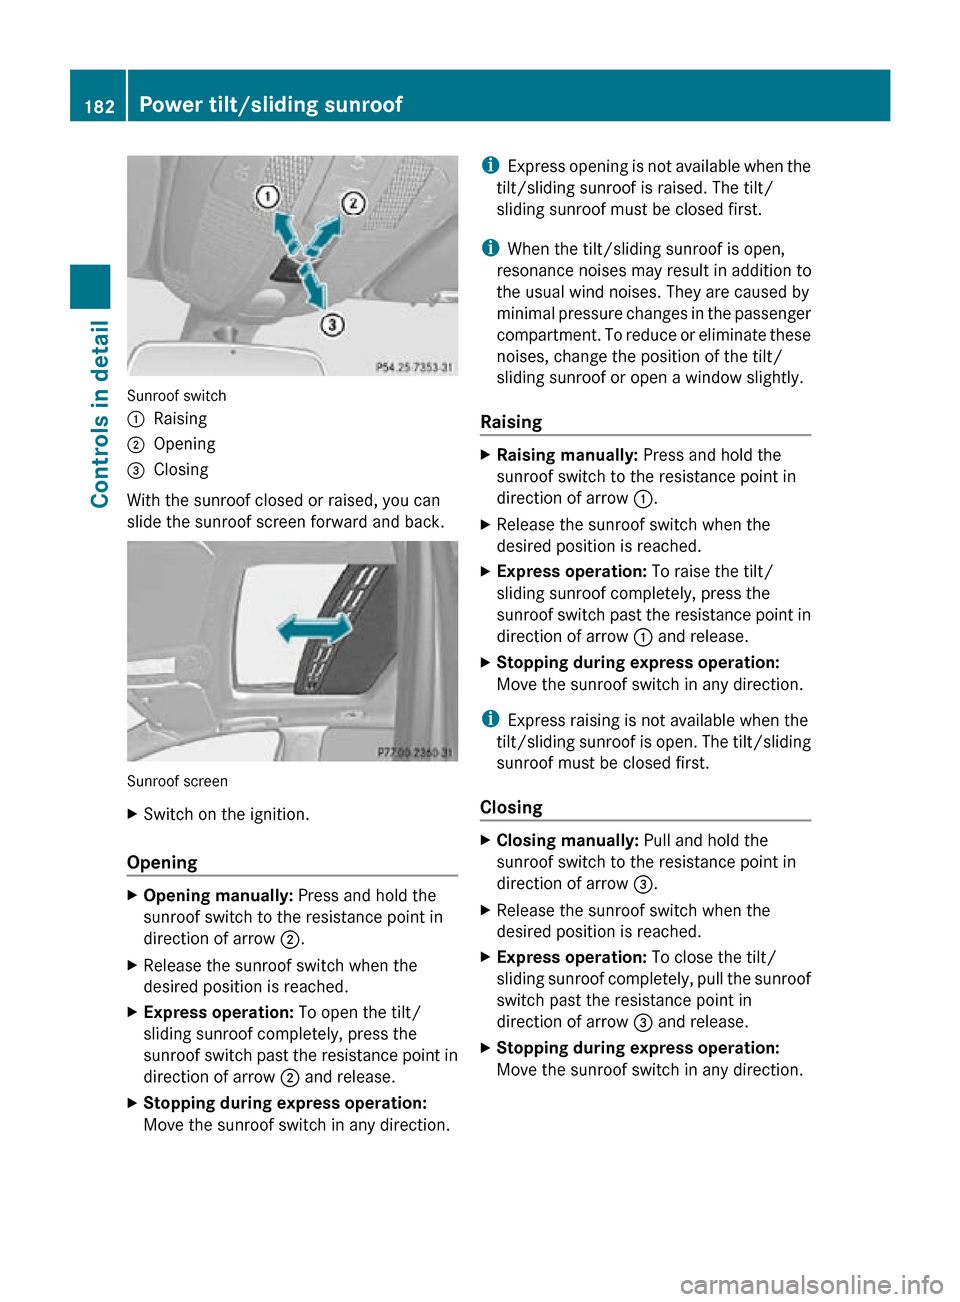
Sunroof switch
:
Raising
; Opening
= Closing
With the sunroof closed or raised, you can
slide the sunroof screen forward and back. Sunroof screen
X
Switch on the ignition.
Opening X
Opening manually: Press and hold the
sunroof switch to the resistance point in
direction of arrow ;.
X Release the sunroof switch when the
desired position is reached.
X Express operation: To open the tilt/
sliding sunroof completely, press the
sunroof switch past the resistance point in
direction of arrow ; and release.
X Stopping during express operation:
Move the sunroof switch in any direction. i
Express opening is not available when the
tilt/sliding sunroof is raised. The tilt/
sliding sunroof must be closed first.
i When the tilt/sliding sunroof is open,
resonance noises may result in addition to
the usual wind noises. They are caused by
minimal pressure changes in the passenger
compartment. To reduce or eliminate these
noises, change the position of the tilt/
sliding sunroof or open a window slightly.
Raising X
Raising manually: Press and hold the
sunroof switch to the resistance point in
direction of arrow :.
X Release the sunroof switch when the
desired position is reached.
X Express operation: To raise the tilt/
sliding sunroof completely, press the
sunroof switch past the resistance point in
direction of arrow : and release.
X Stopping during express operation:
Move the sunroof switch in any direction.
i Express raising is not available when the
tilt/sliding sunroof is open. The tilt/sliding
sunroof must be closed first.
Closing X
Closing manually: Pull and hold the
sunroof switch to the resistance point in
direction of arrow =.
X Release the sunroof switch when the
desired position is reached.
X Express operation: To close the tilt/
sliding sunroof completely, pull the sunroof
switch past the resistance point in
direction of arrow = and release.
X Stopping during express operation:
Move the sunroof switch in any direction. 182
Power tilt/sliding sunroofControls in detail
251_AKB; 4; 52, en-US
d2ureepe,
Version: 2.11.8.1 2009-03-23T09:22:52+01:00 - Seite 182