2010 MERCEDES-BENZ R320 lock
[x] Cancel search: lockPage 87 of 364
X
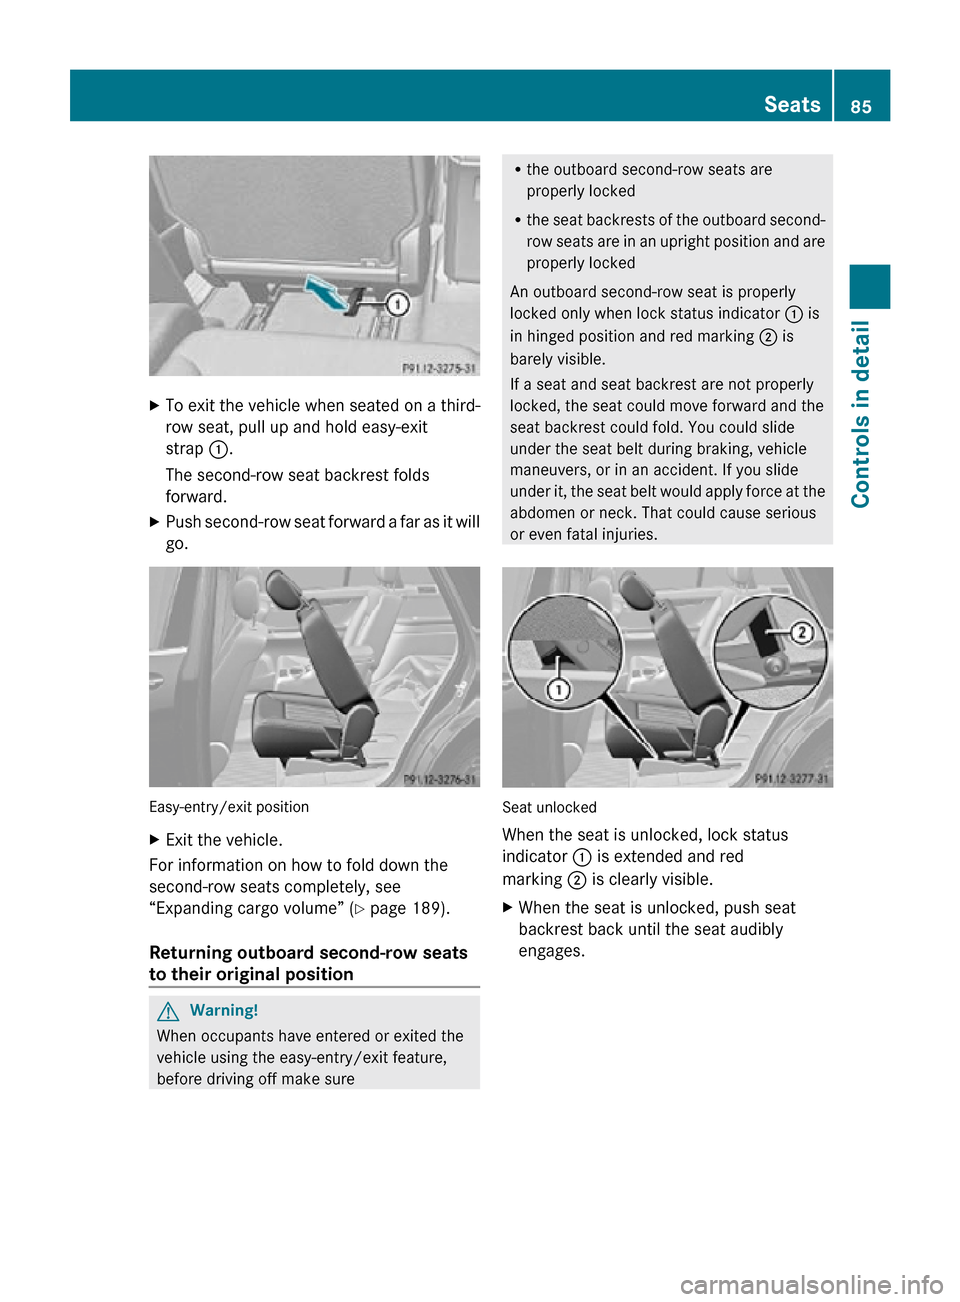
To exit the vehicle when seated on a third-
row seat, pull up and hold easy-exit
strap :.
The second-row seat backrest folds
forward.
X Push second-row seat forward a far as it will
go. Easy-entry/exit position
X
Exit the vehicle.
For information on how to fold down the
second-row seats completely, see
“Expanding cargo volume” ( Y page 189).
Returning outboard second-row seats
to their original position G
Warning!
When occupants have entered or exited the
vehicle using the easy-entry/exit feature,
before driving off make sure R
the outboard second-row seats are
properly locked
R the seat backrests of the outboard second-
row seats are in an upright position and are
properly locked
An outboard second-row seat is properly
locked only when lock status indicator : is
in hinged position and red marking ; is
barely visible.
If a seat and seat backrest are not properly
locked, the seat could move forward and the
seat backrest could fold. You could slide
under the seat belt during braking, vehicle
maneuvers, or in an accident. If you slide
under it, the seat belt would apply force at the
abdomen or neck. That could cause serious
or even fatal injuries. Seat unlocked
When the seat is unlocked, lock status
indicator : is extended and red
marking ; is clearly visible.
X
When the seat is unlocked, push seat
backrest back until the seat audibly
engages. Seats
85Controls in detail
251_AKB; 4; 52, en-US
d2ureepe, Version: 2.11.8.1 2009-03-23T09:22:52+01:00 - Seite 85 Z
Page 88 of 364
Seat locked
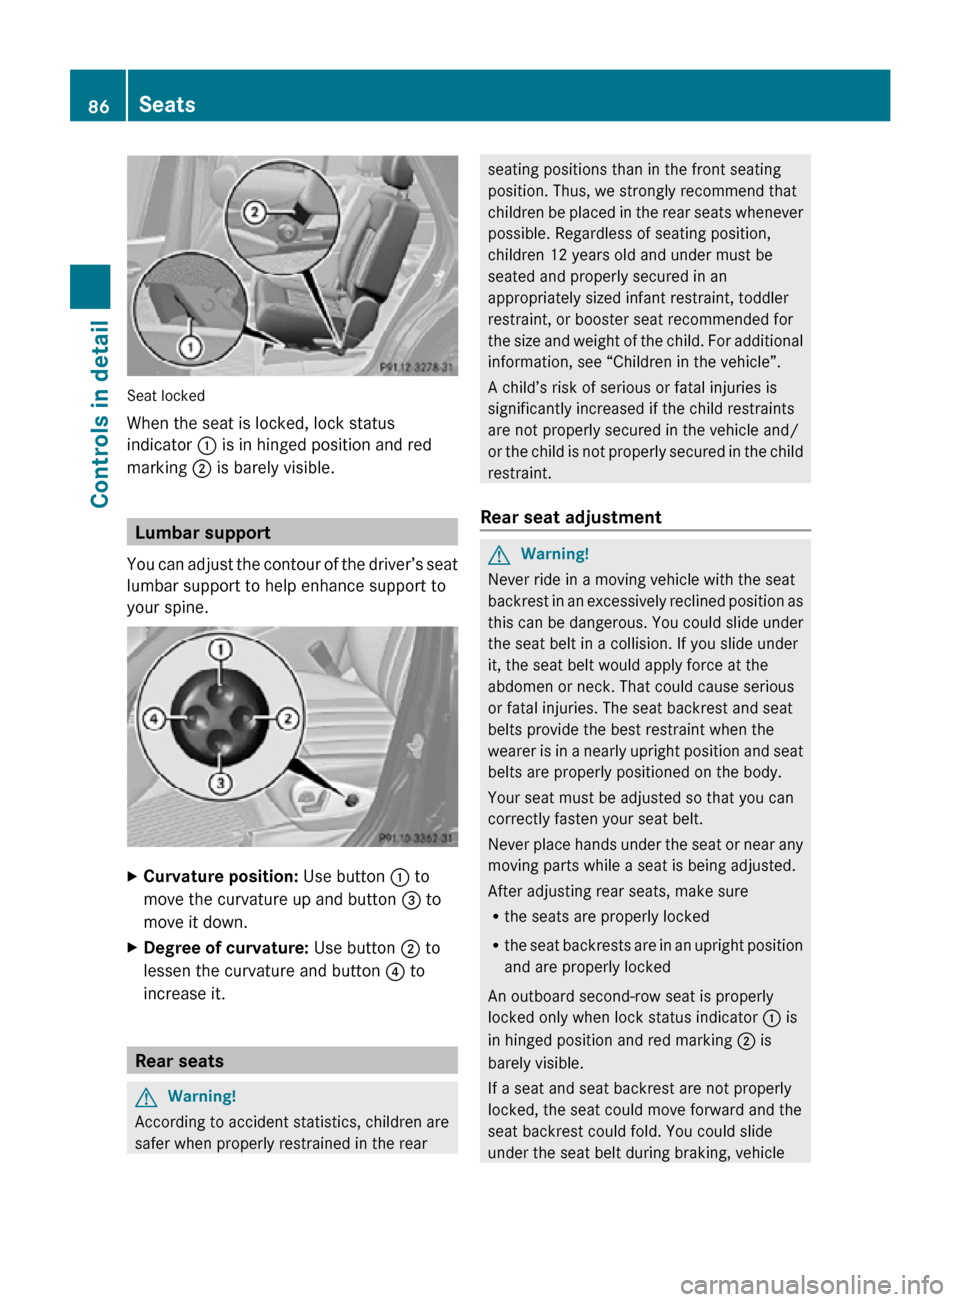
When the seat is locked, lock status
indicator : is in hinged position and red
marking ; is barely visible.
Lumbar support
You can adjust the contour of the driver’s seat
lumbar support to help enhance support to
your spine. X
Curvature position: Use button : to
move the curvature up and button = to
move it down.
X Degree of curvature: Use button ; to
lessen the curvature and button ? to
increase it. Rear seats
G
Warning!
According to accident statistics, children are
safer when properly restrained in the rear seating positions than in the front seating
position. Thus, we strongly recommend that
children be placed in the rear seats whenever
possible. Regardless of seating position,
children 12 years old and under must be
seated and properly secured in an
appropriately sized infant restraint, toddler
restraint, or booster seat recommended for
the size and weight of the child. For additional
information, see “Children in the vehicle”.
A child’s risk of serious or fatal injuries is
significantly increased if the child restraints
are not properly secured in the vehicle and/
or the child is not properly secured in the child
restraint.
Rear seat adjustment G
Warning!
Never ride in a moving vehicle with the seat
backrest in an excessively reclined position as
this can be dangerous. You could slide under
the seat belt in a collision. If you slide under
it, the seat belt would apply force at the
abdomen or neck. That could cause serious
or fatal injuries. The seat backrest and seat
belts provide the best restraint when the
wearer is in a nearly upright position and seat
belts are properly positioned on the body.
Your seat must be adjusted so that you can
correctly fasten your seat belt.
Never place hands under the seat or near any
moving parts while a seat is being adjusted.
After adjusting rear seats, make sure
R the seats are properly locked
R the seat backrests are in an upright position
and are properly locked
An outboard second-row seat is properly
locked only when lock status indicator : is
in hinged position and red marking ; is
barely visible.
If a seat and seat backrest are not properly
locked, the seat could move forward and the
seat backrest could fold. You could slide
under the seat belt during braking, vehicle 86
SeatsControls in detail
251_AKB; 4; 52, en-US
d2ureepe,
Version: 2.11.8.1 2009-03-23T09:22:52+01:00 - Seite 86
Page 89 of 364
maneuvers, or in an accident. If you slide
under it, the seat belt would apply force at the
abdomen or neck. That could cause serious
or even fatal injuries.
Seat locked
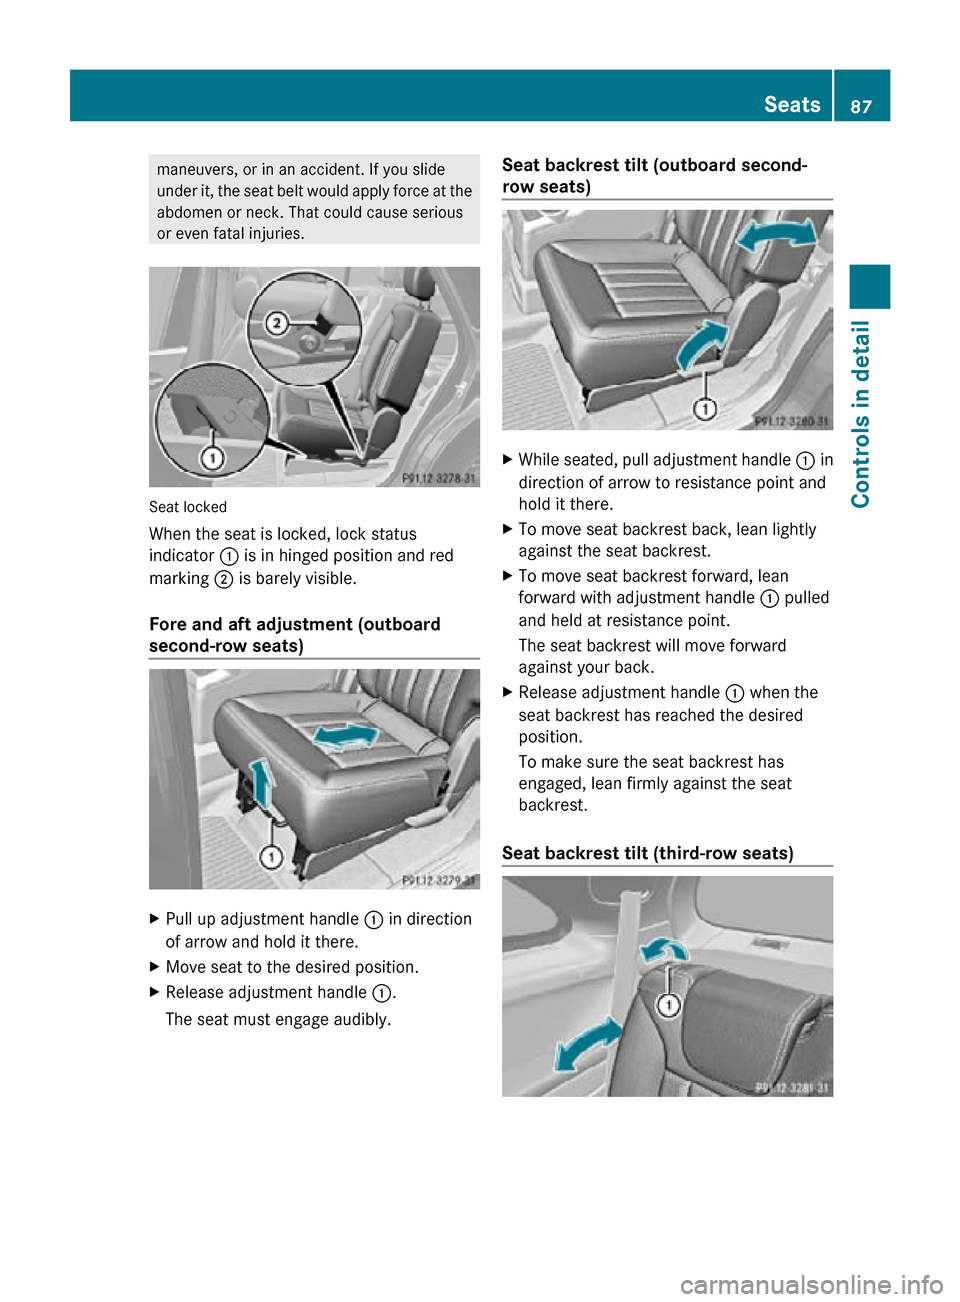
When the seat is locked, lock status
indicator : is in hinged position and red
marking ; is barely visible.
Fore and aft adjustment (outboard
second-row seats)
X
Pull up adjustment handle : in direction
of arrow and hold it there.
X Move seat to the desired position.
X Release adjustment handle :.
The seat must engage audibly. Seat backrest tilt (outboard second-
row seats)
X
While seated, pull adjustment handle : in
direction of arrow to resistance point and
hold it there.
X To move seat backrest back, lean lightly
against the seat backrest.
X To move seat backrest forward, lean
forward with adjustment handle : pulled
and held at resistance point.
The seat backrest will move forward
against your back.
X Release adjustment handle : when the
seat backrest has reached the desired
position.
To make sure the seat backrest has
engaged, lean firmly against the seat
backrest.
Seat backrest tilt (third-row seats) Seats
87Controls in detail
251_AKB; 4; 52, en-US
d2ureepe, Version: 2.11.8.1 2009-03-23T09:22:52+01:00 - Seite 87 Z
Page 93 of 364
Seat heating
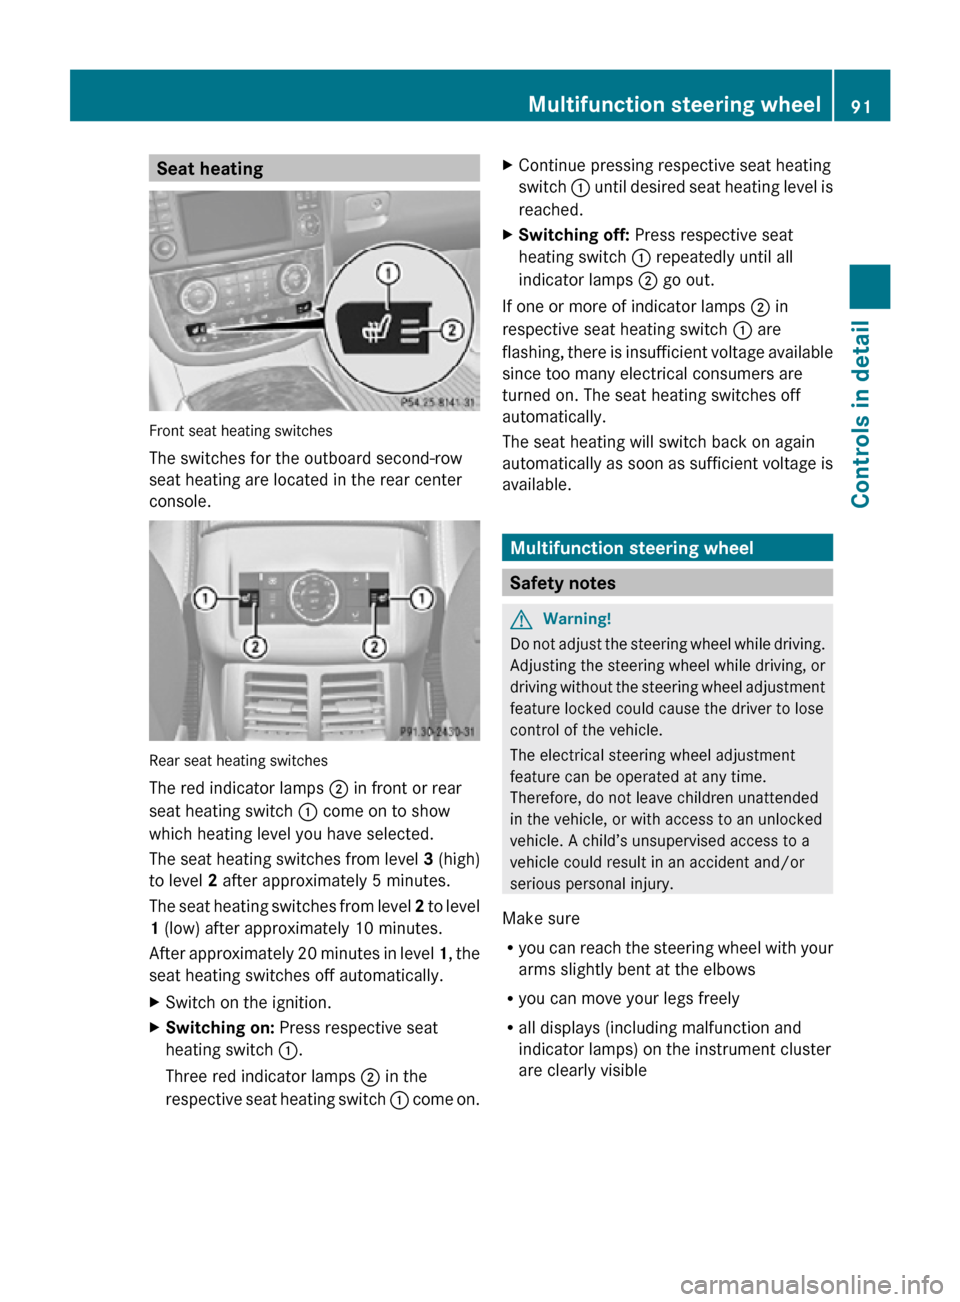
Front seat heating switches
The switches for the outboard second-row
seat heating are located in the rear center
console.
Rear seat heating switches
The red indicator lamps
; in front or rear
seat heating switch : come on to show
which heating level you have selected.
The seat heating switches from level 3 (high)
to level 2 after approximately 5 minutes.
The seat heating switches from level 2 to level
1 (low) after approximately 10 minutes.
After approximately 20 minutes in level 1, the
seat heating switches off automatically.
X Switch on the ignition.
X Switching on: Press respective seat
heating switch :.
Three red indicator lamps ; in the
respective seat heating switch : come on.X
Continue pressing respective seat heating
switch : until desired seat heating level is
reached.
X Switching off: Press respective seat
heating switch : repeatedly until all
indicator lamps ; go out.
If one or more of indicator lamps ; in
respective seat heating switch : are
flashing, there is insufficient voltage available
since too many electrical consumers are
turned on. The seat heating switches off
automatically.
The seat heating will switch back on again
automatically as soon as sufficient voltage is
available. Multifunction steering wheel
Safety notes
G
Warning!
Do not adjust the steering wheel while driving.
Adjusting the steering wheel while driving, or
driving without the steering wheel adjustment
feature locked could cause the driver to lose
control of the vehicle.
The electrical steering wheel adjustment
feature can be operated at any time.
Therefore, do not leave children unattended
in the vehicle, or with access to an unlocked
vehicle. A child’s unsupervised access to a
vehicle could result in an accident and/or
serious personal injury.
Make sure
R you can reach the steering wheel with your
arms slightly bent at the elbows
R you can move your legs freely
R all displays (including malfunction and
indicator lamps) on the instrument cluster
are clearly visible Multifunction steering wheel
91Controls in detail
251_AKB; 4; 52, en-US
d2ureepe, Version: 2.11.8.1 2009-03-23T09:22:52+01:00 - Seite 91 Z
Page 94 of 364
Steering wheel adjustment, manual
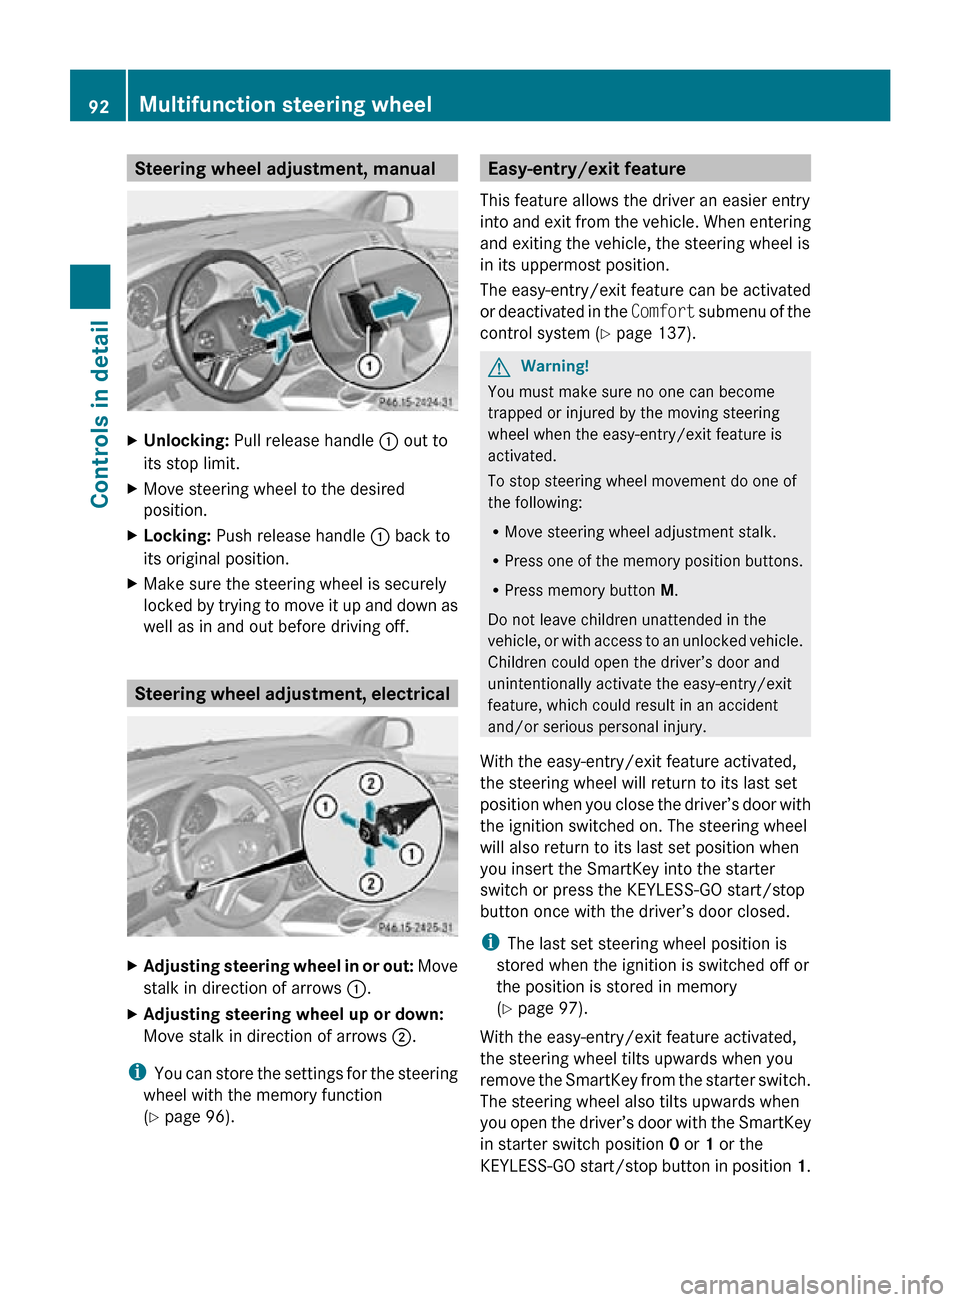
X
Unlocking: Pull release handle : out to
its stop limit.
X Move steering wheel to the desired
position.
X Locking: Push release handle : back to
its original position.
X Make sure the steering wheel is securely
locked by trying to move it up and down as
well as in and out before driving off. Steering wheel adjustment, electrical
X
Adjusting steering wheel in or out: Move
stalk in direction of arrows :.
X Adjusting steering wheel up or down:
Move stalk in direction of arrows ;.
i You can store the settings for the steering
wheel with the memory function
(Y page 96). Easy-entry/exit feature
This feature allows the driver an easier entry
into and exit from the vehicle. When entering
and exiting the vehicle, the steering wheel is
in its uppermost position.
The easy-entry/exit feature can be activated
or deactivated in the Comfort submenu of the
control system ( Y page 137). G
Warning!
You must make sure no one can become
trapped or injured by the moving steering
wheel when the easy-entry/exit feature is
activated.
To stop steering wheel movement do one of
the following:
R Move steering wheel adjustment stalk.
R Press one of the memory position buttons.
R Press memory button M.
Do not leave children unattended in the
vehicle, or with access to an unlocked vehicle.
Children could open the driver’s door and
unintentionally activate the easy-entry/exit
feature, which could result in an accident
and/or serious personal injury.
With the easy-entry/exit feature activated,
the steering wheel will return to its last set
position when you close the driver’s door with
the ignition switched on. The steering wheel
will also return to its last set position when
you insert the SmartKey into the starter
switch or press the KEYLESS-GO start/stop
button once with the driver’s door closed.
i The last set steering wheel position is
stored when the ignition is switched off or
the position is stored in memory
(Y page 97).
With the easy-entry/exit feature activated,
the steering wheel tilts upwards when you
remove the SmartKey from the starter switch.
The steering wheel also tilts upwards when
you open the driver’s door with the SmartKey
in starter switch position 0 or 1 or the
KEYLESS-GO start/stop button in position 1.92
Multifunction steering wheelControls in detail
251_AKB; 4; 52, en-US
d2ureepe,
Version: 2.11.8.1 2009-03-23T09:22:52+01:00 - Seite 92
Page 98 of 364
Folding in and out automatically
The function must be activated in the fold-in
function for the exterior rear view mirrors of
the Convenience submenu (Y page 138).
The exterior rear view mirrors fold in
automatically as soon as the vehicle is locked
from the outside.
The exterior rear view mirrors fold out
automatically as soon as the vehicle is
unlocked and the driver’s or front passenger
door are subsequently opened.
Synchronizing
The power folding rear view mirrors may have
to be synchronized after the vehicle battery
has been disconnected or discharged. If the
exterior rear view mirrors do not fold properly
upon locking or unlocking the vehicle, do the
following:
X
Make sure the power folding function in the
control system is activated (Y page 138).
X When power folding function is
activated and the exterior rear view
mirrors still do not fold properly: Fold
each exterior rear view mirror in completely
(Y page 96).
X Fold each exterior rear view mirror out
completely ( Y page 96).
When the exterior rear view mirrors fold
properly upon locking the vehicle, the exterior
mirrors are synchronized. Otherwise repeat
the above steps.
Folding in and out manually The exterior rear view mirrors can vibrate if
they are not folded out completely. X
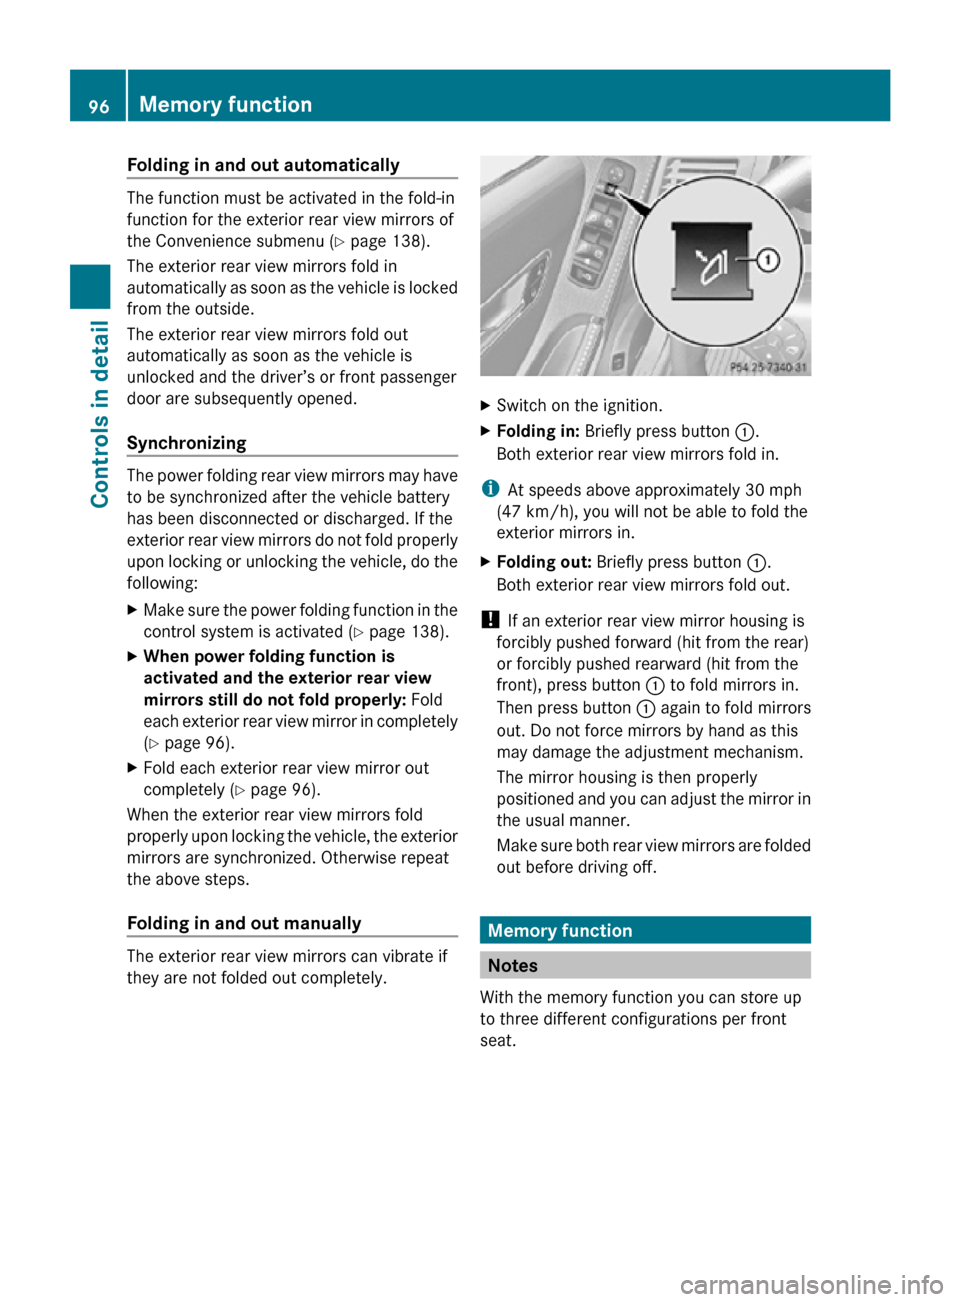
Switch on the ignition.
X Folding in: Briefly press button :.
Both exterior rear view mirrors fold in.
i At speeds above approximately 30 mph
(47 km/h), you will not be able to fold the
exterior mirrors in.
X Folding out: Briefly press button :.
Both exterior rear view mirrors fold out.
! If an exterior rear view mirror housing is
forcibly pushed forward (hit from the rear)
or forcibly pushed rearward (hit from the
front), press button : to fold mirrors in.
Then press button : again to fold mirrors
out. Do not force mirrors by hand as this
may damage the adjustment mechanism.
The mirror housing is then properly
positioned and you can adjust the mirror in
the usual manner.
Make sure both rear view mirrors are folded
out before driving off. Memory function
Notes
With the memory function you can store up
to three different configurations per front
seat. 96
Memory functionControls in detail
251_AKB; 4; 52, en-US
d2ureepe,
Version: 2.11.8.1 2009-03-23T09:22:52+01:00 - Seite 96
Page 104 of 364
Driving in reverse: The front fog lamp
opposite to your steering direction comes
on.
The corner-illuminating front fog lamps will
come on automatically depending on the
steering angle, even if you did not switch on
either turn signal. If the corner-illuminating
front fog lamps came on automatically, they
will also go out automatically depending on
the steering angle and vehicle speed.
The corner-illuminating front fog lamps
temporarily come on on both sides of the
vehicle if you turn the steering wheel in one
direction and then again in the other direction
shortly thereafter.
The corner-illuminating front fog lamp
remains lit for a short time only. It then goes
out automatically.
Switching off X
Switch off the left or right turn signal.
or
X Steer straight ahead.
i There may be a brief delay before the
corner-illuminating front fog lamps go out. Interior lighting in the front
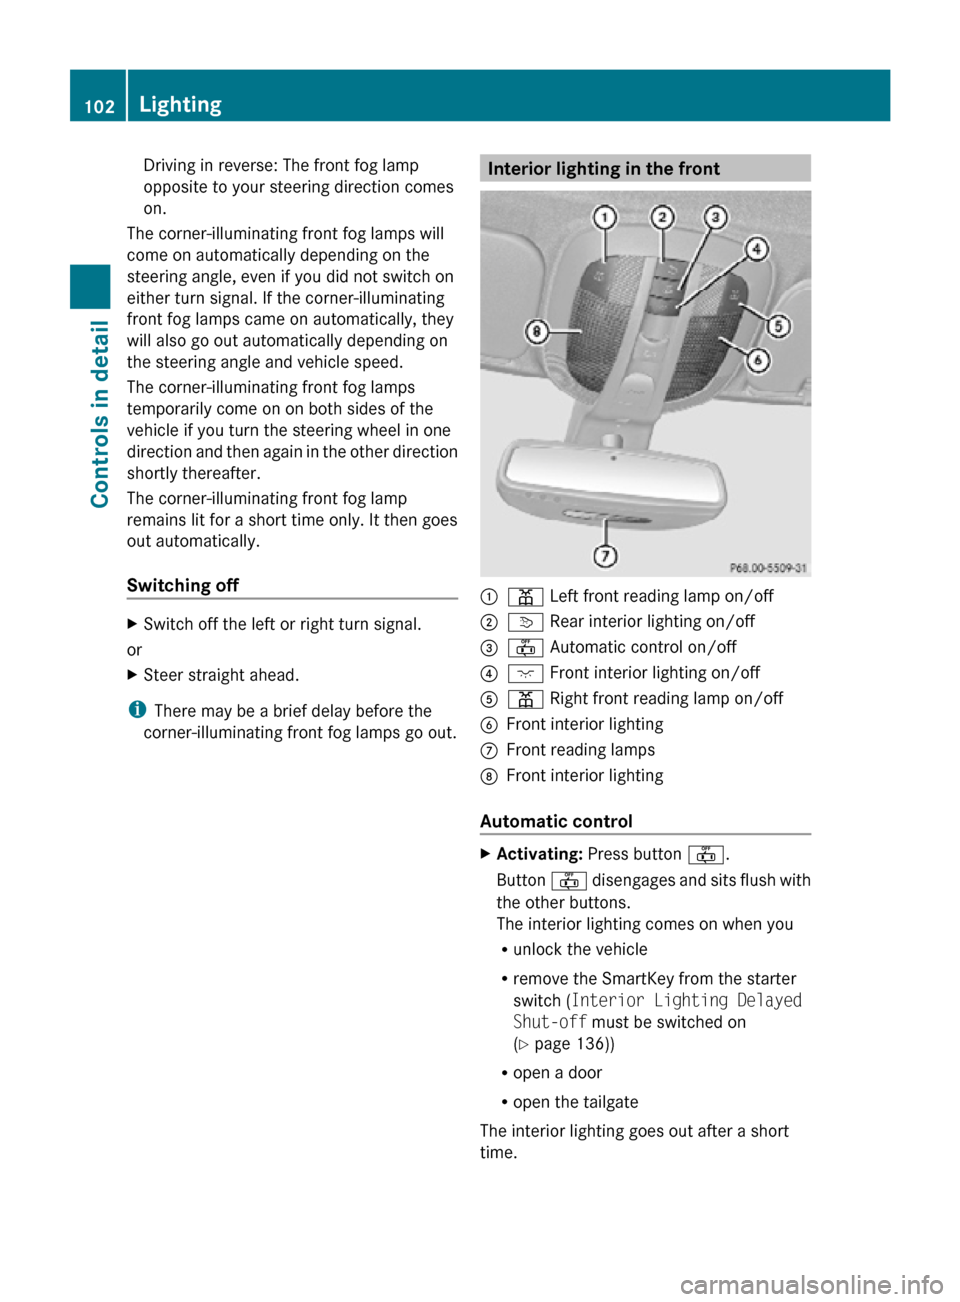
:
p Left front reading lamp on/off
; v Rear interior lighting on/off
= ~ Automatic control on/off
? c Front interior lighting on/off
A p Right front reading lamp on/off
B Front interior lighting
C Front reading lamps
D Front interior lighting
Automatic control X
Activating: Press button ~.
Button ~ disengages and sits flush with
the other buttons.
The interior lighting comes on when you
R unlock the vehicle
R remove the SmartKey from the starter
switch ( Interior Lighting Delayed
Shut-off must be switched on
(Y page 136))
R open a door
R open the tailgate
The interior lighting goes out after a short
time. 102
LightingControls in detail
251_AKB; 4; 52, en-US
d2ureepe,
Version: 2.11.8.1 2009-03-23T09:22:52+01:00 - Seite 102
Page 105 of 364
i
If a door remains open, the interior lamps
go out automatically after approximately
5 minutes when the SmartKey is removed
or in starter switch position 0.
X Deactivating: Press button ~.
Button ~ engages.
Manual control !
An interior lamp switched on manually
does not go out automatically.
Leaving an interior lamp switched on for an
extended period of time with the engine
turned off could result in a discharged
battery.
X Switching front interior lighting on/
off: Press switch c.
X Switching rear interior lighting on/off:
Press switch v.
X Switching front reading lamps on/off:
Press respective switch p.
Emergency lighting The interior lighting comes on automatically
if the vehicle is involved in an accident.
Switching off:
X
Press button ~.
or
X Press hazard warning flasher switch
(Y page 101).
or
X Unlock the vehicle with the SmartKey. Interior lighting in the rear
! An interior lamp switched on manually
does not go out automatically.
Leaving an interior lamp switched on for an
extended period of time with the engine
turned off could result in a discharged
battery. Second-row reading lamps
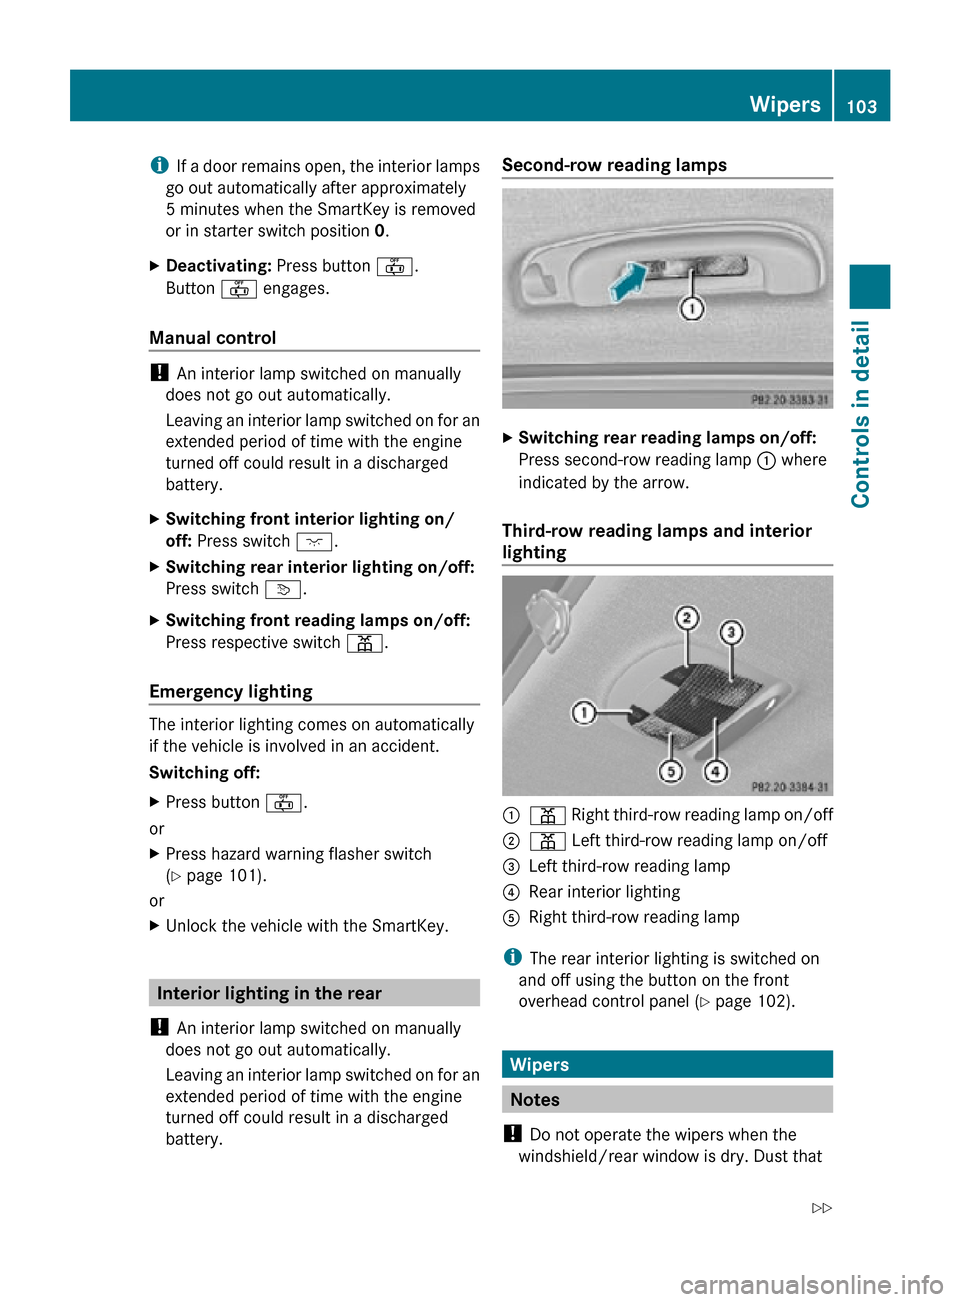
X
Switching rear reading lamps on/off:
Press second-row reading lamp : where
indicated by the arrow.
Third-row reading lamps and interior
lighting :
p Right third-row reading lamp on/off
; p Left third-row reading lamp on/off
= Left third-row reading lamp
? Rear interior lighting
A Right third-row reading lamp
i The rear interior lighting is switched on
and off using the button on the front
overhead control panel ( Y page 102). Wipers
Notes
! Do not operate the wipers when the
windshield/rear window is dry. Dust that Wipers
103Controls in detail
251_AKB; 4; 52, en-US
d2ureepe, Version: 2.11.8.1 2009-03-23T09:22:52+01:00 - Seite 103 Z