2010 MERCEDES-BENZ R320 lock
[x] Cancel search: lockPage 194 of 364
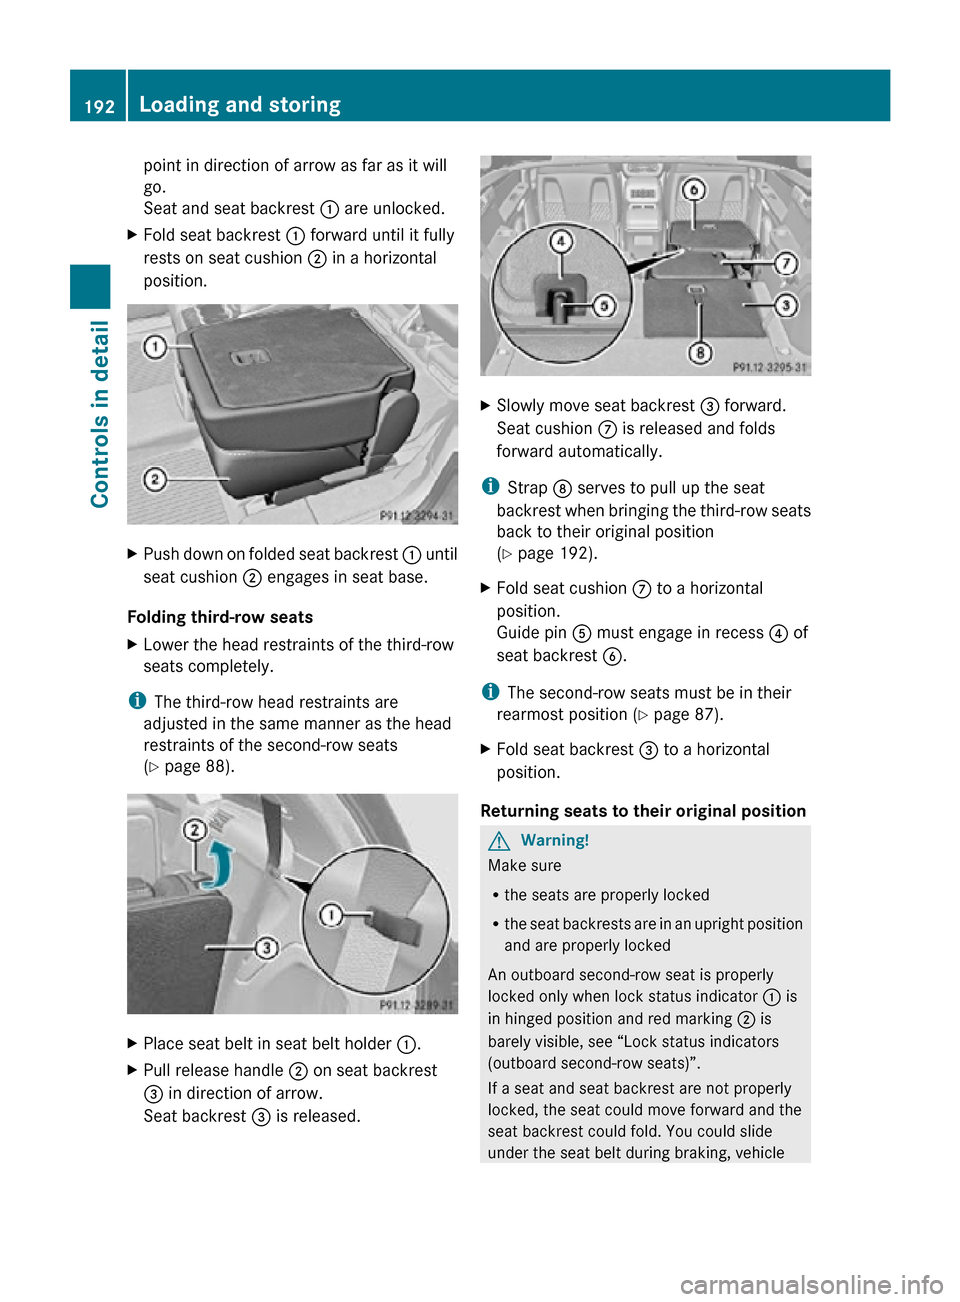
point in direction of arrow as far as it will
go.
Seat and seat backrest
: are unlocked.
X Fold seat backrest : forward until it fully
rests on seat cushion ; in a horizontal
position. X
Push down on folded seat backrest : until
seat cushion ; engages in seat base.
Folding third-row seats
X Lower the head restraints of the third-row
seats completely.
i The third-row head restraints are
adjusted in the same manner as the head
restraints of the second-row seats
(Y page 88). X
Place seat belt in seat belt holder :.
X Pull release handle ; on seat backrest
= in direction of arrow.
Seat backrest = is released. X
Slowly move seat backrest = forward.
Seat cushion C is released and folds
forward automatically.
i Strap D serves to pull up the seat
backrest when bringing the third-row seats
back to their original position
(Y page 192).
X Fold seat cushion C to a horizontal
position.
Guide pin A must engage in recess ? of
seat backrest B.
i The second-row seats must be in their
rearmost position (Y page 87).
X Fold seat backrest = to a horizontal
position.
Returning seats to their original position G
Warning!
Make sure
R the seats are properly locked
R the seat backrests are in an upright position
and are properly locked
An outboard second-row seat is properly
locked only when lock status indicator : is
in hinged position and red marking ; is
barely visible, see “Lock status indicators
(outboard second-row seats)”.
If a seat and seat backrest are not properly
locked, the seat could move forward and the
seat backrest could fold. You could slide
under the seat belt during braking, vehicle 192
Loading and storingControls in detail
251_AKB; 4; 52, en-US
d2ureepe,
Version: 2.11.8.1 2009-03-23T09:22:52+01:00 - Seite 192
Page 195 of 364
maneuvers, or in an accident. If you slide
under it, the belt would apply force at the
abdomen or neck. That could cause serious
or even fatal injuries.
! When returning the seats to their original
position, it is important to proceed in the
following order:
R third-row seats
R outboard second-row seats
R second-row middle seat (7-seat vehicles)
Otherwise, you could damage the seats.
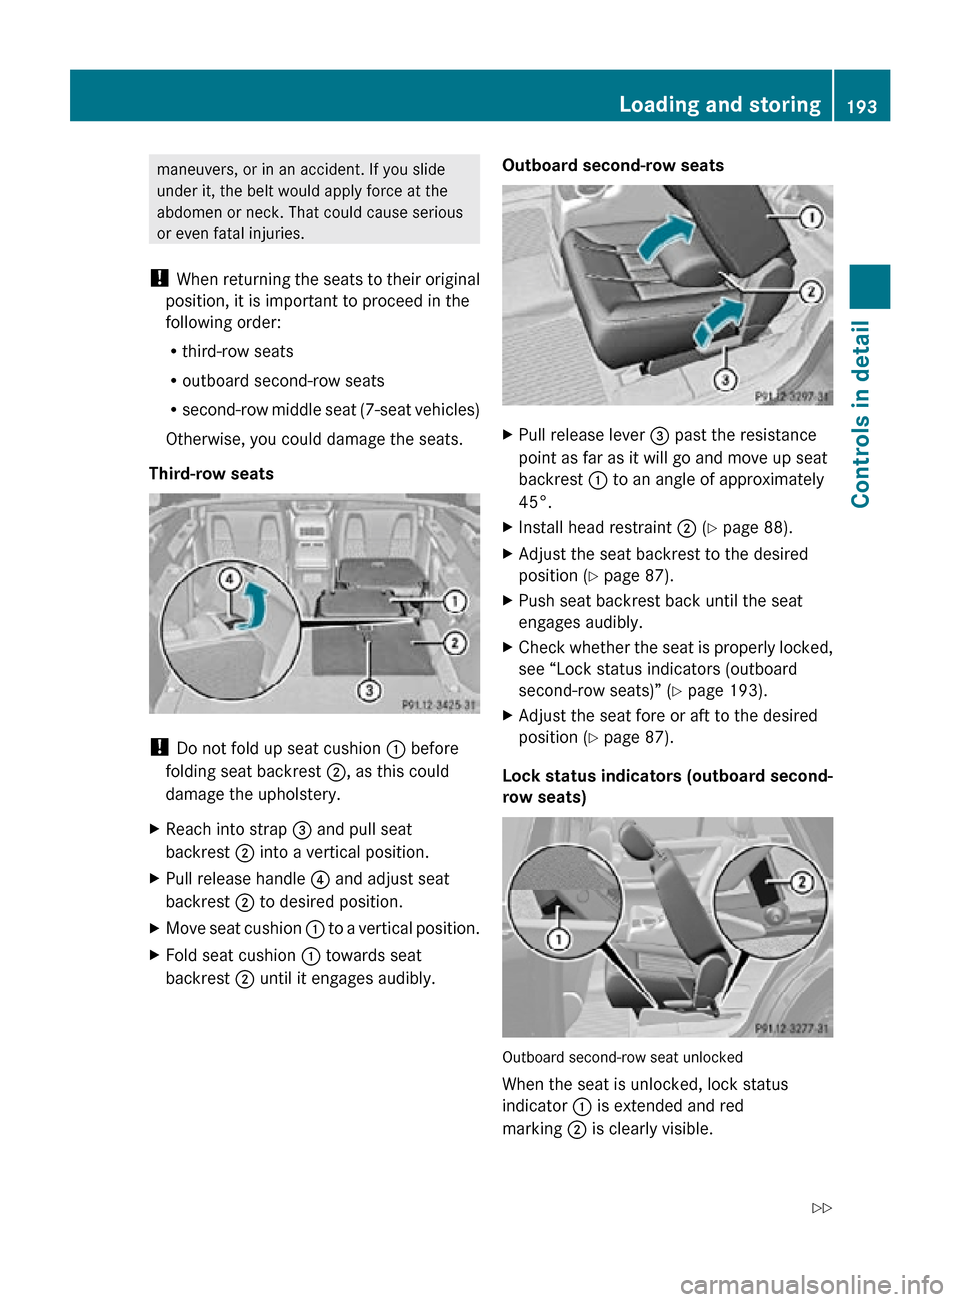
Third-row seats !
Do not fold up seat cushion : before
folding seat backrest ;, as this could
damage the upholstery.
X Reach into strap = and pull seat
backrest ; into a vertical position.
X Pull release handle ? and adjust seat
backrest ; to desired position.
X Move seat cushion : to a vertical position.
X Fold seat cushion : towards seat
backrest ; until it engages audibly. Outboard second-row seats X
Pull release lever = past the resistance
point as far as it will go and move up seat
backrest : to an angle of approximately
45°.
X Install head restraint ; (Y page 88).
X Adjust the seat backrest to the desired
position (Y page 87).
X Push seat backrest back until the seat
engages audibly.
X Check whether the seat is properly locked,
see “Lock status indicators (outboard
second-row seats)” ( Y page 193).
X Adjust the seat fore or aft to the desired
position (Y page 87).
Lock status indicators (outboard second-
row seats) Outboard second-row seat unlocked
When the seat is unlocked, lock status
indicator : is extended and red
marking ; is clearly visible. Loading and storing
193Controls in detail
251_AKB; 4; 52, en-US
d2ureepe, Version: 2.11.8.1 2009-03-23T09:22:52+01:00 - Seite 193 Z
Page 196 of 364
X
When the seat is unlocked, push seat
backrest back until the seat engages
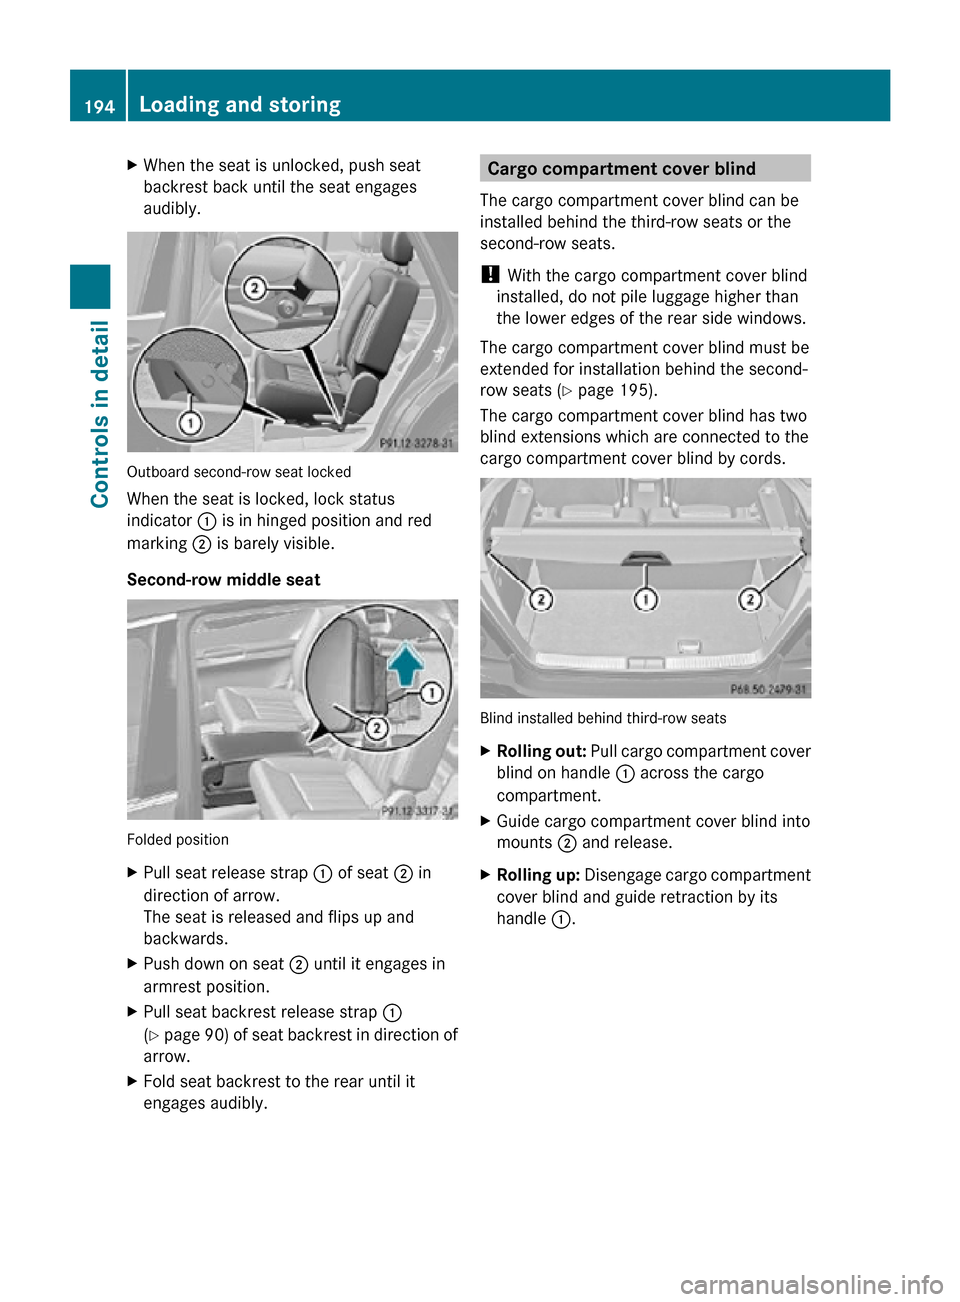
audibly. Outboard second-row seat locked
When the seat is locked, lock status
indicator : is in hinged position and red
marking ; is barely visible.
Second-row middle seat
Folded position
X
Pull seat release strap : of seat ; in
direction of arrow.
The seat is released and flips up and
backwards.
X Push down on seat ; until it engages in
armrest position.
X Pull seat backrest release strap :
(Y page 90) of seat backrest in direction of
arrow.
X Fold seat backrest to the rear until it
engages audibly. Cargo compartment cover blind
The cargo compartment cover blind can be
installed behind the third-row seats or the
second-row seats.
! With the cargo compartment cover blind
installed, do not pile luggage higher than
the lower edges of the rear side windows.
The cargo compartment cover blind must be
extended for installation behind the second-
row seats ( Y page 195).
The cargo compartment cover blind has two
blind extensions which are connected to the
cargo compartment cover blind by cords. Blind installed behind third-row seats
X
Rolling out: Pull cargo compartment cover
blind on handle : across the cargo
compartment.
X Guide cargo compartment cover blind into
mounts ; and release.
X Rolling up: Disengage cargo compartment
cover blind and guide retraction by its
handle :. 194
Loading and storingControls in detail
251_AKB; 4; 52, en-US
d2ureepe,
Version: 2.11.8.1 2009-03-23T09:22:52+01:00 - Seite 194
Page 200 of 364
Keep compartment lids closed. This will help
to prevent stored objects from being thrown
about and injuring vehicle occupants during
R
braking
R vehicle maneuvers
R an accident
Glove box Depending on vehicle equipment, an AUX
socket or a media interface is located in the
glove box. For information on Audio AUX
mode or on media interface, see separate
COMAND system operating instructions.
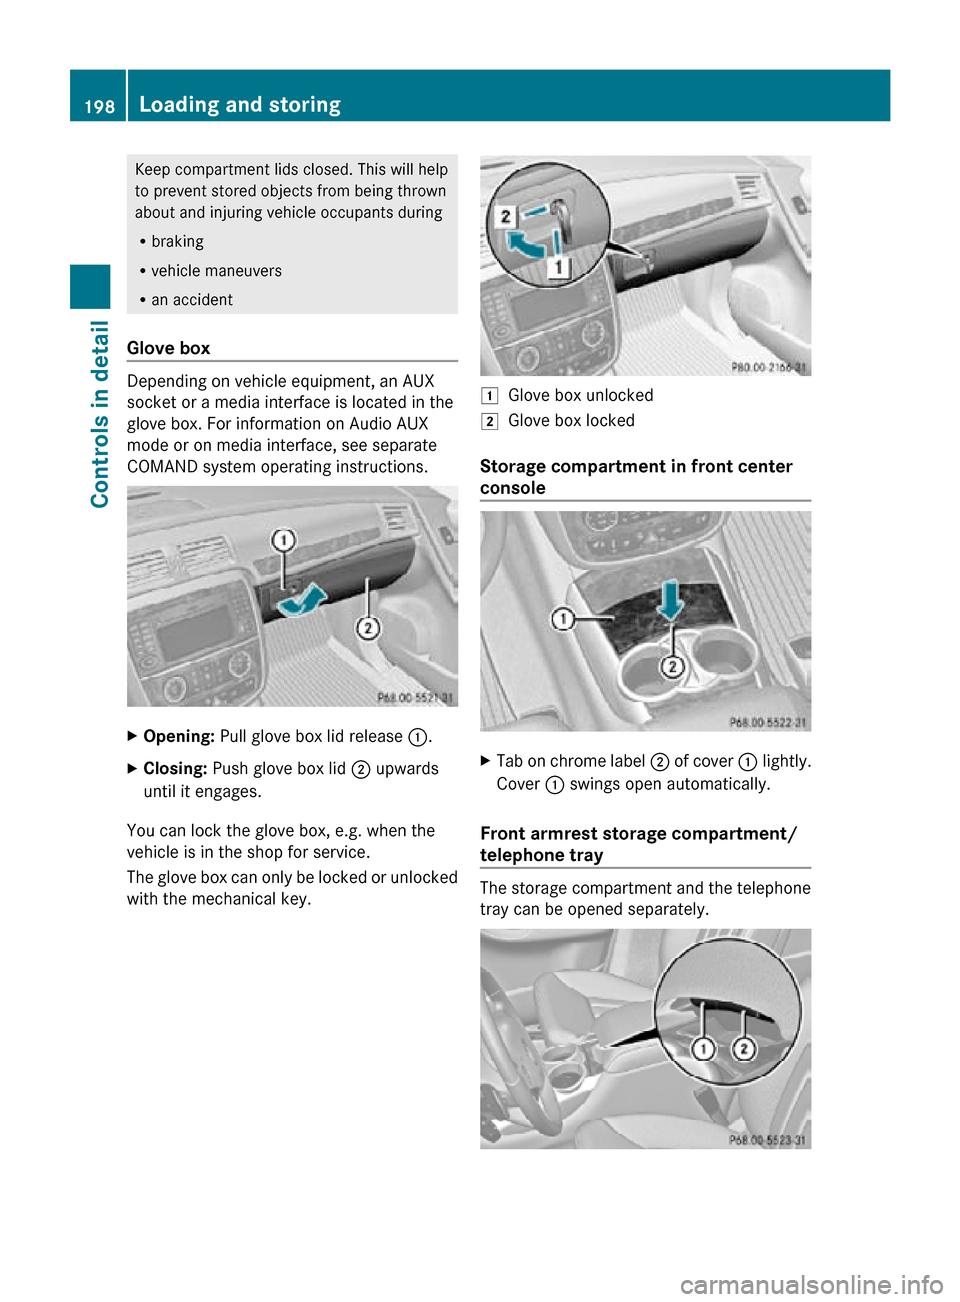
X
Opening: Pull glove box lid release :.
X Closing: Push glove box lid ; upwards
until it engages.
You can lock the glove box, e.g. when the
vehicle is in the shop for service.
The glove box can only be locked or unlocked
with the mechanical key. 1
Glove box unlocked
2 Glove box locked
Storage compartment in front center
console X
Tab on chrome label ; of cover : lightly.
Cover : swings open automatically.
Front armrest storage compartment/
telephone tray The storage compartment and the telephone
tray can be opened separately.198
Loading and storingControls in detail
251_AKB; 4; 52, en-US
d2ureepe,
Version: 2.11.8.1 2009-03-23T09:22:52+01:00 - Seite 198
Page 209 of 364
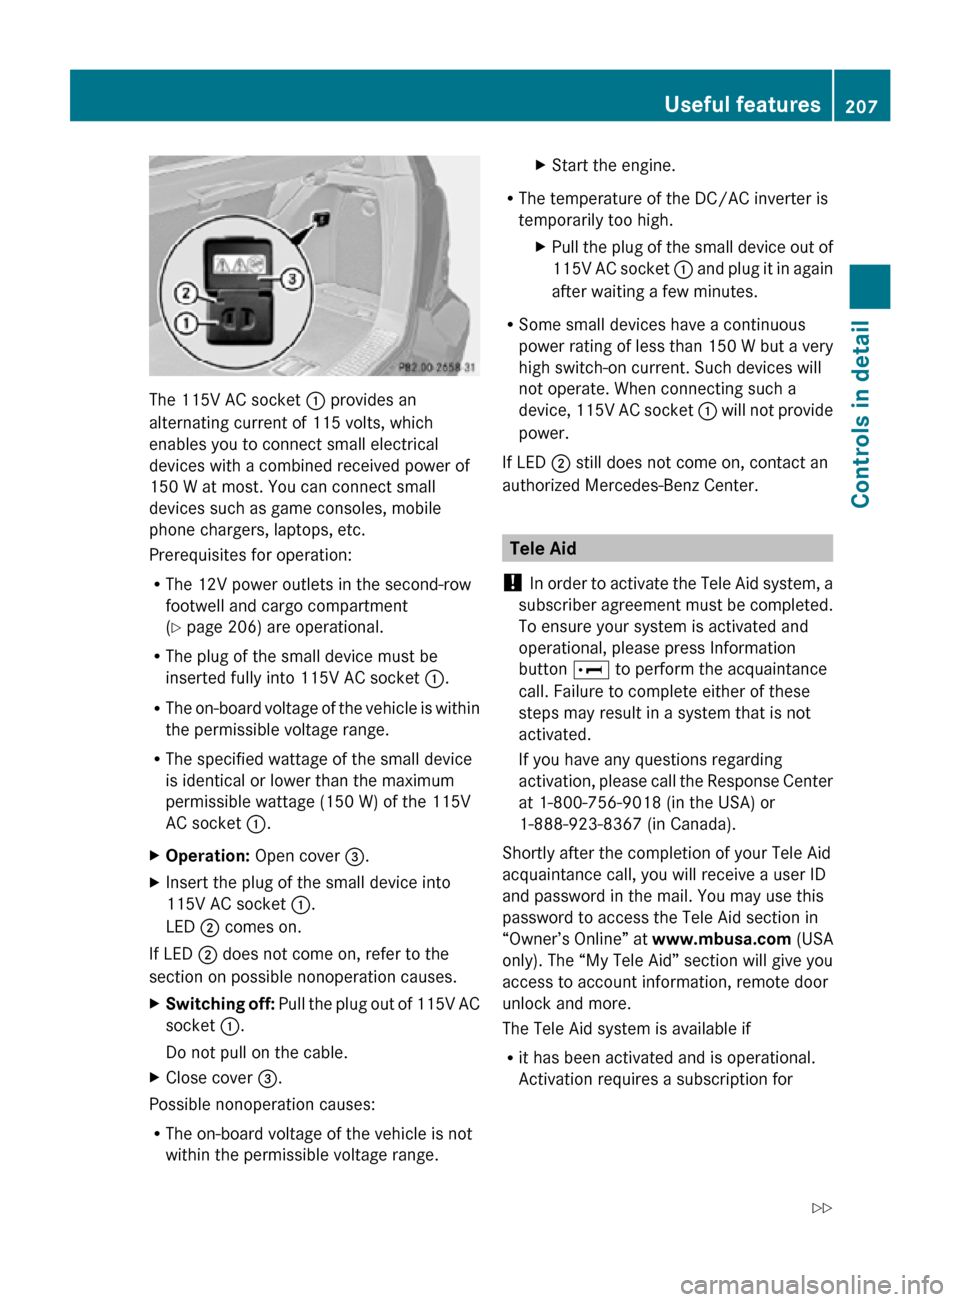
The 115V AC socket
: provides an
alternating current of 115 volts, which
enables you to connect small electrical
devices with a combined received power of
150 W at most. You can connect small
devices such as game consoles, mobile
phone chargers, laptops, etc.
Prerequisites for operation:
R The 12V power outlets in the second-row
footwell and cargo compartment
(Y page 206) are operational.
R The plug of the small device must be
inserted fully into 115V AC socket :.
R The on-board voltage of the vehicle is within
the permissible voltage range.
R The specified wattage of the small device
is identical or lower than the maximum
permissible wattage (150 W) of the 115V
AC socket :.
X Operation: Open cover =.
X Insert the plug of the small device into
115V AC socket :.
LED ; comes on.
If LED ; does not come on, refer to the
section on possible nonoperation causes.
X Switching off: Pull the plug out of 115V AC
socket :.
Do not pull on the cable.
X Close cover =.
Possible nonoperation causes:
R The on-board voltage of the vehicle is not
within the permissible voltage range. X
Start the engine.
R The temperature of the DC/AC inverter is
temporarily too high.
XPull the plug of the small device out of
115V AC socket : and plug it in again
after waiting a few minutes.
R Some small devices have a continuous
power rating of less than 150 W but a very
high switch-on current. Such devices will
not operate. When connecting such a
device, 115V AC socket : will not provide
power.
If LED ; still does not come on, contact an
authorized Mercedes-Benz Center. Tele Aid
! In order to activate the Tele Aid system, a
subscriber agreement must be completed.
To ensure your system is activated and
operational, please press Information
button E to perform the acquaintance
call. Failure to complete either of these
steps may result in a system that is not
activated.
If you have any questions regarding
activation, please call the Response Center
at 1-800-756-9018 (in the USA) or
1-888-923-8367 (in Canada).
Shortly after the completion of your Tele Aid
acquaintance call, you will receive a user ID
and password in the mail. You may use this
password to access the Tele Aid section in
“Owner’s Online” at www.mbusa.com (USA
only). The “My Tele Aid” section will give you
access to account information, remote door
unlock and more.
The Tele Aid system is available if
R it has been activated and is operational.
Activation requires a subscription for Useful features
207Controls in detail
251_AKB; 4; 52, en-US
d2ureepe, Version: 2.11.8.1 2009-03-23T09:22:52+01:00 - Seite 207 Z
Page 214 of 364
Route guidance
You will be prompted to confirm that route
guidance to the entered address is to be
started.
X
Select Yes using button = or ; on
the COMAND system.
X Press button 9 on the COMAND system
to confirm.
The system calculates the route and
subsequently starts the route guidance to the
defined address.
i If you select No, you can save the address
to your address book.
i The Destination Download feature is
available if the relevant mobile phone
network is available and data connection is
possible.
Search & Send “Search & Send” is a navigation destination
address entry service. For more information
on “Search & Send”, refer to separate
COMAND system operating instructions.
Remote door unlock
In case you have locked your vehicle
unintentionally
(e.g. SmartKey inside vehicle),
and the reserve SmartKey is not available:
X Contact the Response Center at
1-800-756-9018
(in the USA) or
1-888-923-8367 (in Canada).
You will be asked to provide your password.
X Then return to your vehicle at the time
arranged with the Response Center and
pull the tailgate recessed handle
(Y page 75) for a minimum of 20 seconds
until the indicator lamp in the SOS button
is flashing.
The
message Connecting Call appears in
the multifunction display.
As an alternative, you may unlock the vehicle
via Internet in the “My Tele Aid” section of “Owner’s Online”, using your ID and password
(USA only).
The Response Center will then unlock your
vehicle with the remote door unlocking
feature.
i
The remote door unlock feature is
available if the relevant cellular phone
network is available.
The
SOS button will flash and the message
Call Connected will appear in the
multifunction display to indicate receipt of
the door unlock command.
Once the vehicle is unlocked, a Response
Center specialist will attempt to establish
voice contact with the vehicle occupants.
If the tailgate recessed handle was pulled
for more than 20 seconds before door
unlock authorization was received by the
Response Center, you must wait
15 minutes before pulling the tailgate
recessed handle again.
Stolen Vehicle Recovery Services In the event your vehicle was stolen:
X
Report the incident to the police.
The police will issue a numbered incident
report.
X Pass this number on to the Response
Center along with your password.
The Response Center will then attempt to
covertly contact the vehicle’s Tele Aid
system. Once the vehicle is located, the
Response
Center will contact the local law
enforcement and you. The vehicle’s
location will only be provided to law
enforcement.
i If the anti-theft alarm stays on for more
than 30 seconds, the Tele Aid system
initiates a call to the Response Center
automatically The Tele Aid system will
initiate the call provided that 212
Useful features
Controls in detail
251_AKB; 4; 52, en-US
d2ureepe,
Version: 2.11.8.1 2009-03-23T09:22:52+01:00 - Seite 212
Page 223 of 364
drained completely. Contact an authorized
Mercedes-Benz Center to have the fuel
system drained completely.
! Gasoline engine:
To prevent damage to the catalytic
converters, only use premium unleaded
gasoline in this vehicle.
Any noticeable irregularities in engine
operation should be repaired promptly.
Otherwise, excessive unburned fuel may
reach the catalytic converter, causing it to
overheat and potentially start a fire.
! Diesel engine:
When filling the diesel fuel tank using fuel
containers, place a filling filter, a suede
cloth or a clean flannel cloth as a filter.
Otherwise, particles from the fuel container
could clog the fuel lines and/or the diesel
injection system.
! Diesel engine:
The engine is more susceptible to wear and
damage if you use
R marine diesel fuel
R heating oil
R additives
The exhaust aftertreatment device will be
seriously damaged if you use any other
diesel fuel than ULTRA-LOW SULFUR
HIGHWAY DIESEL FUEL (15 ppm SULFUR
MAXIMUM).
The use of such non-approved fuels and/or
special additives is not covered by the
Mercedes-Benz Limited Warranty.
i Gasoline engine:
Only use premium unleaded gasoline with
a minimum Posted Octane Rating of 91
(average of 96 RON/86 MON).
Information on gasoline quality can
normally be found on the fuel pump. Please
contact gas station personnel in case
labels on the pump cannot be found. For more information on gasoline, see
“Premium unleaded gasoline (gasoline
engine)” (
Y page 353), see “Fuel
requirements” ( Y page 353), or contact an
authorized Mercedes-Benz Center, or visit
www.mbusa.com (USA only).
i Diesel engine:
Only use commercially available vehicular
ULTRA-LOW SULFUR DIESEL FUEL
(15 ppm SULFUR MAXIMUM). Information
on diesel quality can normally be found on
the fuel pump. Please contact gas station
personnel in case labels on the pump
cannot be found.
For more information on diesel fuels, see
“Fuel requirements” (Y page 353), or
contact an authorized Mercedes-Benz
Center, or visit www.mbusa.com (USA
only).
i Diesel engine:
If you have driven the vehicle until the tank
is empty, the fuel system needs to be bled
(Y page 331).
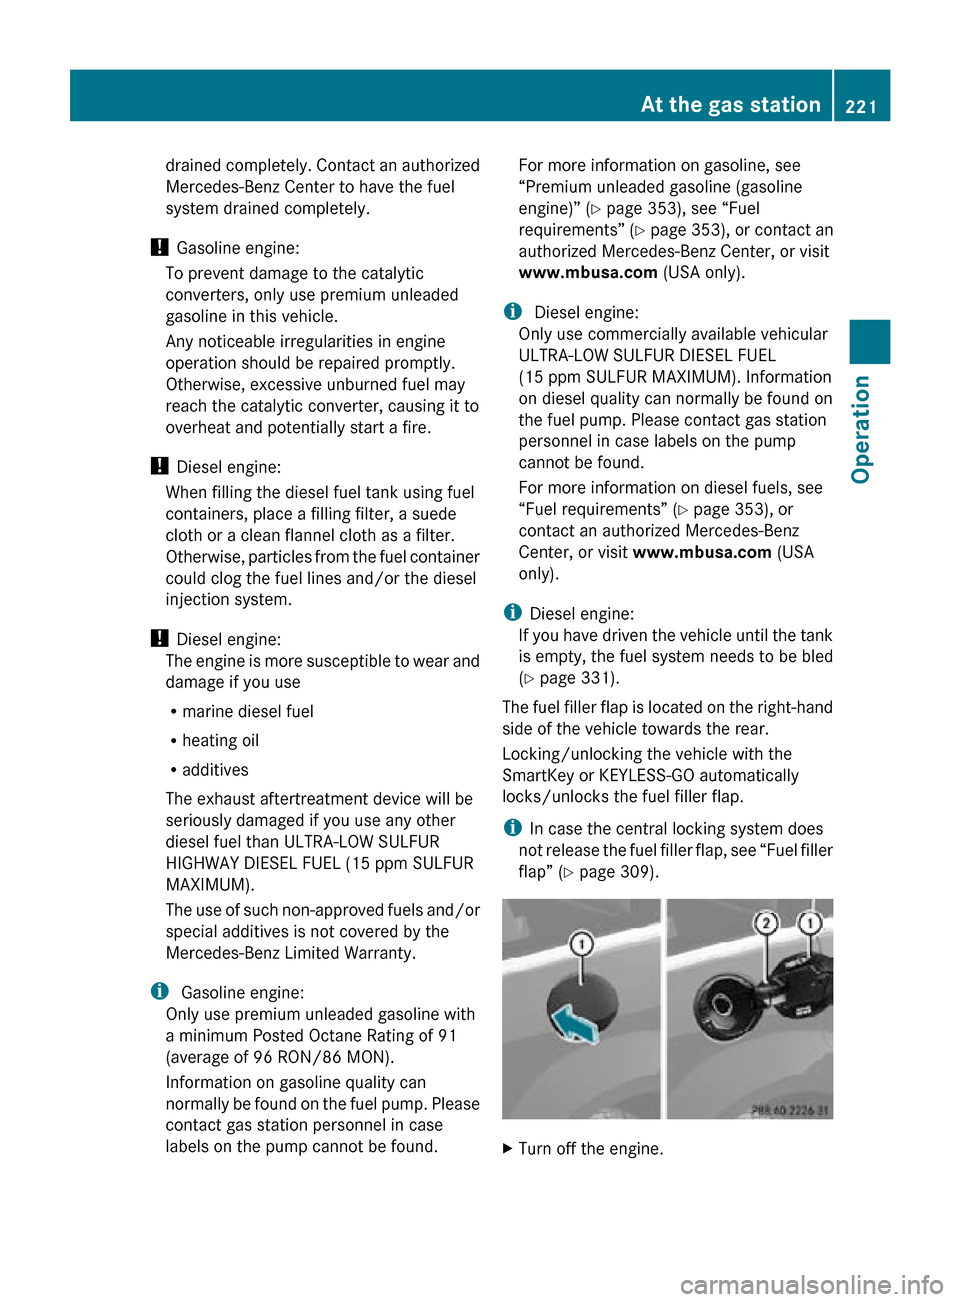
The fuel filler flap is located on the right-hand
side of the vehicle towards the rear.
Locking/unlocking the vehicle with the
SmartKey or KEYLESS-GO automatically
locks/unlocks the fuel filler flap.
i In case the central locking system does
not release the fuel filler flap, see “Fuel filler
flap” (Y page 309). X
Turn off the engine. At the gas station
221Operation
251_AKB; 4; 52, en-US
d2ureepe, Version: 2.11.8.1 2009-03-23T09:22:52+01:00 - Seite 221 Z
Page 224 of 364
i
Leaving the engine running and the fuel
filler cap open can cause the yellow fuel
tank
reserve warning lamp to flash and the
malfunction indicator lamp ! (USA
only) or ; (Canada only) to illuminate.
For more information, see also “Practical
hints” (Y page 305).
X Remove the SmartKey from the starter
switch.
KEYLESS-GO: Open the driver’s door (this
puts the starter switch in position 0, same
as with the SmartKey removed from the
starter switch). The driver’s door then can
be closed again.
X Opening: Press fuel filler flap : at the
point indicated by the arrow.
X Turn fuel filler cap ; counterclockwise.
X Take off fuel filler cap ;.
! The fuel filler cap is tethered to the fuel
filler neck. Do not drop the cap. It could
damage the vehicle paint finish.
X Set fuel filler cap ; on fuel filler flap :.
X Fully insert filler nozzle unit and refuel.
X Only fill your tank until the filler nozzle unit
cuts out – do not top off or overfill .
X Closing: Turn fuel filler cap ; clockwise
until it audibly engages.
X Close fuel filler flap :.
Low outside temperatures (diesel
engine) !
Do not fill the tank with gasoline. Do not
blend
diesel fuel with gasoline or kerosene.
The fuel system and engine will otherwise
be damaged, which is not covered by the
Mercedes-Benz Limited Warranty.
To prevent malfunctions, diesel fuel with
improved cold flow characteristics is offered
in the winter months. Check with your fuel
retailer. Check regularly and before a long trip
For information on quantities and
requirements
of operating agents, see “Fuels,
coolants, lubricants, etc.” (Y page 350).
Check the following:
R Engine oil level ( Y page 224)
R Tire inflation pressure ( Y page 230)
R Coolant level ( Y page 225)
R Vehicle lighting ( Y page 313)
R Washer system and headlamp cleaning
system (Y page 226)
R Brake fluid ( Y page 227) Engine compartment
Hood
G
Warning!
Do not pull the release lever while the vehicle
is in motion. Otherwise the hood could be
forced open by passing air flow.
This
could cause the hood to come loose and
injure you and/or others.
Opening G
Warning!
Do not open the hood when the engine is
overheated. You could be seriously injured.
Observe the coolant temperature display to
determine whether the engine may be
overheated. If you see flames or smoke
coming from the engine compartment, move
away from the vehicle. Wait until the engine
has cooled. If necessary, call the fire
department. G
Warning!
You could be injured when the hood is open –
even when the engine is turned off.
Parts of the engine can become very hot. To
prevent
burns, let the engine cool completely
before touching any components on the 222
Engine compartment
Operation
251_AKB; 4; 52, en-US
d2ureepe,
Version: 2.11.8.1 2009-03-23T09:22:52+01:00 - Seite 222