2010 MERCEDES-BENZ R320 lock
[x] Cancel search: lockPage 326 of 364

(80 km/h) or below with the recommended
tire inflation pressure.
X Contact an authorized Mercedes-Benz
Center
as soon as possible to obtain a new
TIREFIT kit.
X Bring used TIREFIT materials to an
authorized Mercedes-Benz Center for
proper disposal.
X Replace your TIREFIT container every
4 years. Replacement containers are
available
at any authorized Mercedes-Benz
Center. Mounting the spare wheel
Introduction X
Prepare the vehicle as described
(Y page 320).
X Take the following out of the vehicle:
R
spare wheel
R jack
R wheel wrench
R collapsible wheel chock
R alignment bolt
R electric air pump
For information on where to find the
respective items, see “Where will I find ...?”
(Y page 270) and ( Y page 272).
i Vehicles without spare wheel are not
factory-equipped
with the tools required for
a wheel change such as a jack or a wheel
wrench. Some tools required for a wheel
change are specific to your vehicle.
Contact an authorized Mercedes-Benz
Center to obtain the tools approved for
your vehicle. This section describes the
wheel change using the tools approved and
recommended for your vehicle. Lifting the vehicle G
Warning!
When jacking up the vehicle, only use the jack
which has been specifically approved by
Mercedes-Benz for your vehicle.
The
jack is designed exclusively for jacking up
the vehicle at the jack take-up brackets built
into both sides of the vehicle. Make sure the
jack arm is fully seated in the jack take-up
bracket. The jack must always be vertical
when in use, especially on inclines or
declines.
The jack is intended only for lifting the vehicle
briefly for wheel changes. It is not suited for
performing maintenance work under the
vehicle. To help avoid personal injury, use the
jack only to lift the vehicle during a wheel
change.
Never get beneath the vehicle while it is
supported by the jack. Keep hands and feet
away from the area under the lifted vehicle.
Always lower the vehicle onto sufficient
capacity jackstands before working under the
vehicle.
Always engage the parking brake firmly and
block the wheels with wheel chocks or other
sizeable objects before raising the vehicle
with the jack. Do not disengage the parking
brake while the vehicle is raised.
Make sure that the ground on which the
vehicle is standing and where you place the
jack is solid, level and not slippery. If
necessary, use a large underlay. On slippery
surfaces, such as tiled floors, you should use
a non-slip underlay, for example a rubber mat.
Do not use wooden blocks or similar objects
to support the jack. Otherwise the jack may
not be able to achieve its load-bearing
capacity if it is not at its full height.
Never start the engine when the vehicle is
raised.
Also observe the notes on the jack. 324
Flat tire
Practical hints
251_AKB; 4; 52, en-US
d2ureepe,
Version: 2.11.8.1 2009-03-23T09:22:52+01:00 - Seite 324
Page 327 of 364
X
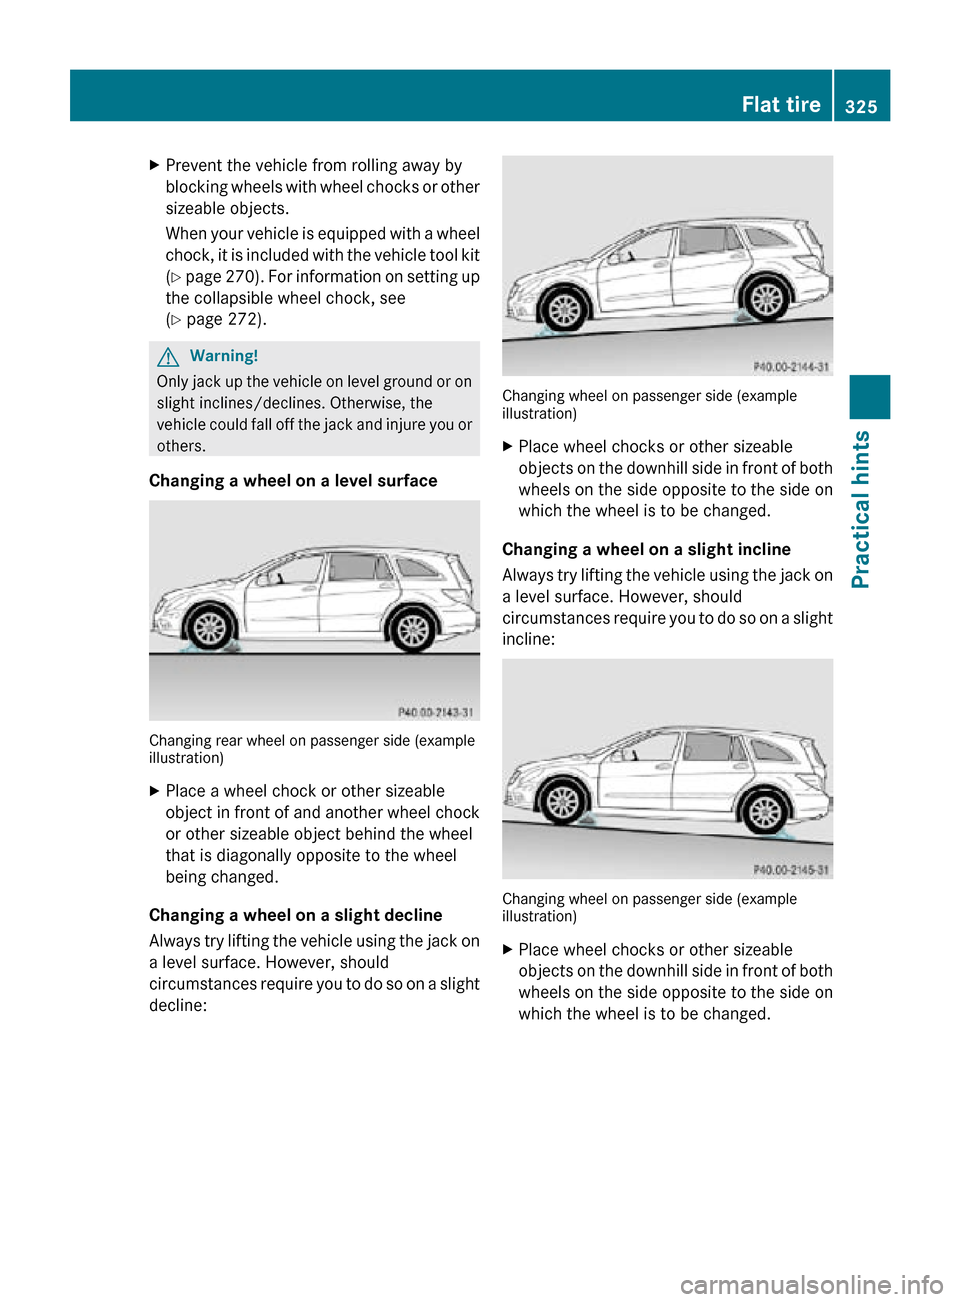
Prevent the vehicle from rolling away by
blocking wheels with wheel chocks or other
sizeable objects.
When your vehicle is equipped with a wheel
chock, it is included with the vehicle tool kit
(Y page 270). For information on setting up
the collapsible wheel chock, see
(Y page 272). G
Warning!
Only jack up the vehicle on level ground or on
slight inclines/declines. Otherwise, the
vehicle could fall off the jack and injure you or
others.
Changing a wheel on a level surface Changing rear wheel on passenger side (example
illustration)
X
Place a wheel chock or other sizeable
object in front of and another wheel chock
or other sizeable object behind the wheel
that is diagonally opposite to the wheel
being changed.
Changing a wheel on a slight decline
Always try lifting the vehicle using the jack on
a level surface. However, should
circumstances require you to do so on a slight
decline: Changing wheel on passenger side (example
illustration)
X
Place wheel chocks or other sizeable
objects on the downhill side in front of both
wheels on the side opposite to the side on
which the wheel is to be changed.
Changing a wheel on a slight incline
Always try lifting the vehicle using the jack on
a level surface. However, should
circumstances require you to do so on a slight
incline: Changing wheel on passenger side (example
illustration)
X
Place wheel chocks or other sizeable
objects on the downhill side in front of both
wheels on the side opposite to the side on
which the wheel is to be changed. Flat tire
325Practical hints
251_AKB; 4; 52, en-US
d2ureepe, Version: 2.11.8.1 2009-03-23T09:22:52+01:00 - Seite 325 Z
Page 334 of 364
Always use the particular AdBlue
®
refill
containers for refilling outside the
maintenance service interval. Contact an
authorized Mercedes-Benz Center or call
Roadside Assistance if necessary
(Y page 210).
Additional information on BlueTEC exhaust
gas aftertreatment and AdBlue ®
is available
at any authorized Mercedes-Benz Center. Refilling with AdBlue
®
G
Warning!
Make sure
R AdBlue ®
does not come into contact with
skin, eyes, or clothing
R to keep AdBlue ®
out of the reach of children
If you and/or others have come into contact
with AdBlue ®
:
R If AdBlue ®
has gotten into contact with
eyes, flush with plenty of water immediately
and seek medical help.
R Clean affected skin immediately with plenty
of water.
R If AdBlue ®
was swallowed, rinse mouth
immediately with plenty of water and drink
plenty of water. Consult a physician. G
Warning!
When opening the filler cap of the AdBlue ®
tank ammonia gas vapors may escape. Refill
AdBlue ®
in a well ventilated area only.
Ammonia gas vapors have a pungent odor and
are particularly irritating for your skin,
mucous membranes, and eyes. Inhaling
ammonia gas vapors will cause burning eyes,
nose, and throat, as well as coughing and
watering eyes.
! Only use AdBlue ®
complying with
ISO 22241. Do not add additives to
AdBlue ®
and do not dilute AdBlue ®
with water. Otherwise, the BlueTEC exhaust gas
aftertreatment system could be damaged.
Damage caused by using additives or
diluting with water are not covered by the
Mercedes-Benz Limited Warranty.
! Rinse surfaces that have come into
contact with AdBlue ®
, or remove AdBlue ®
with a moist cloth and cold water
immediately. If AdBlue ®
has crystallized
already, use cold water and a sponge.
AdBlue ®
residues will crystallize and soil
the affected surfaces.
! AdBlue ®
is not a fuel additive and must
not be added to the diesel fuel tank. If
AdBlue ®
reaches the diesel fuel tank, the
engine could be damaged which is not
covered by the Mercedes-Benz Limited
Warranty.
For more information on AdBlue ®
, see
(Y page 354).
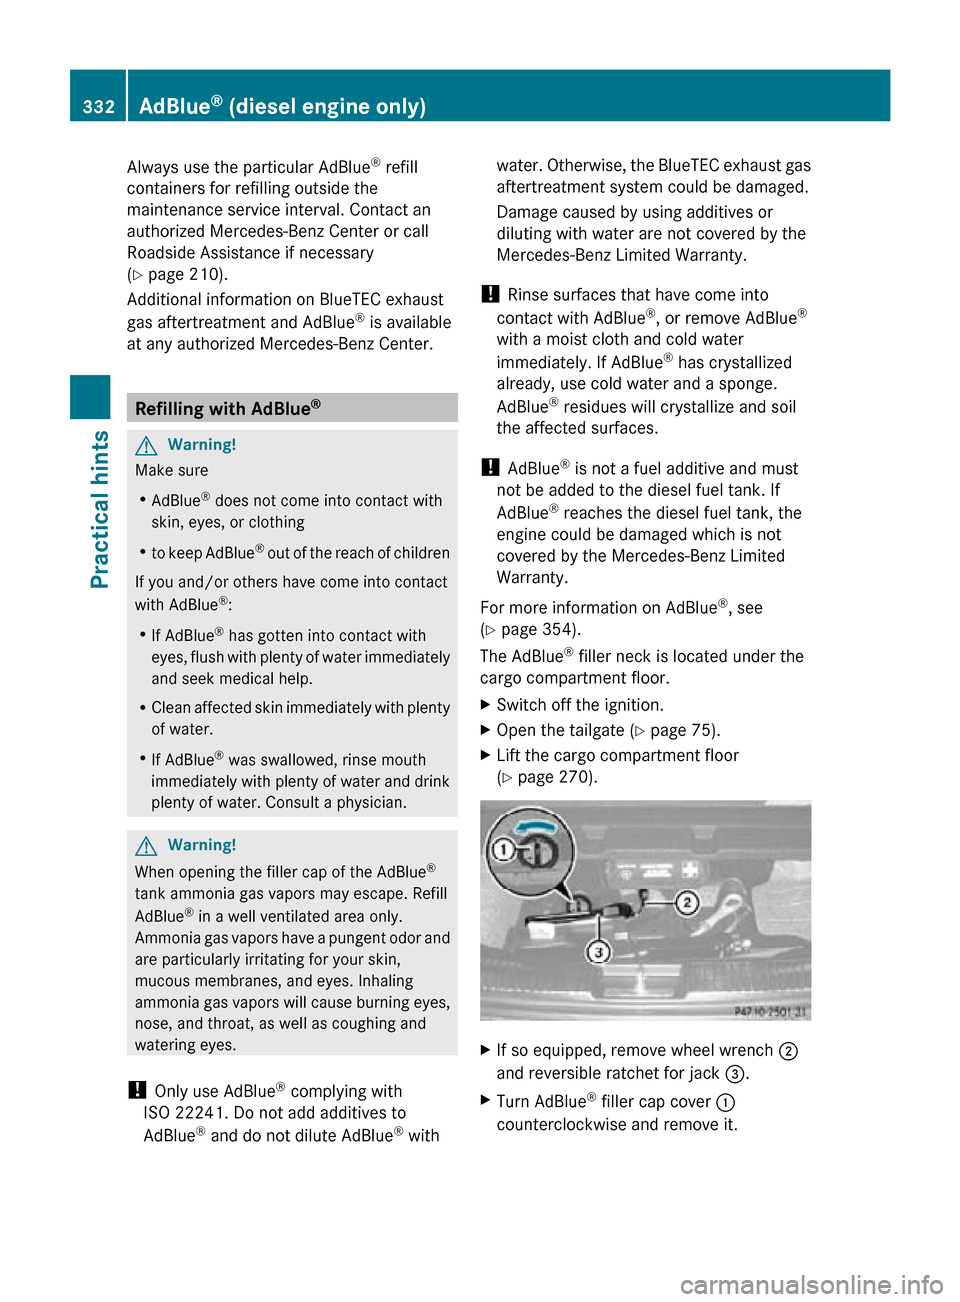
The AdBlue ®
filler neck is located under the
cargo compartment floor.
X Switch off the ignition.
X Open the tailgate ( Y page 75).
X Lift the cargo compartment floor
(Y page 270). X
If so equipped, remove wheel wrench ;
and reversible ratchet for jack =.
X Turn AdBlue ®
filler cap cover :
counterclockwise and remove it. 332
AdBlue ®
(diesel engine only)Practical hints
251_AKB; 4; 52, en-US
d2ureepe, Version: 2.11.8.1 2009-03-23T09:22:52+01:00 - Seite 332
Page 335 of 364
X
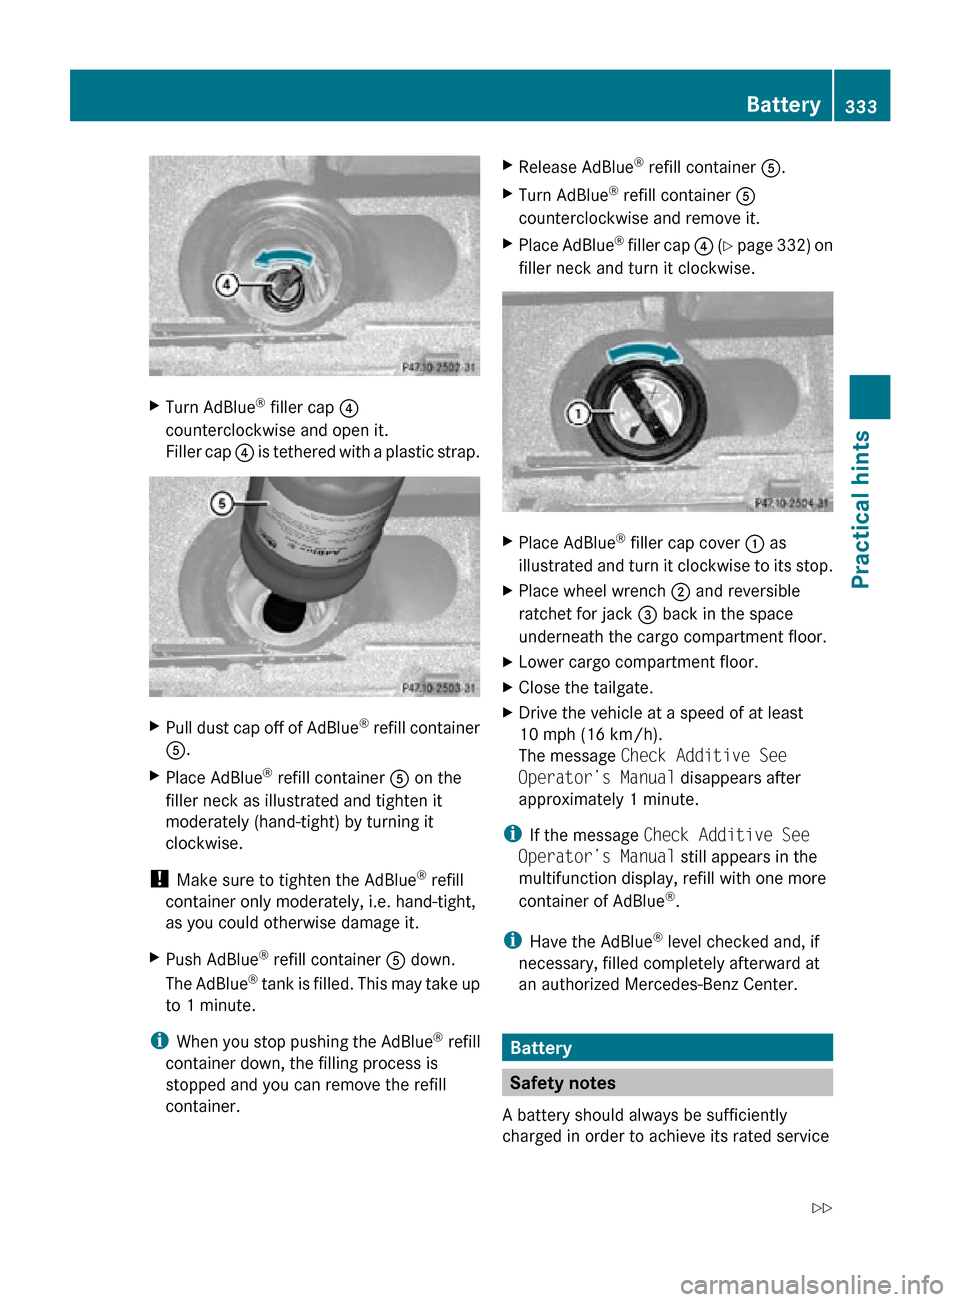
Turn AdBlue ®
filler cap ?
counterclockwise and open it.
Filler cap ? is tethered with a plastic strap. X
Pull dust cap off of AdBlue ®
refill container
A.
X Place AdBlue ®
refill container A on the
filler neck as illustrated and tighten it
moderately (hand-tight) by turning it
clockwise.
! Make sure to tighten the AdBlue ®
refill
container only moderately, i.e. hand-tight,
as you could otherwise damage it.
X Push AdBlue ®
refill container A down.
The AdBlue ®
tank is filled. This may take up
to 1 minute.
i When you stop pushing the AdBlue ®
refill
container down, the filling process is
stopped and you can remove the refill
container. X
Release AdBlue ®
refill container A.
X Turn AdBlue ®
refill container A
counterclockwise and remove it.
X Place AdBlue ®
filler cap ? (Y page 332) on
filler neck and turn it clockwise. X
Place AdBlue ®
filler cap cover : as
illustrated and turn it clockwise to its stop.
X Place wheel wrench ; and reversible
ratchet for jack = back in the space
underneath the cargo compartment floor.
X Lower cargo compartment floor.
X Close the tailgate.
X Drive the vehicle at a speed of at least
10 mph (16 km/h).
The message Check Additive See
Operator’s Manual disappears after
approximately 1 minute.
i If the message Check Additive See
Operator’s Manual still appears in the
multifunction display, refill with one more
container of AdBlue ®
.
i Have the AdBlue ®
level checked and, if
necessary, filled completely afterward at
an authorized Mercedes-Benz Center. Battery
Safety notes
A battery should always be sufficiently
charged in order to achieve its rated service Battery
333Practical hints
251_AKB; 4; 52, en-US
d2ureepe, Version: 2.11.8.1 2009-03-23T09:22:52+01:00 - Seite 333 Z
Page 337 of 364
battery cover is non-removable. Do not
attempt to open the battery as otherwise
the battery will be damaged.
VRLA
batteries do not require topping-up of
the electrolyte level. They cannot be
opened to check the electrolyte level.
However, the battery condition must be
checked periodically by performing a
battery conductance test. Refer to
Maintenance Booklet for battery condition
testing intervals.
The factory-equipped battery may only be
replaced with a battery that
R has the same security features
R is of identical size
R is of identical voltage
R is of identical capacity
! As any other battery, the battery may
discharge if you do not operate the vehicle
for an extended period of time. Have the
battery disconnected at a qualified
workshop or an authorized Mercedes-Benz
Center in such a case. You may also
connect an accessory battery charge unit
expressly approved by Mercedes-Benz for
your vehicle model to maintain the battery
charge. Contact an authorized Mercedes-
Benz Center for further information.
The battery, the battery ventilation hose
and the lateral plug must always be
securely installed when the vehicle is in
operation.
! Never loosen or detach battery terminal
clamps while the engine is running or the
SmartKey is in the starter switch or
KEYLESS-GO button is in position 1.
Otherwise the alternator and other
electronic components could be severely
damaged.
Have the battery checked regularly at an
authorized Mercedes-Benz Center.
Refer to Maintenance Booklet for
maintenance intervals or contact an authorized Mercedes-Benz Center for
further information.
i After battery power was interrupted, do
the following:
R Set the clock
(Y page 133).
Vehicles with COMAND system with
navigation module: Time and date are set
automatically.
R Synchronize the door windows
(Y page 107).
R Synchronize the power tilt/sliding
sunroof (Y page 183).
R Synchronize the power tilt/sliding panel
(Y page 186).
R Synchronize the exterior rear view
mirrors (Y page 96). Charging the battery
G
Warning!
Never charge a battery while still installed in
the vehicle unless the accessory battery
charge unit approved by Mercedes-Benz is
being used. Gases may escape during
charging and could cause an explosion that
may
result in personal injury, paint damage or
corrosion.
An accessory battery charge unit specially
adapted for Mercedes-Benz vehicles and
tested and approved by Mercedes-Benz is
available. It permits the charging of the
battery in its installed position. Contact an
authorized Mercedes-Benz Center for
information and availability.
Charge battery in accordance with the
separate instructions for the accessory
battery charger.
Have the battery charged at an authorized
Mercedes-Benz Center. If you charge the
battery yourself, follow the operating
instructions for your charging device. Battery
335
Practical hints
251_AKB; 4; 52, en-US
d2ureepe, Version: 2.11.8.1 2009-03-23T09:22:52+01:00 - Seite 335 Z
Page 341 of 364
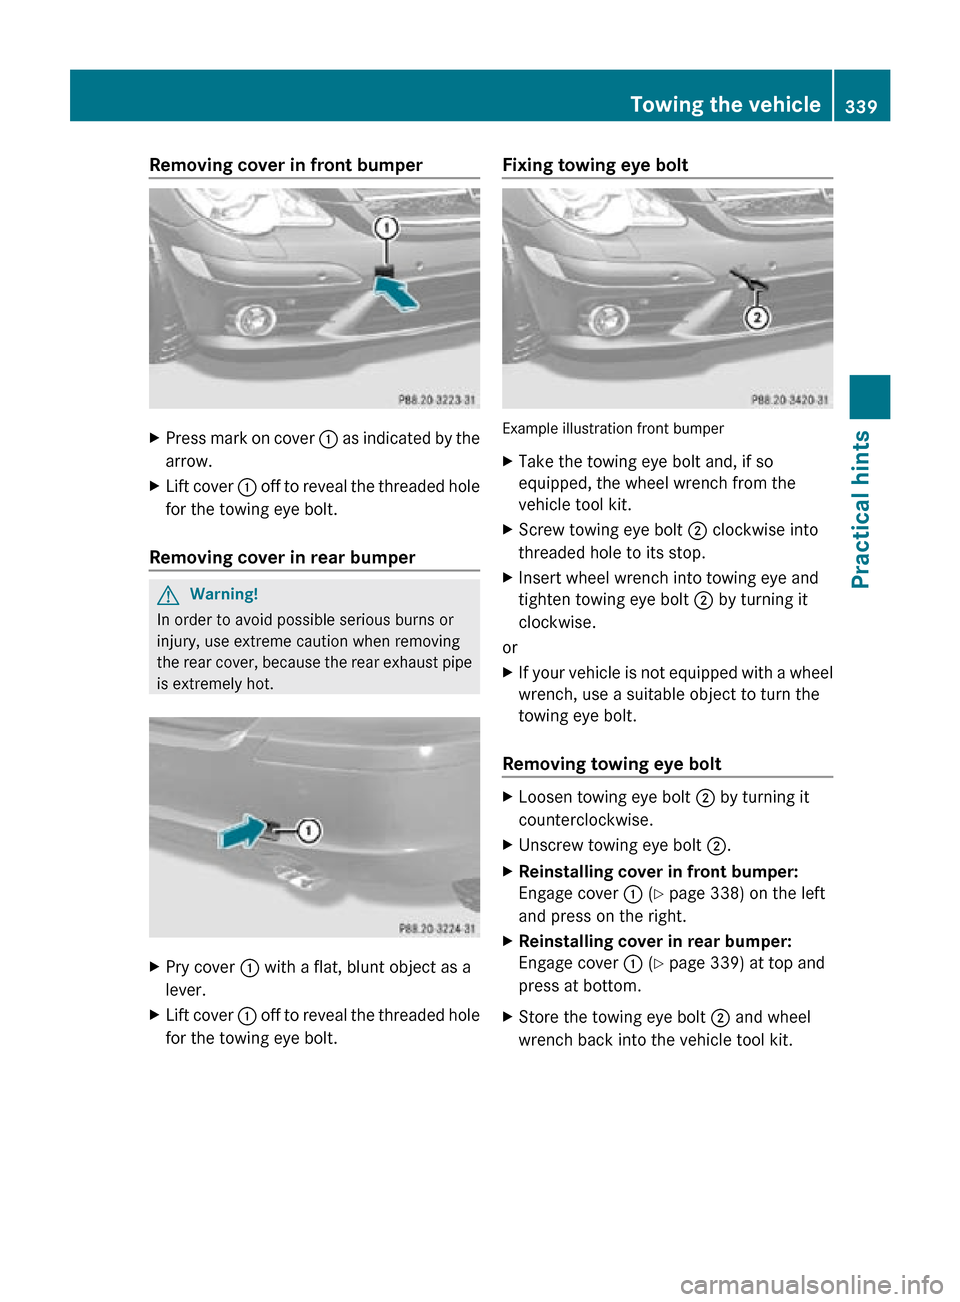
Removing cover in front bumper
X
Press mark on cover : as indicated by the
arrow.
X Lift cover : off to reveal the threaded hole
for the towing eye bolt.
Removing cover in rear bumper G
Warning!
In order to avoid possible serious burns or
injury, use extreme caution when removing
the rear cover, because the rear exhaust pipe
is extremely hot. X
Pry cover : with a flat, blunt object as a
lever.
X Lift cover : off to reveal the threaded hole
for the towing eye bolt. Fixing towing eye bolt
Example illustration front bumper
X
Take the towing eye bolt and, if so
equipped, the wheel wrench from the
vehicle tool kit.
X Screw towing eye bolt ; clockwise into
threaded hole to its stop.
X Insert wheel wrench into towing eye and
tighten towing eye bolt ; by turning it
clockwise.
or
X If your vehicle is not equipped with a wheel
wrench, use a suitable object to turn the
towing eye bolt.
Removing towing eye bolt X
Loosen towing eye bolt ; by turning it
counterclockwise.
X Unscrew towing eye bolt ;.
X Reinstalling cover in front bumper:
Engage cover : (Y page 338) on the left
and press on the right.
X Reinstalling cover in rear bumper:
Engage cover : (Y page 339) at top and
press at bottom.
X Store the towing eye bolt ; and wheel
wrench back into the vehicle tool kit. Towing the vehicle
339Practical hints
251_AKB; 4; 52, en-US
d2ureepe, Version: 2.11.8.1 2009-03-23T09:22:52+01:00 - Seite 339 Z