Page 305 of 364

i
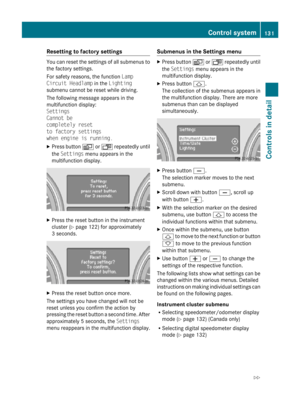
After 60 seconds with an unfastened seat belt the warning chime stops sounding and the
seat belt telltale illuminates continuously. The seat belt telltale will only go out if both, the
driver and front passenger’s seat belt are fastened, or the vehicle is standing still and a front
door is opened. Problem
Possible causes/consequences and
X Solutions+
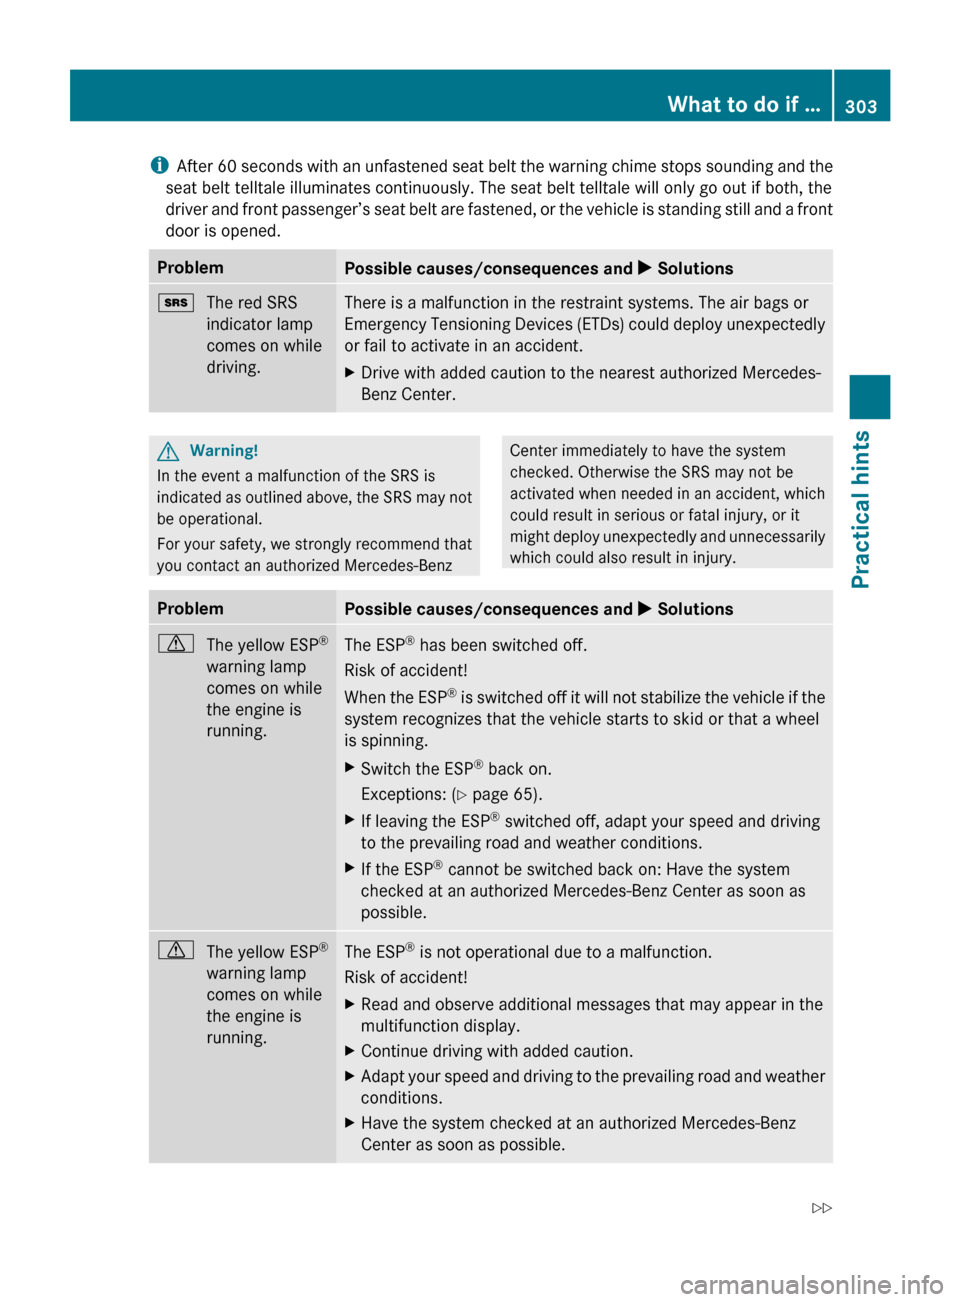
The red SRS
indicator lamp
comes on while
driving. There is a malfunction in the restraint systems. The air bags or
Emergency
Tensioning Devices (ETDs) could deploy unexpectedly
or fail to activate in an accident.
X Drive with added caution to the nearest authorized Mercedes-
Benz Center. G
Warning!
In the event a malfunction of the SRS is
indicated
as outlined above, the SRS may not
be operational.
For your safety, we strongly recommend that
you contact an authorized Mercedes-Benz Center immediately to have the system
checked. Otherwise the SRS may not be
activated
when needed in an accident, which
could result in serious or fatal injury, or it
might deploy unexpectedly and unnecessarily
which could also result in injury. Problem
Possible causes/consequences and
X Solutionsd
The yellow ESP ®
warning lamp
comes on while
the engine is
running. The ESP
®
has been switched off.
Risk of accident!
When
the ESP ®
is switched off it will not stabilize the vehicle if the
system recognizes that the vehicle starts to skid or that a wheel
is spinning.
X Switch the ESP ®
back on.
Exceptions:
(Y page 65).
X If leaving the ESP ®
switched off, adapt your speed and driving
to the prevailing road and weather conditions.
X If the ESP ®
cannot be switched back on: Have the system
checked at an authorized Mercedes-Benz Center as soon as
possible. d
The yellow ESP ®
warning lamp
comes on while
the engine is
running. The ESP
®
is not operational due to a malfunction.
Risk of accident!
X Read and observe additional messages that may appear in the
multifunction display.
X Continue driving with added caution.
X Adapt your speed and driving to the prevailing road and weather
conditions.
X Have the system checked at an authorized Mercedes-Benz
Center as soon as possible. What to do if …
303
Practical hints
251_AKB; 4; 52, en-US
d2ureepe, Version: 2.11.8.1 2009-03-23T09:22:52+01:00 - Seite 303 Z
Page 306 of 364

Problem
Possible causes/consequences and
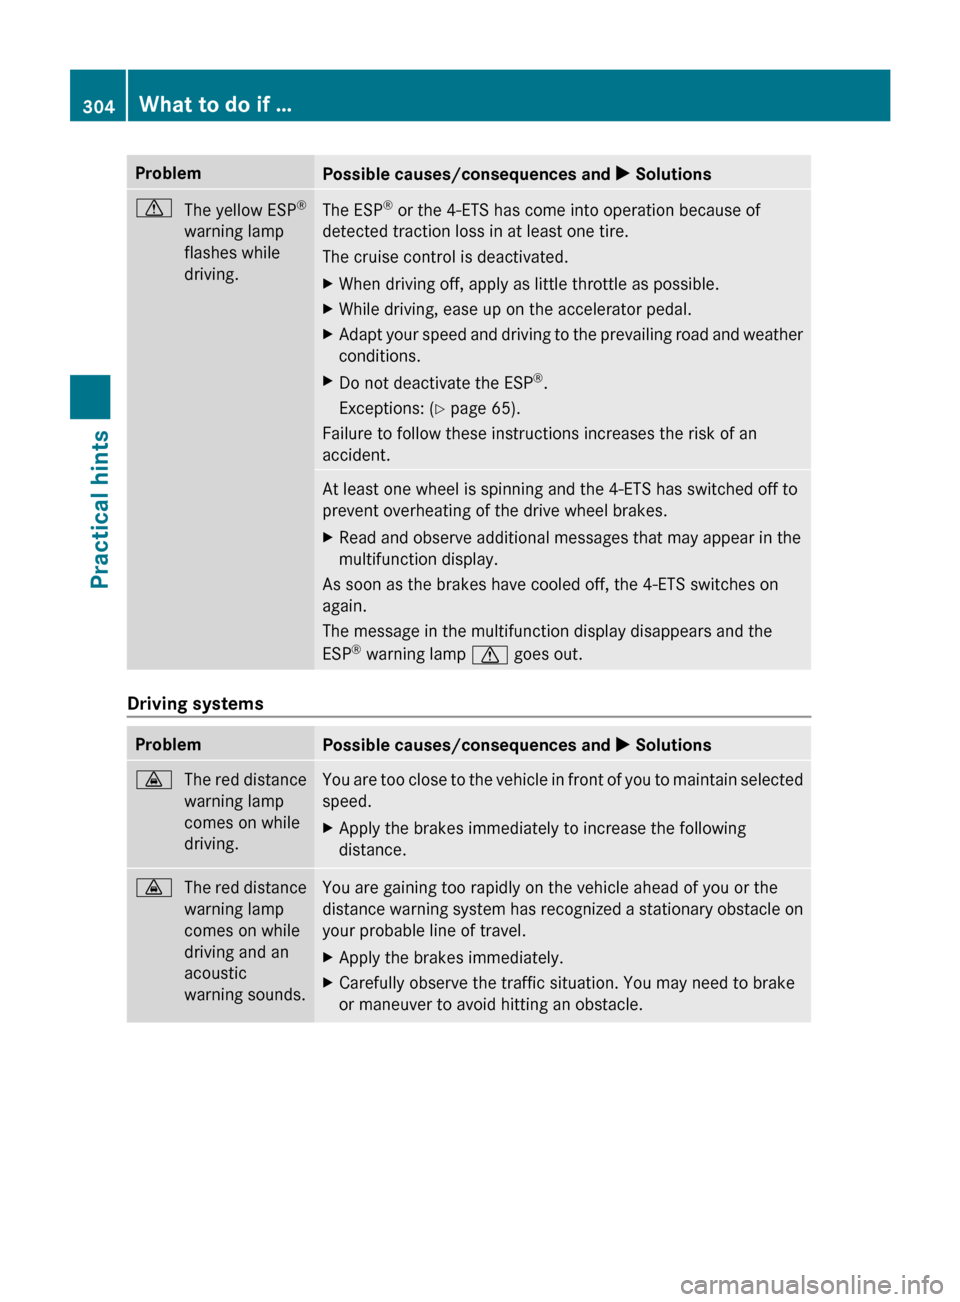
X Solutionsd
The yellow ESP ®
warning lamp
flashes while
driving. The ESP
®
or the 4-ETS has come into operation because of
detected traction loss in at least one tire.
The cruise control is deactivated.
X When driving off, apply as little throttle as possible.
X While driving, ease up on the accelerator pedal.
X Adapt your speed and driving to the prevailing road and weather
conditions.
X Do not deactivate the ESP ®
.
Exceptions: (Y page 65).
Failure to follow these instructions increases the risk of an
accident. At least one wheel is spinning and the 4-ETS has switched off to
prevent overheating of the drive wheel brakes.
X
Read and observe additional messages that may appear in the
multifunction display.
As soon as the brakes have cooled off, the 4-ETS switches on
again.
The message in the multifunction display disappears and the
ESP ®
warning lamp d goes out. Driving systems
Problem
Possible causes/consequences and
X Solutions·
The red distance
warning lamp
comes on while
driving. You are too close to the vehicle in front of you to maintain selected
speed.
X
Apply the brakes immediately to increase the following
distance. ·
The red distance
warning lamp
comes on while
driving and an
acoustic
warning sounds. You are gaining too rapidly on the vehicle ahead of you or the
distance
warning system has recognized a stationary obstacle on
your probable line of travel.
X Apply the brakes immediately.
X Carefully observe the traffic situation. You may need to brake
or maneuver to avoid hitting an obstacle. 304
What to do if …
Practical hints
251_AKB; 4; 52, en-US
d2ureepe,
Version: 2.11.8.1 2009-03-23T09:22:52+01:00 - Seite 304
Page 307 of 364

Vehicle
Problem
Possible causes/consequences and
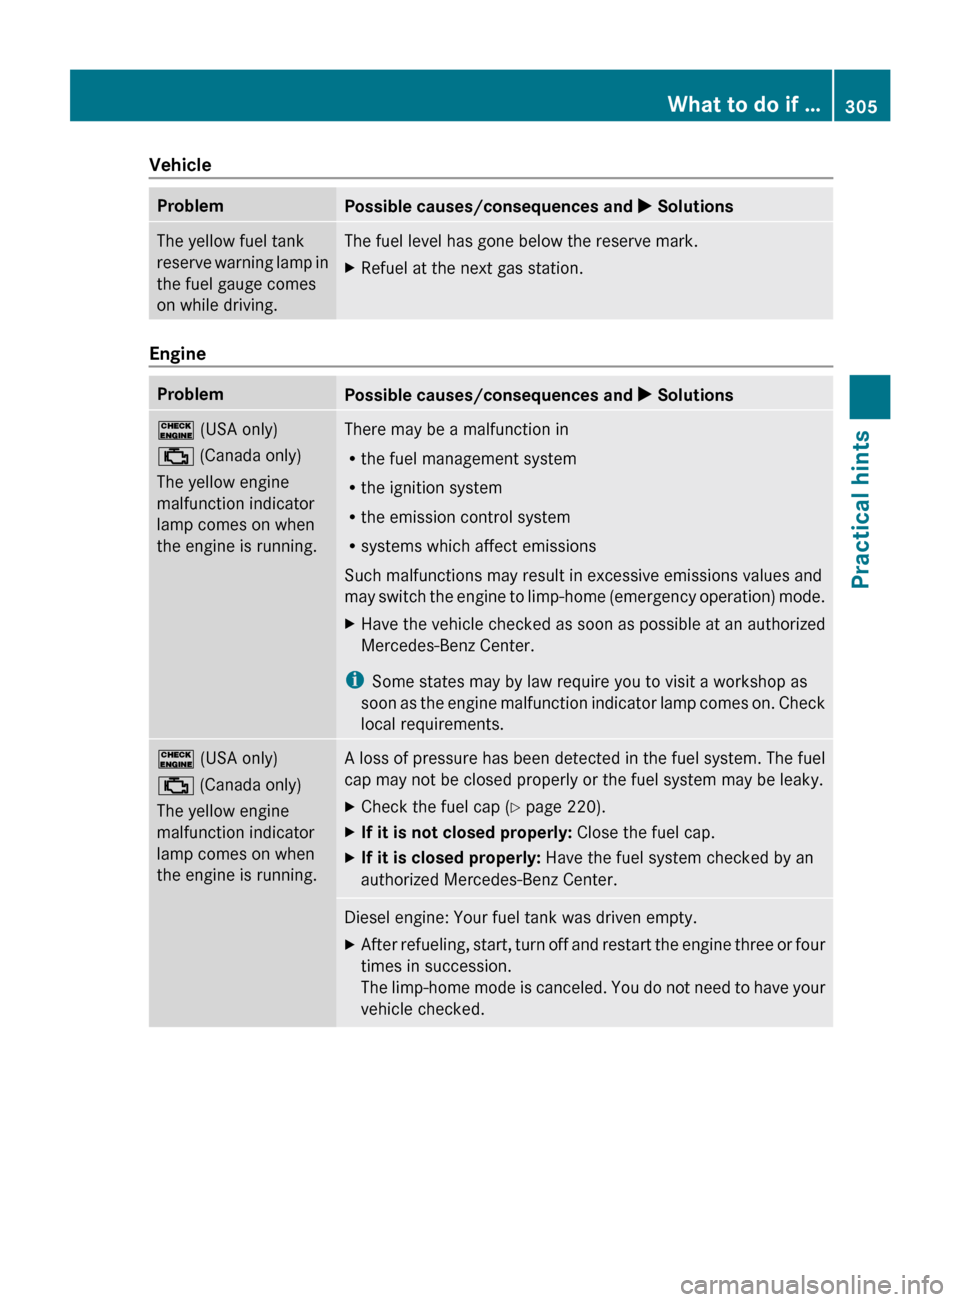
X SolutionsThe yellow fuel tank
reserve
warning lamp in
the fuel gauge comes
on while driving. The fuel level has gone below the reserve mark.
X
Refuel at the next gas station. Engine
Problem
Possible causes/consequences and
X Solutions! (USA only)
; (Canada only)
The yellow engine
malfunction indicator
lamp comes on when
the engine is running. There may be a malfunction in
R
the fuel management system
R the ignition system
R the emission control system
R systems which affect emissions
Such malfunctions may result in excessive emissions values and
may
switch the engine to limp-home (emergency operation) mode.
X Have the vehicle checked as soon as possible at an authorized
Mercedes-Benz Center.
i Some states may by law require you to visit a workshop as
soon
as the engine malfunction indicator lamp comes on. Check
local requirements. ! (USA only)
; (Canada only)
The yellow engine
malfunction indicator
lamp comes on when
the engine is running. A loss of pressure has been detected in the fuel system. The fuel
cap may not be closed properly or the fuel system may be leaky.
X
Check the fuel cap ( Y page 220).
X If it is not closed properly: Close the fuel cap.
X If it is closed properly: Have the fuel system checked by an
authorized Mercedes-Benz Center. Diesel engine: Your fuel tank was driven empty.
X
After refueling, start, turn off and restart the engine three or four
times in succession.
The
limp-home mode is canceled. You do not need to have your
vehicle checked. What to do if …
305
Practical hints
251_AKB; 4; 52, en-US
d2ureepe, Version: 2.11.8.1 2009-03-23T09:22:52+01:00 - Seite 305 Z
Page 308 of 364

Tires
Problem
Possible causes/consequences and
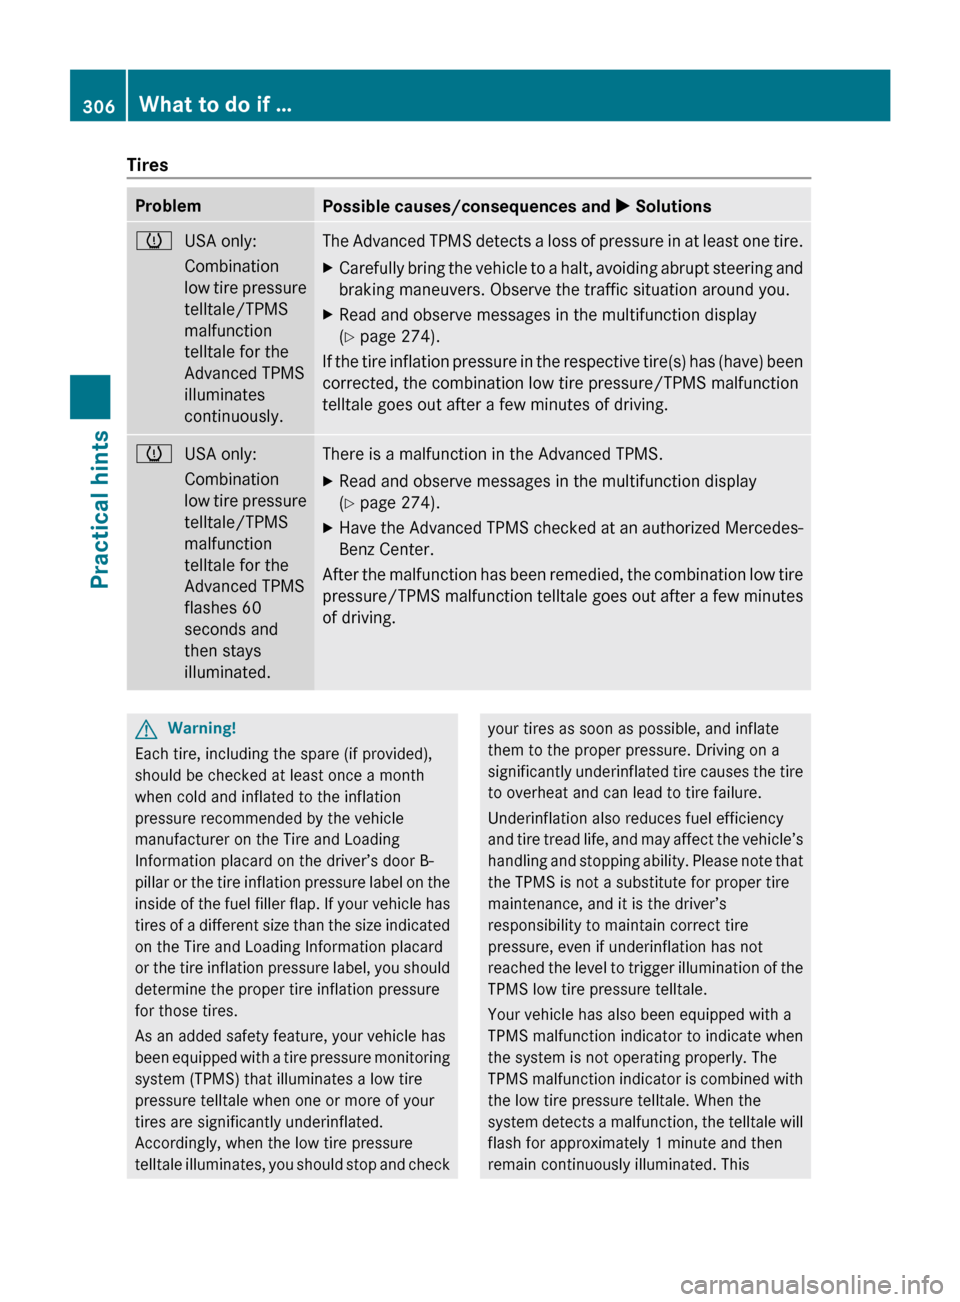
X Solutionsh
USA only:
Combination
low
tire pressure
telltale/TPMS
malfunction
telltale for the
Advanced TPMS
illuminates
continuously. The Advanced TPMS detects a loss of pressure in at least one tire.
X
Carefully bring the vehicle to a halt, avoiding abrupt steering and
braking maneuvers. Observe the traffic situation around you.
X Read and observe messages in the multifunction display
(Y page 274).
If the tire inflation pressure in the respective tire(s) has (have) been
corrected, the combination low tire pressure/TPMS malfunction
telltale goes out after a few minutes of driving. h
USA only:
Combination
low
tire pressure
telltale/TPMS
malfunction
telltale for the
Advanced TPMS
flashes 60
seconds and
then stays
illuminated. There is a malfunction in the Advanced TPMS.
X
Read and observe messages in the multifunction display
(Y page 274).
X Have the Advanced TPMS checked at an authorized Mercedes-
Benz Center.
After the malfunction has been remedied, the combination low tire
pressure/TPMS
malfunction telltale goes out after a few minutes
of driving. G
Warning!
Each tire, including the spare (if provided),
should be checked at least once a month
when cold and inflated to the inflation
pressure recommended by the vehicle
manufacturer on the Tire and Loading
Information placard on the driver’s door B-
pillar
or the tire inflation pressure label on the
inside of the fuel filler flap. If your vehicle has
tires of a different size than the size indicated
on the Tire and Loading Information placard
or the tire inflation pressure label, you should
determine the proper tire inflation pressure
for those tires.
As an added safety feature, your vehicle has
been equipped with a tire pressure monitoring
system (TPMS) that illuminates a low tire
pressure telltale when one or more of your
tires are significantly underinflated.
Accordingly, when the low tire pressure
telltale illuminates, you should stop and check your tires as soon as possible, and inflate
them to the proper pressure. Driving on a
significantly
underinflated tire causes the tire
to overheat and can lead to tire failure.
Underinflation also reduces fuel efficiency
and tire tread life, and may affect the vehicle’s
handling and stopping ability. Please note that
the TPMS is not a substitute for proper tire
maintenance, and it is the driver’s
responsibility to maintain correct tire
pressure, even if underinflation has not
reached the level to trigger illumination of the
TPMS low tire pressure telltale.
Your vehicle has also been equipped with a
TPMS malfunction indicator to indicate when
the system is not operating properly. The
TPMS malfunction indicator is combined with
the low tire pressure telltale. When the
system detects a malfunction, the telltale will
flash for approximately 1 minute and then
remain continuously illuminated. This 306
What to do if …
Practical hints
251_AKB; 4; 52, en-US
d2ureepe,
Version: 2.11.8.1 2009-03-23T09:22:52+01:00 - Seite 306
Page 309 of 364

sequence will continue upon subsequent
vehicle start-ups as long as the malfunction
exists. When the malfunction indicator is
illuminated, the system may not be able to
detect
or signal low tire pressure as intended.
TPMS malfunctions may occur for a variety of
reasons, including the installation of
incompatible replacement or alternate tires or wheels on the vehicle that prevent the
TPMS from functioning properly. Always
check the TPMS malfunction telltale after
replacing
one or more tires or wheels on your
vehicle to ensure that the replacement or
alternate tires and wheels allow the TPMS to
continue to function properly. Lamp in center console
Problem
Possible causes/consequences and
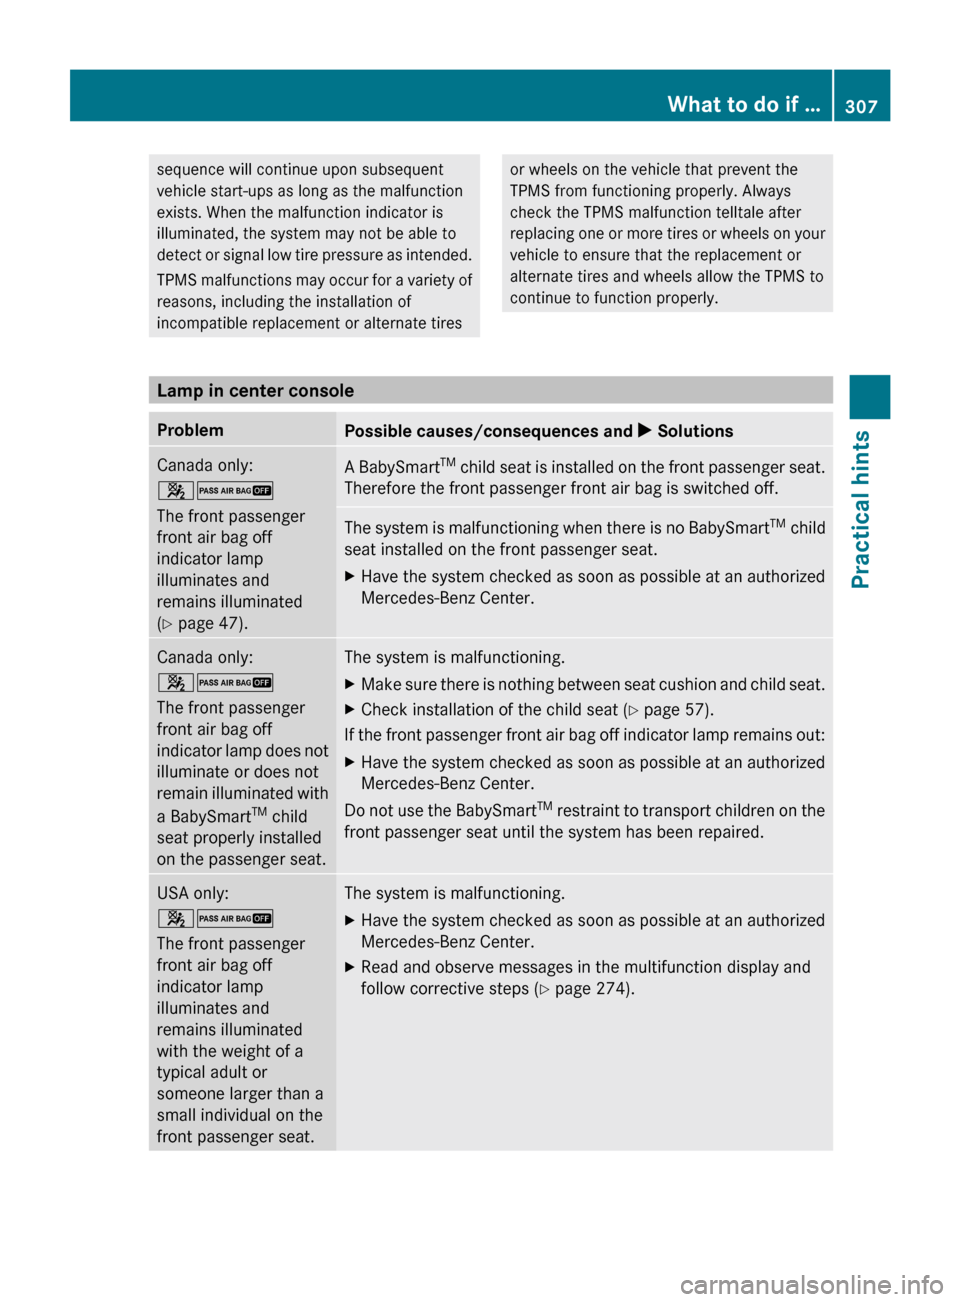
X SolutionsCanada only:
42
The front passenger
front air bag off
indicator lamp
illuminates and
remains illuminated
(Y page 47).
A BabySmart
TM
child seat is installed on the front passenger seat.
Therefore the front passenger front air bag is switched off. The system is malfunctioning when there is no BabySmart
TM
child
seat installed on the front passenger seat.
X Have the system checked as soon as possible at an authorized
Mercedes-Benz Center. Canada only:
42
The front passenger
front air bag off
indicator
lamp does not
illuminate or does not
remain illuminated with
a BabySmart TM
child
seat properly installed
on the passenger seat. The system is malfunctioning.
X
Make sure there is nothing between seat cushion and child seat.
X Check installation of the child seat ( Y page 57).
If the front passenger front air bag off indicator lamp remains out:
X Have the system checked as soon as possible at an authorized
Mercedes-Benz Center.
Do not use the BabySmart TM
restraint to transport children on the
front passenger seat until the system has been repaired. USA only:
42
The front passenger
front air bag off
indicator lamp
illuminates and
remains illuminated
with the weight of a
typical adult or
someone larger than a
small individual on the
front passenger seat. The system is malfunctioning.
X
Have the system checked as soon as possible at an authorized
Mercedes-Benz Center.
X Read and observe messages in the multifunction display and
follow corrective steps (Y page 274). What to do if …
307
Practical hints
251_AKB; 4; 52, en-US
d2ureepe, Version: 2.11.8.1 2009-03-23T09:22:52+01:00 - Seite 307 Z
Page 310 of 364

G
Warning!
If the 42 indicator lamp
illuminates and remains illuminated with the
weight of a typical adult or someone larger than a small individual on the front passenger
seat, do not have any passenger use the front
passenger seat until the system has been
repaired.
Problem
Possible causes/consequences and
X SolutionsUSA only:
42
The front passenger
front air bag off
indicator lamp does not
illuminate and/or does
not remain illuminated
with the weight of a
typical 12-month-old
child in a standard child
restraint or less on the
front passenger seat. The system is malfunctioning.
X
Make sure there is nothing between seat cushion and child seat
and check installation of the child seat.
X Make sure no objects applying supplemental weight onto the
seat are present.
X Make sure no objects which apply forces to the seat are present
(e.g. objects such as books, briefcases etc. lodged behind or
around the seat, head restraints pushing against roof etc.). The
system may recognize such forces as supplemental weight.
X If the front passenger front air bag off indicator lamp remains
out, have the system checked as soon as possible at an
authorized Mercedes-Benz Center. Do not transport a child on
the front passenger seat until the system has been repaired.
X Read and observe messages in the multifunction display and
follow corrective steps (Y page 274). G
Warning!
If the 42 indicator lamp does not
illuminate or remains out with the weight of a
typical 12-month-old child in a standard child
restraint or less on the front passenger seat,
do not transport a child on the front
passenger seat until the system has been
repaired. Unlocking/locking manually
Unlocking the vehicle
If you cannot unlock the vehicle with the
SmartKey or with KEYLESS-GO, unlock the
driver’s door using the mechanical key.
The anti-theft alarm system will trigger when
you
R unlocking the driver’s door with the
mechanical key and
R open the driver’s door
To cancel the alarm, insert the SmartKey into
the starter switch.
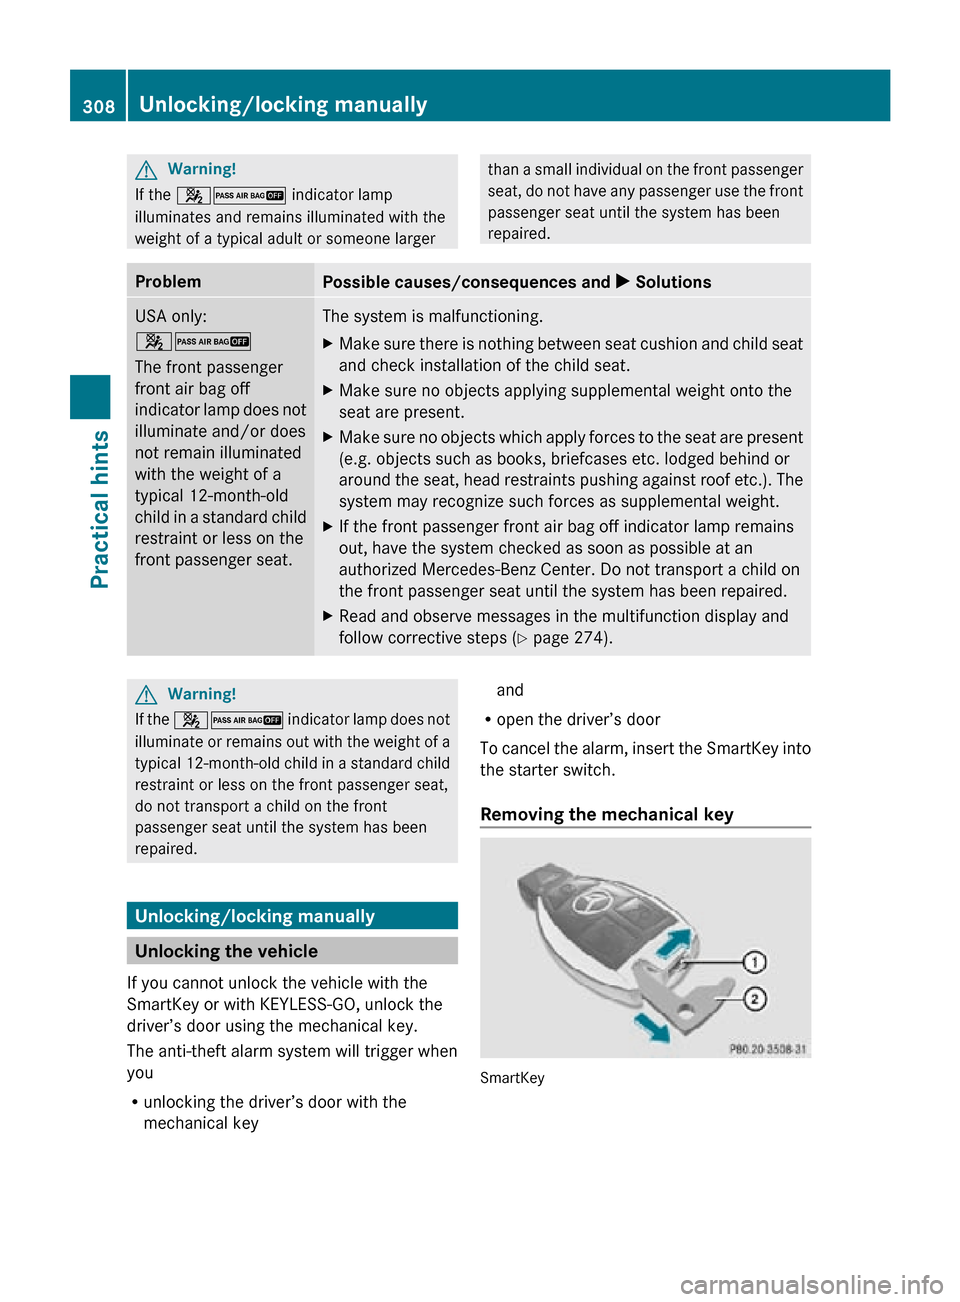
Removing the mechanical key SmartKey308
Unlocking/locking manuallyPractical hints
251_AKB; 4; 52, en-US
d2ureepe,
Version: 2.11.8.1 2009-03-23T09:22:52+01:00 - Seite 308
Page 311 of 364

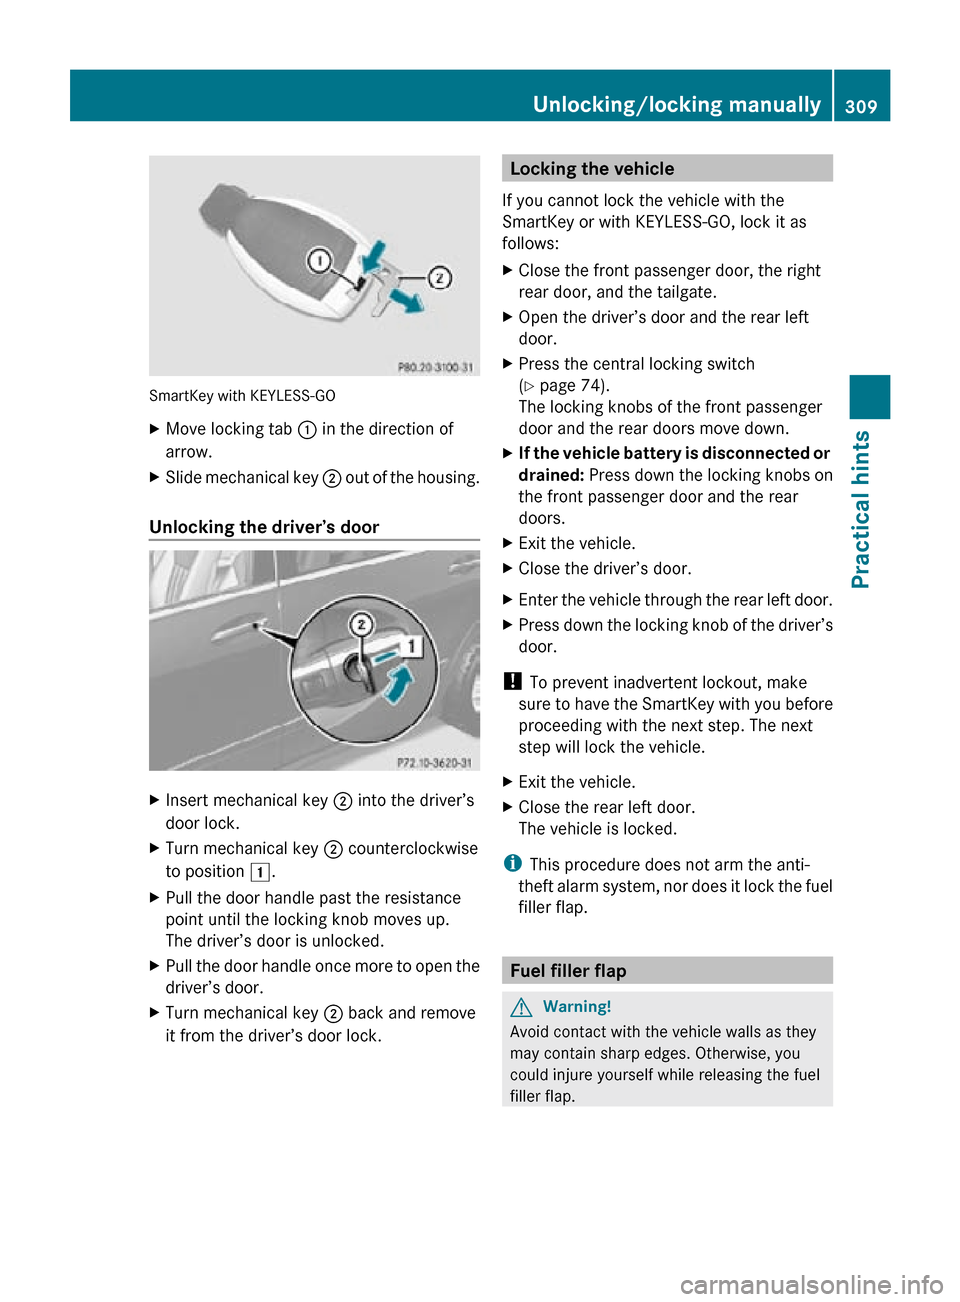
SmartKey with KEYLESS-GO
X
Move locking tab : in the direction of
arrow.
X Slide mechanical key ; out of the housing.
Unlocking the driver’s door X
Insert mechanical key ; into the driver’s
door lock.
X Turn mechanical key ; counterclockwise
to position 1.
X Pull the door handle past the resistance
point until the locking knob moves up.
The driver’s door is unlocked.
X Pull the door handle once more to open the
driver’s door.
X Turn mechanical key ; back and remove
it from the driver’s door lock. Locking the vehicle
If you cannot lock the vehicle with the
SmartKey or with KEYLESS-GO, lock it as
follows:
X Close the front passenger door, the right
rear door, and the tailgate.
X Open the driver’s door and the rear left
door.
X Press the central locking switch
(Y page 74).
The locking knobs of the front passenger
door and the rear doors move down.
X If the vehicle battery is disconnected or
drained: Press down the locking knobs on
the front passenger door and the rear
doors.
X Exit the vehicle.
X Close the driver’s door.
X Enter the vehicle through the rear left door.
X Press down the locking knob of the driver’s
door.
! To prevent inadvertent lockout, make
sure to have the SmartKey with you before
proceeding with the next step. The next
step will lock the vehicle.
X Exit the vehicle.
X Close the rear left door.
The vehicle is locked.
i This procedure does not arm the anti-
theft alarm system, nor does it lock the fuel
filler flap. Fuel filler flap
G
Warning!
Avoid contact with the vehicle walls as they
may contain sharp edges. Otherwise, you
could injure yourself while releasing the fuel
filler flap. Unlocking/locking manually
309Practical hints
251_AKB; 4; 52, en-US
d2ureepe, Version: 2.11.8.1 2009-03-23T09:22:52+01:00 - Seite 309 Z
Page 312 of 364

In case the central locking system does not
release the fuel filler flap, you can open it
manually.
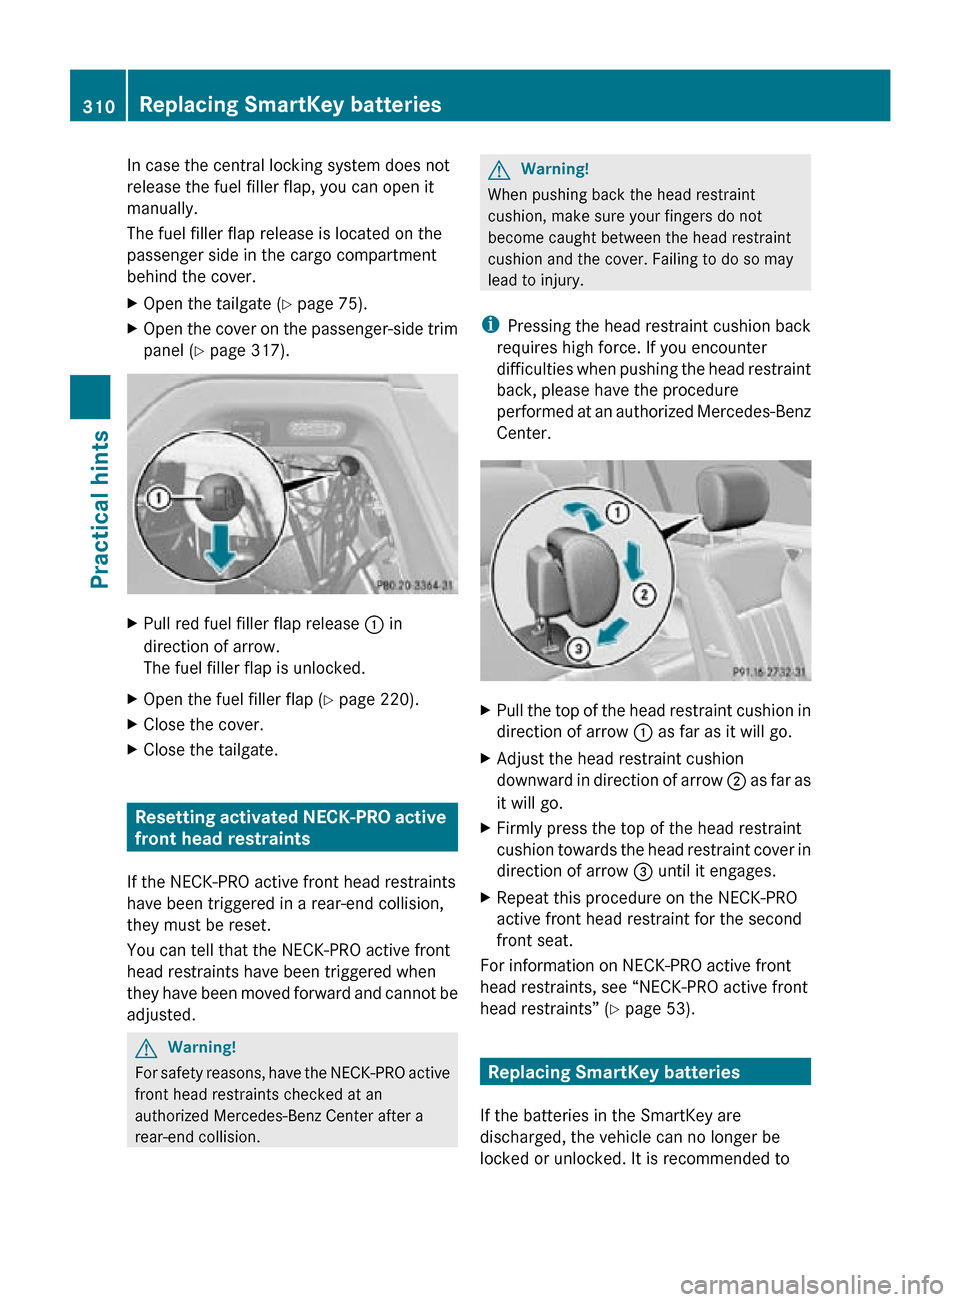
The fuel filler flap release is located on the
passenger side in the cargo compartment
behind the cover.
X
Open the tailgate ( Y page 75).
X Open the cover on the passenger-side trim
panel ( Y page 317). X
Pull red fuel filler flap release : in
direction of arrow.
The fuel filler flap is unlocked.
X Open the fuel filler flap ( Y page 220).
X Close the cover.
X Close the tailgate. Resetting activated NECK-PRO active
front head restraints
If the NECK-PRO active front head restraints
have been triggered in a rear-end collision,
they must be reset.
You can tell that the NECK-PRO active front
head restraints have been triggered when
they have been moved forward and cannot be
adjusted. G
Warning!
For safety reasons, have the NECK-PRO active
front head restraints checked at an
authorized Mercedes-Benz Center after a
rear-end collision. G
Warning!
When pushing back the head restraint
cushion, make sure your fingers do not
become caught between the head restraint
cushion and the cover. Failing to do so may
lead to injury.
i Pressing the head restraint cushion back
requires high force. If you encounter
difficulties when pushing the head restraint
back, please have the procedure
performed at an authorized Mercedes-Benz
Center. X
Pull the top of the head restraint cushion in
direction of arrow : as far as it will go.
X Adjust the head restraint cushion
downward in direction of arrow ; as far as
it will go.
X Firmly press the top of the head restraint
cushion towards the head restraint cover in
direction of arrow = until it engages.
X Repeat this procedure on the NECK-PRO
active front head restraint for the second
front seat.
For information on NECK-PRO active front
head restraints, see “NECK-PRO active front
head restraints” ( Y page 53). Replacing SmartKey batteries
If the batteries in the SmartKey are
discharged, the vehicle can no longer be
locked or unlocked. It is recommended to 310
Replacing SmartKey batteriesPractical hints
251_AKB; 4; 52, en-US
d2ureepe,
Version: 2.11.8.1 2009-03-23T09:22:52+01:00 - Seite 310