2010 MERCEDES-BENZ R320 parking brake
[x] Cancel search: parking brakePage 120 of 364
Shifting into reverse gear R
X
With the vehicle at a standstill, depress the
brake pedal.
X Move the gear selector lever up past the
resistance point.
Shifting into drive position D X
With the vehicle at a standstill, depress the
brake pedal.
X Move the gear selector lever down past the
resistance point. Shifting procedure
The automatic transmission selects individual
gears automatically, depending on
R the selected gear range ( Y page 119)
R the selected program mode C/S
(Y page 120)
R the position of the accelerator pedal
R the vehicle speed
With drive position D selected, you can
influence transmission shifting by limiting or
extending the gear range. Transmission positions
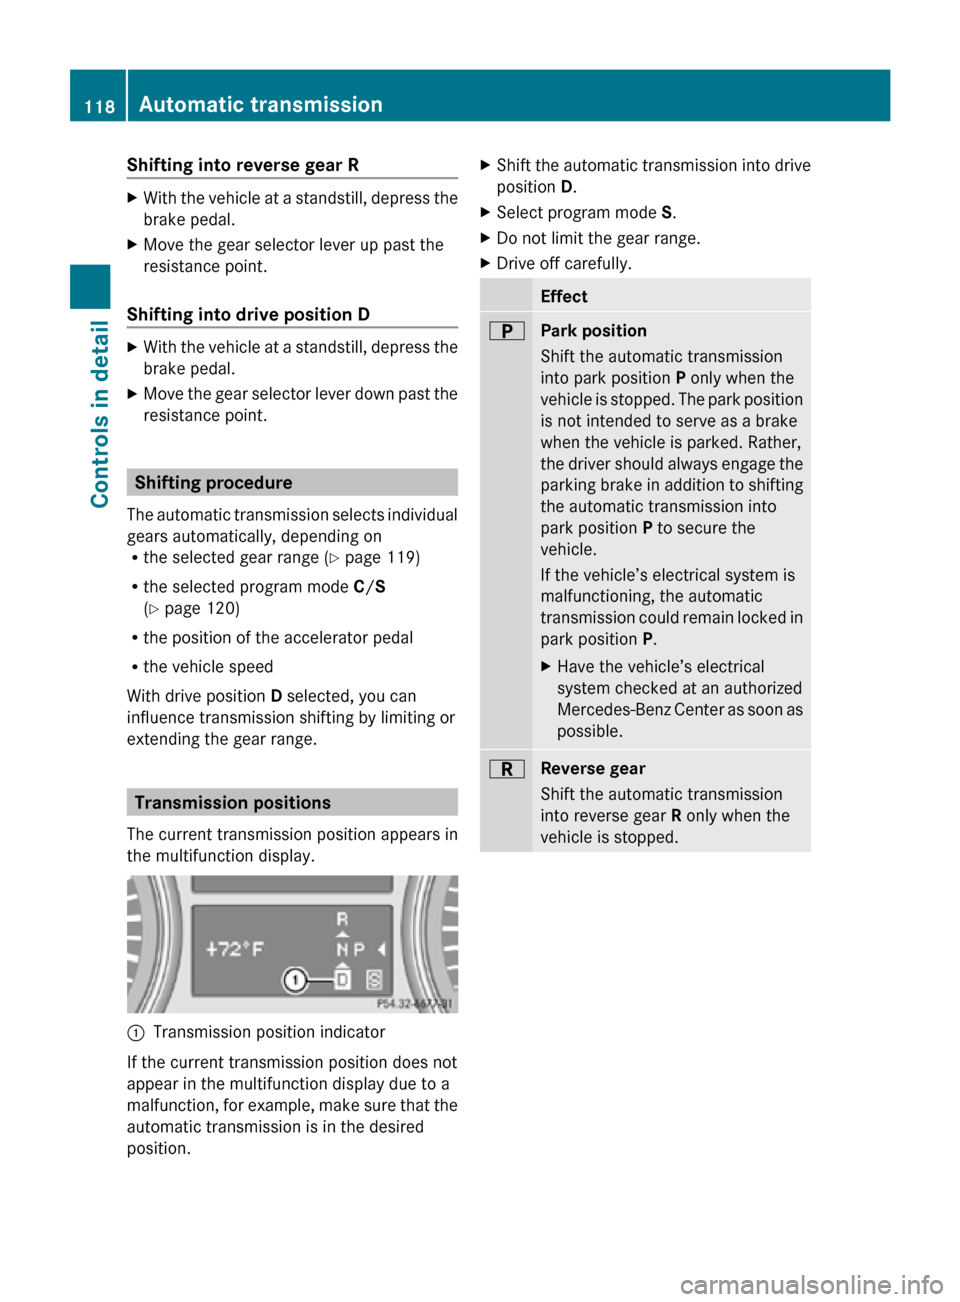
The current transmission position appears in
the multifunction display. :
Transmission position indicator
If the current transmission position does not
appear in the multifunction display due to a
malfunction, for example, make sure that the
automatic transmission is in the desired
position. X
Shift the automatic transmission into drive
position D.
X Select program mode S.
X Do not limit the gear range.
X Drive off carefully. Effect
B
Park position
Shift the automatic transmission
into park position P only when the
vehicle is stopped. The park position
is not intended to serve as a brake
when the vehicle is parked. Rather,
the driver should always engage the
parking brake in addition to shifting
the automatic transmission into
park position P to secure the
vehicle.
If the vehicle’s electrical system is
malfunctioning, the automatic
transmission could remain locked in
park position P.
X
Have the vehicle’s electrical
system checked at an authorized
Mercedes-Benz Center as soon as
possible. C
Reverse gear
Shift the automatic transmission
into reverse gear R only when the
vehicle is stopped.118
Automatic transmissionControls in detail
251_AKB; 4; 52, en-US
d2ureepe,
Version: 2.11.8.1 2009-03-23T09:22:52+01:00 - Seite 118
Page 121 of 364
Effect
A
Neutral position
No power is transmitted from the
engine to the drive axle. When the
brakes
are released, the vehicle can
be moved freely (pushed or towed).
To avoid damage to the
transmission, never shift the
automatic transmission into neutral
position N while driving.
Exception: If the ESP ®
is switched
off or malfunctioning, shift the
automatic transmission into neutral
position N if the vehicle is in danger
of skidding.
! Coasting the vehicle, or driving
for any other reason with the
automatic transmission in neutral
position N can result in
transmission damage that is not
covered by the Mercedes-Benz
Limited Warranty. 7
Drive position
The automatic transmission shifts
automatically. All forward gears are
available.
Driving tips
Kickdown Use the kickdown when you want maximum
acceleration.
X
U.S. vehicles: Fully depress the
accelerator pedal.
Depending on the engine speed the
automatic transmission shifts into a lower
gear.
X Canada vehicles:
Depress the accelerator
pedal past the point of resistance.
Depending on the engine speed the
automatic transmission shifts into a lower
gear. Rocking the vehicle Rocking the vehicle by shifting the automatic
transmission directly between drive position
D and reverse gear
R can help free a vehicle
stuck in mud or snow. The engine control
system of this vehicle electronically limits
directly shifting the automatic transmission
between drive position D and reverse gear R
to
very low speeds, i.e. approximately 5 mph
(9 km/h). To shift the automatic transmission
directly between drive position D and reverse
gear R, move the gear selector lever up or
down past the resistance point.
Working on the vehicle G
Warning!
When working on the vehicle, engage the
parking brake and shift the automatic
transmission into park position P. Otherwise
the
vehicle could roll away which could result
in an accident and/or serious personal injury.
Towing a trailer X
When you tow a trailer, shift into a lower
gear range manually if the automatic
transmission hunts between gears on
inclines.
A
lower gear range and reduction of speed
reduces the potential to overload or to
overheat the engine.
For more information on trailer towing, see
“Trailer towing”
(Y page 256). Gear ranges
With the automatic transmission in drive
position D, you can limit or extend the gear
range, see “One-touch gearshifting”
(Y page 120). Automatic transmission
119
Controls in detail
251_AKB; 4; 52, en-US
d2ureepe, Version: 2.11.8.1 2009-03-23T09:22:52+01:00 - Seite 119 Z
Page 124 of 364

Transfer case
The vehicle is equipped with all-wheel drive
(4MATIC). Both the front and rear axles are
powered at all times when the vehicle is being
operated.
! Only conduct operational or performance
tests on a two-axle dynamometer. If such
tests are necessary, contact an authorized
Mercedes-Benz Center. You could
otherwise seriously damage the brake
system or the transfer case which is not
covered by the Mercedes-Benz Limited
Warranty.
! Because the ESP ®
operates
automatically, the engine and ignition must
be shut off (SmartKey in starter switch
position 0 or 1 or KEYLESS-GO start/stop
button in position 0 or 1) when the parking
brake is being tested on a brake test
dynamometer. Such testing should be no
longer than 10 seconds.
Active braking action through the ESP ®
may otherwise seriously damage the brake
system which is not covered by the
Mercedes-Benz Limited Warranty. Instrument cluster
Introduction
For a full view illustration of the instrument
cluster, see “Instrument cluster”
(Y page 28). G
Warning!
No messages will be displayed if either the
instrument cluster or the multifunction
display is inoperative.
As a result, you will not be able to see
information about your driving conditions,
such as
R speed
R outside temperature R
warning/indicator lamps
R malfunction/warning messages
R failure of any systems
Driving characteristics may be impaired.
If you must continue to drive, do so with added
caution. Contact an authorized Mercedes-
Benz Center as soon as possible. :
To dim instrument cluster illumination
; Reset button
= To brighten instrument cluster
illumination
For information on changing the instrument
cluster settings, e.g. the language, see
(Y page 132). Activating the instrument cluster
The instrument cluster is activated when you
R open the driver’s door
R switch on the ignition
R press button :, ; or =
i Opening the driver’s door or pressing
button :, ; or = without switching on
the ignition activates the instrument
cluster illumination only for 30 seconds. 122
Instrument clusterControls in detail
251_AKB; 4; 52, en-US
d2ureepe,
Version: 2.11.8.1 2009-03-23T09:22:52+01:00 - Seite 122
Page 145 of 364
G
Warning!
When the cruise control is braking, the brake
pedal is retracted (i.e. depressed
automatically). The pedals’ range of motion
must not be impeded by any obstacles:
R Do not place any objects in the footwell.
R Make sure that the floormats and carpets
are securely in place.
R Do not rest your foot underneath the brake
pedal, as it could otherwise be trapped.
You could otherwise cause an accident and
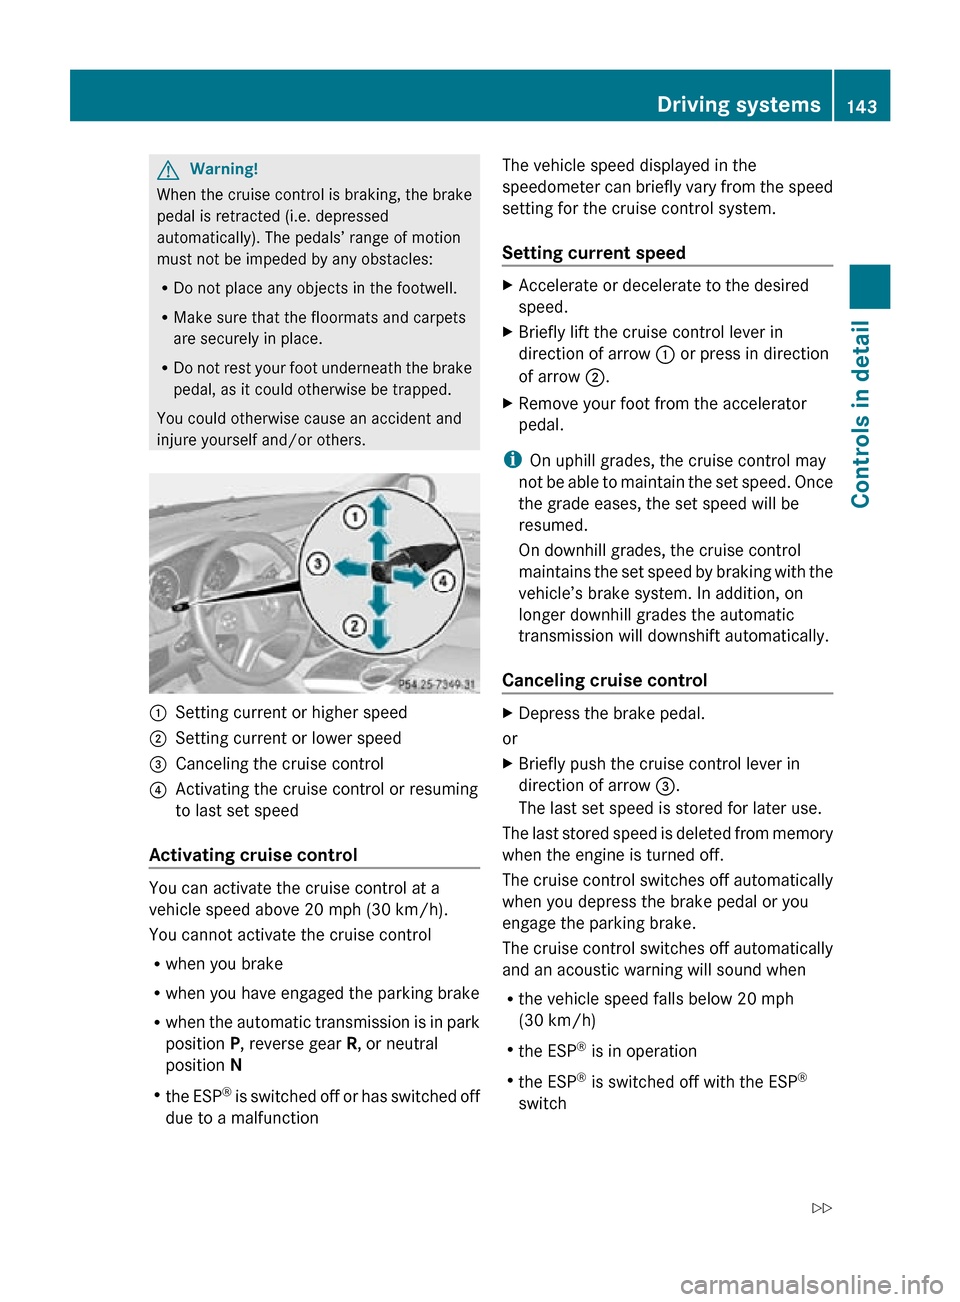
injure yourself and/or others. :
Setting current or higher speed
; Setting current or lower speed
= Canceling the cruise control
? Activating the cruise control or resuming
to last set speed
Activating cruise control You can activate the cruise control at a
vehicle speed above 20 mph (30 km/h).
You cannot activate the cruise control
R
when you brake
R when you have engaged the parking brake
R when the automatic transmission is in park
position P, reverse gear R, or neutral
position N
R the ESP ®
is switched off or has switched off
due to a malfunction The vehicle speed displayed in the
speedometer can briefly vary from the speed
setting for the cruise control system.
Setting current speed X
Accelerate or decelerate to the desired
speed.
X Briefly lift the cruise control lever in
direction of arrow : or press in direction
of arrow ;.
X Remove your foot from the accelerator
pedal.
i On uphill grades, the cruise control may
not be able to maintain the set speed. Once
the grade eases, the set speed will be
resumed.
On downhill grades, the cruise control
maintains the set speed by braking with the
vehicle’s brake system. In addition, on
longer downhill grades the automatic
transmission will downshift automatically.
Canceling cruise control X
Depress the brake pedal.
or
X Briefly push the cruise control lever in
direction of arrow =.
The last set speed is stored for later use.
The last stored speed is deleted from memory
when the engine is turned off.
The cruise control switches off automatically
when you depress the brake pedal or you
engage the parking brake.
The cruise control switches off automatically
and an acoustic warning will sound when
R the vehicle speed falls below 20 mph
(30 km/h)
R the ESP ®
is in operation
R the ESP ®
is switched off with the ESP ®
switch Driving systems
143Controls in detail
251_AKB; 4; 52, en-US
d2ureepe, Version: 2.11.8.1 2009-03-23T09:22:52+01:00 - Seite 143 Z
Page 150 of 364
X
Press button V or U repeatedly until
one of the following two displays appears
in the multifunction display.
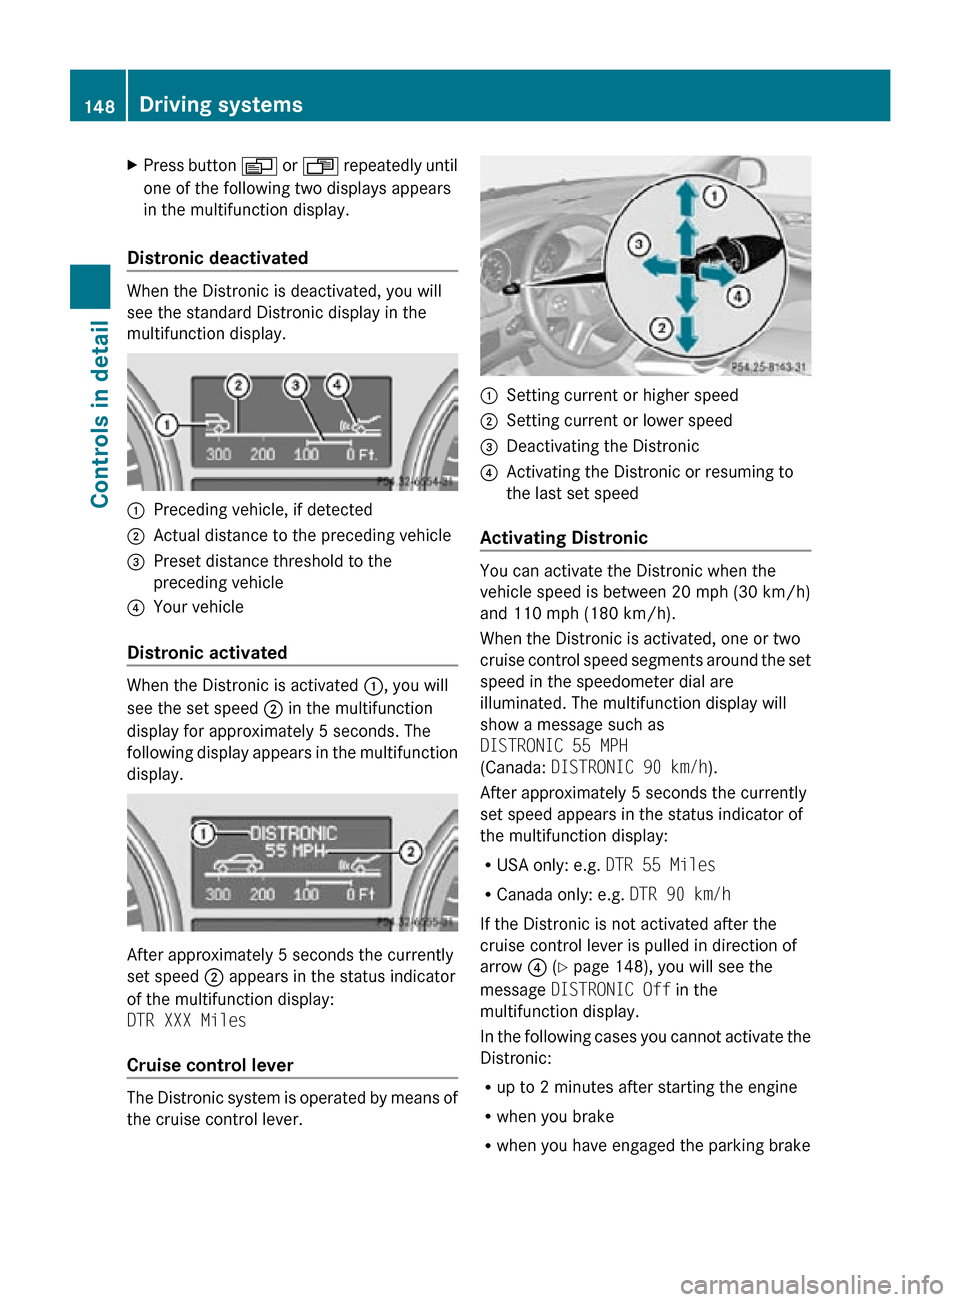
Distronic deactivated When the Distronic is deactivated, you will
see the standard Distronic display in the
multifunction display.
:
Preceding vehicle, if detected
; Actual distance to the preceding vehicle
= Preset distance threshold to the
preceding vehicle
? Your vehicle
Distronic activated When the Distronic is activated
:, you will
see the set speed ; in the multifunction
display for approximately 5 seconds. The
following display appears in the multifunction
display. After approximately 5 seconds the currently
set speed ; appears in the status indicator
of the multifunction display:
DTR XXX Miles
Cruise control lever
The Distronic system is operated by means of
the cruise control lever. :
Setting current or higher speed
; Setting current or lower speed
= Deactivating the Distronic
? Activating the Distronic or resuming to
the last set speed
Activating Distronic You can activate the Distronic when the
vehicle speed is between 20 mph (30 km/h)
and 110 mph (180 km/h).
When the Distronic is activated, one or two
cruise control speed segments around the set
speed in the speedometer dial are
illuminated. The multifunction display will
show a message such as
DISTRONIC 55 MPH
(Canada: DISTRONIC 90 km/h).
After approximately 5 seconds the currently
set speed appears in the status indicator of
the multifunction display:
R
USA only: e.g. DTR 55 Miles
R Canada only: e.g. DTR 90 km/h
If the Distronic is not activated after the
cruise control lever is pulled in direction of
arrow ? (Y page 148), you will see the
message DISTRONIC Off in the
multifunction display.
In the following cases you cannot activate the
Distronic:
R up to 2 minutes after starting the engine
R when you brake
R when you have engaged the parking brake 148
Driving systemsControls in detail
251_AKB; 4; 52, en-US
d2ureepe,
Version: 2.11.8.1 2009-03-23T09:22:52+01:00 - Seite 148
Page 152 of 364
Setting stored speed (Resume function)
G
Warning!
The set speed stored in memory should only
be set again if prevailing road conditions and
legal speed limits permit. Possible
acceleration or deceleration differences
arising from returning to the preset speed
could
cause an accident and/or serious injury
to you and others.
X Briefly pull the cruise control lever in
direction of arrow ? (Y page 148).
If no speed is stored, the current speed is
set and stored.
X Remove your foot from the accelerator
pedal.
Deactivating Distronic X
Depress the brake pedal.
or
X Briefly push the cruise control lever in
direction of arrow = (Y page 148).
The cruise control speed segments in the
speedometer dial will go out and the
following message appears briefly in the
multifunction display: DISTRONIC Off
The last set speed is stored for later use.
The last stored speed is deleted from memory
when the engine is turned off.
The Distronic switches off automatically
when you depress the brake pedal or you
engage the parking brake. In this case, the
cruise control speed segments in the
speedometer dial will go out.
The
Distronic also switches off automatically
when
R the vehicle speed falls below 20 mph
(30 km/h)
R the ESP ®
is in operation
R the ESP ®
is switched off with the ESP ®
switch R
the ESP ®
has switched off due to a
malfunction
R you shift the automatic transmission into
neutral position N while driving
The cruise control speed segments in the
speedometer dial goes out and an acoustic
warning will sound. Observe additional
messages in the multifunction display that
may appear. G
Warning!
Distronic switches off and releases the brakes
when the vehicle decelerates below the
minimum speed of 20 mph (30 km/h) by
operation of the system. At that time the
driver must apply the brakes in order to
reduce vehicle speed further or bring it to a
stop.
Depressing the accelerator pedal does not
deactivate the Distronic. After a brief
acceleration (e.g. for passing), the Distronic
will resume the last set speed.
Setting the following distance in
Distronic You can set the specified following distance
for Distronic by varying the time setting
between
1.0 and 2.0 seconds. Using this time
setting and the current speed of your vehicle,
Distronic calculates and sets the required
following distance to the preceding vehicle.
The set distance will be shown in the
multifunction display. G
Warning!
It is up to the driver to exercise discretion to
select the appropriate setting given road
conditions, traffic, driver’s preferred driving
style and applicable laws and driving
recommendations
for safe following distance.150
Driving systems
Controls in detail
251_AKB; 4; 52, en-US
d2ureepe,
Version: 2.11.8.1 2009-03-23T09:22:52+01:00 - Seite 150
Page 155 of 364
X
Activating/deactivating: Activate or
deactivate the distance warning function in
the control system (Y page 138).
When activated, the distance warning
function indicator Ä appears in the
multifunction display. Hill-start assist system
G
Warning!
The hill-start assist system is not designed to
function as a parking brake. It does not
prevent the vehicle from moving when parked
on an incline.
Always engage the parking brake in addition
to shifting the automatic transmission into
park position P.
On uphill grades, the hill-start assist system
maintains the pressure in the brake system
for approximately 1 second after you have
released the brake pedal. Therefore, you can
start off smoothly without the vehicle moving
immediately after releasing the brake pedal.
X Depress the brake pedal.
X Shift the automatic transmission into drive
position D or reverse gear R.
X Release the brake pedal.
X Carefully depress the accelerator pedal.
The hill-start assist system is inactive
R when starting off on a level road or downhill
grades
R with the automatic transmission in neutral
position N
R with the parking brake engaged
R if the ESP ®
has switched off due to a
malfunction Rear-axle level control
The rear-axle level control adjusts the vehicle
level for the rear axle. The rear-axle level
control is beneficial because it keeps the vehicle level at the rear axle constant,
independent of the load.
i
Observe the information on towing a
trailer, see “Trailer towing” ( Y page 256). AIRMATIC
The AIRMATIC lets you select the chassis and
suspension setup. The chassis and
suspension setup adjusts the damping
behavior and the ride height for your vehicle.
The AIRMATIC consists of two components.
The Adaptive Damping System (ADS)
(Y page 153) and the vehicle level control
(Y page 154). Adaptive Damping System (ADS)
The Adaptive Damping System (ADS) is
controlled electronically and operates
continuously. It adjusts the damping
characteristics to the current operating and
driving conditions. The damping is adjusted
individually for each wheel. Driving safety and
tire comfort are increased.
The fine tuning of the damping is dependent
on:
R your driving style
R road surface conditions
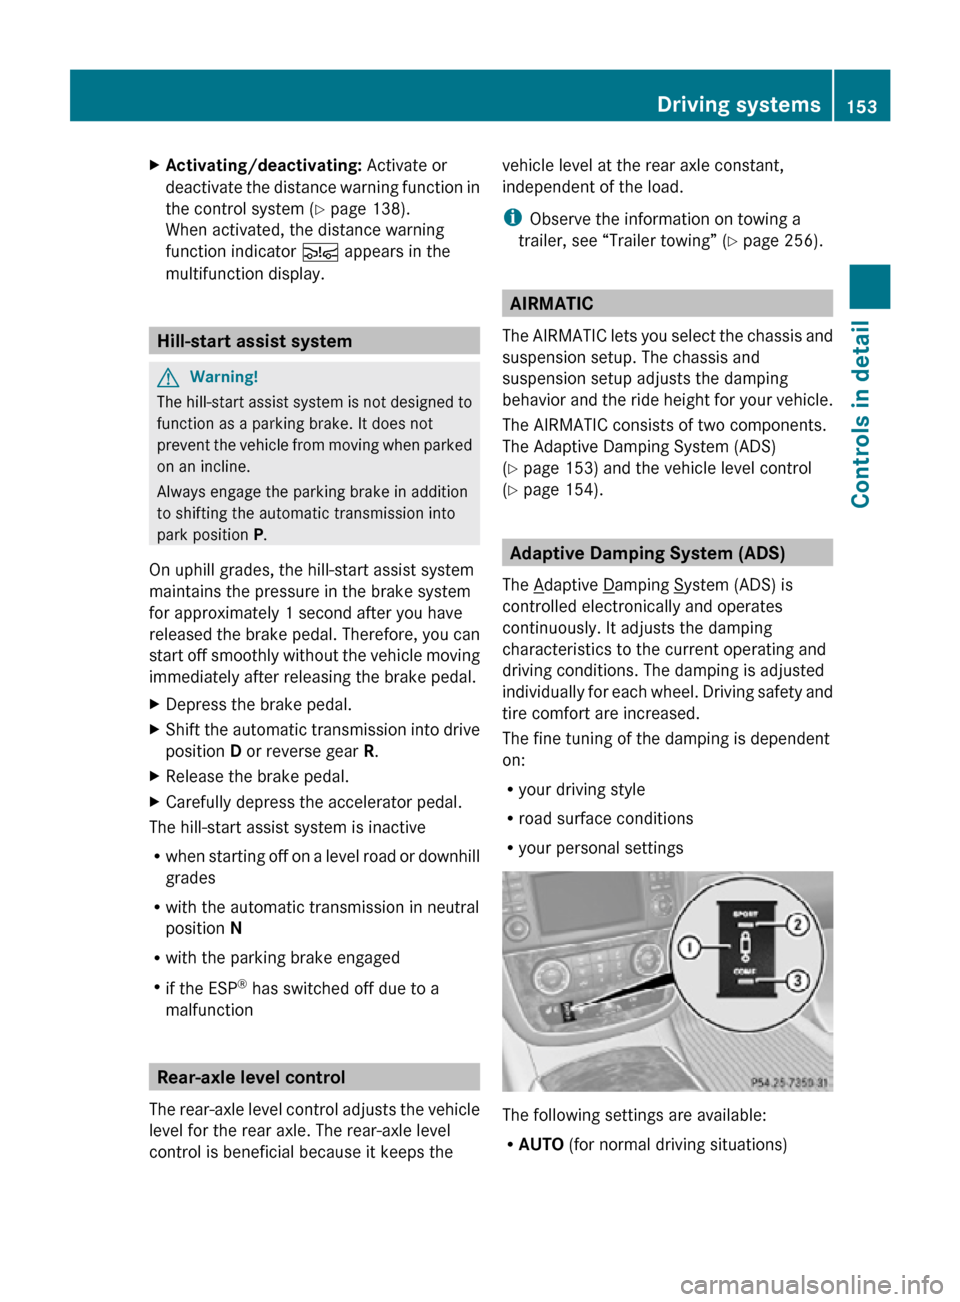
R your personal settings The following settings are available:
R
AUTO (for normal driving situations) Driving systems
153Controls in detail
251_AKB; 4; 52, en-US
d2ureepe, Version: 2.11.8.1 2009-03-23T09:22:52+01:00 - Seite 153 Z
Page 158 of 364
X
Close all doors and the tailgate.
X Start the engine.
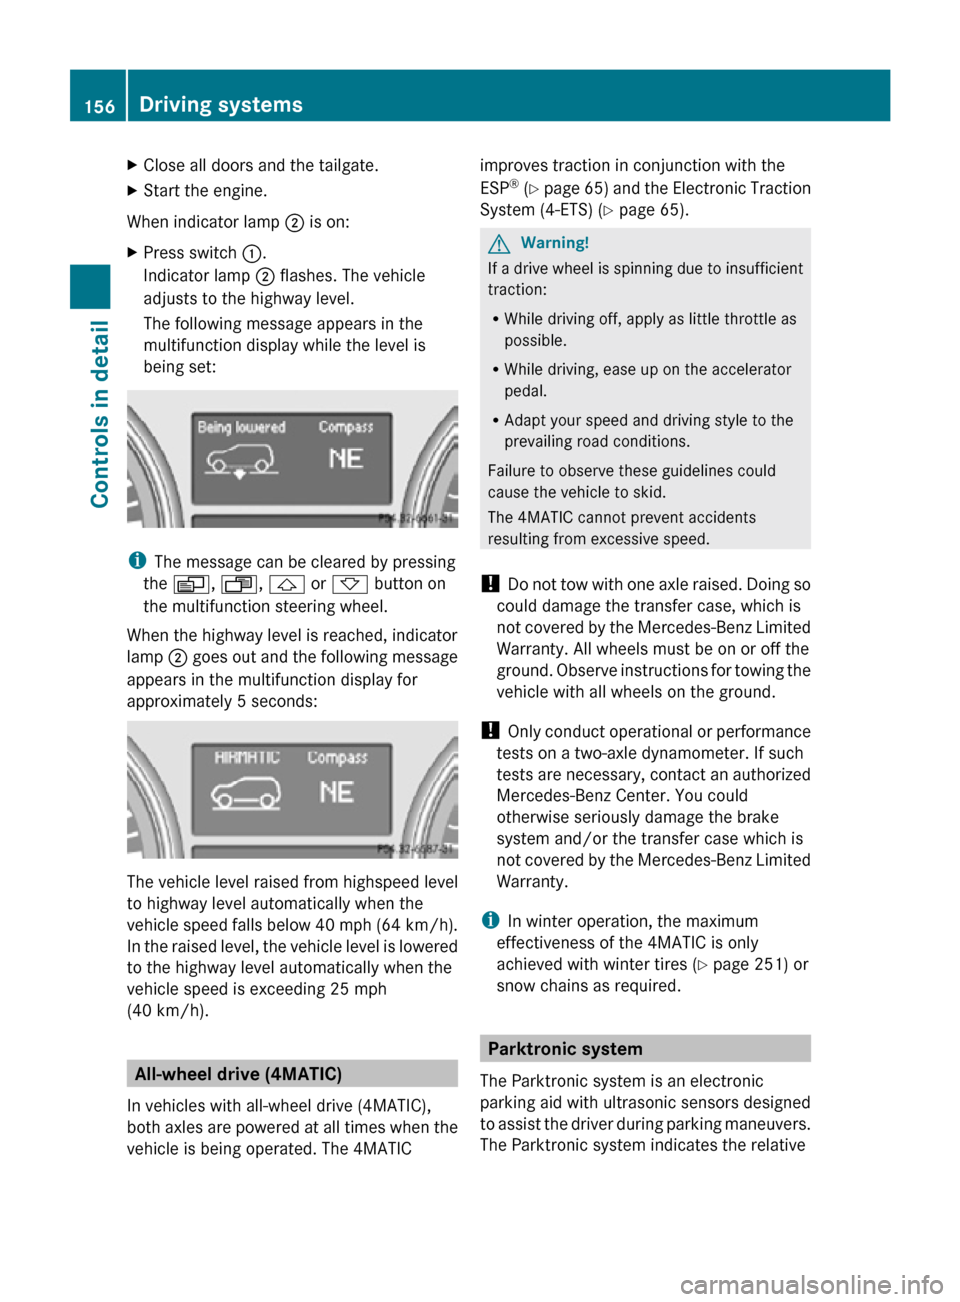
When indicator lamp ; is on:
X Press switch :.
Indicator lamp ; flashes. The vehicle
adjusts to the highway level.
The following message appears in the
multifunction display while the level is
being set: i
The message can be cleared by pressing
the V, U, & or * button on
the multifunction steering wheel.
When the highway level is reached, indicator
lamp ; goes out and the following message
appears in the multifunction display for
approximately 5 seconds: The vehicle level raised from highspeed level
to highway level automatically when the
vehicle speed falls below 40 mph (64 km/h).
In the raised level, the vehicle level is lowered
to the highway level automatically when the
vehicle speed is exceeding 25 mph
(40 km/h).
All-wheel drive (4MATIC)
In vehicles with all-wheel drive (4MATIC),
both axles are powered at all times when the
vehicle is being operated. The 4MATIC improves traction in conjunction with the
ESP
®
(Y page 65) and the Electronic Traction
System (4-ETS) (Y page 65). G
Warning!
If a drive wheel is spinning due to insufficient
traction:
R While driving off, apply as little throttle as
possible.
R While driving, ease up on the accelerator
pedal.
R Adapt your speed and driving style to the
prevailing road conditions.
Failure to observe these guidelines could
cause the vehicle to skid.
The 4MATIC cannot prevent accidents
resulting from excessive speed.
! Do not tow with one axle raised. Doing so
could damage the transfer case, which is
not covered by the Mercedes-Benz Limited
Warranty. All wheels must be on or off the
ground. Observe instructions for towing the
vehicle with all wheels on the ground.
! Only conduct operational or performance
tests on a two-axle dynamometer. If such
tests are necessary, contact an authorized
Mercedes-Benz Center. You could
otherwise seriously damage the brake
system and/or the transfer case which is
not covered by the Mercedes-Benz Limited
Warranty.
i In winter operation, the maximum
effectiveness of the 4MATIC is only
achieved with winter tires ( Y page 251) or
snow chains as required. Parktronic system
The Parktronic system is an electronic
parking aid with ultrasonic sensors designed
to assist the driver during parking maneuvers.
The Parktronic system indicates the relative 156
Driving systemsControls in detail
251_AKB; 4; 52, en-US
d2ureepe,
Version: 2.11.8.1 2009-03-23T09:22:52+01:00 - Seite 156