2010 MERCEDES-BENZ GLK350 4MATIC trailer
[x] Cancel search: trailerPage 243 of 344
Rim
A metal support for a tire or a tire and tube
assembly upon which the tire beads are
seated.
Sidewall
The portion of a tire between the tread and
the bead.
TIN (Tire Identification Number)
Unique identifier which facilitates efforts by
tire manufacturers to notify purchasers in
recall situations or other safety matters
concerning tires and gives purchasers the
means to easily identify such tires. The TIN is
comprised of “Manufacturer’s identification
mark”, “Tire size”, “Tire type code” and “Date
of manufacture”.
Tire ply composition and material used
This indicates the number of plies or the
number of layers of rubber-coated fabric in
the tire tread and sidewall. Tire
manufacturers also must indicate the ply
materials in the tire and sidewall, which
include steel, nylon, polyester, and others.
Tire speed rating
Part of tire designation (speed symbol);
indicates the speed range for which a tire is
approved.
Total load limit
Rated cargo and luggage load plus
68 kilograms (150 lb) times the vehicle’s
designated seating capacity.
Traction
The adhesive friction of a tire on a surface on
which it moves. The amount of grip provided.
Tread
The portion of a tire that comes into contact
with the road.
Treadwear indicators
Narrow bands, sometimes called “wear bars”
that show across the tread of a tire when only
1 / 16 in (1.6 mm) of tread remains.
TWR (Tongue Weight Rating)
Maximum permissible weight on trailer
tongue.
Uniform Tire Quality Grading Standards
A tire information system that provides
consumers with ratings for a tire’s traction,
temperature and treadwear. Ratings are
determined by tire manufacturers using U.S.
government testing procedures. The ratings
are molded into the sidewall of the tire.
Vehicle maximum load on the tire
Load on an individual tire that is determined
by distributing to each axle its share of the
maximum loaded vehicle weight and dividing
it by two.
Winter driving
General information
Have your vehicle winterized at an authorized
Mercedes-Benz Center.
Winter tires
GWarning!
Winter tires with a tread depth of less than
1 / 6 in (4 mm) must be replaced. They are no
longer suitable for winter operation.
Winter driving241OperationX204_AKB; 3; 23, en-USd2ureepe,Version: 2.11.8.12009-07-16T19:16:58+02:00 - Seite 241Z
Page 248 of 344
extended period with the ESP®
switched
off. Doing so may cause serious damage to
the drivetrain which is not covered by the
Mercedes-Benz Limited Warranty.
! Simultaneously depressing the
accelerator pedal and applying the brakes
reduces engine performance and causes
premature brake and drivetrain wear which
is not covered by the Mercedes-Benz
Limited Warranty.
Hydroplaning
Depending on the depth of the water layer on
the road, hydroplaning may occur, even at low
speeds and with new tires. In heavy rain or
when conditions indicate possible
hydroplaning:
XReduce vehicle speed.XAvoid track grooves in the road.XApply brakes cautiously.
Standing water
! Do not drive through flooded areas.
Before driving through water, determine its
depth.
If you must drive through standing water,
drive slowly to prevent water from entering
the passenger compartment or the engine
compartment. Water in these areas could
cause damage to electrical components or
wiring of the engine or transmission, or
could result in water being ingested by the
engine through the air intake causing
severe internal engine damage. Any such
damage is not covered by the Mercedes-
Benz Limited Warranty.
Prevent water from entering the passenger
compartment or the engine compartment. If
you must drive through standing water, keep
in mind that
R the maximum depth of the water may not
exceed 12 in (30 cm)
R you must drive slowly
Trailer towing
GWarning!
Failure to use proper equipment and driving
technique can result in a loss of vehicle
control when towing a trailer.
Improper towing or failure to follow the
instructions in this manual can result in
vehicle damage and/or serious personal
injury. Follow the guidelines below carefully
to assure safe trailer operation.
Contact an authorized Mercedes-Benz Center
should you require an explanation of
information contained in this manual.
Trailer hitch
R Only install a trailer hitch receiver approved
for your vehicle.
For information on availability and
installation, contact an authorized
Mercedes-Benz Center.
R The bumpers on your vehicle are not
designed for use with clamp-type hitches.
Do not attach rental hitches or other
bumper-type hitches to them.
R To reduce the possibility of damage,
remove the hitch ball adapter from the
receiver when not in use.
Electrical connections
The vehicle is prewired to accept the seven-
wire harness included in the Mercedes-Benz
approved trailer hitch receiver kit.
i A four-pole conversion plug is available
from your authorized Mercedes-Benz
Center as a spare part.
For further information, contact an
authorized Mercedes-Benz Center.
246Driving instructionsOperation
X204_AKB; 3; 23, en-USd2ureepe,Version: 2.11.8.12009-07-16T19:16:58+02:00 - Seite 246
Page 249 of 344
Vehicle and trailer weights and ratings
The Gross Trailer Weight (GTW) is the weight
of the trailer plus the weight of all cargo,
equipment, luggage, etc. loaded on the
trailer. The maximum permissible GTW to be
towed: 3 500 lb (1 588 kg).
Trailer Tongue Weight Rating (TWR) is the
maximum permissible weight on the trailer
tongue: 280 lb (127 kg) limit for Mercedes-
Benz approved hitch receiver.
Loading a trailer
R When loading a trailer, you should observe
that neither the permissible GTW, nor the
Gross Vehicle Weight Rating (GVWR) are
exceeded. The GVWR is indicated on the
certification label located on the driver’s
door B-pillar ( Y page 227).
Maximum permissible values are listed on
the safety compliance certification labels
for the vehicle and for the trailer to be
towed.
The lowest value listed must be selected
when determining how the vehicle and
trailer are loaded.
R The tongue weight at the hitch ball must be
added to the rear axle weight to prevent
exceeding the rear Gross Axle Weight
Rating (GAWR). The GAWR is indicated on
the certification label located on the
driver’s door B-pillar ( Y page 227).
i Mercedes-Benz recommends loading the
trailer in such a manner that it has a tongue
weight between 8 % and 10 % of the GTW.
i The weight of other accessories,
passengers and cargo will reduce the
maximum trailer weight and tongue weight
your vehicle can tow.
Checking weights of vehicle and trailer
R To assure that the towing vehicle and trailer
are in compliance with the maximum
permissible weight limits, have the loaded
rig (towing vehicle including driver,
passengers and cargo, trailer fully loaded)
weighed on a commercial scale.
R Check the vehicle’s front and rear gross
axle weight, the Gross Trailer Weight (GTW)
and tongue weight.
The values as measured must not exceed
the weight limits listed under “Vehicle and
trailer weights and ratings” ( Y page 247).
Coupling a trailer
Observe maximum permitted trailer
dimensions (width and length).
Most states and all Canadian provinces
require
R safety chains between the towing vehicle
and the trailer
The chains should be criss-crossed under
the trailer tongue. They must be attached
to the hitch receiver, and not to the
vehicle’s bumper or axle.
Make sure to leave enough slack in the
chains to permit turning corners.
R a separate brake system at various trailer
weights
R a break-away switch on trailers with a
separate brake system.
Check with your local state laws for specific
requirements.
The switch activates the trailer brakes in
the possible event that the trailer might
separate from the tow vehicle.
! Do not connect a trailer brake system (if
trailer is so equipped) directly to the
vehicle’s hydraulic brake system, as your
vehicle is equipped with antilock brakes. If
you do, neither the vehicle’s brakes nor the
trailer’s brakes will function properly.
i The provided vehicle electrical wiring
harness for trailer towing has a brake signal
wire for hook-up to a brake controller.
Driving instructions247OperationX204_AKB; 3; 23, en-USd2ureepe,Version: 2.11.8.12009-07-16T19:16:58+02:00 - Seite 247Z
Page 250 of 344
XMake sure the automatic transmission is in
park position P (Y page 103).XEngage the parking brake for the vehicle
( Y page 102).XClose all doors and the tailgate.XAttach the trailer.XPlug in all electrical connectors.
Towing a trailer
There are many different laws, including
speed limit restrictions, having to do with
trailer towing. Make sure your rig will be legal,
not only for where you reside, but also for
where you will be driving. A good source for
this information can be the police or local
authorities.
Note the following, when driving with a trailer:
R In order to gain skill and an understanding
of the vehicle’s behavior, you should
practice turning, stopping and backing up
in an area which is free of traffic.
R Before you start driving check the
- trailer hitch
- break-away switch
- safety chains
- electrical connections
- lighting
- tires
R Adjust the mirrors ( Y page 84) to permit
unobstructed view beyond rear of trailer.
R If the trailer has electric brakes, start your
vehicle and trailer moving slowly, and then
apply only the trailer brake controller by
hand to make sure the brakes are working
properly.
R Always secure items in the trailer to
prevent load shifts while driving.
R When towing a trailer, check occasionally
to make sure the load is secure, and that
trailer lighting and brakes (if so equipped)
are functioning properly.
R Take into consideration that when towing a
trailer, the handling characteristics are
different and less stable from those when
operating the vehicle without a trailer.
It is important to avoid sudden maneuvers.
R The vehicle and trailer combination is
heavier, and therefore limited in
acceleration and climbing ability, and has a
larger braking distance.
It is more prone to reacting to cross wind
gusts, and requires more sensitive steering
input.
R If possible, do not brake abruptly, but
rather engage the brake slightly at first to
permit the trailer to activate its brake. Then
increase the braking force.
! If the trailer should begin to sway, reduce
the vehicle’s speed immediately.
Do not attempt to straighten out the tow
vehicle and trailer by increasing the speed.
R If the transmission shifts between gears on
inclines repeatedly, shift to a lower gear
range manually ( Y page 106). Select 4, 3 ,
2 or 1.
A lower gear and reduction of speed
reduces the chance of engine overloading
and/or overheating.
R When going down an incline, shift into a
lower gear and use the engine’s braking
effect.
Avoid riding the brakes, thus overheating
the vehicle and trailer brakes (if so
equipped).
R If the engine coolant rises to an extremely
high temperature when the air conditioning
is on, turn off the air conditioning system.
Engine coolant heat can be additionally
vented by opening the windows, switching
the climate control fan speed to high and
setting the temperature control to the
maximum.
R During a passing maneuver extreme care
must be exercised since your vehicle with
a trailer will require additional passing248Driving instructionsOperation
X204_AKB; 3; 23, en-USd2ureepe,Version: 2.11.8.12009-07-16T19:16:58+02:00 - Seite 248
Page 251 of 344
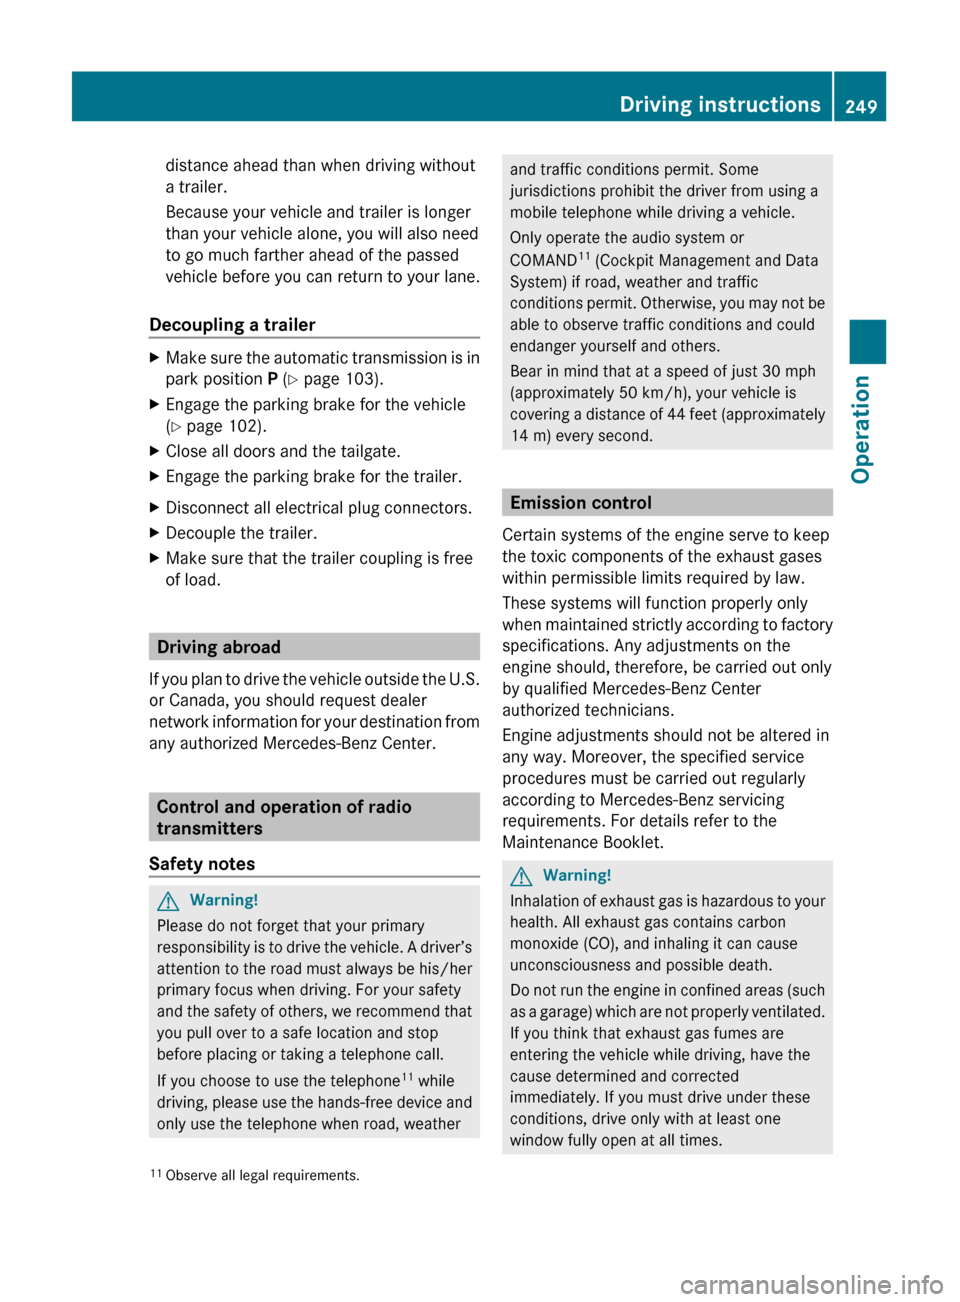
distance ahead than when driving without
a trailer.
Because your vehicle and trailer is longer
than your vehicle alone, you will also need
to go much farther ahead of the passed
vehicle before you can return to your lane.
Decoupling a trailer XMake sure the automatic transmission is in
park position P (Y page 103).XEngage the parking brake for the vehicle
( Y page 102).XClose all doors and the tailgate.XEngage the parking brake for the trailer.XDisconnect all electrical plug connectors.XDecouple the trailer.XMake sure that the trailer coupling is free
of load.
Driving abroad
If you plan to drive the vehicle outside the U.S.
or Canada, you should request dealer
network information for your destination from
any authorized Mercedes-Benz Center.
Control and operation of radio
transmitters
Safety notes
GWarning!
Please do not forget that your primary
responsibility is to drive the vehicle. A driver’s
attention to the road must always be his/her
primary focus when driving. For your safety
and the safety of others, we recommend that
you pull over to a safe location and stop
before placing or taking a telephone call.
If you choose to use the telephone 11
while
driving, please use the hands-free device and
only use the telephone when road, weather
and traffic conditions permit. Some
jurisdictions prohibit the driver from using a
mobile telephone while driving a vehicle.
Only operate the audio system or
COMAND 11
(Cockpit Management and Data
System) if road, weather and traffic
conditions permit. Otherwise, you may not be
able to observe traffic conditions and could
endanger yourself and others.
Bear in mind that at a speed of just 30 mph
(approximately 50 km/h), your vehicle is
covering a distance of 44 feet (approximately
14 m) every second.
Emission control
Certain systems of the engine serve to keep
the toxic components of the exhaust gases
within permissible limits required by law.
These systems will function properly only
when maintained strictly according to factory
specifications. Any adjustments on the
engine should, therefore, be carried out only
by qualified Mercedes-Benz Center
authorized technicians.
Engine adjustments should not be altered in
any way. Moreover, the specified service
procedures must be carried out regularly
according to Mercedes-Benz servicing
requirements. For details refer to the
Maintenance Booklet.
GWarning!
Inhalation of exhaust gas is hazardous to your
health. All exhaust gas contains carbon
monoxide (CO), and inhaling it can cause
unconsciousness and possible death.
Do not run the engine in confined areas (such
as a garage) which are not properly ventilated.
If you think that exhaust gas fumes are
entering the vehicle while driving, have the
cause determined and corrected
immediately. If you must drive under these
conditions, drive only with at least one
window fully open at all times.
11 Observe all legal requirements.Driving instructions249OperationX204_AKB; 3; 23, en-USd2ureepe,Version: 2.11.8.12009-07-16T19:16:58+02:00 - Seite 249Z
Page 288 of 344
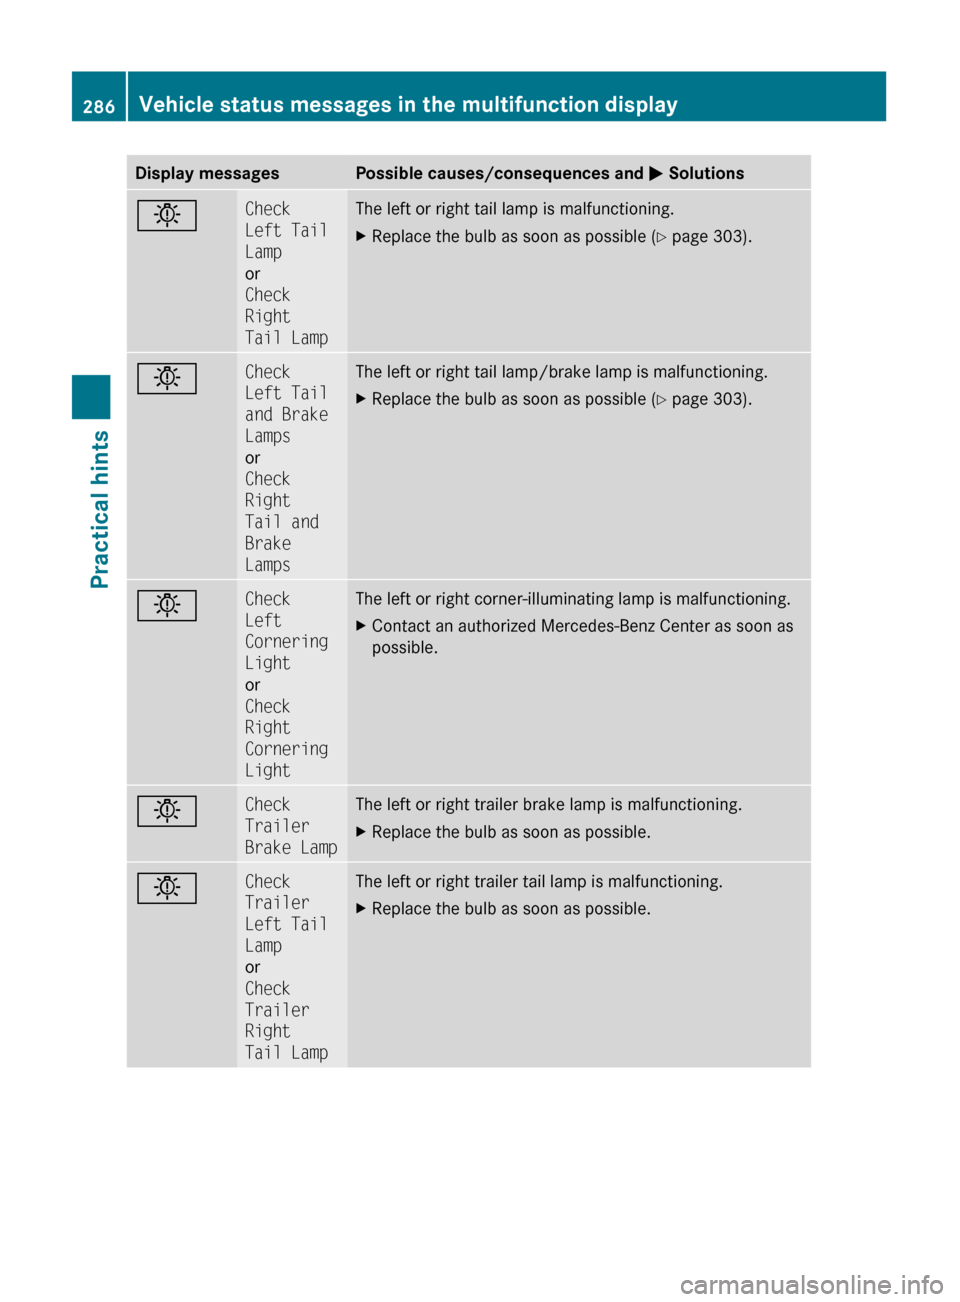
Display messagesPossible causes/consequences and M SolutionsbCheck
Left Tail
Lamp
or
Check
Right
Tail LampThe left or right tail lamp is malfunctioning.XReplace the bulb as soon as possible ( Y page 303).bCheck
Left Tail
and Brake
Lamps
or
Check
Right
Tail and
Brake
LampsThe left or right tail lamp/brake lamp is malfunctioning.XReplace the bulb as soon as possible ( Y page 303).bCheck
Left
Cornering
Light
or
Check
Right
Cornering
LightThe left or right corner-illuminating lamp is malfunctioning.XContact an authorized Mercedes-Benz Center as soon as
possible.bCheck
Trailer
Brake LampThe left or right trailer brake lamp is malfunctioning.XReplace the bulb as soon as possible.bCheck
Trailer
Left Tail
Lamp
or
Check
Trailer
Right
Tail LampThe left or right trailer tail lamp is malfunctioning.XReplace the bulb as soon as possible.286Vehicle status messages in the multifunction displayPractical hints
X204_AKB; 3; 23, en-USd2ureepe,Version: 2.11.8.12009-07-16T19:16:58+02:00 - Seite 286
Page 289 of 344
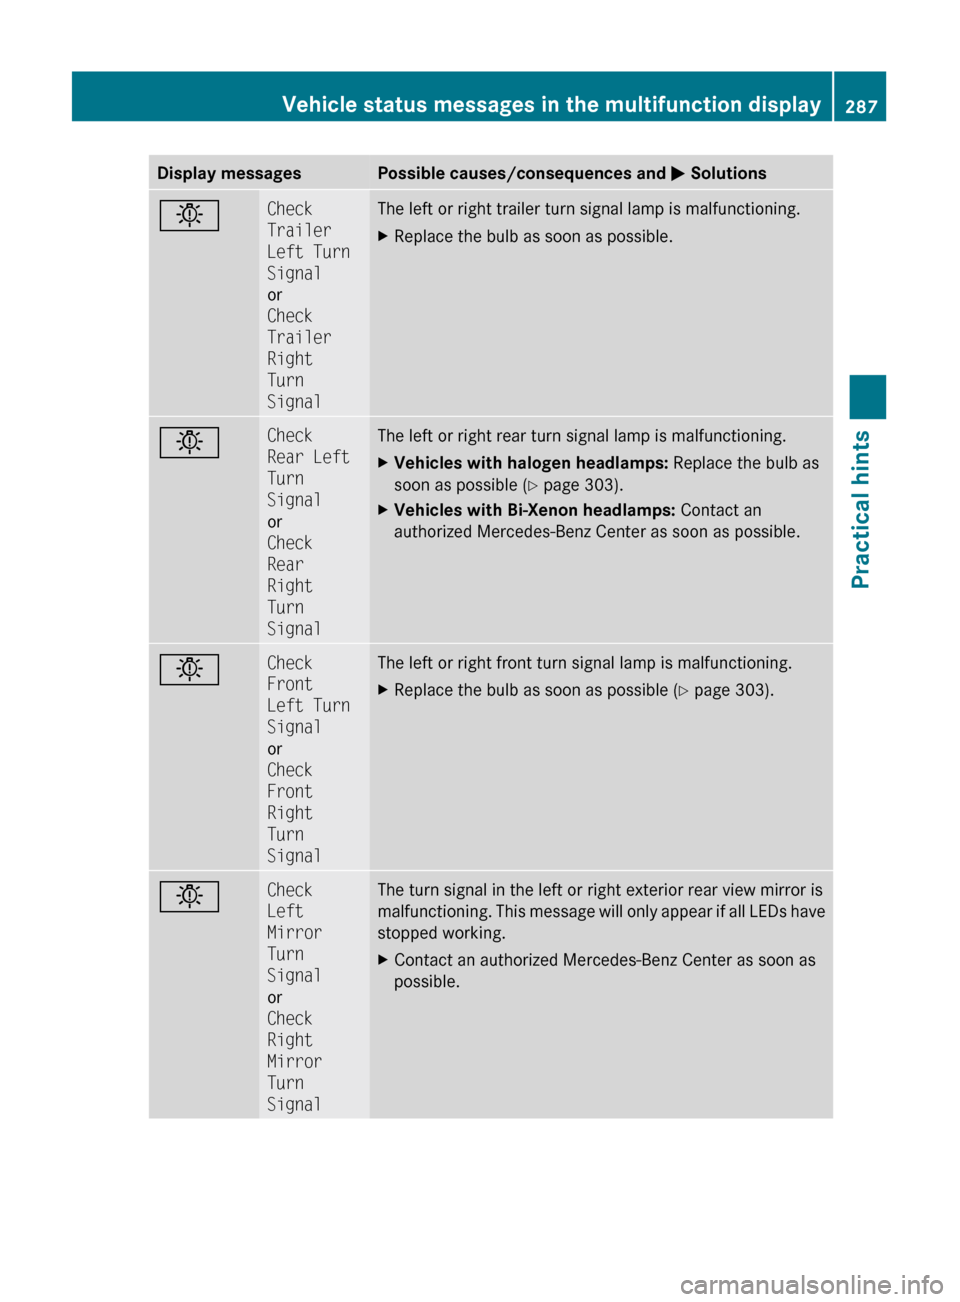
Display messagesPossible causes/consequences and M SolutionsbCheck
Trailer
Left Turn
Signal
or
Check
Trailer
Right
Turn
SignalThe left or right trailer turn signal lamp is malfunctioning.XReplace the bulb as soon as possible.bCheck
Rear Left
Turn
Signal
or
Check
Rear
Right
Turn
SignalThe left or right rear turn signal lamp is malfunctioning.XVehicles with halogen headlamps: Replace the bulb as
soon as possible ( Y page 303).XVehicles with Bi-Xenon headlamps: Contact an
authorized Mercedes-Benz Center as soon as possible.bCheck
Front
Left Turn
Signal
or
Check
Front
Right
Turn
SignalThe left or right front turn signal lamp is malfunctioning.XReplace the bulb as soon as possible ( Y page 303).bCheck
Left
Mirror
Turn
Signal
or
Check
Right
Mirror
Turn
SignalThe turn signal in the left or right exterior rear view mirror is
malfunctioning. This message will only appear if all LEDs have
stopped working.XContact an authorized Mercedes-Benz Center as soon as
possible.Vehicle status messages in the multifunction display287Practical hintsX204_AKB; 3; 23, en-USd2ureepe,Version: 2.11.8.12009-07-16T19:16:58+02:00 - Seite 287Z
Page 327 of 344

Note the following when freeing a stranded
vehicle:
RAvoid pulling the vehicle abruptly or
diagonally, since it could result in damage
to the chassis alignment.
RNever try to free a vehicle that is still
coupled to a trailer.
RIf possible, a vehicle equipped with a trailer
hitch receiver should be pulled backward in
its own previously made tracks.
Fuses
Introduction
The electrical fuses in your vehicle serve to
switch off malfunctioning power circuits.
If a fuse is blown, the components and
systems secured by that fuse will stop
operating.
GWarning!
Only use fuses approved by Mercedes-Benz
with the specified amperage for the system in
question and do not attempt to repair or
bridge a blown fuse. Using other than
approved fuses or using repaired or bridged
fuses may cause an overload leading to a fire,
and/or cause damage to electrical
components and/or systems. Have the cause
determined and remedied by an authorized
Mercedes-Benz Center.
A blown fuse must be replaced by an
appropriate spare fuse (recognizable by its
color or the fuse rating given on the fuse) of
the amperage recommended in the fuse
chart. Any Mercedes-Benz Center will be glad
to advise you on this subject.
iIn case of a blown fuse contact Roadside
Assistance or an authorized Mercedes-
Benz Center.
If a newly inserted fuse blows again, have the
cause determined and rectified by an
authorized Mercedes-Benz Center.
The fuse chart is located in the cargo
compartment with the vehicle tool kit
(Y page 260). The fuse chart explains the fuse
allocation and fuse amperages.
Before replacing fuses
XEngage the parking brake.XMake sure the automatic transmission is in
park position P.
XSwitch off all electrical consumers.XTurn off the engine.XRemove the SmartKey from the starter
switch.
Fuse box in passenger compartment
! Do not use sharp objects such as a
screwdriver to open the fuse box cover in
the dashboard. You could damage the fuse
box cover or the dashboard.
XOpen the driver’s door.XOpening: Using your hands, pull fuse box
cover : in direction of arrow = and
remove in direction of arrow ;.
XClosing: Hook fuse box cover : into the
opening at the front.
XPress fuse box cover : back on until it
engages.
! The fuse box cover must be properly
positioned as described. Otherwise,
Fuses325Practical hintsX204_AKB; 3; 23, en-USd2ureepe,Version: 2.11.8.12009-07-16T19:16:58+02:00 - Seite 325Z