2010 MERCEDES-BENZ GLK350 4MATIC washer fluid
[x] Cancel search: washer fluidPage 254 of 344
attack the paintwork as well as the vehicle
underbody and cause lasting damage.
Such damage is caused not only by extreme
and varying climatic conditions, but also by:
R Air pollution
R Road salt
R Tar
R Gravel and stone chipping
To avoid paint damage, you should
immediately remove:
R Grease and oil
R Fuel
R Coolant
R Brake fluid
R Bird droppings
R Insects
R Tree resins etc.
Frequent washing reduces and/or eliminates
the aggressiveness and potency of the above
adverse influences.
More frequent washings are necessary to
deal with unfavorable conditions:
R near the ocean
R in industrial areas (smoke, exhaust
emissions)
R during winter operation
You should check your vehicle from time to
time for stone chipping or other damage. Any
damage should be repaired as soon as
possible to prevent corrosion.
In doing so, do not neglect the underbody of
the vehicle. A prerequisite for a thorough
check is a washing of the underbody followed
by a thorough inspection. Damaged areas
need to be re-undercoated.
Your vehicle has been treated at the factory
with a wax-base rustproofing in the body
cavities which will last for the lifetime of the
vehicle. Post-production treatment is neither
necessary nor recommended by Mercedes-
Benz because of the possibility ofincompatibility between materials used in the
production process and others applied later.
We have selected vehicle-care products and
compiled recommendations which are
specially matched to our vehicles and which
always reflect the latest technology. You can
obtain Mercedes-Benz approved vehicle-care
products at an authorized Mercedes-Benz
Center.
Scratches, corrosive deposits, corrosion or
damage due to negligent or incorrect care
cannot always be removed or repaired with
the vehicle-care products recommended
here. In such cases it is best to seek aid at an
authorized Mercedes-Benz Center.
The following topics deal with the cleaning
and care of your vehicle and give important
“how-to” information as well as references to
Mercedes-Benz approved vehicle-care
products.
Power washer
! Follow the instructions provided by the
power washer manufacturer on
maintaining a distance between the vehicle
and the nozzle of the power washer.
Never use a round nozzle to power-wash
tires. The intense jet of water can result in
damage to the tire.
Always replace a damaged tire.
Always keep the jet of water moving across
the surface. Do not aim directly at electrical
parts, electrical connectors, seals, or other
rubber parts.
Tar stains
Quickly remove tar stains before they dry and
become more difficult to remove. A tar
remover is recommended.
Paintwork, painted body components
! Affixing stickers, magnets, adhesive tape
or similar materials to painted body
components may damage the paintwork.
252Vehicle careOperation
X204_AKB; 3; 23, en-USd2ureepe,Version: 2.11.8.12009-07-16T19:16:58+02:00 - Seite 252
Page 280 of 344
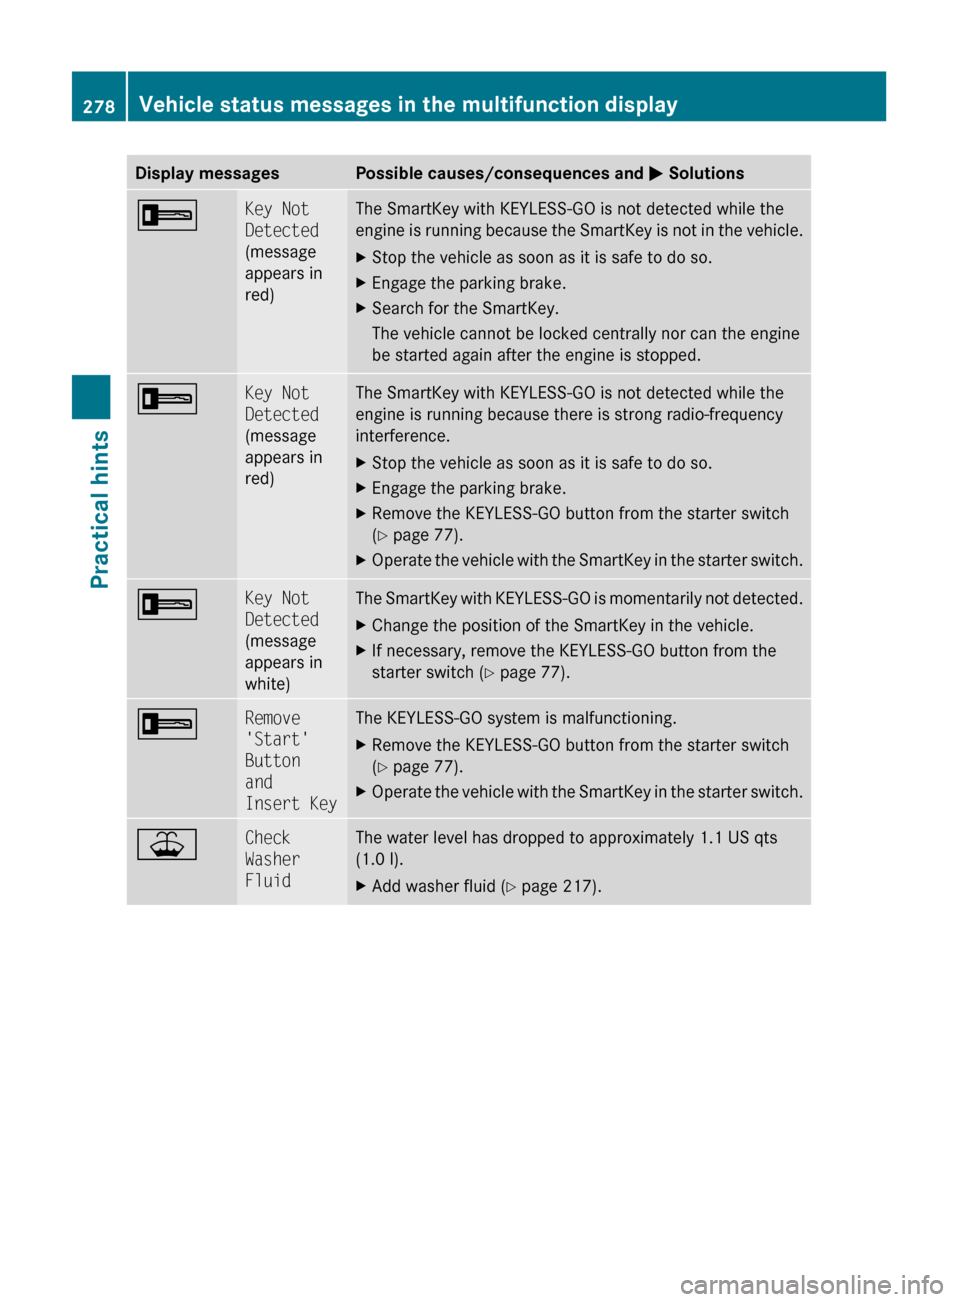
Display messagesPossible causes/consequences and M Solutions+Key Not
Detected
(message
appears in
red)The SmartKey with KEYLESS-GO is not detected while the
engine is running because the SmartKey is not in the vehicle.XStop the vehicle as soon as it is safe to do so.XEngage the parking brake.XSearch for the SmartKey.
The vehicle cannot be locked centrally nor can the engine
be started again after the engine is stopped.+Key Not
Detected
(message
appears in
red)The SmartKey with KEYLESS-GO is not detected while the
engine is running because there is strong radio-frequency
interference.XStop the vehicle as soon as it is safe to do so.XEngage the parking brake.XRemove the KEYLESS-GO button from the starter switch
( Y page 77).XOperate the vehicle with the SmartKey in the starter switch.+Key Not
Detected
(message
appears in
white)The SmartKey with KEYLESS-GO is momentarily not detected.XChange the position of the SmartKey in the vehicle.XIf necessary, remove the KEYLESS-GO button from the
starter switch ( Y page 77).+Remove
'Start'
Button
and
Insert KeyThe KEYLESS-GO system is malfunctioning.XRemove the KEYLESS-GO button from the starter switch
( Y page 77).XOperate the vehicle with the SmartKey in the starter switch.¥Check
Washer
FluidThe water level has dropped to approximately 1.1 US qts
(1.0 l).XAdd washer fluid ( Y page 217).278Vehicle status messages in the multifunction displayPractical hints
X204_AKB; 3; 23, en-USd2ureepe,Version: 2.11.8.12009-07-16T19:16:58+02:00 - Seite 278
Page 308 of 344
Before you start to replace a bulb for a front
lamp, do the following:
XSwitch off the ignition.XTurn the exterior lamp switch to position
$.
XOpen the hood (Y page 214).XRemove the cover above the respective
headlamp (Y page 306).
XDriver’s side only: Release the washer fluid
reservoir (Y page 306).
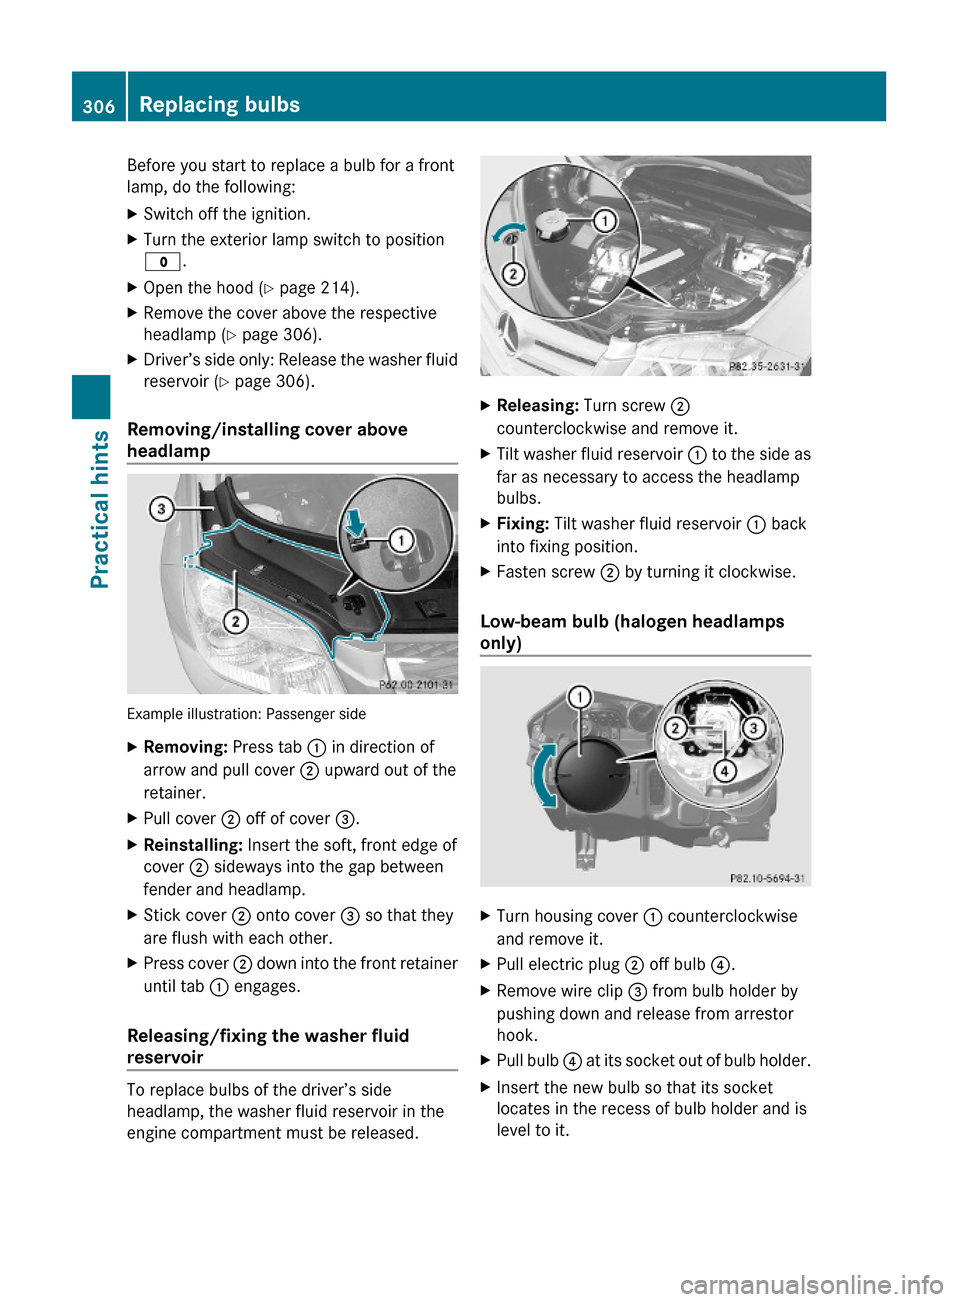
Removing/installing cover above
headlamp
Example illustration: Passenger side
XRemoving: Press tab : in direction of
arrow and pull cover ; upward out of the
retainer.
XPull cover ; off of cover =.XReinstalling: Insert the soft, front edge of
cover ; sideways into the gap between
fender and headlamp.
XStick cover ; onto cover = so that they
are flush with each other.
XPress cover ; down into the front retainer
until tab : engages.
Releasing/fixing the washer fluid
reservoir
To replace bulbs of the driver’s side
headlamp, the washer fluid reservoir in the
engine compartment must be released.
XReleasing: Turn screw ;
counterclockwise and remove it.
XTilt washer fluid reservoir : to the side as
far as necessary to access the headlamp
bulbs.
XFixing: Tilt washer fluid reservoir : back
into fixing position.
XFasten screw ; by turning it clockwise.
Low-beam bulb (halogen headlamps
only)
XTurn housing cover : counterclockwise
and remove it.
XPull electric plug ; off bulb ?.XRemove wire clip = from bulb holder by
pushing down and release from arrestor
hook.
XPull bulb ? at its socket out of bulb holder.XInsert the new bulb so that its socket
locates in the recess of bulb holder and is
level to it.
306Replacing bulbsPractical hints
X204_AKB; 3; 23, en-USd2ureepe,Version: 2.11.8.12009-07-16T19:16:58+02:00 - Seite 306
Page 309 of 344
XFold wire clip = back and press it down on
bulb holder to engage it in the arrestor
hook.
XConnect electric plug ; on bulb ?.XAlign housing cover : and turn it
clockwise.
XDriver’s side only: Fix the washer fluid
reservoir (Y page 306).
XInstall the cover above the headlamp
(Y page 306).
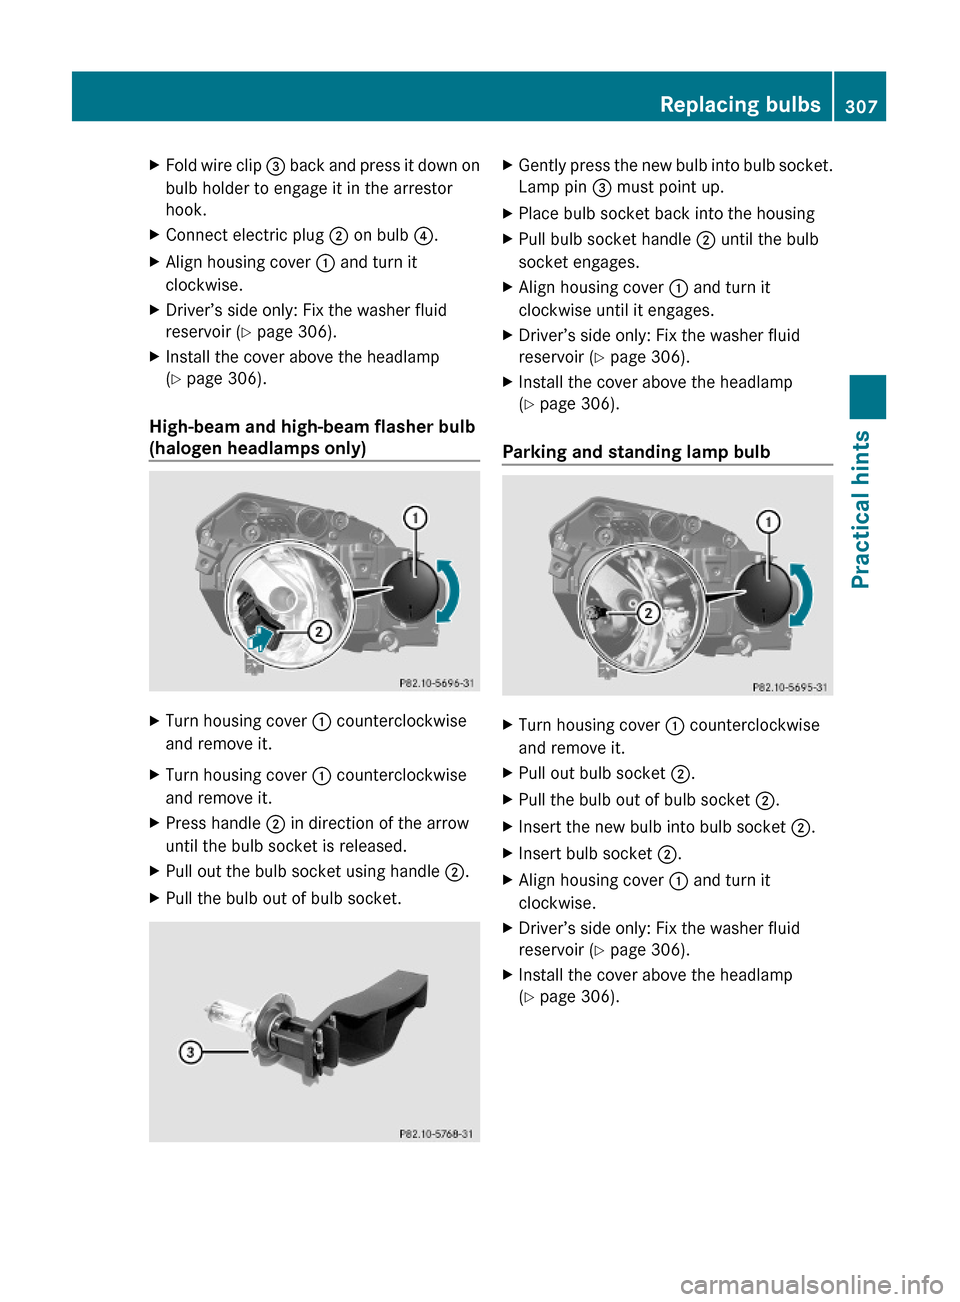
High-beam and high-beam flasher bulb
(halogen headlamps only)
XTurn housing cover : counterclockwise
and remove it.
XTurn housing cover : counterclockwise
and remove it.
XPress handle ; in direction of the arrow
until the bulb socket is released.
XPull out the bulb socket using handle ;.XPull the bulb out of bulb socket.XGently press the new bulb into bulb socket.
Lamp pin = must point up.
XPlace bulb socket back into the housingXPull bulb socket handle ; until the bulb
socket engages.
XAlign housing cover : and turn it
clockwise until it engages.
XDriver’s side only: Fix the washer fluid
reservoir (Y page 306).
XInstall the cover above the headlamp
(Y page 306).
Parking and standing lamp bulb
XTurn housing cover : counterclockwise
and remove it.
XPull out bulb socket ;.XPull the bulb out of bulb socket ;.XInsert the new bulb into bulb socket ;.XInsert bulb socket ;.XAlign housing cover : and turn it
clockwise.
XDriver’s side only: Fix the washer fluid
reservoir (Y page 306).
XInstall the cover above the headlamp
(Y page 306).
Replacing bulbs307Practical hintsX204_AKB; 3; 23, en-USd2ureepe,Version: 2.11.8.12009-07-16T19:16:58+02:00 - Seite 307Z
Page 310 of 344
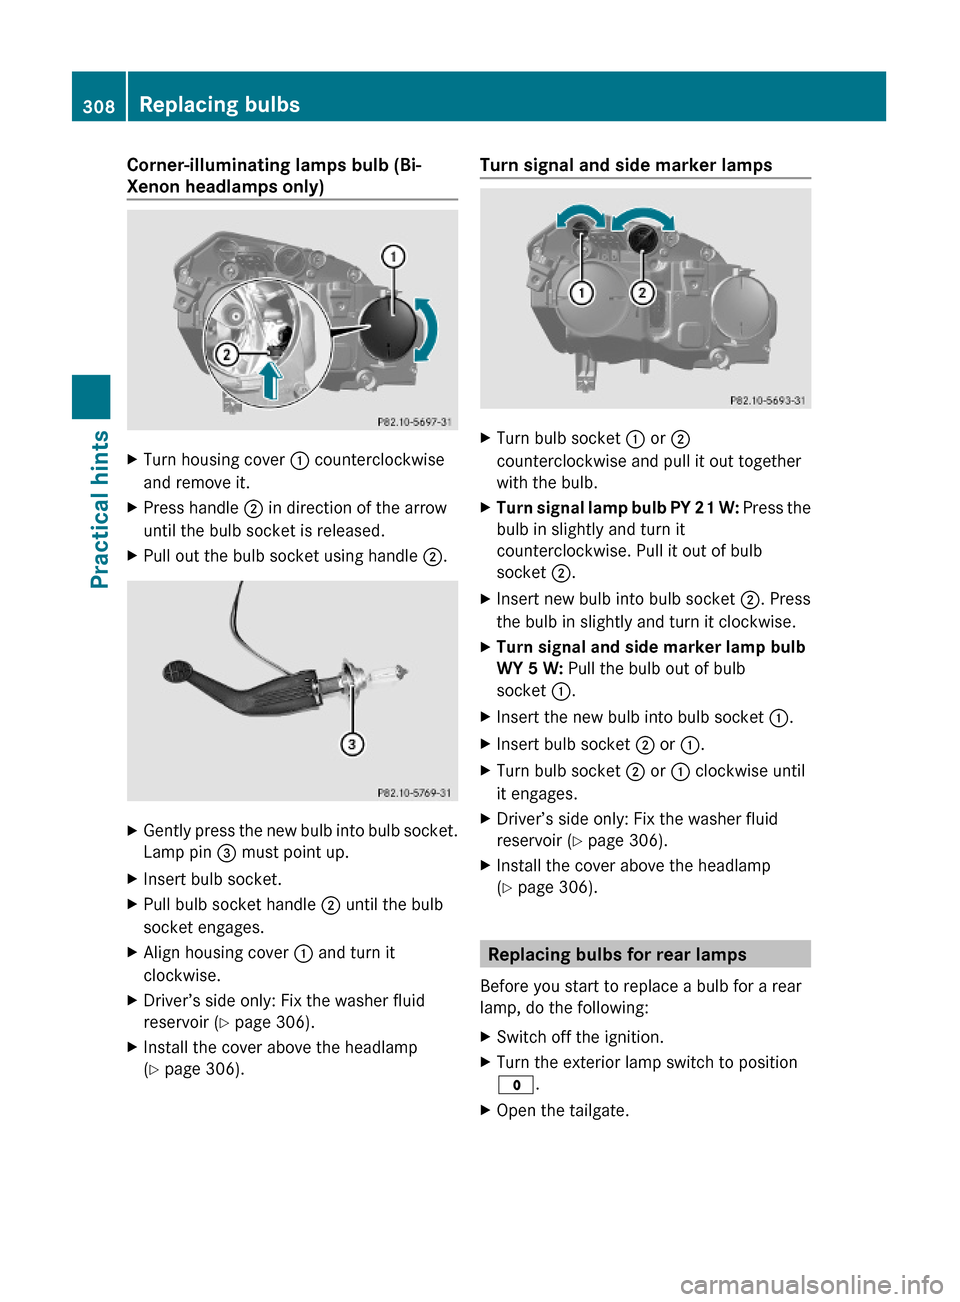
Corner-illuminating lamps bulb (Bi-
Xenon headlamps only)
XTurn housing cover : counterclockwise
and remove it.
XPress handle ; in direction of the arrow
until the bulb socket is released.
XPull out the bulb socket using handle ;.XGently press the new bulb into bulb socket.
Lamp pin = must point up.
XInsert bulb socket.XPull bulb socket handle ; until the bulb
socket engages.
XAlign housing cover : and turn it
clockwise.
XDriver’s side only: Fix the washer fluid
reservoir (Y page 306).
XInstall the cover above the headlamp
(Y page 306).
Turn signal and side marker lampsXTurn bulb socket : or ;
counterclockwise and pull it out together
with the bulb.
XTurn signal lamp bulb PY 21 W: Press the
bulb in slightly and turn it
counterclockwise. Pull it out of bulb
socket ;.
XInsert new bulb into bulb socket ;. Press
the bulb in slightly and turn it clockwise.
XTurn signal and side marker lamp bulb
WY 5 W: Pull the bulb out of bulb
socket :.
XInsert the new bulb into bulb socket :.XInsert bulb socket ; or :.XTurn bulb socket ; or : clockwise until
it engages.
XDriver’s side only: Fix the washer fluid
reservoir (Y page 306).
XInstall the cover above the headlamp
(Y page 306).
Replacing bulbs for rear lamps
Before you start to replace a bulb for a rear
lamp, do the following:
XSwitch off the ignition.XTurn the exterior lamp switch to position
$.
XOpen the tailgate.308Replacing bulbsPractical hints
X204_AKB; 3; 23, en-USd2ureepe,Version: 2.11.8.12009-07-16T19:16:58+02:00 - Seite 308
Page 337 of 344
![MERCEDES-BENZ GLK350 4MATIC 2010 X204 Owners Manual ModelCapacityFuels, coolants,
lubricants, etc.Fuel tankAll models17.4 US gal (66.0 l)Premium unleaded
gasoline (Minimum
Posted Octane 91
[Avg. of
96 RON/86 MON])Fuel tank
reserveAll modelsapprox. 2.](/manual-img/4/3527/w960_3527-336.png "MERCEDES-BENZ GLK350 4MATIC 2010 X204 Owners Manual ModelCapacityFuels, coolants,
lubricants, etc.Fuel tankAll models17.4 US gal (66.0 l)Premium unleaded
gasoline (Minimum
Posted Octane 91
[Avg. of
96 RON/86 MON])Fuel tank
reserveAll modelsapprox. 2.")
ModelCapacityFuels, coolants,
lubricants, etc.Fuel tankAll models17.4 US gal (66.0 l)Premium unleaded
gasoline (Minimum
Posted Octane 91
[Avg. of
96 RON/86 MON])Fuel tank
reserveAll modelsapprox. 2.1 US gal (8.0 l)Air
conditioning
systemAll models—R134a refrigerant
and special
PAG lubricant oil
(never R 12)Washer system
and headlamp
cleaning
systemAll models6.3 US qt (6.0 l)MB Windshield
Washer
Concentrate 27
( Y page 339)
Washer fluid mixing
ratio ( Y page 339)Approved engine oils
Engine oils are specifically tested for their
suitability in our engines and durability for our
service intervals. Therefore, only use
approved engine oils and oil filters required
for vehicles with the Maintenance System.
For a listing of approved engine oils and oil
filters, contact an authorized Mercedes-Benz
Center or visit www.mbusa.com (USA only).
! Using engine oils and oil filters of a
specification other than those expressly
required for the Maintenance System, or
changing of oil and oil filter at change
intervals longer than those called for by the
Maintenance System will result in engine or
emission control system damage not
covered by the Mercedes-Benz Limited
Warranty.
Please follow Maintenance System
recommendations for scheduled oil
changes. Failure to do so will result in
engine or emission control system damagenot covered by the Mercedes-Benz Limited
Warranty.
Mercedes-Benz recommends MOBIL OIL.
Use the table below to determine the
MB sheet number.ModelEngine,
typeMB sheet
numberGLK 350 28272229.5GLK 350 4MATIC272229.5
i
MB sheet numbers are printed on the
outside of oil containers.
27 Mixed with water or commercially available premixed washer solvent/antifreeze.
28 USA only.Fuels, coolants, lubricants, etc.335Technical dataX204_AKB; 3; 23, en-USd2ureepe,Version: 2.11.8.12009-07-16T19:16:58+02:00 - Seite 335Z
Page 341 of 344
Washer system and headlamp
cleaning systemGWarning!
Washer solvent/antifreeze is highly
flammable. Do not spill washer solvent/
antifreeze on hot engine parts, because it may
ignite and burn. You could be seriously
burned.
XUse MB Windshield Washer Concentrate
“MB SummerFit”.XMix with water for temperatures above
freezing point.XMix with commercially available premixed
washer solvent/antifreeze for
temperatures below freezing point.
Washer fluid mixing ratio
For temperatures above the freezing point:
1 part “MB SummerFit” to 100 parts water
(1.34 fl oz [40 ml] “MB SummerFit” to 1 gal
[4.0 l] water)
For temperatures below freezing point:
1 part “MB SummerFit” to 100 parts solvent
(1.34 fl oz [40 ml] “MB SummerFit” to 1 gal
[4.0 l] solvent)
Fuels, coolants, lubricants, etc.339Technical dataX204_AKB; 3; 23, en-USd2ureepe,Version: 2.11.8.12009-07-16T19:16:58+02:00 - Seite 339Z