2010 MERCEDES-BENZ GLK350 4MATIC run flat
[x] Cancel search: run flatPage 13 of 344
L
Labels
Certification ................................... 328
Emission control information .........329
Tire and Loading Information
placard ........................................... 227
Tire inflation pressure ....................220
Lamps, exterior
Exterior lamp switch ........................87
Front .............................................. 304
Messages in the multifunction
display ........................................... 283
Rear ............................................... 305
Switching on/off .............................. 87
Lamps, indicator and warning
ABS .......................................... 28, 289
Brakes ..................................... 28, 289
Center console ................................ 31
Coolant .................................... 28, 295
Engine malfunction ..................28, 295
ESP ®
........................................ 28, 293
Fog lamps ........................................ 89
Front fog lamps ................................ 28
Front passenger front air bag off
(Canada only) .......................... 45, 297
Front passenger front air bag off
(USA only) ................................ 42, 298
Fuel tank reserve .....................28, 294
High-beam headlamps ...............28, 90
Instrument cluster ...................28, 288
Low-beam headlamps ................28, 88
Low tire pressure/TPMS
malfunction telltale ..................28, 296
Rear fog lamp .................................. 28
Seat belt telltale ................28, 50, 292
SRS .................................... 28, 36, 293
Turn signals ..................................... 28
LATCH-type child seat anchors (ISOFIX)
see Children in the vehicle
License plate lamps
Messages in the multifunction
display ........................................... 285
Replacing bulbs ............................. 305
Light alloy wheels, cleaning ............. 256
Lighter see Cigarette lighter Lighting ................................................ 87
Daytime running lamp mode ............88
Exterior ............................................ 87
Interior ............................................. 92
Limp-home mode .............................. 108
Load index (tires) ...................... 235, 240
Loading see Vehicle loading
Locator lighting ................................. 122
Locking the vehicle
KEYLESS-GO .................................... 67
Manually ........................................ 299
SmartKey ......................................... 66
Loss of
Key .................................................. 69
Service and Warranty Information
booklet .......................................... 328
Low-beam headlamps ......................... 88
Exterior lamp switch ........................87
Replacing bulbs ............................. 304
Switching on .................................... 88
Lubricants .......................................... 334
Lumbar support ................................... 80
M
Maintenance ........................................ 20
Maintenance System
Service indicator display ................251
Service indicator message .............250
Service term exceeded ..................250
Manual headlamp mode (Low-
beam headlamps) ................................ 88
Maximum engine speed see Vehicle specification
Maximum loaded vehicle weight ..... 240
Maximum load rating (tires) ............. 240
Maximum permissible tire
inflation pressure .............................. 240
Mechanical key see Key, Mechanical
Media interface ................................. 192
Memory function ........................... 33, 86
Menus see Control system menus
Mirrors .................................................. 83
Auto-dimming rear view mirrors ....... 84
Index11X204_AKB; 3; 23, en-USd2ureepe,Version: 2.11.8.12009-07-16T19:16:58+02:00 - Seite 11
Page 74 of 344
A minimum height clearance of 6.90 ft
(2.10 m) is required to open the tailgate.
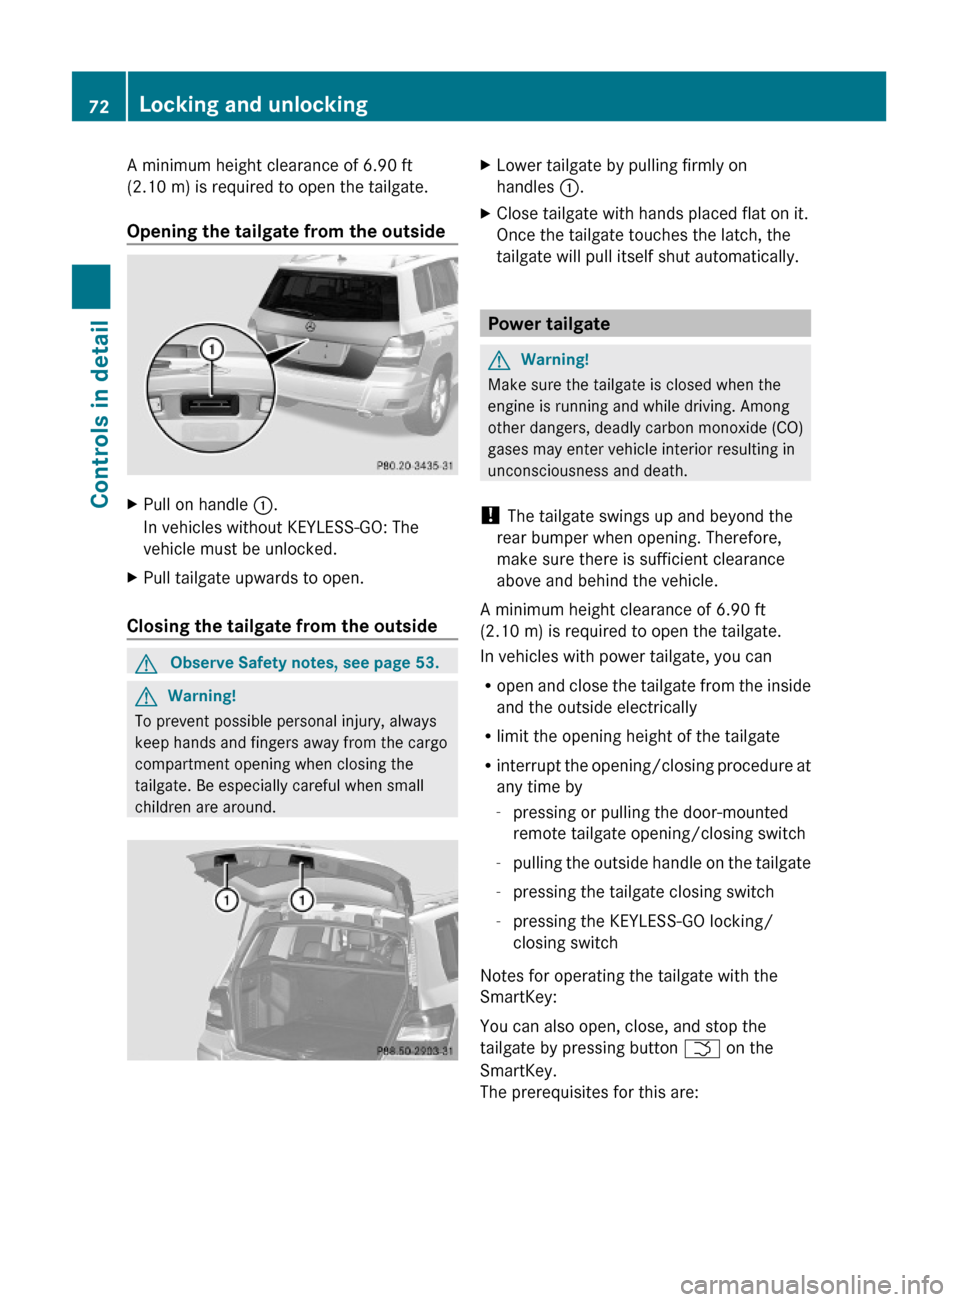
Opening the tailgate from the outside
XPull on handle :.
In vehicles without KEYLESS-GO: The
vehicle must be unlocked.
XPull tailgate upwards to open.
Closing the tailgate from the outside
GObserve Safety notes, see page 53.GWarning!
To prevent possible personal injury, always
keep hands and fingers away from the cargo
compartment opening when closing the
tailgate. Be especially careful when small
children are around.
XLower tailgate by pulling firmly on
handles :.
XClose tailgate with hands placed flat on it.
Once the tailgate touches the latch, the
tailgate will pull itself shut automatically.
Power tailgate
GWarning!
Make sure the tailgate is closed when the
engine is running and while driving. Among
other dangers, deadly carbon monoxide (CO)
gases may enter vehicle interior resulting in
unconsciousness and death.
! The tailgate swings up and beyond the
rear bumper when opening. Therefore,
make sure there is sufficient clearance
above and behind the vehicle.
A minimum height clearance of 6.90 ft
(2.10 m) is required to open the tailgate.
In vehicles with power tailgate, you can
Ropen and close the tailgate from the inside
and the outside electrically
Rlimit the opening height of the tailgate
Rinterrupt the opening/closing procedure at
any time by
-pressing or pulling the door-mounted
remote tailgate opening/closing switch
-pulling the outside handle on the tailgate
-pressing the tailgate closing switch
-pressing the KEYLESS-GO locking/
closing switch
Notes for operating the tailgate with the
SmartKey:
You can also open, close, and stop the
tailgate by pressing button F on the
SmartKey.
The prerequisites for this are:
72Locking and unlockingControls in detail
X204_AKB; 3; 23, en-USd2ureepe,Version: 2.11.8.12009-07-16T19:16:58+02:00 - Seite 72
Page 215 of 344
Any noticeable irregularities in engine
operation should be repaired promptly.
Otherwise, excessive unburned fuel may
reach the catalytic converter, causing it to
overheat and potentially start a fire.
i Only use premium unleaded gasoline with
a minimum Posted Octane Rating of 91
(average of 96 RON/86 MON).
Information on gasoline quality can
normally be found on the fuel pump. Please
contact gas station personnel in case
labels on the pump cannot be found.
Locking/unlocking the vehicle with the
SmartKey or KEYLESS-GO automatically
locks/unlocks the fuel filler flap.
iIn case the central locking system does
not release the fuel filler flap, see “Fuel filler
flap” (Y page 301).
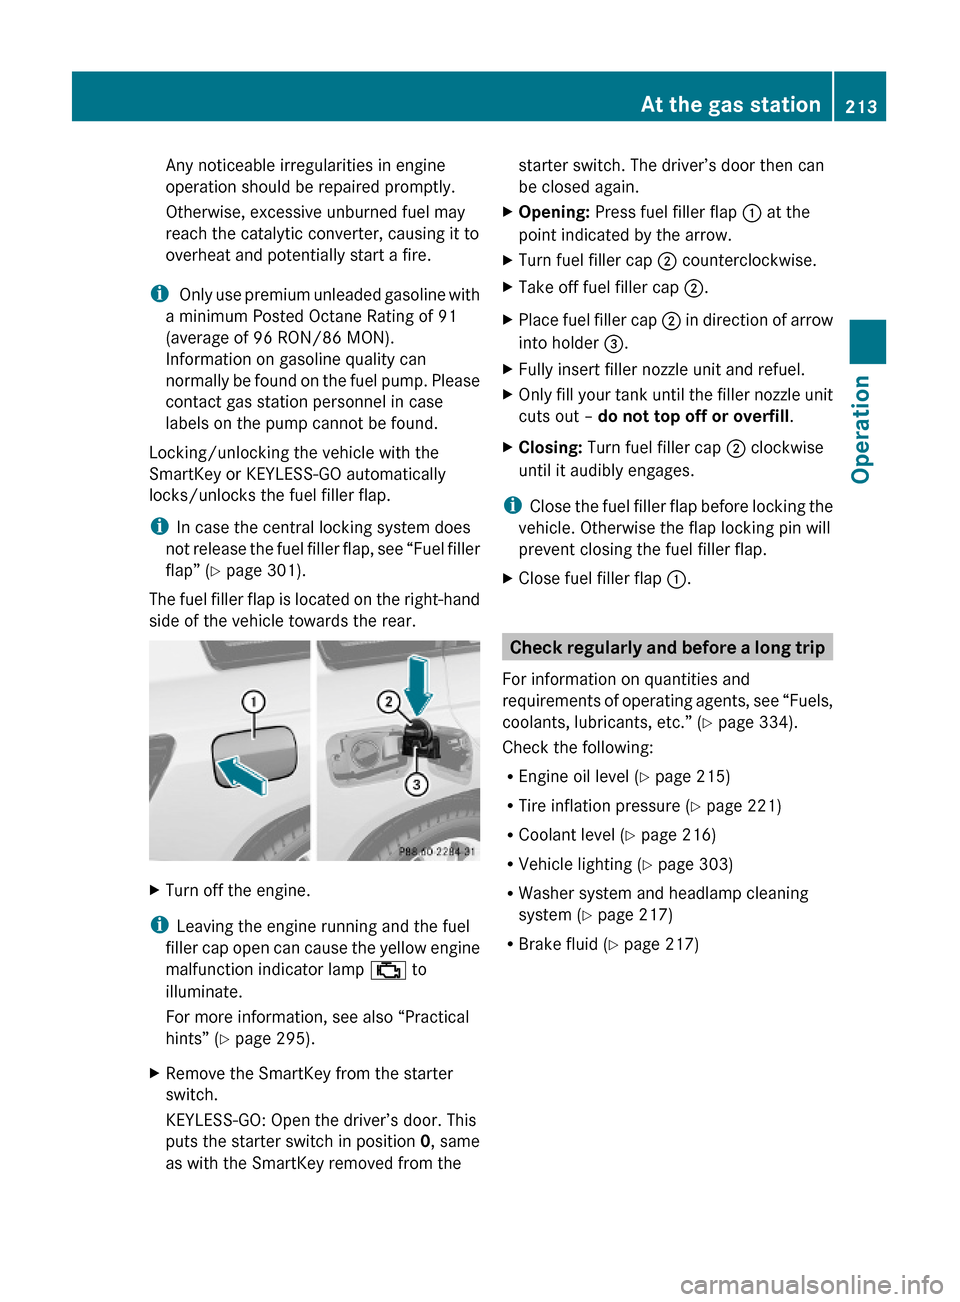
The fuel filler flap is located on the right-hand
side of the vehicle towards the rear.
XTurn off the engine.
iLeaving the engine running and the fuel
filler cap open can cause the yellow engine
malfunction indicator lamp ; to
illuminate.
For more information, see also “Practical
hints” (Y page 295).
XRemove the SmartKey from the starter
switch.
KEYLESS-GO: Open the driver’s door. This
puts the starter switch in position 0, same
as with the SmartKey removed from the
starter switch. The driver’s door then can
be closed again.
XOpening: Press fuel filler flap : at the
point indicated by the arrow.
XTurn fuel filler cap ; counterclockwise.XTake off fuel filler cap ;.XPlace fuel filler cap ; in direction of arrow
into holder =.
XFully insert filler nozzle unit and refuel.XOnly fill your tank until the filler nozzle unit
cuts out – do not top off or overfill.
XClosing: Turn fuel filler cap ; clockwise
until it audibly engages.
iClose the fuel filler flap before locking the
vehicle. Otherwise the flap locking pin will
prevent closing the fuel filler flap.
XClose fuel filler flap :.
Check regularly and before a long trip
For information on quantities and
requirements of operating agents, see “Fuels,
coolants, lubricants, etc.” (Y page 334).
Check the following:
REngine oil level (Y page 215)
RTire inflation pressure (Y page 221)
RCoolant level (Y page 216)
RVehicle lighting (Y page 303)
RWasher system and headlamp cleaning
system (Y page 217)
RBrake fluid (Y page 217)
At the gas station213OperationX204_AKB; 3; 23, en-USd2ureepe,Version: 2.11.8.12009-07-16T19:16:58+02:00 - Seite 213Z
Page 225 of 344
iThe recommended tire inflation pressures
for your vehicle can be found on
R the Tire and Loading Information placard
located on the driver’s door B-pillar
( Y page 227)
R the tire inflation pressure label on the
inside of the fuel filler flap
The tire inflation pressures are not listed in
the Operator’s Manual.GWarning!
The tire pressure loss warning system does
not provide a warning for wrongly selected tire
inflation pressures. Always adjust tire
inflation pressure according to the Tire and
Loading Information placard on the driver’s
door B-pillar or on the tire inflation pressure
label located on the inside of the fuel filler flap.
The tire pressure loss warning system does
not replace regular checks of the tire inflation
pressures since a gradual pressure loss in
more than one tire cannot be detected by the
tire pressure loss warning system.
The tire pressure loss warning system is not
able to issue a warning due to a sudden
dramatic loss of tire inflation pressure (e.g.
tire blowout caused by a foreign object). In
this case bring the vehicle to a halt by carefully
applying the brakes and avoiding abrupt
steering maneuvers.
Restarting the tire pressure loss warning
system
The tire pressure loss warning system must
be restarted in the following situations:
R after you have changed the tire inflation
pressure
R after you have replaced the wheels or tires
R after you have installed new wheels or tires
XUsing the Tire and Loading Information
placard on the driver’s door B-pillar or, if
available, the tire inflation pressure label on
the inside of the fuel filler flap, make sure
the tire inflation pressure of all four tires is
correct.GWarning!
The tire pressure loss warning system can
only warn you in a reliable manner if you have
set the correct tire inflation pressures for
each tire.
If an incorrect tire inflation pressure was set,
the system will monitor the pressure
according to the incorrect value.
XSwitch on the ignition.XPress button = or ; on the
multifunction steering wheel to select the
Service menu (Y page 118).XPress button 9 or : on the
multifunction steering wheel to select
Tire Pressure .XPress button a on the multifunction
steering wheel to confirm.
The following message appears in the
multifunction display:
Run Flat Indicator
Active
Press 'OK' to RestartXPress button a.
The following message will appear in the
multifunction display:
Tire Pressure
Now OK?
Cancel
YesXIf you wish to confirm: Press button
9 or : to select Yes.XPress button a.
The following message will appear in the
multifunction display:
Run Flat
Indicator
Restarted
After a certain “learning phase”, the tire
pressure loss warning system checks the
set pressure values for all four tires.XIf you wish to cancel: Press button 9
or : to select Cancel.XPress button a to confirm.
The previous settings remain unchanged.Tires and wheels223OperationX204_AKB; 3; 23, en-USd2ureepe,Version: 2.11.8.12009-07-16T19:16:58+02:00 - Seite 223Z
Page 245 of 344
Winter driving instructionsGWarning!
If the vehicle becomes stuck in snow, make
sure snow is kept clear of the exhaust pipe
and from around the vehicle with the engine
running. Otherwise, deadly carbon monoxide
(CO) gases may enter vehicle interior
resulting in unconsciousness and death.
To assure sufficient fresh air ventilation, open
a window slightly on the side of the vehicle
not facing the wind.
GWarning!
The outside temperature indicator is not
designed to serve as an ice-warning device
and is therefore unsuitable for that purpose.
Indicated temperatures just above the
freezing point do not guarantee that the road
surface is free of ice. The road may still be icy,
especially in wooded areas or on bridges.
GWarning!
On slippery road surfaces, never downshift in
order to obtain braking action. This could
result in drive wheel slip and reduced vehicle
control. Your vehicle’s ABS will not prevent
this type of loss of control.
The most important rule for slippery or icy
roads is to drive sensibly and to avoid abrupt
acceleration, braking and steering
maneuvers. Do not use the cruise control
system under such conditions.
When the vehicle is in danger of skidding, shift
the automatic transmission to neutral
position N. Try to keep the vehicle under
control by corrective steering action.
i For information on driving with snow
chains, see “Snow chains” ( Y page 242).
Road salts and chemicals can adversely
affect braking efficiency. Increased pedal
force may become necessary to produce the
normal brake effect.
Depressing the brake pedal periodically when
traveling at length on salt-strewn roads can
bring road-salt-impaired braking efficiency
back to normal.
If the vehicle is parked after being driven on
salt-treated roads, the braking efficiency
should be tested as soon as possible after
driving is resumed.GWarning!
Make sure not to endanger any other road
users when carrying out these braking
maneuvers.
Driving instructions
Drive sensibly – save fuel
To save fuel you should:
R Keep tires at the recommended inflation
pressures.
R Remove unnecessary loads.
R Remove roof rack when not in use.
R Allow engine to warm up under low load
use.
R Avoid frequent acceleration and
deceleration.
R Have all maintenance work performed at
the intervals specified in the Maintenance
Booklet and as required by the
Maintenance system. Contact an
authorized Mercedes-Benz Center.
Fuel consumption is also increased by driving
in cold weather, in stop-and-go traffic, on
short trips and in mountainous areas.
Drinking and driving
GWarning!
Drinking and driving and/or taking drugs and
driving are very dangerous combinations.
Even a small amount of alcohol or drugs can
affect your reflexes, perceptions and
judgment.
Driving instructions243OperationX204_AKB; 3; 23, en-USd2ureepe,Version: 2.11.8.12009-07-16T19:16:58+02:00 - Seite 243Z
Page 270 of 344
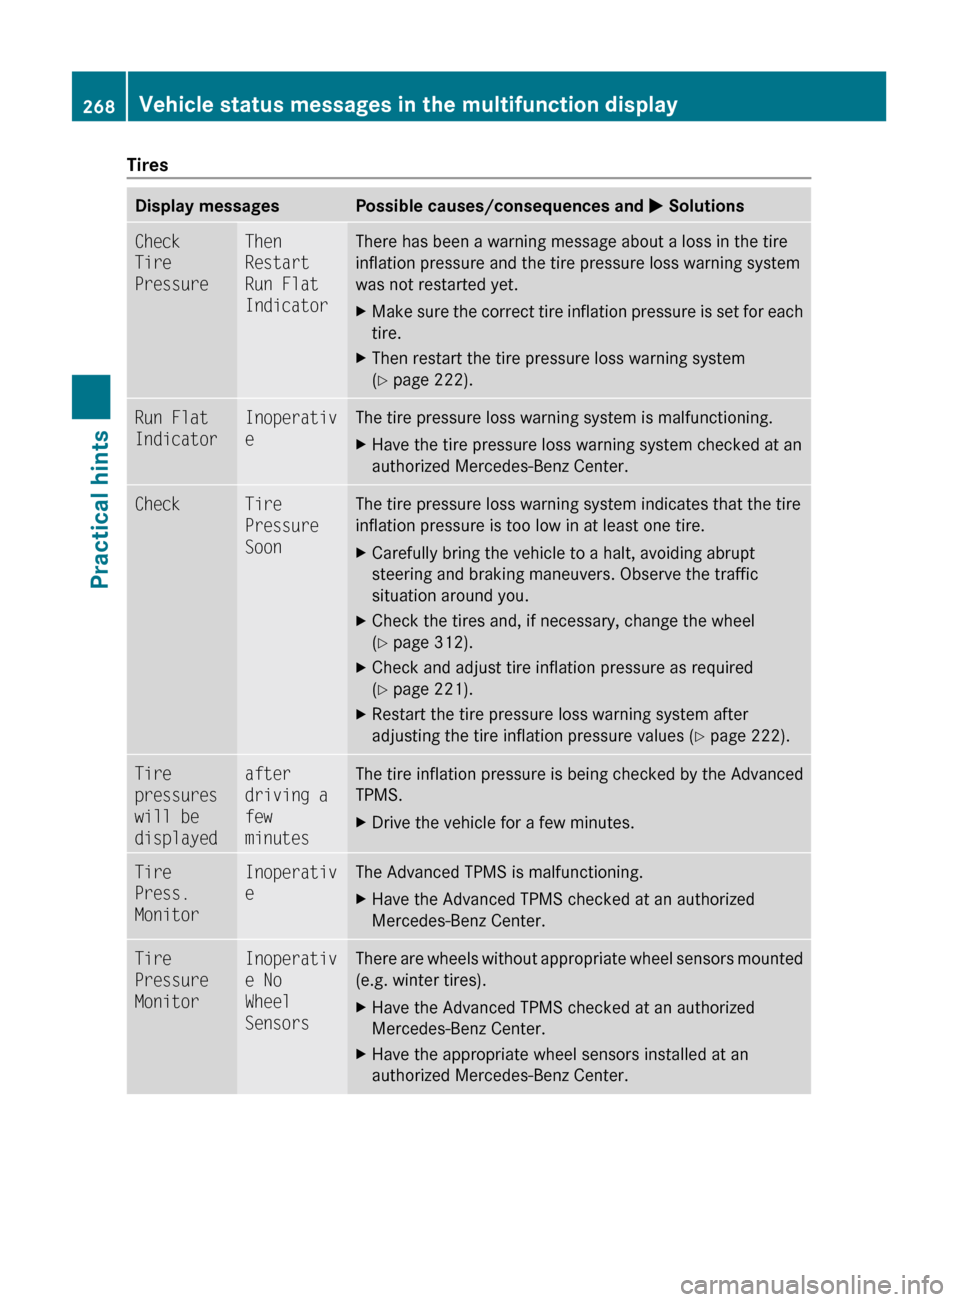
TiresDisplay messagesPossible causes/consequences and M SolutionsCheck
Tire
PressureThen
Restart
Run Flat
IndicatorThere has been a warning message about a loss in the tire
inflation pressure and the tire pressure loss warning system
was not restarted yet.XMake sure the correct tire inflation pressure is set for each
tire.XThen restart the tire pressure loss warning system
( Y page 222).Run Flat
IndicatorInoperativ
eThe tire pressure loss warning system is malfunctioning.XHave the tire pressure loss warning system checked at an
authorized Mercedes-Benz Center.CheckTire
Pressure
SoonThe tire pressure loss warning system indicates that the tire
inflation pressure is too low in at least one tire.XCarefully bring the vehicle to a halt, avoiding abrupt
steering and braking maneuvers. Observe the traffic
situation around you.XCheck the tires and, if necessary, change the wheel
( Y page 312).XCheck and adjust tire inflation pressure as required
( Y page 221).XRestart the tire pressure loss warning system after
adjusting the tire inflation pressure values ( Y page 222).Tire
pressures
will be
displayedafter
driving a
few
minutesThe tire inflation pressure is being checked by the Advanced
TPMS.XDrive the vehicle for a few minutes.Tire
Press.
MonitorInoperativ
eThe Advanced TPMS is malfunctioning.XHave the Advanced TPMS checked at an authorized
Mercedes-Benz Center.Tire
Pressure
MonitorInoperativ
e No
Wheel
SensorsThere are wheels without appropriate wheel sensors mounted
(e.g. winter tires).XHave the Advanced TPMS checked at an authorized
Mercedes-Benz Center.XHave the appropriate wheel sensors installed at an
authorized Mercedes-Benz Center.268Vehicle status messages in the multifunction displayPractical hints
X204_AKB; 3; 23, en-USd2ureepe,Version: 2.11.8.12009-07-16T19:16:58+02:00 - Seite 268
Page 298 of 344
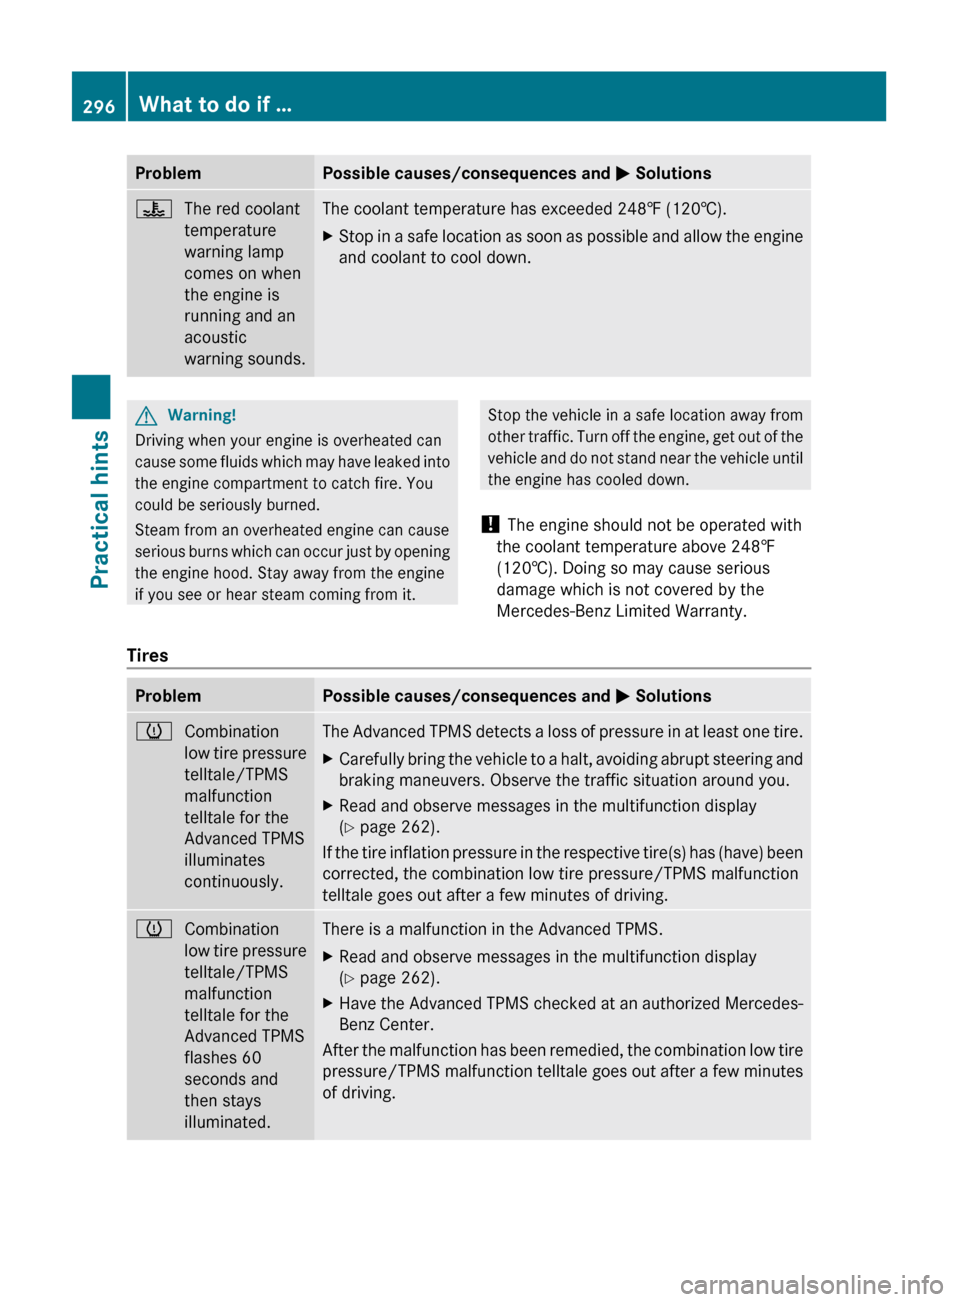
ProblemPossible causes/consequences and M Solutions?The red coolant
temperature
warning lamp
comes on when
the engine is
running and an
acoustic
warning sounds.The coolant temperature has exceeded 248‡ (120†).XStop in a safe location as soon as possible and allow the engine
and coolant to cool down.GWarning!
Driving when your engine is overheated can
cause some fluids which may have leaked into
the engine compartment to catch fire. You
could be seriously burned.
Steam from an overheated engine can cause
serious burns which can occur just by opening
the engine hood. Stay away from the engine
if you see or hear steam coming from it.
Stop the vehicle in a safe location away from
other traffic. Turn off the engine, get out of the
vehicle and do not stand near the vehicle until
the engine has cooled down.
! The engine should not be operated with
the coolant temperature above 248‡
(120†). Doing so may cause serious
damage which is not covered by the
Mercedes-Benz Limited Warranty.
Tires
ProblemPossible causes/consequences and M SolutionshCombination
low tire pressure
telltale/TPMS
malfunction
telltale for the
Advanced TPMS
illuminates
continuously.The Advanced TPMS detects a loss of pressure in at least one tire.XCarefully bring the vehicle to a halt, avoiding abrupt steering and
braking maneuvers. Observe the traffic situation around you.XRead and observe messages in the multifunction display
( Y page 262).
If the tire inflation pressure in the respective tire(s) has (have) been
corrected, the combination low tire pressure/TPMS malfunction
telltale goes out after a few minutes of driving.
hCombination
low tire pressure
telltale/TPMS
malfunction
telltale for the
Advanced TPMS
flashes 60
seconds and
then stays
illuminated.There is a malfunction in the Advanced TPMS.XRead and observe messages in the multifunction display
( Y page 262).XHave the Advanced TPMS checked at an authorized Mercedes-
Benz Center.
After the malfunction has been remedied, the combination low tire
pressure/TPMS malfunction telltale goes out after a few minutes
of driving.
296What to do if …Practical hints
X204_AKB; 3; 23, en-USd2ureepe,Version: 2.11.8.12009-07-16T19:16:58+02:00 - Seite 296
Page 323 of 344
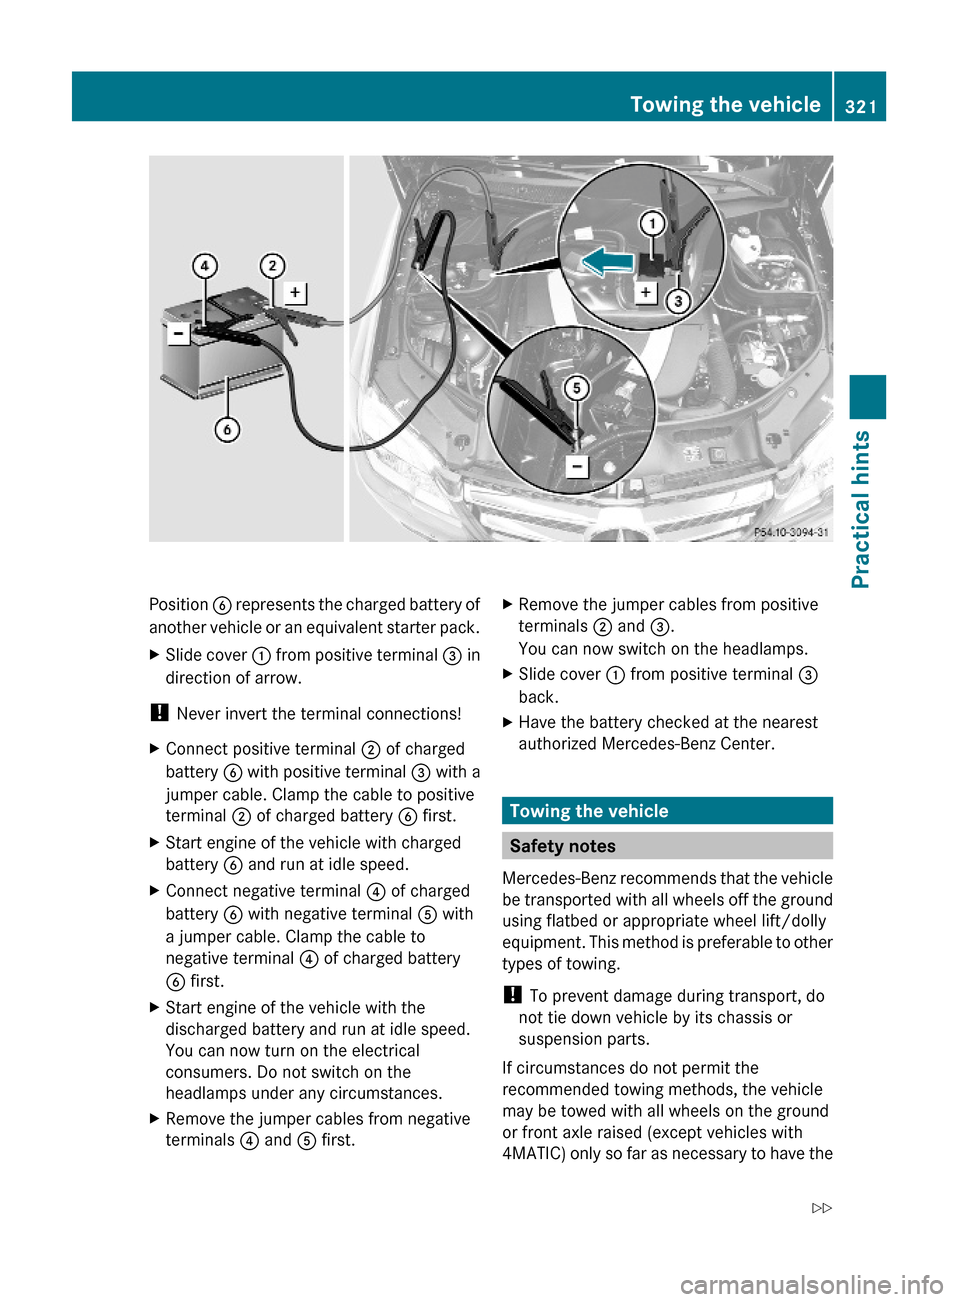
Position B represents the charged battery of
another vehicle or an equivalent starter pack.
XSlide cover : from positive terminal = in
direction of arrow.
! Never invert the terminal connections!
XConnect positive terminal ; of charged
battery B with positive terminal = with a
jumper cable. Clamp the cable to positive
terminal ; of charged battery B first.
XStart engine of the vehicle with charged
battery B and run at idle speed.
XConnect negative terminal ? of charged
battery B with negative terminal A with
a jumper cable. Clamp the cable to
negative terminal ? of charged battery
B first.
XStart engine of the vehicle with the
discharged battery and run at idle speed.
You can now turn on the electrical
consumers. Do not switch on the
headlamps under any circumstances.
XRemove the jumper cables from negative
terminals ? and A first.
XRemove the jumper cables from positive
terminals ; and =.
You can now switch on the headlamps.
XSlide cover : from positive terminal =
back.
XHave the battery checked at the nearest
authorized Mercedes-Benz Center.
Towing the vehicle
Safety notes
Mercedes-Benz recommends that the vehicle
be transported with all wheels off the ground
using flatbed or appropriate wheel lift/dolly
equipment. This method is preferable to other
types of towing.
! To prevent damage during transport, do
not tie down vehicle by its chassis or
suspension parts.
If circumstances do not permit the
recommended towing methods, the vehicle
may be towed with all wheels on the ground
or front axle raised (except vehicles with
4MATIC) only so far as necessary to have the
Towing the vehicle321Practical hintsX204_AKB; 3; 23, en-USd2ureepe,Version: 2.11.8.12009-07-16T19:16:58+02:00 - Seite 321Z