2010 MERCEDES-BENZ GLK350 4MATIC height adjustment
[x] Cancel search: height adjustmentPage 12 of 344
NECK-PRO active front head
restraints ......................................... 51
Rear seat head restraints ................. 80
Height adjustment
Seat belt outlet ................................ 50
Seats ............................................... 78
High-beam flasher ............................... 90
High-beam headlamps ................ 90, 304
Replacing bulbs ............................. 304
Hill-start assist system ..................... 171
Hood ................................................... 214
Messages in the multifunction
display ........................................... 277
Hooks ................................................. 189
Horn ...................................................... 27
Hydroplaning ..................................... 246
I
Identification labels .......................... 328
Identification number, vehicle
(VIN) ................................................... 329
Ignition ........................................... 76, 99
Immobilizer .......................................... 63
Infant and child restraint systems see Children in the vehicle
Inflation pressure
see Tires, Inflation pressure
Inside door handle .............................. 70
Instrument cluster ...................... 28, 108
Illumination .................................... 109
Lamps ............................................ 288
Multifunction display .....................112
Instrument lighting
see Instrument cluster, Illumination
Instrument panel
see Instrument cluster
Instruments and controls
see Cockpit
Interior lighting
Delayed shut-off ............................ 123
Emergency lighting ..........................92
Front ................................................ 92
Front reading lamps .........................92
Rear ................................................. 92
Rear reading lamps ..........................92
Interior rear view mirror ..................... 84
Auto-dimming rear view mirrors ....... 84
Interior storage spaces see Storage compartments
Intermittent wiping ............................. 93
Rain sensor ...................................... 93
ISOFIX (Child seat anchors –
LATCH-type) see Children in the vehicle
J
Jack ..................................................... 261
Jump starting ..................................... 319
K
Key, Mechanical
Loss of ............................................. 69
Replacing ......................................... 70
Unlocking/locking manually ..........299
Key, SmartKey
Battery check lamp ..........................69
Checking batteries ...........................69
Factory setting ........................... 67, 69
Global locking (KEYLESS-
GO) .................................................. 69
Global locking (SmartKey) ................ 67
Global unlocking (KEYLESS-
GO) .................................................. 69
Global unlocking
(SmartKey) ....................................... 67
Important notes on KEYLESS-GO .....68
Locking/unlocking ........................... 66
Loss of ............................................. 69
Messages in the multifunction
display ........................................... 277
Opening and closing the
panorama roof ................................. 97
Opening and closing the windows .... 97
Remote control ................................ 66
Replacing ......................................... 70
Replacing batteries ........................302
Restoring to factory setting .......67, 69
Selective setting ........................67, 69
Starter switch positions ...................76
KEYLESS-GO
Starter switch positions ...................76
Kickdown ........................................... 105
Kilopascal (air pressure unit) ........... 240
10IndexX204_AKB; 3; 23, en-USd2ureepe,Version: 2.11.8.12009-07-16T19:16:58+02:00 - Seite 10
Page 16 of 344
Proximity keysee Key, SmartKey
PSI (air pressure unit) ....................... 240
R
Radio .................................................. 136
Satellite radio ................................ 140
Selecting stations ..........................115
Radio transmitters ............................ 249
Rain sensor see Intermittent wiping
Rear axle oil ....................................... 334
Rear center console ashtray see Ashtrays
Rear center seat belt
Unblocking ....................................... 50
Rear doors
Child safety locks ............................ 58
Rear door window
Override switch ................................ 58
Rear fog lamp
see Fog lamps
Rear lamps
see Tail lamps
Rear seat head restraints
see Head restraints
Rear view camera .............................. 174
Cleaning the camera lens ..............254
Rear window defroster ..................... 184
Rear window wiper/washer ............... 94
Recommended tire inflation
pressure ..................................... 219, 240
Refrigerant, air conditioning ............ 336
Refueling ............................................ 212
Regular checks .................................. 213
Reminder, Seat belt see Seat belts, Telltale
Remote control
see Key, SmartKey
Remote door lock (Tele Aid) ............. 205
Remote door unlock (Tele Aid) ......... 204
Replacing
Key .................................................. 70
Replacing bulbs ................................. 303
Reporting safety defects .................... 23
Research Octane Number see RON
Reserve fuel
Messages in the multifunction
display ........................................... 282
Warning lamp ................................. 294
Restraint systems
see Occupant safety
Rims ........................................... 241, 331
Roadside Assistance ................... 20, 203
Roller sunblinds ................................. 184
RON (Research Octane Number) ..... 337
Roof rack ............................................ 188
Rubber parts, cleaning ...................... 256
S
Safety
Driving safety systems .....................59
Occupant safety ............................... 36
Reporting defects ............................ 23
Safety belts
see Seat belts
Satellite radio .................................... 140
Seat belt force limiter ......................... 51
Seat belts ............................................. 47
Children in the vehicle .....................53
Cleaning ......................................... 256
Fastening ......................................... 49
Height adjustment ...........................50
Proper use of ................................... 48
Rear center seat .............................. 50
Safety guidelines ............................. 39
Safety notes ..................................... 47
Telltale ........................................... 292
Seat heating ......................................... 81
Seating capacity ................................ 228
Seats ..................................................... 78
Adjusting ......................................... 33
Adjustment ...................................... 78
Easy-entry/exit feature ....................83
Heating ............................................ 81
Memory function .............................. 86
Rear seat bench ............................. 189
Securing cargo
Cargo tie-down rings ...................... 188
Selective setting
see Key, SmartKey
Selector lever
see Gear selector lever
14IndexX204_AKB; 3; 23, en-USd2ureepe,Version: 2.11.8.12009-07-16T19:16:58+02:00 - Seite 14
Page 52 of 344
XPush latch plate ; into buckle = until it
clicks.
XIf necessary, adjust the seat belt to the
correct height (Y page 50).
XIf necessary, tighten the lap portion to a
snug fit by pulling shoulder portion up.
All lap/shoulder belts except the driver’s seat
belt have special seat belt retractors to
secure child restraints properly. For more
information on special seat belt retractors,
see “Infant and child restraint systems”
(Y page 54).
To release the seat belt with seat belt release
button ?, see (Y page 50).
Releasing the seat belts
XPress seat belt release button ?
(Y page 49).
Allow the retractor to completely rewind
the seat belt by guiding latch plate ;
(Y page 49).
! Make sure the seat belt retracts
completely. Otherwise the seat belt and/or
latch plate could get caught or pinched in
the door or in the seat mechanism. This can
damage the seat belt and impair its
effectiveness, and/or cause damage to the
door and/or door trim panel. Such damage
is not covered by the Mercedes-Benz
Limited Warranty.
Damaged seat belts must be replaced.
Contact an authorized Mercedes-Benz
Center.
Rear center seat belt
The seat belt of the rear center seat may be
blocked when the left rear seat backrest is
folded forward and back (Y page 189). The
seat belt can then not be pulled out.
XUnblocking the seat belt of the rear
center seat: Pull the center seat belt
approximately 1 in (25 mm) out of the seat
belt outlet in the seat backrest and release
it.
The seat belt is retracted and unblocked.
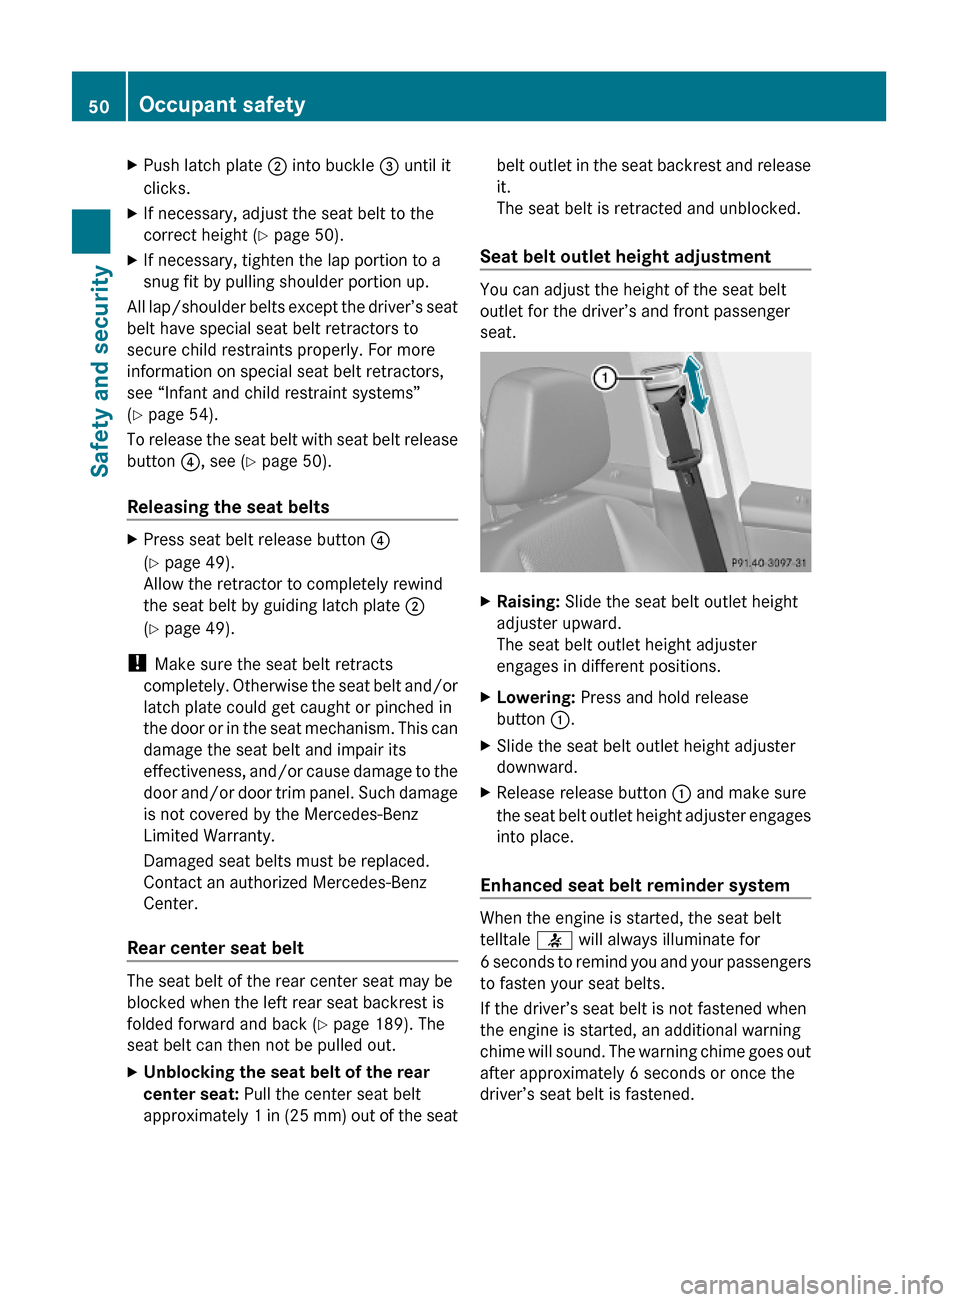
Seat belt outlet height adjustment
You can adjust the height of the seat belt
outlet for the driver’s and front passenger
seat.
XRaising: Slide the seat belt outlet height
adjuster upward.
The seat belt outlet height adjuster
engages in different positions.
XLowering: Press and hold release
button :.
XSlide the seat belt outlet height adjuster
downward.
XRelease release button : and make sure
the seat belt outlet height adjuster engages
into place.
Enhanced seat belt reminder system
When the engine is started, the seat belt
telltale 7 will always illuminate for
6 seconds to remind you and your passengers
to fasten your seat belts.
If the driver’s seat belt is not fastened when
the engine is started, an additional warning
chime will sound. The warning chime goes out
after approximately 6 seconds or once the
driver’s seat belt is fastened.
50Occupant safetySafety and security
X204_AKB; 3; 23, en-USd2ureepe,Version: 2.11.8.12009-07-16T19:16:58+02:00 - Seite 50
Page 54 of 344
restraints on the front seats are designed to
move forward in the direction of travel. They
thus provide the head with increased support
earlier on in the collision sequence. The
NECK-PRO active front head restraints will
move forward whether the seats are occupied
or not.
GWarning!
Do not attach any objects (e.g. hangers) to the
head restraint posts. Otherwise, the NECK-
PRO active front head restraints may not be
able to function properly or offer the intended
degree of protection they were designed for
in the event of a rear-end collision.
GWarning!
Only use seat or head restraint covers which
have been tested and approved by Mercedes-
Benz for your vehicle model.
Using other seat or head restraint covers may
interfere with or prevent the activation of the
NECK-PRO active front head restraints and/
or the deployment of the front side impact air
bags.
Contact an authorized Mercedes-Benz Center
for availability.
When the NECK-PRO active front head
restraints have been triggered in an accident,
the NECK-PRO active front head restraints
must be reset. Otherwise, the NECK-PRO
active front head restraints cannot offer any
additional protection in the event of another
rear-end collision.
For information on resetting the activated
NECK-PRO active front head restraints, see
“Resetting activated head restraints”
(Y page 301).
You cannot remove the NECK-PRO active
front head restraints.
GWarning!
For your protection, drive only with properly
positioned head restraints.
Adjust the head restraint so that it is as close
to the head as possible and the center of the
head restraint supports the back of the head
at eye level. This will reduce the potential for
injury to the head and neck in the event of an
accident or similar situation.
For information on head restraint adjustment,
see “Head restraint height” (Y page 79), or
see “Head restraint fore and aft adjustment”
(Y page 80).
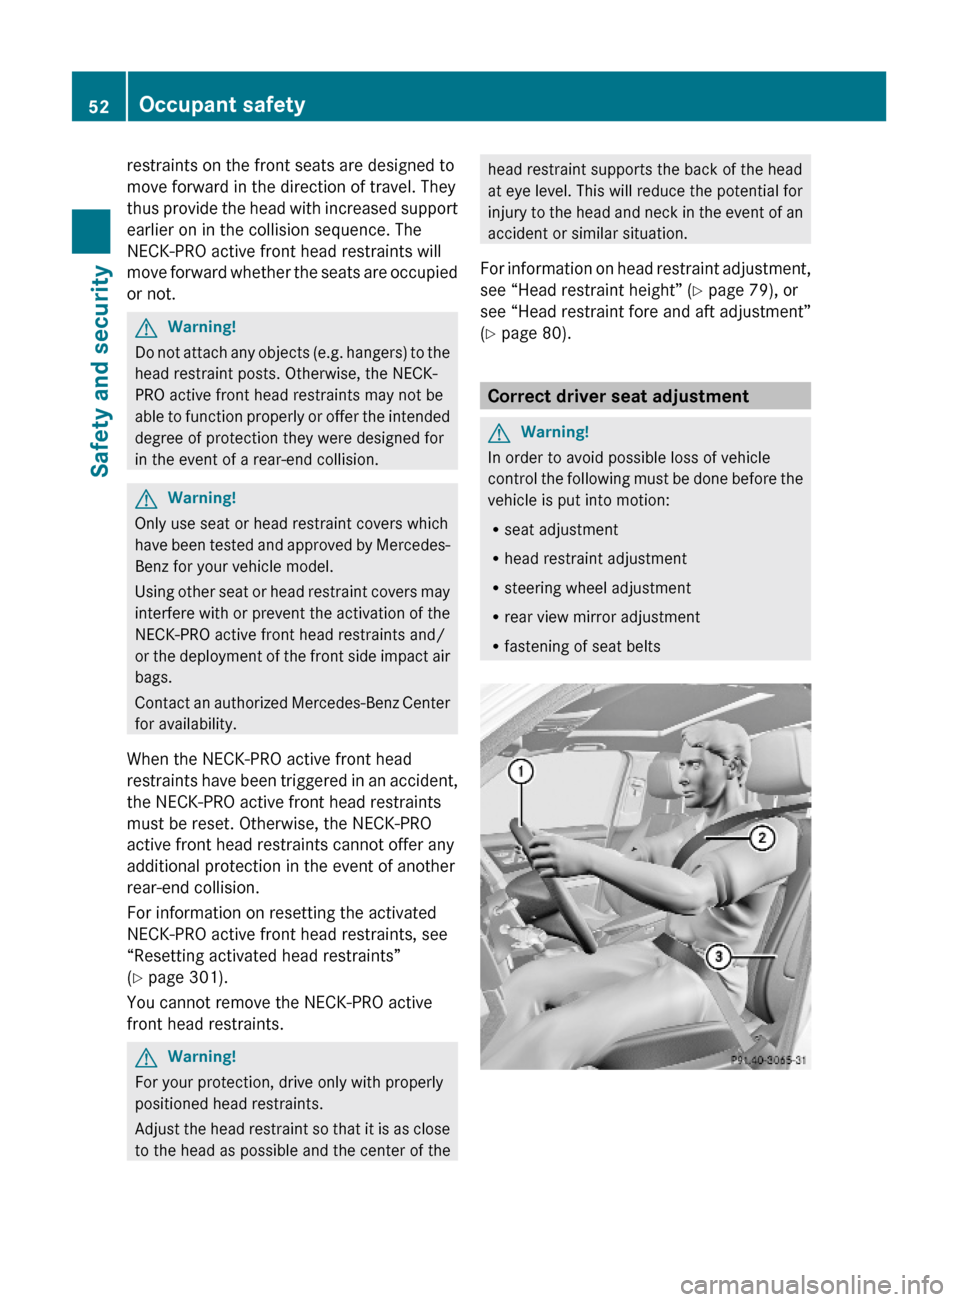
Correct driver seat adjustment
GWarning!
In order to avoid possible loss of vehicle
control the following must be done before the
vehicle is put into motion:
Rseat adjustment
Rhead restraint adjustment
Rsteering wheel adjustment
Rrear view mirror adjustment
Rfastening of seat belts
52Occupant safetySafety and security
X204_AKB; 3; 23, en-USd2ureepe,Version: 2.11.8.12009-07-16T19:16:58+02:00 - Seite 52
Page 81 of 344
Do not drive the vehicle without the seat head
restraints. Head restraints are intended to
help reduce injuries during an accident.
Seat adjustment
! When moving the seats, make sure there
are no items in the footwell or behind the
seats. Otherwise, you could damage the
seats and/or the items.
Power seats
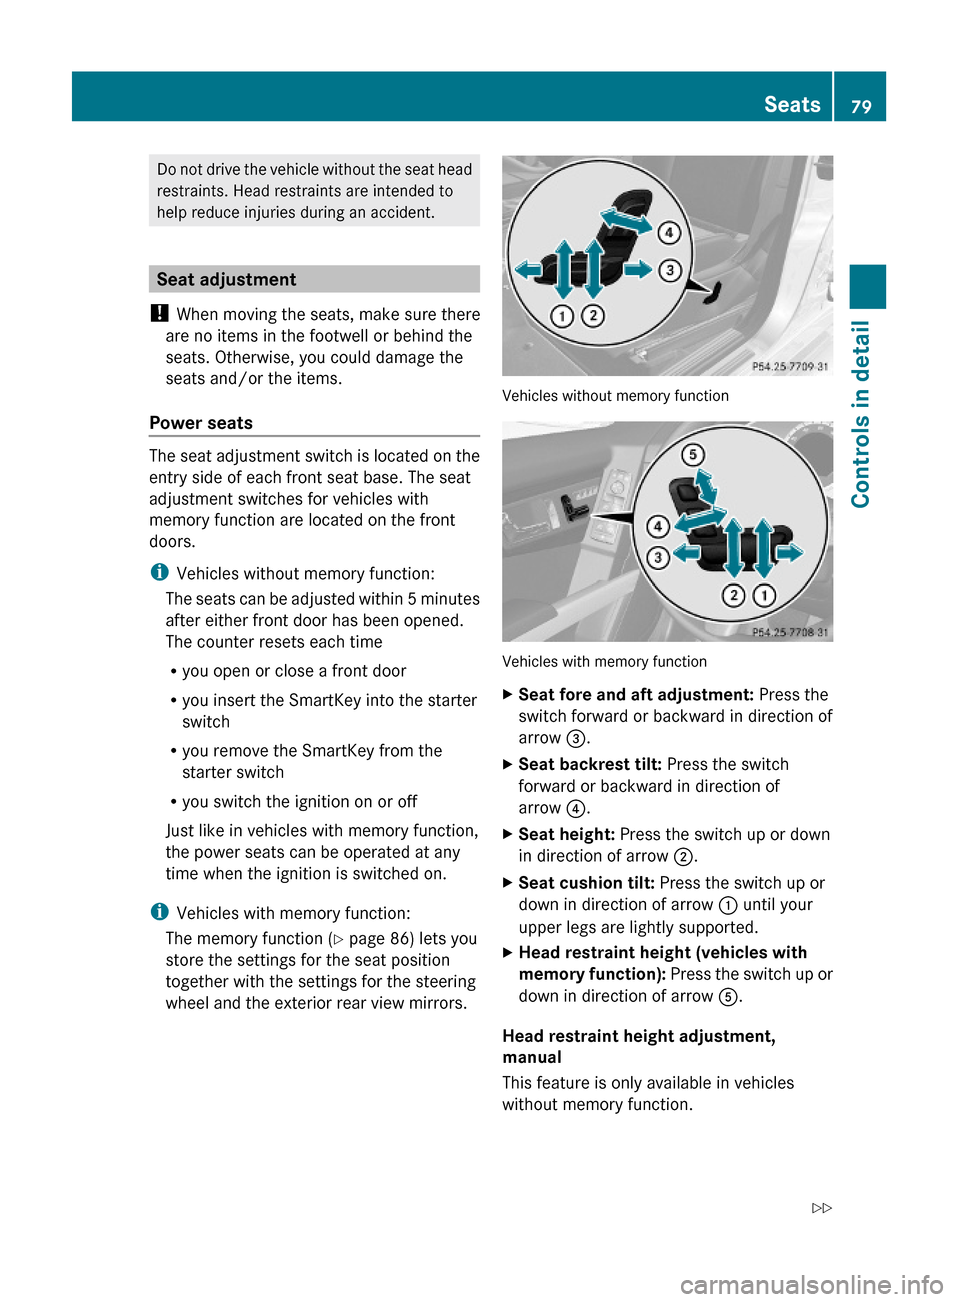
The seat adjustment switch is located on the
entry side of each front seat base. The seat
adjustment switches for vehicles with
memory function are located on the front
doors.
iVehicles without memory function:
The seats can be adjusted within 5 minutes
after either front door has been opened.
The counter resets each time
Ryou open or close a front door
Ryou insert the SmartKey into the starter
switch
Ryou remove the SmartKey from the
starter switch
Ryou switch the ignition on or off
Just like in vehicles with memory function,
the power seats can be operated at any
time when the ignition is switched on.
iVehicles with memory function:
The memory function (Y page 86) lets you
store the settings for the seat position
together with the settings for the steering
wheel and the exterior rear view mirrors.
Vehicles without memory function
Vehicles with memory function
XSeat fore and aft adjustment: Press the
switch forward or backward in direction of
arrow =.
XSeat backrest tilt: Press the switch
forward or backward in direction of
arrow ?.
XSeat height: Press the switch up or down
in direction of arrow ;.
XSeat cushion tilt: Press the switch up or
down in direction of arrow : until your
upper legs are lightly supported.
XHead restraint height (vehicles with
memory function): Press the switch up or
down in direction of arrow A.
Head restraint height adjustment,
manual
This feature is only available in vehicles
without memory function.
Seats79Controls in detailX204_AKB; 3; 23, en-USd2ureepe,Version: 2.11.8.12009-07-16T19:16:58+02:00 - Seite 79Z
Page 82 of 344
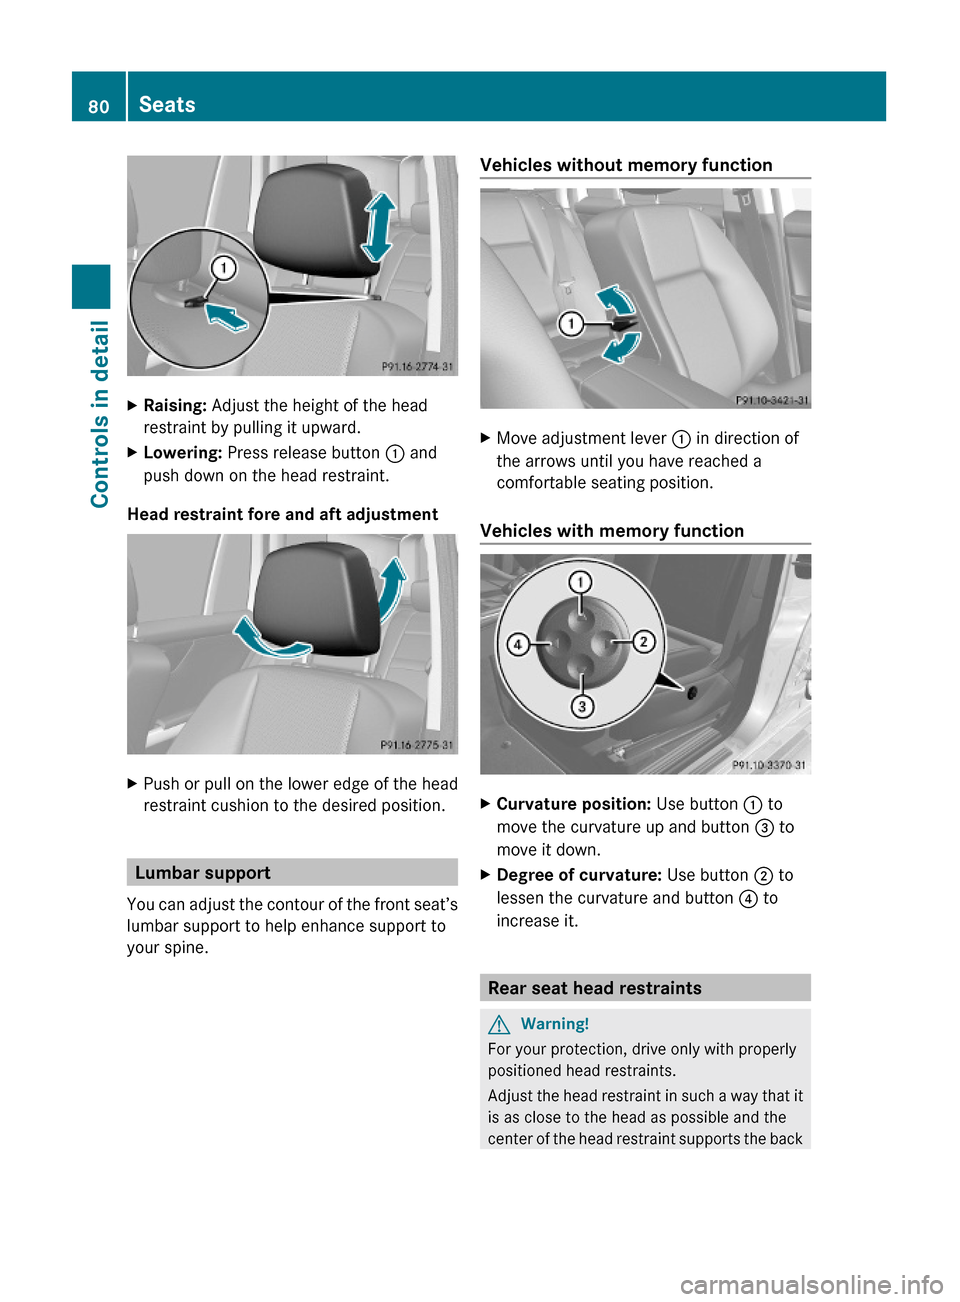
XRaising: Adjust the height of the head
restraint by pulling it upward.
XLowering: Press release button : and
push down on the head restraint.
Head restraint fore and aft adjustment
XPush or pull on the lower edge of the head
restraint cushion to the desired position.
Lumbar support
You can adjust the contour of the front seat’s
lumbar support to help enhance support to
your spine.
Vehicles without memory functionXMove adjustment lever : in direction of
the arrows until you have reached a
comfortable seating position.
Vehicles with memory function
XCurvature position: Use button : to
move the curvature up and button = to
move it down.
XDegree of curvature: Use button ; to
lessen the curvature and button ? to
increase it.
Rear seat head restraints
GWarning!
For your protection, drive only with properly
positioned head restraints.
Adjust the head restraint in such a way that it
is as close to the head as possible and the
center of the head restraint supports the back
80SeatsControls in detail
X204_AKB; 3; 23, en-USd2ureepe,Version: 2.11.8.12009-07-16T19:16:58+02:00 - Seite 80
Page 83 of 344
of the head at eye level. This will reduce the
potential for injury to the head and neck in the
event of an accident or similar situation.
With a rear seat occupied, make sure to move
the respective head restraint up from the
lowest non-use position and have the
occupant adjust the head restraint properly.
Do not drive the vehicle without the seat head
restraints installed when the rear seats are
occupied. Head restraints are intended to
help reduce injuries during an accident.
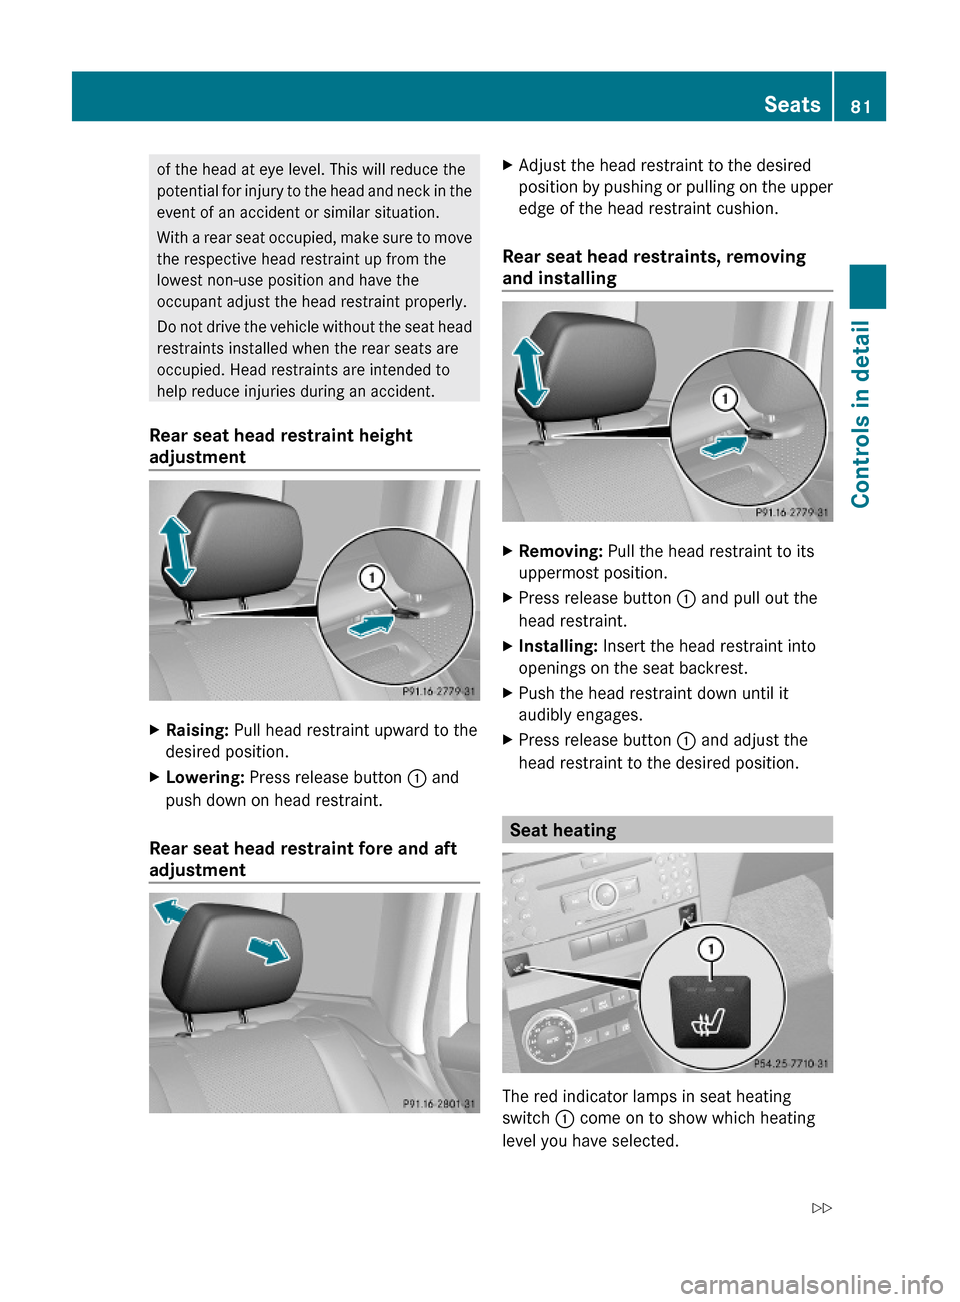
Rear seat head restraint height
adjustment
XRaising: Pull head restraint upward to the
desired position.
XLowering: Press release button : and
push down on head restraint.
Rear seat head restraint fore and aft
adjustment
XAdjust the head restraint to the desired
position by pushing or pulling on the upper
edge of the head restraint cushion.
Rear seat head restraints, removing
and installing
XRemoving: Pull the head restraint to its
uppermost position.
XPress release button : and pull out the
head restraint.
XInstalling: Insert the head restraint into
openings on the seat backrest.
XPush the head restraint down until it
audibly engages.
XPress release button : and adjust the
head restraint to the desired position.
Seat heating
The red indicator lamps in seat heating
switch : come on to show which heating
level you have selected.
Seats81Controls in detailX204_AKB; 3; 23, en-USd2ureepe,Version: 2.11.8.12009-07-16T19:16:58+02:00 - Seite 81Z