2010 MERCEDES-BENZ GLK350 4MATIC brake sensor
[x] Cancel search: brake sensorPage 14 of 344
Exterior rear view mirror parking
position ............................................ 85
Exterior rear view mirrors ................84
Interior rear view mirror ...................84
Memory function .............................. 86
Power-folding exterior rear view
mirrors ............................................. 85
Vanity mirror .................................. 196
MON (Motor Octane Number) .......... 337
Motor Octane Number see MON
MP3 mode .......................................... 146
Multifunction display ........................ 112
Symbol messages ..........................270
Text messages ............................... 264
Vehicle status messages ...............262
Multifunction display messages
ABS ....................................... 271, 272
Active headlamps .......................... 283
Advanced TPMS ............................. 268
Air bags ......................................... 264
Alternator ...................................... 281
Battery ........................................... 281
Brake fluid ..................................... 273
Brake pads ..................................... 270
Cargo compartment ....................... 277
Child seat ...................................... 267
Coolant .......................................... 279
Corner-illuminating lamps ..............286
Cruise control ................................ 267
Doors ............................................. 277
EBP ................................................ 272
Engine oil ....................................... 282
ESP ®
............................. 271, 272, 274
Fog lamps .............................. 283, 285
Front passenger front air bag ........264
Gas cap .......................................... 282
High-beam lamps ........................... 284
Hood .............................................. 277
License plate lamps .......................285
Light sensor ................................... 285
Low-beam lamps ............................ 285
Parking brake ................................ 272
Parking lamps ................................ 284
Power steering ............................... 279
Reserve fuel ................................... 282
Reverse lamp ................................. 283
Side marker lamps .........................284SmartKey ....................................... 277
SmartKey with KEYLESS-GO ..........277
SRS ................................................ 275
Tailgate .......................................... 277
Tail lamps ...................................... 286
Tele Aid .......................................... 275
Tire inflation pressure ............268, 288
Tire pressure monitor ....................268
Tires ...................................... 268, 288
Trailer brake lamps ........................286
Trailer tail lamps ............................ 286
Trailer turn signal lamps ................287
Turn signals ................................... 287
Multifunction steering wheel
Adjustment ...................................... 82
Buttons .......................................... 110
Cleaning ......................................... 256
Easy-entry/exit feature ...........83, 124
Memory function .............................. 86
Overview .......................................... 29
N
Navigation system see Separate operating instructions
Navi menu .......................................... 115
NECK-PRO active front head
restraints ............................................. 51
Resetting ....................................... 301
Nets, parcel ....................................... 188
Normal occupant weight .................. 240
Number, vehicle identification
(VIN) ................................................... 329
O
Occupant Classification System see OCS (Occupant Classification
System)
Occupant distribution ....................... 240
Occupant safety
Air bags ........................................... 37
BabySmart™ .................................... 45
Children and air bags .......................37
Children in the vehicle .....................53
Child seat anchors – LATCH-type
(ISOFIX) ........................................... 57
Fastening the seat belts ................... 49
12IndexX204_AKB; 3; 23, en-USd2ureepe,Version: 2.11.8.12009-07-16T19:16:58+02:00 - Seite 12
Page 15 of 344
Front passenger front air bag off
indicator lamp (Canada
only) ........................................ 45, 297
Front passenger front air bag off
indicator lamp (USA only) ........42, 298
Infant and child restraint systems .... 54
Introduction ..................................... 36
ISOFIX (Child seat anchors –
LATCH-type) ..................................... 57
OCS (Occupant Classification
System) ........................................... 42
Seat belts .................................. 39, 47
OCS (Occupant Classification
System) ................................................ 42
Self-test ........................................... 45
Odometer ........................................... 113
Oil, oil level see Engine oil
On-board computer
see Control system
One-touch gearshifting ..................... 107
Operating safety .................................. 22
Ornamental moldings, cleaning ....... 254
Overhead control panel ...................... 32
P
Paintwork, cleaning .......................... 252
Paintwork code ................................. 329
Panic alarm .......................................... 59
Panorama roof with power tilt/
sliding panel ...................................... 185
Cleaning ......................................... 255
Operation ....................................... 185
Roller sunblinds ............................. 184
Synchronizing ................................ 186
Parcel nets ......................................... 188
Parking ............................................... 101
Parktronic system ..........................172
Parking brake .................................... 102
Messages in the multifunction
display ........................................... 272
Parking position
Exterior rear view mirrors ................85
Transmission position ....................104
Parktronic system
Cleaning system sensors ...............254
Malfunction .................................... 174
Minimum distance .........................173
Sensor range ................................. 172
Switching on/off ........................... 174
System sensors ............................. 172
Warning indicators .........................173
Parts service ...................................... 328
PASS AIR BAG OFF indicator lamp
(Canada only) see Front passenger front air bag
off indicator lamp (Canada only)
PASS AIR BAG OFF indicator lamp
(USA only) see Front passenger front air bag
off indicator lamp (USA only)
Passenger safety
see Occupant safety
Pedals ................................................. 244
Phone see Telephone
Plastic parts, cleaning ...................... 256
Power assistance .............................. 244
Power outlets .................................... 197
Power seats see Seats
Power steering
Messages in the multifunction
display ........................................... 279
Power tailgate
Closing ............................................. 72
Opening ........................................... 72
Power washer .................................... 252
Power windows ................................... 95
Cleaning ......................................... 255
Operation ......................................... 95
Rear door window, override
switch .............................................. 58
Synchronizing .................................. 96
Practical hints ................................... 260
Problems
While driving .................................. 101
With vehicle ..................................... 22
With wipers ...................................... 95
Product information ............................ 19
Production options weight ............... 240
Program mode selector switch
Automatic shift program ................106Index13X204_AKB; 3; 23, en-USd2ureepe,Version: 2.11.8.12009-07-16T19:16:58+02:00 - Seite 13
Page 100 of 344
XVehicles with panorama roof with
power tilt/sliding panel: Press and hold
button & on the SmartKey once more.
The roller sunblinds extend.
XRelease button & on the SmartKey to
interrupt the extending procedure.
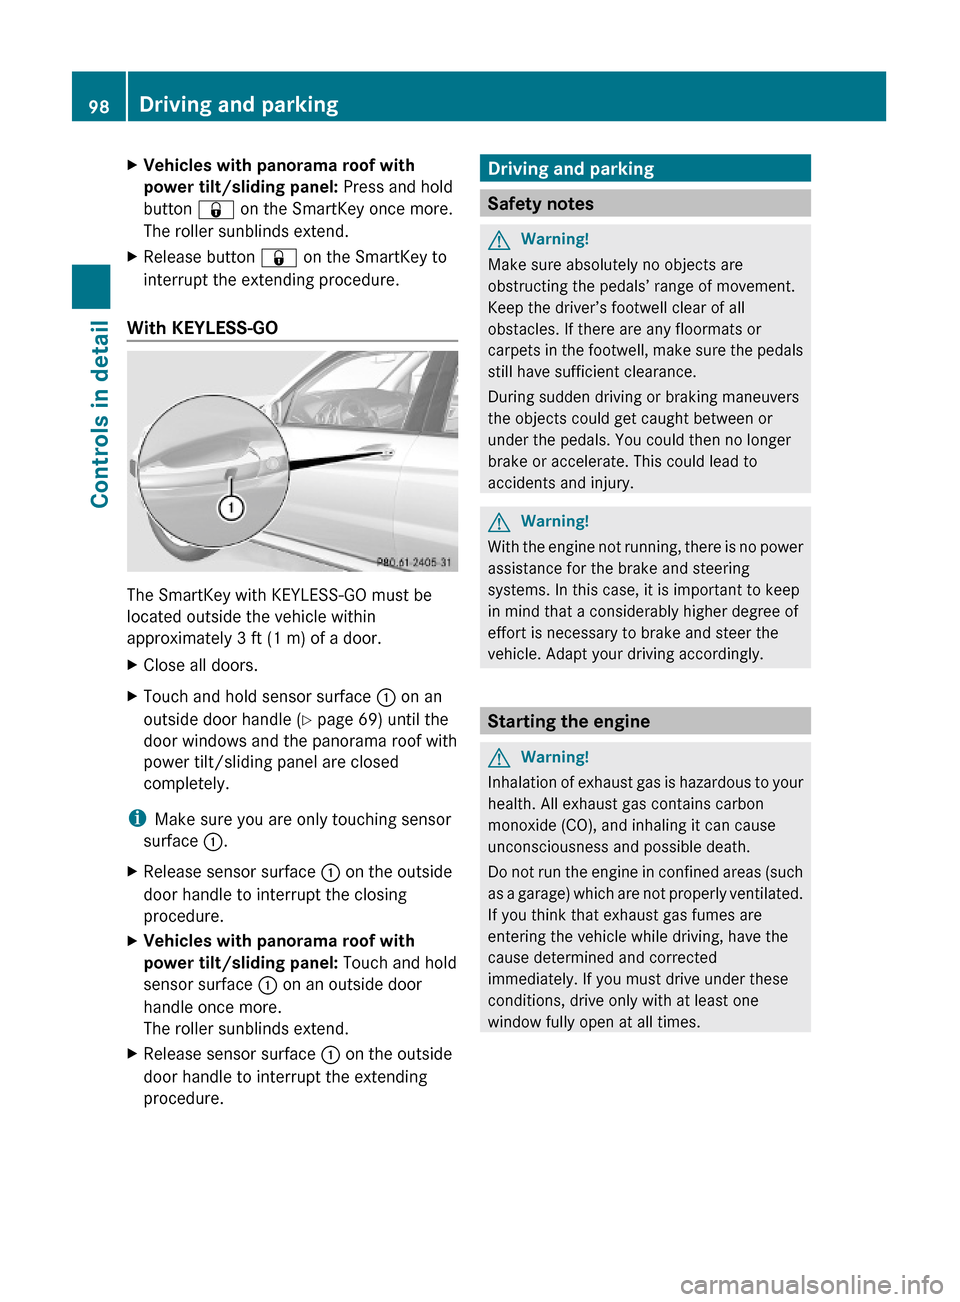
With KEYLESS-GO
The SmartKey with KEYLESS-GO must be
located outside the vehicle within
approximately 3 ft (1 m) of a door.
XClose all doors.XTouch and hold sensor surface : on an
outside door handle (Y page 69) until the
door windows and the panorama roof with
power tilt/sliding panel are closed
completely.
iMake sure you are only touching sensor
surface :.
XRelease sensor surface : on the outside
door handle to interrupt the closing
procedure.
XVehicles with panorama roof with
power tilt/sliding panel: Touch and hold
sensor surface : on an outside door
handle once more.
The roller sunblinds extend.
XRelease sensor surface : on the outside
door handle to interrupt the extending
procedure.
Driving and parking
Safety notes
GWarning!
Make sure absolutely no objects are
obstructing the pedals’ range of movement.
Keep the driver’s footwell clear of all
obstacles. If there are any floormats or
carpets in the footwell, make sure the pedals
still have sufficient clearance.
During sudden driving or braking maneuvers
the objects could get caught between or
under the pedals. You could then no longer
brake or accelerate. This could lead to
accidents and injury.
GWarning!
With the engine not running, there is no power
assistance for the brake and steering
systems. In this case, it is important to keep
in mind that a considerably higher degree of
effort is necessary to brake and steer the
vehicle. Adapt your driving accordingly.
Starting the engine
GWarning!
Inhalation of exhaust gas is hazardous to your
health. All exhaust gas contains carbon
monoxide (CO), and inhaling it can cause
unconsciousness and possible death.
Do not run the engine in confined areas (such
as a garage) which are not properly ventilated.
If you think that exhaust gas fumes are
entering the vehicle while driving, have the
cause determined and corrected
immediately. If you must drive under these
conditions, drive only with at least one
window fully open at all times.
98Driving and parkingControls in detail
X204_AKB; 3; 23, en-USd2ureepe,Version: 2.11.8.12009-07-16T19:16:58+02:00 - Seite 98
Page 174 of 344
Parktronic system (Parking Assist)
The Parktronic system is an electronic
parking aid with ultrasonic sensors designed
to assist the driver during parking maneuvers.
The Parktronic system indicates the relative
distance between the vehicle and an obstacle
visually and audibly.
The Parktronic system is activated
automatically when
Ryou switch on the ignition
and
Ryou release the parking brake
and
Rthe automatic transmission is in drive
position D, reverse gear R, or neutral
position N
The Parktronic system deactivates at speeds
above approximately 11 mph (18 km/h). At
lower speeds, the Parktronic system
activates again.
The Parktronic system also deactivates when
you shift the automatic transmission into
park position P or engage the parking brake.
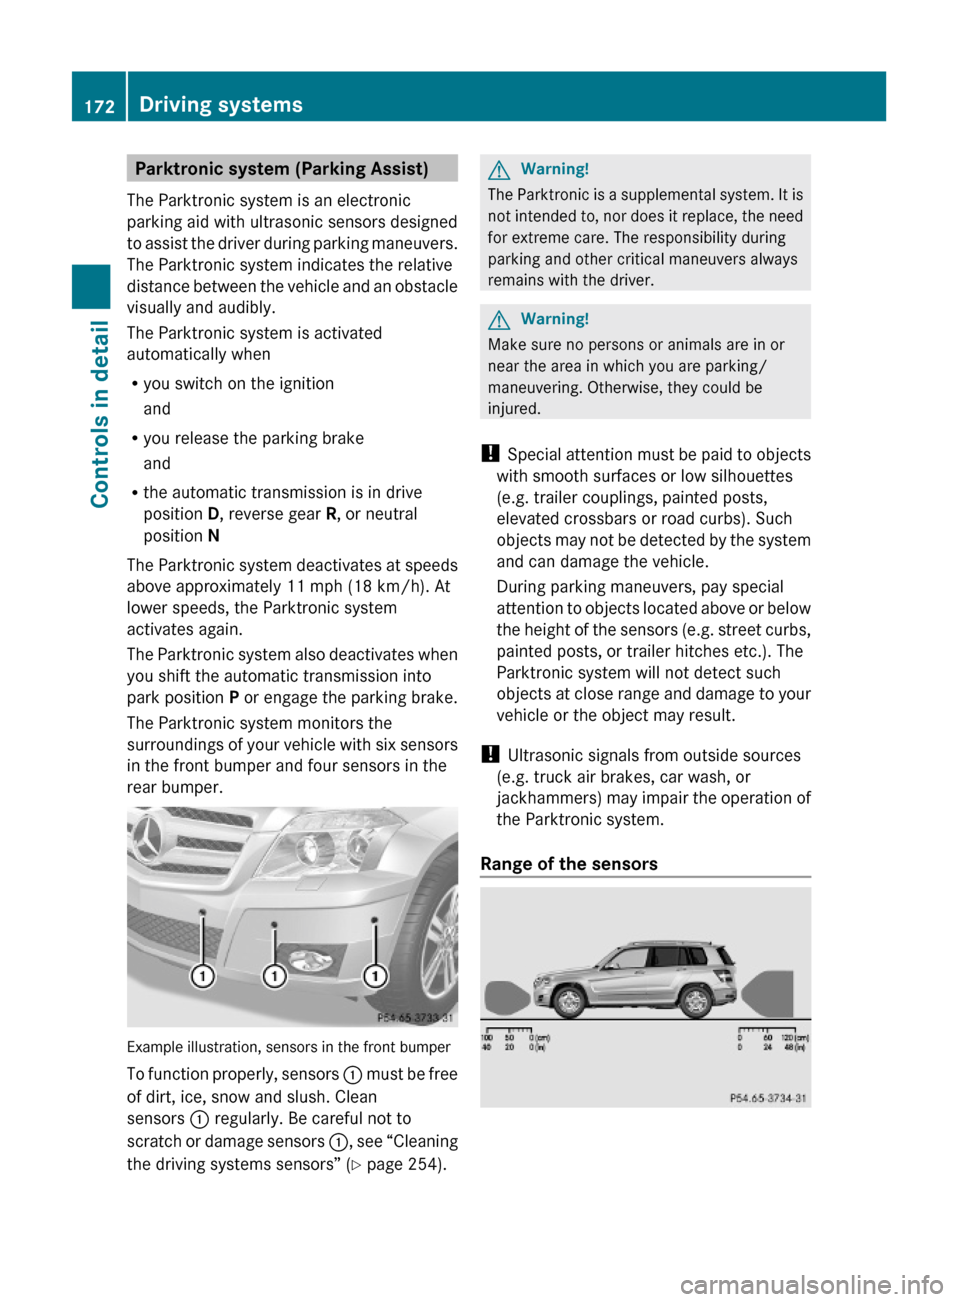
The Parktronic system monitors the
surroundings of your vehicle with six sensors
in the front bumper and four sensors in the
rear bumper.
Example illustration, sensors in the front bumper
To function properly, sensors : must be free
of dirt, ice, snow and slush. Clean
sensors : regularly. Be careful not to
scratch or damage sensors :, see “Cleaning
the driving systems sensors” (Y page 254).
GWarning!
The Parktronic is a supplemental system. It is
not intended to, nor does it replace, the need
for extreme care. The responsibility during
parking and other critical maneuvers always
remains with the driver.
GWarning!
Make sure no persons or animals are in or
near the area in which you are parking/
maneuvering. Otherwise, they could be
injured.
! Special attention must be paid to objects
with smooth surfaces or low silhouettes
(e.g. trailer couplings, painted posts,
elevated crossbars or road curbs). Such
objects may not be detected by the system
and can damage the vehicle.
During parking maneuvers, pay special
attention to objects located above or below
the height of the sensors (e.g. street curbs,
painted posts, or trailer hitches etc.). The
Parktronic system will not detect such
objects at close range and damage to your
vehicle or the object may result.
! Ultrasonic signals from outside sources
(e.g. truck air brakes, car wash, or
jackhammers) may impair the operation of
the Parktronic system.
Range of the sensors
172Driving systemsControls in detail
X204_AKB; 3; 23, en-USd2ureepe,Version: 2.11.8.12009-07-16T19:16:58+02:00 - Seite 172
Page 176 of 344
RFront area: An intermittent acoustic
warning will sound as the first red distance
segment illuminates and a constant
acoustic warning lasting a maximum of
2 seconds will sound for the second red
distance segment. The signal is canceled
when the automatic transmission is shifted
into park position P or the parking brake is
engaged.
RRear area: An intermittent acoustic
warning will sound as the first red distance
segment illuminates and a constant
acoustic warning lasting a maximum of
2 seconds will sound for the second red
distance segment. The signal is canceled
when the automatic transmission is shifted
into drive position D, or park position P, or
the parking brake is engaged.
Switching the Parktronic system on/
off
The Parktronic system switches on
automatically when the ignition is switched
on.
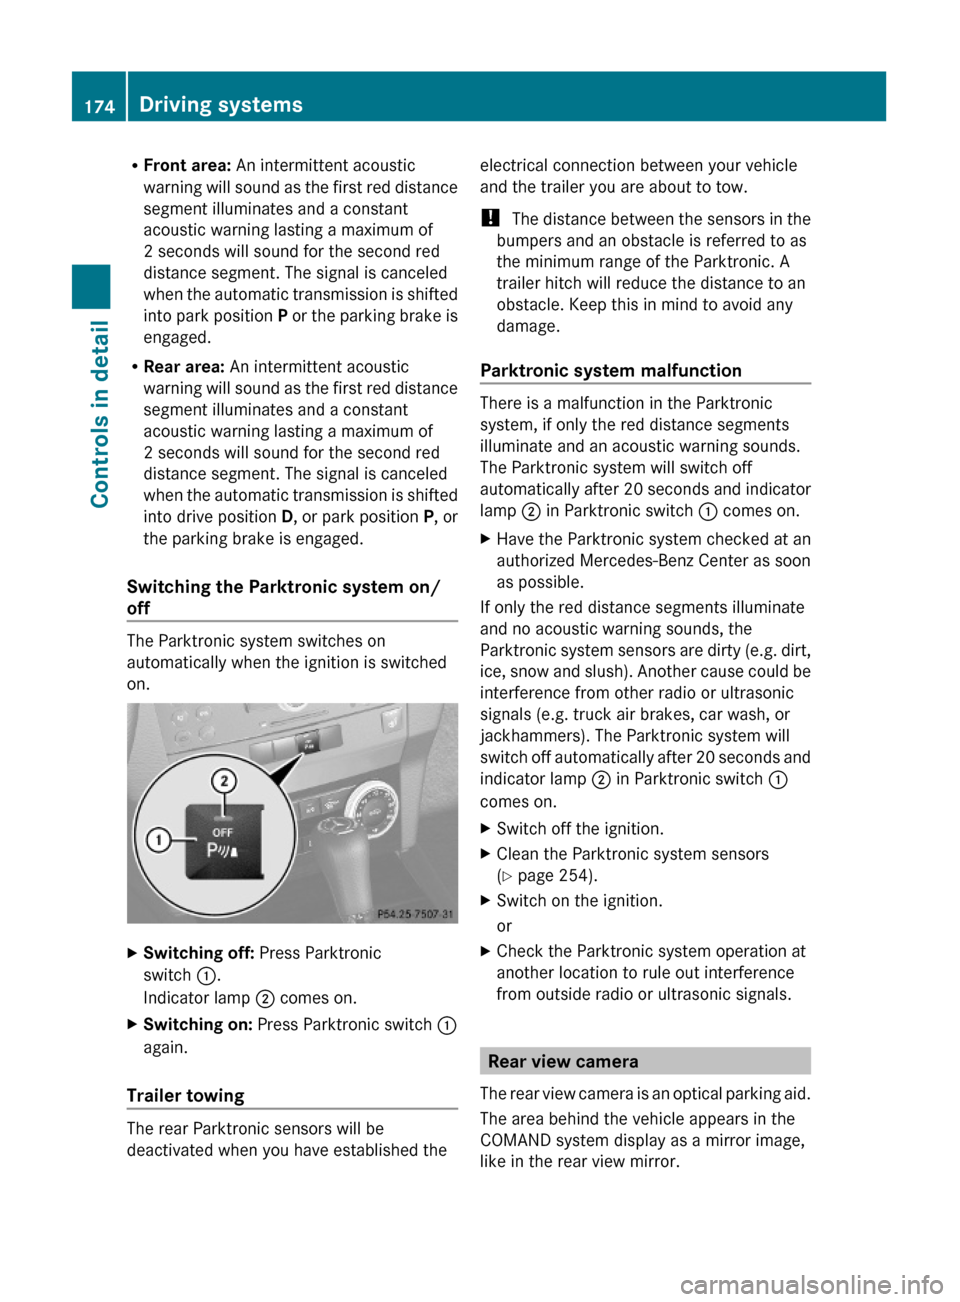
XSwitching off: Press Parktronic
switch :.
Indicator lamp ; comes on.
XSwitching on: Press Parktronic switch :
again.
Trailer towing
The rear Parktronic sensors will be
deactivated when you have established the
electrical connection between your vehicle
and the trailer you are about to tow.
! The distance between the sensors in the
bumpers and an obstacle is referred to as
the minimum range of the Parktronic. A
trailer hitch will reduce the distance to an
obstacle. Keep this in mind to avoid any
damage.
Parktronic system malfunction
There is a malfunction in the Parktronic
system, if only the red distance segments
illuminate and an acoustic warning sounds.
The Parktronic system will switch off
automatically after 20 seconds and indicator
lamp ; in Parktronic switch : comes on.
XHave the Parktronic system checked at an
authorized Mercedes-Benz Center as soon
as possible.
If only the red distance segments illuminate
and no acoustic warning sounds, the
Parktronic system sensors are dirty (e.g. dirt,
ice, snow and slush). Another cause could be
interference from other radio or ultrasonic
signals (e.g. truck air brakes, car wash, or
jackhammers). The Parktronic system will
switch off automatically after 20 seconds and
indicator lamp ; in Parktronic switch :
comes on.
XSwitch off the ignition.XClean the Parktronic system sensors
(Y page 254).
XSwitch on the ignition.
or
XCheck the Parktronic system operation at
another location to rule out interference
from outside radio or ultrasonic signals.
Rear view camera
The rear view camera is an optical parking aid.
The area behind the vehicle appears in the
COMAND system display as a mirror image,
like in the rear view mirror.
174Driving systemsControls in detail
X204_AKB; 3; 23, en-USd2ureepe,Version: 2.11.8.12009-07-16T19:16:58+02:00 - Seite 174
Page 219 of 344
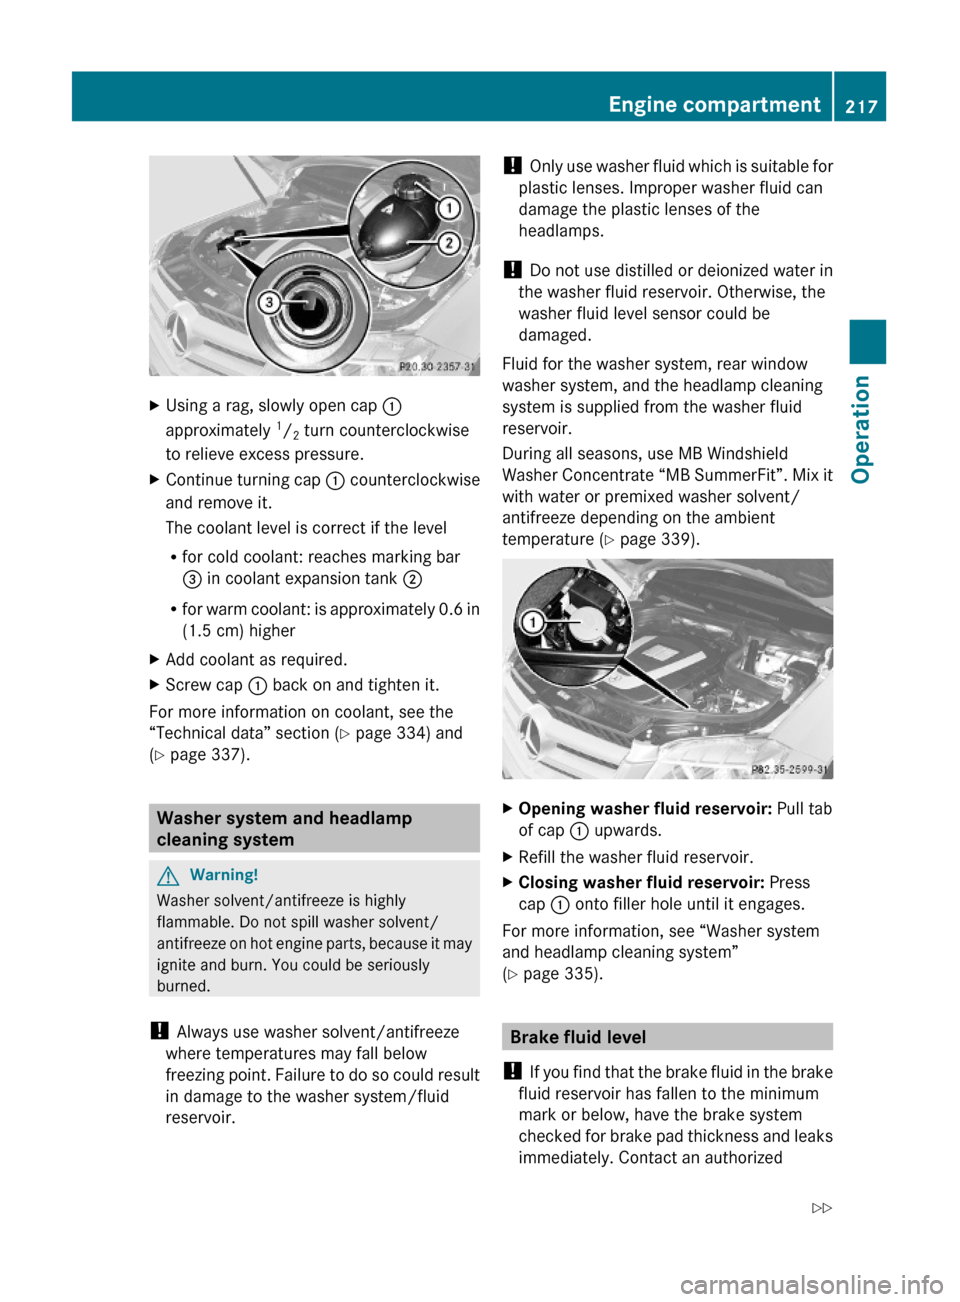
XUsing a rag, slowly open cap :
approximately 1/2 turn counterclockwise
to relieve excess pressure.
XContinue turning cap : counterclockwise
and remove it.
The coolant level is correct if the level
Rfor cold coolant: reaches marking bar
= in coolant expansion tank ;
Rfor warm coolant: is approximately 0.6 in
(1.5 cm) higher
XAdd coolant as required.XScrew cap : back on and tighten it.
For more information on coolant, see the
“Technical data” section (Y page 334) and
(Y page 337).
Washer system and headlamp
cleaning system
GWarning!
Washer solvent/antifreeze is highly
flammable. Do not spill washer solvent/
antifreeze on hot engine parts, because it may
ignite and burn. You could be seriously
burned.
! Always use washer solvent/antifreeze
where temperatures may fall below
freezing point. Failure to do so could result
in damage to the washer system/fluid
reservoir.
! Only use washer fluid which is suitable for
plastic lenses. Improper washer fluid can
damage the plastic lenses of the
headlamps.
! Do not use distilled or deionized water in
the washer fluid reservoir. Otherwise, the
washer fluid level sensor could be
damaged.
Fluid for the washer system, rear window
washer system, and the headlamp cleaning
system is supplied from the washer fluid
reservoir.
During all seasons, use MB Windshield
Washer Concentrate “MB SummerFit”. Mix it
with water or premixed washer solvent/
antifreeze depending on the ambient
temperature (Y page 339).
XOpening washer fluid reservoir: Pull tab
of cap : upwards.
XRefill the washer fluid reservoir.XClosing washer fluid reservoir: Press
cap : onto filler hole until it engages.
For more information, see “Washer system
and headlamp cleaning system”
(Y page 335).
Brake fluid level
! If you find that the brake fluid in the brake
fluid reservoir has fallen to the minimum
mark or below, have the brake system
checked for brake pad thickness and leaks
immediately. Contact an authorized
Engine compartment217OperationX204_AKB; 3; 23, en-USd2ureepe,Version: 2.11.8.12009-07-16T19:16:58+02:00 - Seite 217Z
Page 226 of 344
Advanced Tire Pressure Monitoring
System (Advanced TPMS), (USA only)
Your vehicle is equipped with the Advanced
Tire Pressure Monitoring System (Advanced
TPMS). It measures the tire inflation pressure
in the vehicle’s tires and issues warnings in
case of pressure loss in one or more of the
tires.
The TPMS is equipped with a combination low
tire pressure/ TPMS malfunction telltale in
the instrument cluster. Depending on how the
telltale illuminates, it indicates a low tire
pressure condition or a malfunction in the
TPMS system itself:
R If the telltale illuminates continuously, one
or more of your tires is significantly
underinflated. There is no malfunction in
the TPMS.
R If the telltale flashes for 60 seconds and
then stays illuminated, the TPMS system
itself is not operating properly.
The TPMS only functions on wheels that are
equipped with the proper electronic sensors.
GWarning!
The TPMS does not indicate a warning for
wrongly selected inflation pressures. Always
adjust tire inflation pressure according to the
Tire and Loading Information placard or the
supplemental tire inflation pressure
information on the inside of the fuel filler flap.
The TPMS is not able to issue a warning due
to a sudden dramatic loss of pressure (e.g. tire
blowout caused by a foreign object). In this
case bring the vehicle to a halt by carefully
applying the brakes and avoiding abrupt
steering maneuvers.
GWarning!
Each tire, including the spare (if provided),
should be checked at least once a month
when cold and inflated to the inflation
pressure recommended by the vehicle
manufacturer on the Tire and Loading
Information placard on the driver’s door B-
pillar or the tire inflation pressure label on the
inside of the fuel filler flap. If your vehicle has
tires of a different size than the size indicated
on the Tire and Loading Information placard
or the tire inflation pressure label, you should
determine the proper tire inflation pressure
for those tires.
As an added safety feature, your vehicle has
been equipped with a tire pressure monitoring
system (TPMS) that illuminates a low tire
pressure telltale when one or more of your
tires are significantly underinflated.
Accordingly, when the low tire pressure
telltale illuminates, you should stop and check
your tires as soon as possible, and inflate
them to the proper pressure. Driving on a
significantly underinflated tire causes the tire
to overheat and can lead to tire failure.
Underinflation also reduces fuel efficiency
and tire tread life, and may affect the vehicle’s
handling and stopping ability. Please note that
the TPMS is not a substitute for proper tire
maintenance, and it is the driver’s
responsibility to maintain correct tire
pressure, even if underinflation has not
reached the level to trigger illumination of the
TPMS low tire pressure telltale.
Your vehicle has also been equipped with a
TPMS malfunction indicator to indicate when
the system is not operating properly. The
TPMS malfunction indicator is combined with
the low tire pressure telltale. When the
system detects a malfunction, the telltale will
flash for approximately 1 minute and then
remain continuously illuminated. This
sequence will continue upon subsequent
vehicle start-ups as long as the malfunction
exists. When the malfunction indicator is
illuminated, the system may not be able to
detect or signal low tire pressure as intended.
TPMS malfunctions may occur for a variety of
reasons, including the installation of
incompatible replacement or alternate tires
or wheels on the vehicle that prevent the
TPMS from functioning properly. Always
check the TPMS malfunction telltale after224Tires and wheelsOperation
X204_AKB; 3; 23, en-USd2ureepe,Version: 2.11.8.12009-07-16T19:16:58+02:00 - Seite 224
Page 256 of 344
which can be caused by residual wax on the
windshield.
Ornamental moldings
XFor regular cleaning and care of ornamental
moldings, use a damp cloth.
! Do not use chrome cleaner on ornamental
moldings. Although ornamental moldings
may have chrome appearance, they could
be made of anodized aluminum that will be
damaged when cleaned with chrome
cleaner. Instead, use a damp cloth to clean
those ornamental moldings.
For very dirty ornamental moldings of
which you are sure are chrome-plated, use
a chrome cleaner. If in doubt whether an
ornamental molding is chrome-plated,
contact an authorized Mercedes-Benz
Center.
Headlamps, brake lamps, tail lamps,
side markers, turn signal lenses
XUse a mild vehicle wash detergent, such as
Mercedes-Benz approved Car Shampoo,
with plenty of water.
! Only use window cleaning solutions that
are suitable for plastic lamp lenses.
Window cleaning solutions which are not
suitable may damage the plastic lamp
lenses of the headlamps. Therefore, do not
use abrasives, solvents or cleaners that
contain solvents.
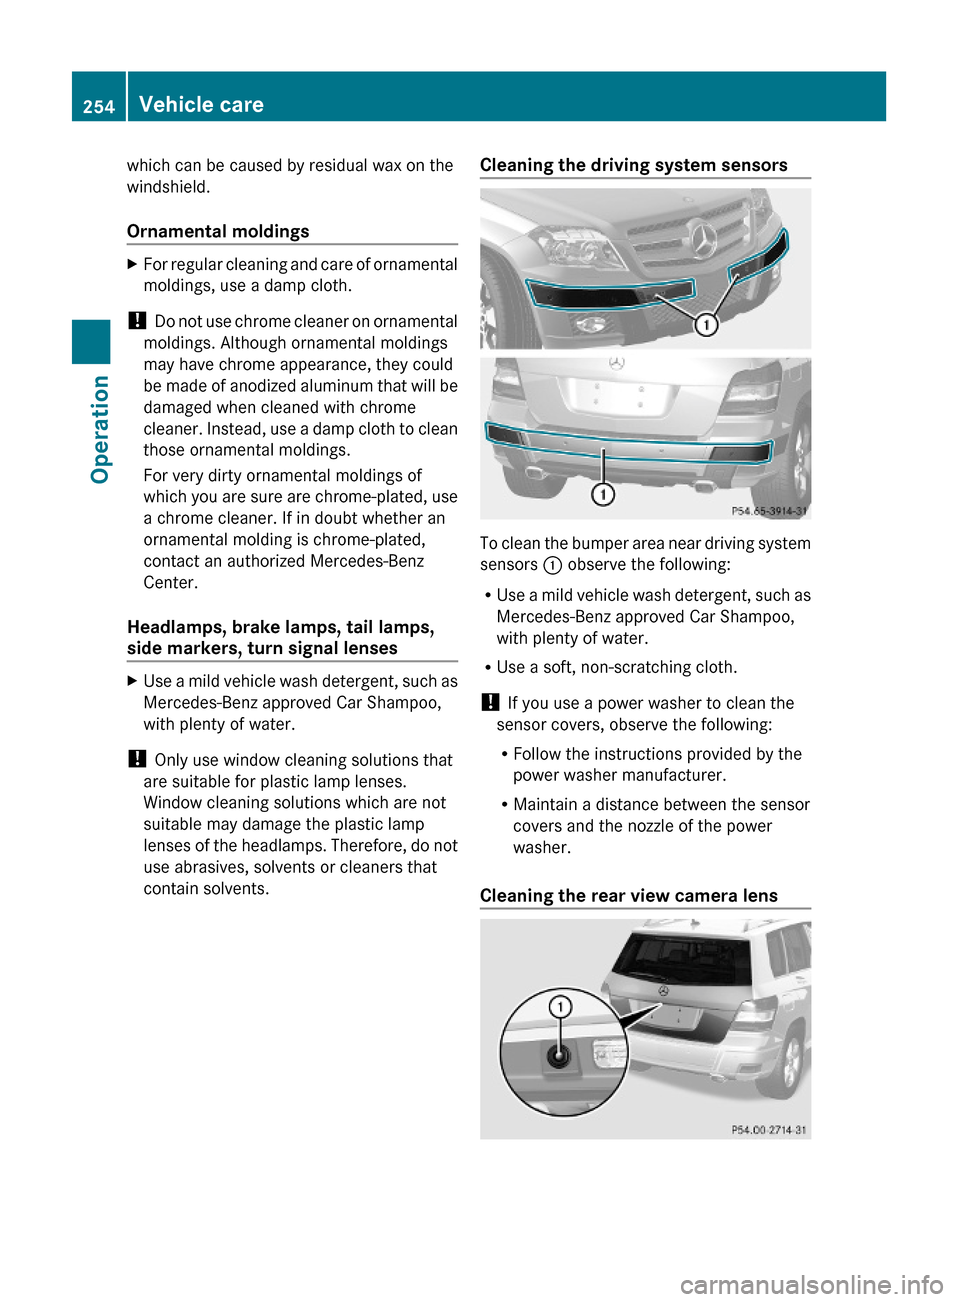
Cleaning the driving system sensors
To clean the bumper area near driving system
sensors : observe the following:
RUse a mild vehicle wash detergent, such as
Mercedes-Benz approved Car Shampoo,
with plenty of water.
RUse a soft, non-scratching cloth.
! If you use a power washer to clean the
sensor covers, observe the following:
RFollow the instructions provided by the
power washer manufacturer.
RMaintain a distance between the sensor
covers and the nozzle of the power
washer.
Cleaning the rear view camera lens
254Vehicle careOperation
X204_AKB; 3; 23, en-USd2ureepe,Version: 2.11.8.12009-07-16T19:16:58+02:00 - Seite 254