2010 MERCEDES-BENZ GLK350 4MATIC navigation system
[x] Cancel search: navigation systemPage 14 of 344
Exterior rear view mirror parking
position ............................................ 85
Exterior rear view mirrors ................84
Interior rear view mirror ...................84
Memory function .............................. 86
Power-folding exterior rear view
mirrors ............................................. 85
Vanity mirror .................................. 196
MON (Motor Octane Number) .......... 337
Motor Octane Number see MON
MP3 mode .......................................... 146
Multifunction display ........................ 112
Symbol messages ..........................270
Text messages ............................... 264
Vehicle status messages ...............262
Multifunction display messages
ABS ....................................... 271, 272
Active headlamps .......................... 283
Advanced TPMS ............................. 268
Air bags ......................................... 264
Alternator ...................................... 281
Battery ........................................... 281
Brake fluid ..................................... 273
Brake pads ..................................... 270
Cargo compartment ....................... 277
Child seat ...................................... 267
Coolant .......................................... 279
Corner-illuminating lamps ..............286
Cruise control ................................ 267
Doors ............................................. 277
EBP ................................................ 272
Engine oil ....................................... 282
ESP ®
............................. 271, 272, 274
Fog lamps .............................. 283, 285
Front passenger front air bag ........264
Gas cap .......................................... 282
High-beam lamps ........................... 284
Hood .............................................. 277
License plate lamps .......................285
Light sensor ................................... 285
Low-beam lamps ............................ 285
Parking brake ................................ 272
Parking lamps ................................ 284
Power steering ............................... 279
Reserve fuel ................................... 282
Reverse lamp ................................. 283
Side marker lamps .........................284SmartKey ....................................... 277
SmartKey with KEYLESS-GO ..........277
SRS ................................................ 275
Tailgate .......................................... 277
Tail lamps ...................................... 286
Tele Aid .......................................... 275
Tire inflation pressure ............268, 288
Tire pressure monitor ....................268
Tires ...................................... 268, 288
Trailer brake lamps ........................286
Trailer tail lamps ............................ 286
Trailer turn signal lamps ................287
Turn signals ................................... 287
Multifunction steering wheel
Adjustment ...................................... 82
Buttons .......................................... 110
Cleaning ......................................... 256
Easy-entry/exit feature ...........83, 124
Memory function .............................. 86
Overview .......................................... 29
N
Navigation system see Separate operating instructions
Navi menu .......................................... 115
NECK-PRO active front head
restraints ............................................. 51
Resetting ....................................... 301
Nets, parcel ....................................... 188
Normal occupant weight .................. 240
Number, vehicle identification
(VIN) ................................................... 329
O
Occupant Classification System see OCS (Occupant Classification
System)
Occupant distribution ....................... 240
Occupant safety
Air bags ........................................... 37
BabySmart™ .................................... 45
Children and air bags .......................37
Children in the vehicle .....................53
Child seat anchors – LATCH-type
(ISOFIX) ........................................... 57
Fastening the seat belts ................... 49
12IndexX204_AKB; 3; 23, en-USd2ureepe,Version: 2.11.8.12009-07-16T19:16:58+02:00 - Seite 12
Page 117 of 344
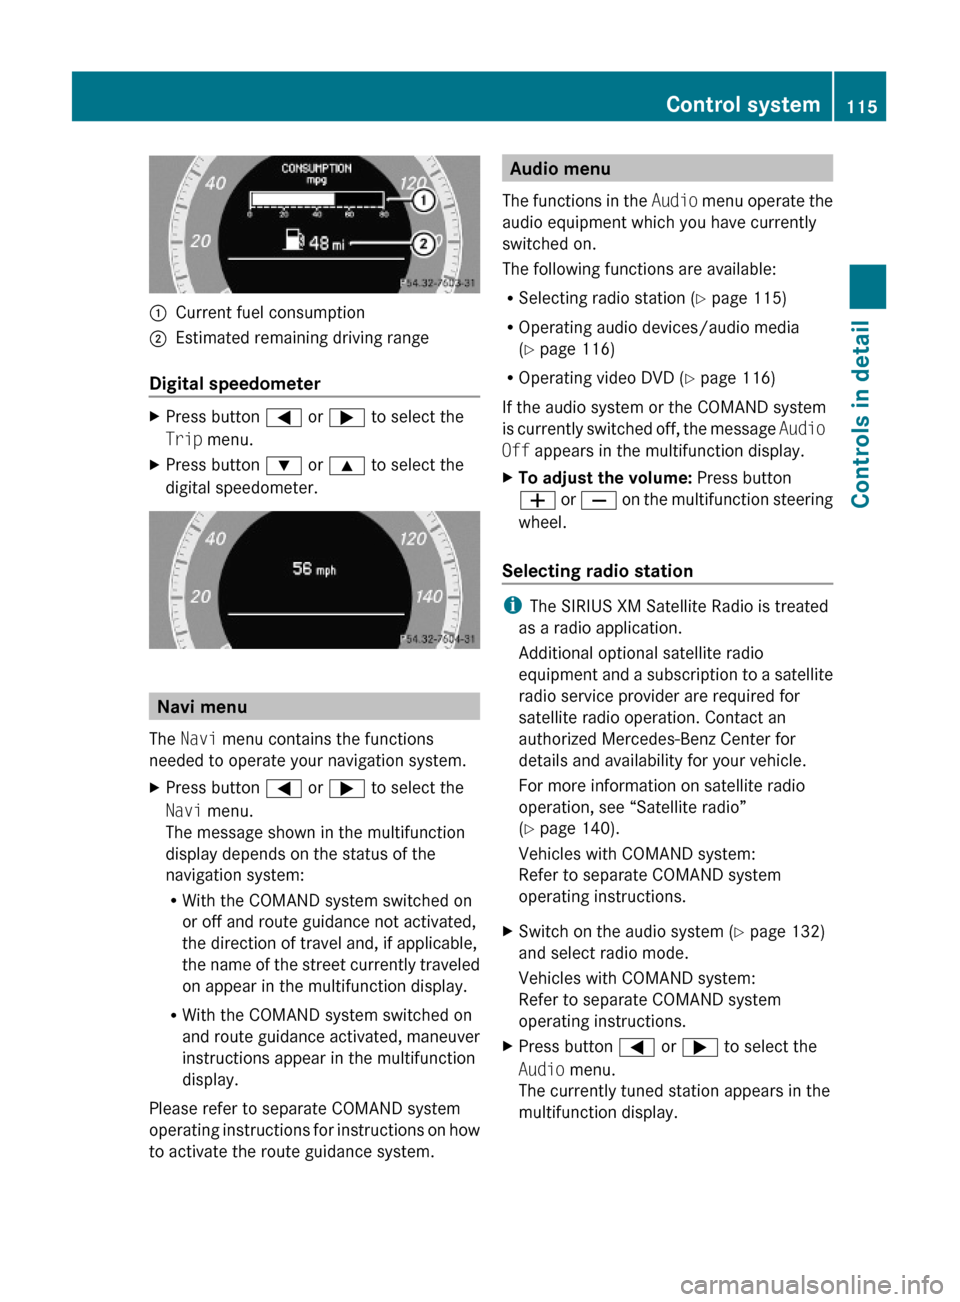
:Current fuel consumption;Estimated remaining driving range
Digital speedometer
XPress button = or ; to select the
Trip menu.
XPress button : or 9 to select the
digital speedometer.
Navi menu
The Navi menu contains the functions
needed to operate your navigation system.
XPress button = or ; to select the
Navi menu.
The message shown in the multifunction
display depends on the status of the
navigation system:
RWith the COMAND system switched on
or off and route guidance not activated,
the direction of travel and, if applicable,
the name of the street currently traveled
on appear in the multifunction display.
RWith the COMAND system switched on
and route guidance activated, maneuver
instructions appear in the multifunction
display.
Please refer to separate COMAND system
operating instructions for instructions on how
to activate the route guidance system.
Audio menu
The functions in the Audio menu operate the
audio equipment which you have currently
switched on.
The following functions are available:
RSelecting radio station (Y page 115)
ROperating audio devices/audio media
(Y page 116)
ROperating video DVD (Y page 116)
If the audio system or the COMAND system
is currently switched off, the message Audio
Off appears in the multifunction display.
XTo adjust the volume: Press button
W or X on the multifunction steering
wheel.
Selecting radio station
iThe SIRIUS XM Satellite Radio is treated
as a radio application.
Additional optional satellite radio
equipment and a subscription to a satellite
radio service provider are required for
satellite radio operation. Contact an
authorized Mercedes-Benz Center for
details and availability for your vehicle.
For more information on satellite radio
operation, see “Satellite radio”
(Y page 140).
Vehicles with COMAND system:
Refer to separate COMAND system
operating instructions.
XSwitch on the audio system (Y page 132)
and select radio mode.
Vehicles with COMAND system:
Refer to separate COMAND system
operating instructions.
XPress button = or ; to select the
Audio menu.
The currently tuned station appears in the
multifunction display.
Control system115Controls in detailX204_AKB; 3; 23, en-USd2ureepe,Version: 2.11.8.12009-07-16T19:16:58+02:00 - Seite 115Z
Page 122 of 344
XPress button : or 9 to select a
submenu.
Scroll down with button :, scroll up with
button 9.
With the selection marker on the desired
submenu, use the button a to access the
individual functions within that submenu.
Once within the submenu, you can use button
9 to move to the next function or
button : to move to the previous function
within that submenu.
The following lists show what settings can be
changed within the various menus. Detailed
instructions on making individual settings can
be found on the following pages.
Instrument cluster submenu
RSelecting speedometer display mode
(Y page 120)
RPermanent display (speed display or
outside temperature) (Y page 121)
Time/Date submenu
RSetting the time (Y page 121)
RSetting the date (Y page 121)
Lights submenu
RSwitching daytime running lamp mode on
or off (USA only) (Y page 122)
RSwitching locator lighting on or off
(Y page 122)
RSwitching interior lighting delayed shut-off
on or off (Y page 123)
Vehicle submenu
RSwitching automatic central locking on or
off (Y page 124)
Convenience submenu
RActivating easy-entry/exit feature
(Y page 124)
RSwitching fold-in function for exterior rear
view mirrors on or off (Y page 124)
Instrument cluster submenu
Access the Instr. Cluster submenu via
the Settings menu. Use the Instr.
Cluster submenu to change the instrument
cluster display settings.
The following functions are available:
RSelecting speedometer display mode
(Y page 120)
RPermanent display (speed display or
outside temperature) (Y page 121)
Selecting speedometer display mode
XPress = or ; to select the
Settings menu.
XPress button : or 9 to select the
Instr. Cluster submenu.
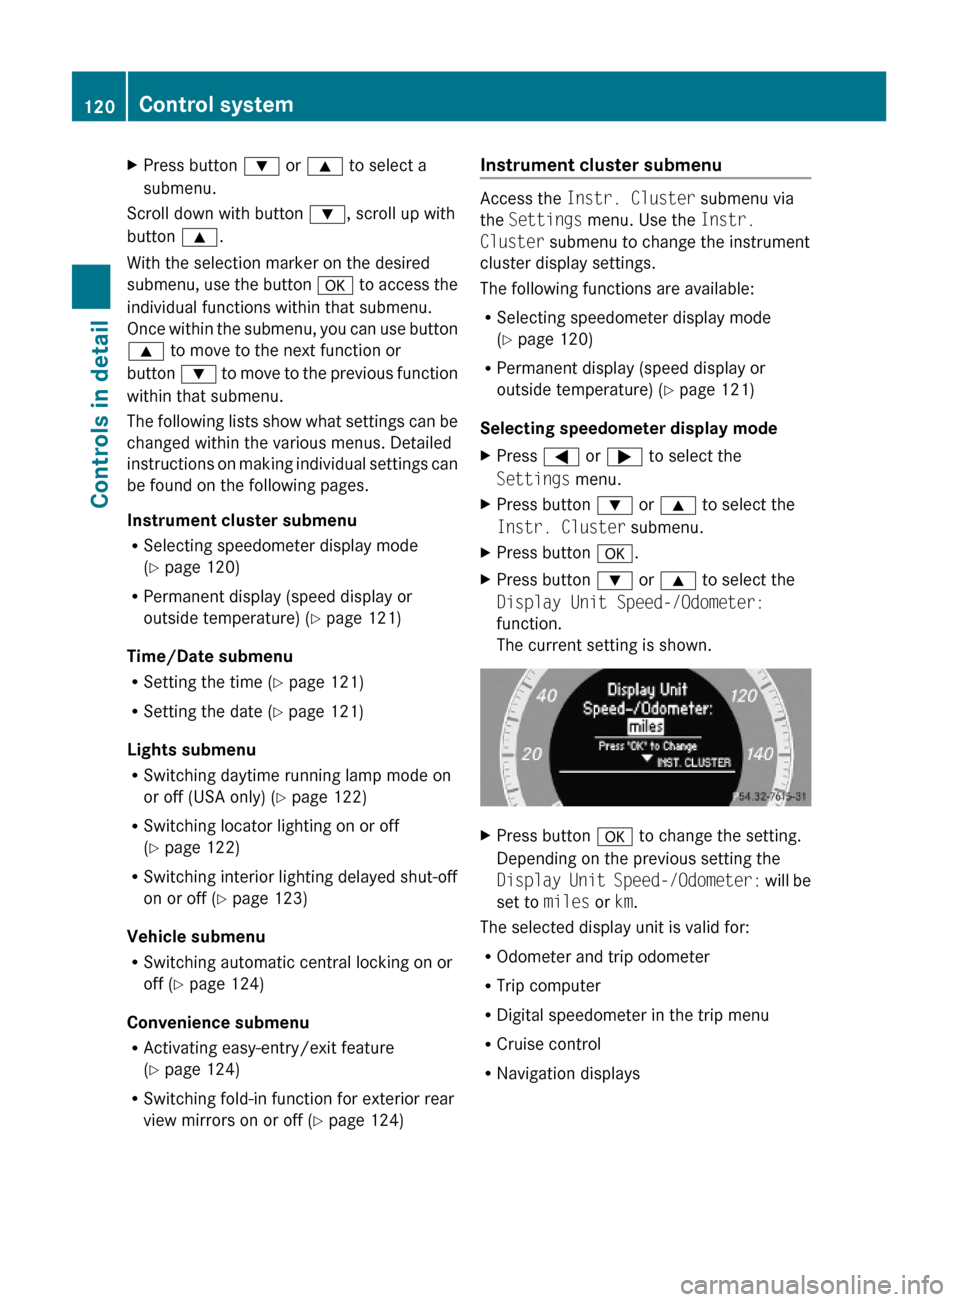
XPress button a.XPress button : or 9 to select the
Display Unit Speed-/Odometer:
function.
The current setting is shown.
XPress button a to change the setting.
Depending on the previous setting the
Display Unit Speed-/Odometer: will be
set to miles or km.
The selected display unit is valid for:
ROdometer and trip odometer
RTrip computer
RDigital speedometer in the trip menu
RCruise control
RNavigation displays
120Control systemControls in detail
X204_AKB; 3; 23, en-USd2ureepe,Version: 2.11.8.12009-07-16T19:16:58+02:00 - Seite 120
Page 123 of 344
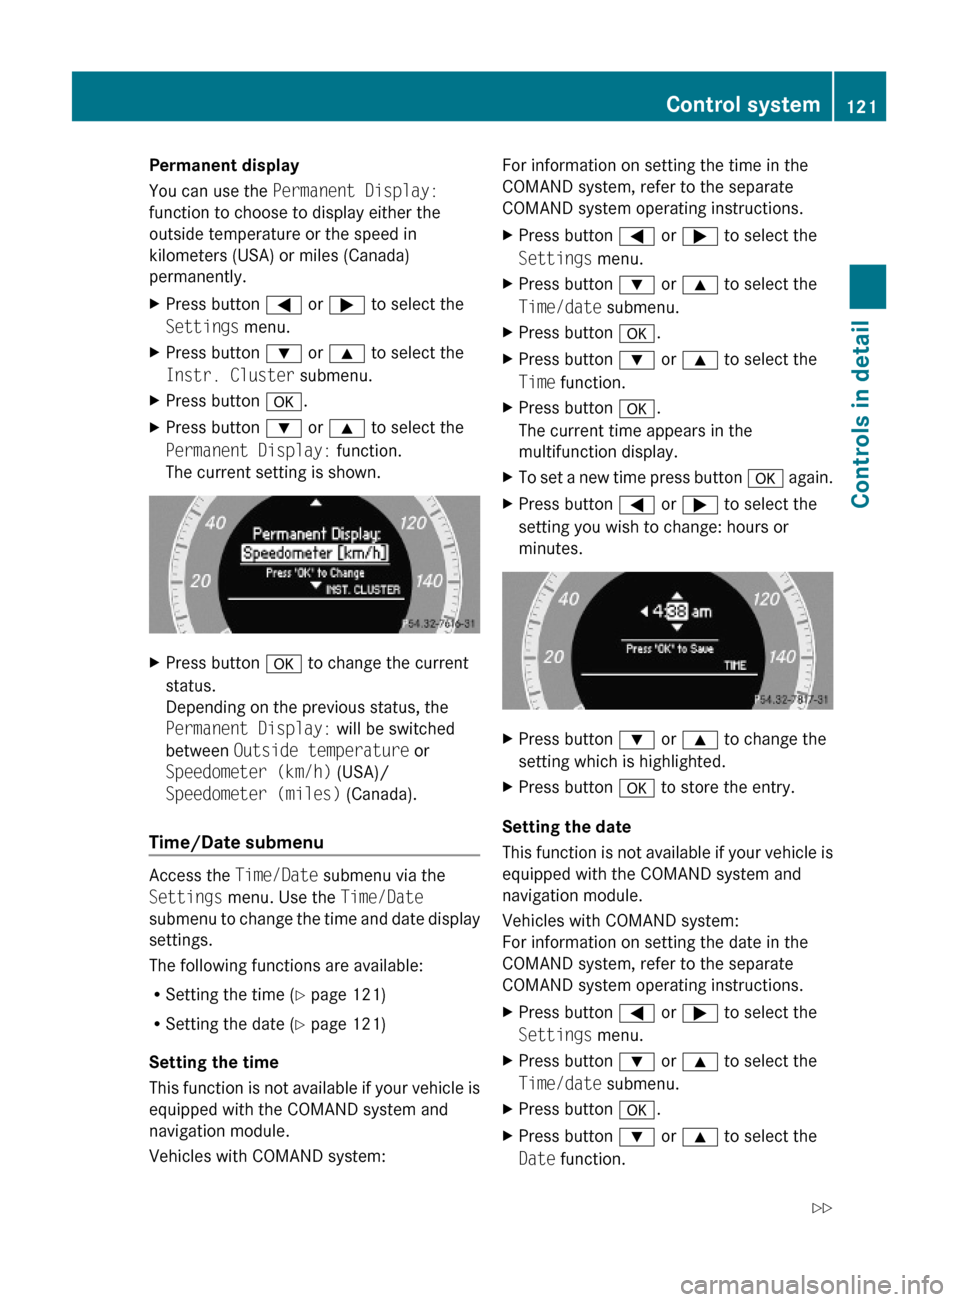
Permanent display
You can use the Permanent Display:
function to choose to display either the
outside temperature or the speed in
kilometers (USA) or miles (Canada)
permanently.
XPress button = or ; to select the
Settings menu.
XPress button : or 9 to select the
Instr. Cluster submenu.
XPress button a.XPress button : or 9 to select the
Permanent Display: function.
The current setting is shown.
XPress button a to change the current
status.
Depending on the previous status, the
Permanent Display: will be switched
between Outside temperature or
Speedometer (km/h) (USA)/
Speedometer (miles) (Canada).
Time/Date submenu
Access the Time/Date submenu via the
Settings menu. Use the Time/Date
submenu to change the time and date display
settings.
The following functions are available:
RSetting the time (Y page 121)
RSetting the date (Y page 121)
Setting the time
This function is not available if your vehicle is
equipped with the COMAND system and
navigation module.
Vehicles with COMAND system:
For information on setting the time in the
COMAND system, refer to the separate
COMAND system operating instructions.
XPress button = or ; to select the
Settings menu.
XPress button : or 9 to select the
Time/date submenu.
XPress button a.XPress button : or 9 to select the
Time function.
XPress button a.
The current time appears in the
multifunction display.
XTo set a new time press button a again.XPress button = or ; to select the
setting you wish to change: hours or
minutes.
XPress button : or 9 to change the
setting which is highlighted.
XPress button a to store the entry.
Setting the date
This function is not available if your vehicle is
equipped with the COMAND system and
navigation module.
Vehicles with COMAND system:
For information on setting the date in the
COMAND system, refer to the separate
COMAND system operating instructions.
XPress button = or ; to select the
Settings menu.
XPress button : or 9 to select the
Time/date submenu.
XPress button a.XPress button : or 9 to select the
Date function.
Control system121Controls in detailX204_AKB; 3; 23, en-USd2ureepe,Version: 2.11.8.12009-07-16T19:16:58+02:00 - Seite 121Z
Page 205 of 344
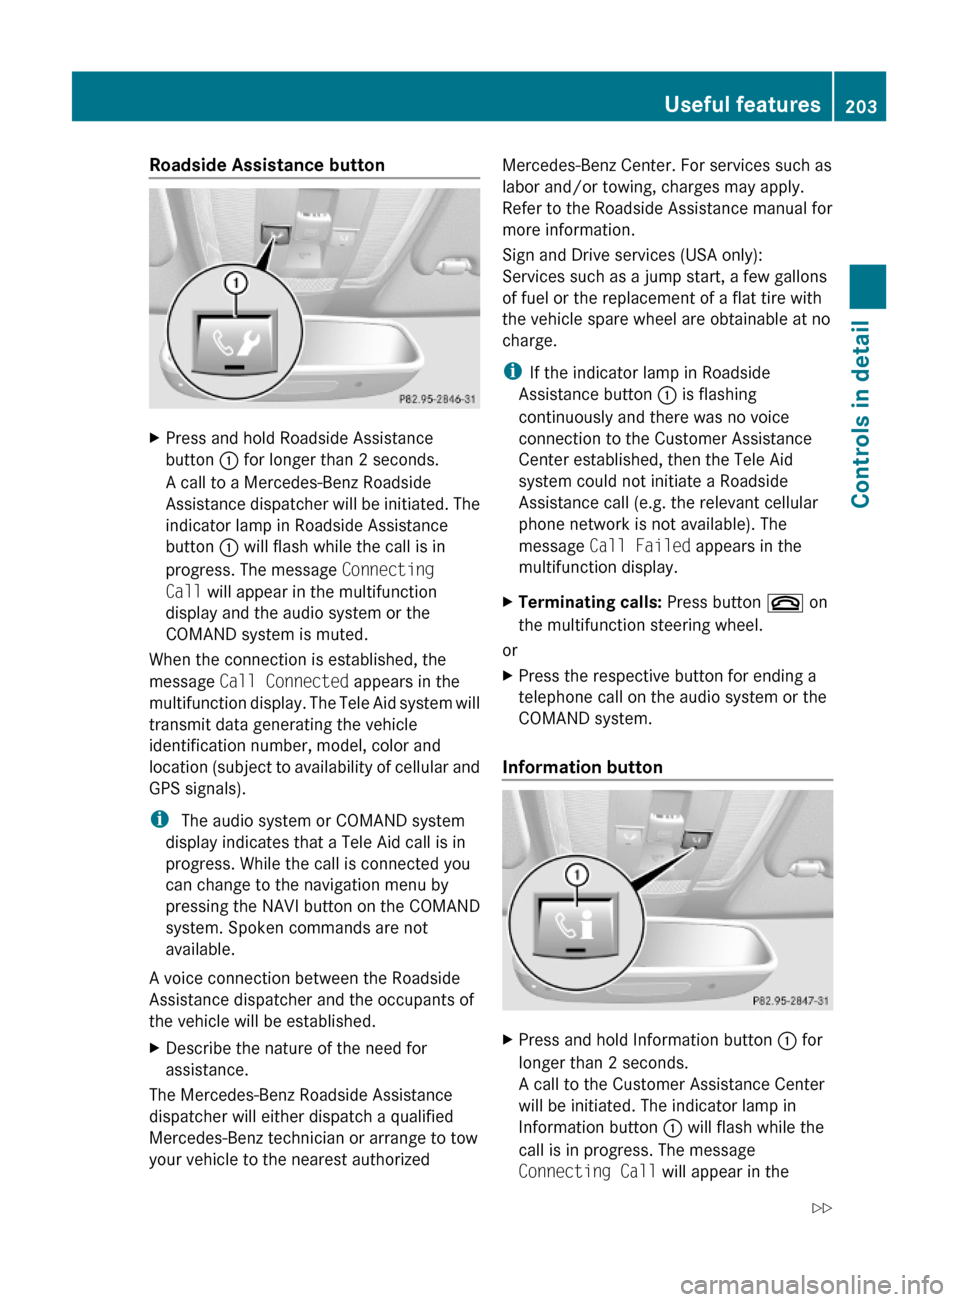
Roadside Assistance button XPress and hold Roadside Assistance
button : for longer than 2 seconds.
A call to a Mercedes-Benz Roadside
Assistance dispatcher will be initiated. The
indicator lamp in Roadside Assistance
button : will flash while the call is in
progress. The message Connecting
Call will appear in the multifunction
display and the audio system or the
COMAND system is muted.
When the connection is established, the
message Call Connected appears in the
multifunction display. The Tele Aid system will
transmit data generating the vehicle
identification number, model, color and
location (subject to availability of cellular and
GPS signals).
i The audio system or COMAND system
display indicates that a Tele Aid call is in
progress. While the call is connected you
can change to the navigation menu by
pressing the NAVI button on the COMAND
system. Spoken commands are not
available.
A voice connection between the Roadside
Assistance dispatcher and the occupants of
the vehicle will be established.
XDescribe the nature of the need for
assistance.
The Mercedes-Benz Roadside Assistance
dispatcher will either dispatch a qualified
Mercedes-Benz technician or arrange to tow
your vehicle to the nearest authorized
Mercedes-Benz Center. For services such as
labor and/or towing, charges may apply.
Refer to the Roadside Assistance manual for
more information.
Sign and Drive services (USA only):
Services such as a jump start, a few gallons
of fuel or the replacement of a flat tire with
the vehicle spare wheel are obtainable at no
charge.
iIf the indicator lamp in Roadside
Assistance button : is flashing
continuously and there was no voice
connection to the Customer Assistance
Center established, then the Tele Aid
system could not initiate a Roadside
Assistance call (e.g. the relevant cellular
phone network is not available). The
message Call Failed appears in the
multifunction display.
XTerminating calls: Press button ~ on
the multifunction steering wheel.
or
XPress the respective button for ending a
telephone call on the audio system or the
COMAND system.
Information button
XPress and hold Information button : for
longer than 2 seconds.
A call to the Customer Assistance Center
will be initiated. The indicator lamp in
Information button : will flash while the
call is in progress. The message
Connecting Call will appear in the
Useful features203Controls in detailX204_AKB; 3; 23, en-USd2ureepe,Version: 2.11.8.12009-07-16T19:16:58+02:00 - Seite 203Z
Page 206 of 344
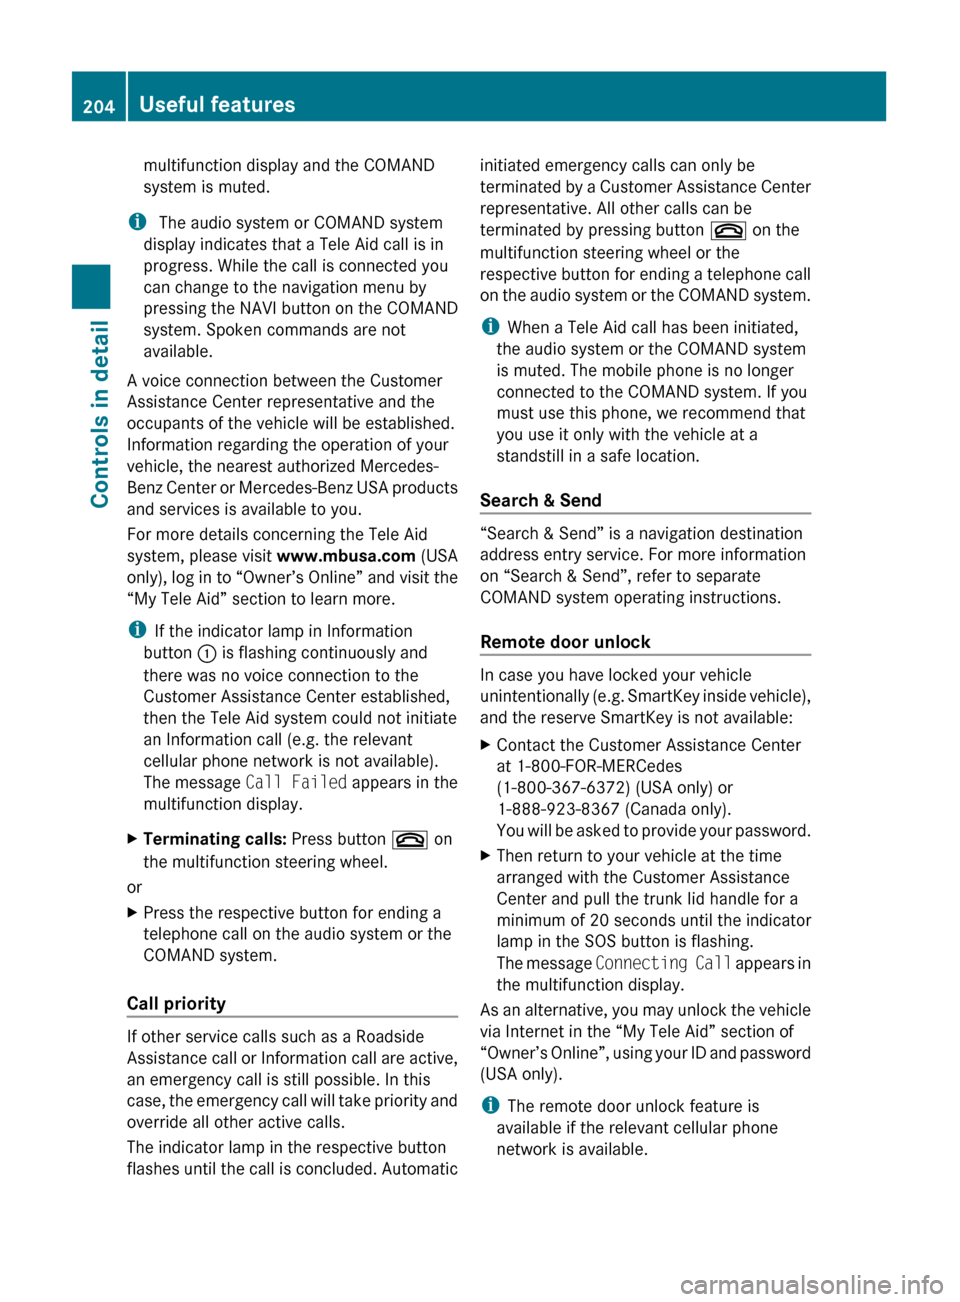
multifunction display and the COMAND
system is muted.
i The audio system or COMAND system
display indicates that a Tele Aid call is in
progress. While the call is connected you
can change to the navigation menu by
pressing the NAVI button on the COMAND
system. Spoken commands are not
available.
A voice connection between the Customer
Assistance Center representative and the
occupants of the vehicle will be established.
Information regarding the operation of your
vehicle, the nearest authorized Mercedes-
Benz Center or Mercedes-Benz USA products
and services is available to you.
For more details concerning the Tele Aid
system, please visit www.mbusa.com (USA
only), log in to “Owner’s Online” and visit the
“My Tele Aid” section to learn more.
i If the indicator lamp in Information
button : is flashing continuously and
there was no voice connection to the
Customer Assistance Center established,
then the Tele Aid system could not initiate
an Information call (e.g. the relevant
cellular phone network is not available).
The message Call Failed appears in the
multifunction display.
XTerminating calls: Press button ~ on
the multifunction steering wheel.
or
XPress the respective button for ending a
telephone call on the audio system or the
COMAND system.
Call priority
If other service calls such as a Roadside
Assistance call or Information call are active,
an emergency call is still possible. In this
case, the emergency call will take priority and
override all other active calls.
The indicator lamp in the respective button
flashes until the call is concluded. Automatic
initiated emergency calls can only be
terminated by a Customer Assistance Center
representative. All other calls can be
terminated by pressing button ~ on the
multifunction steering wheel or the
respective button for ending a telephone call
on the audio system or the COMAND system.
i When a Tele Aid call has been initiated,
the audio system or the COMAND system
is muted. The mobile phone is no longer
connected to the COMAND system. If you
must use this phone, we recommend that
you use it only with the vehicle at a
standstill in a safe location.
Search & Send
“Search & Send” is a navigation destination
address entry service. For more information
on “Search & Send”, refer to separate
COMAND system operating instructions.
Remote door unlock
In case you have locked your vehicle
unintentionally (e.g. SmartKey inside vehicle),
and the reserve SmartKey is not available:
XContact the Customer Assistance Center
at 1-800-FOR-MERCedes
(1-800-367-6372) (USA only) or
1-888-923-8367 (Canada only).
You will be asked to provide your password.XThen return to your vehicle at the time
arranged with the Customer Assistance
Center and pull the trunk lid handle for a
minimum of 20 seconds until the indicator
lamp in the SOS button is flashing.
The message Connecting Call appears in
the multifunction display.
As an alternative, you may unlock the vehicle
via Internet in the “My Tele Aid” section of
“Owner’s Online”, using your ID and password
(USA only).
i The remote door unlock feature is
available if the relevant cellular phone
network is available.
204Useful featuresControls in detail
X204_AKB; 3; 23, en-USd2ureepe,Version: 2.11.8.12009-07-16T19:16:58+02:00 - Seite 204
Page 291 of 344
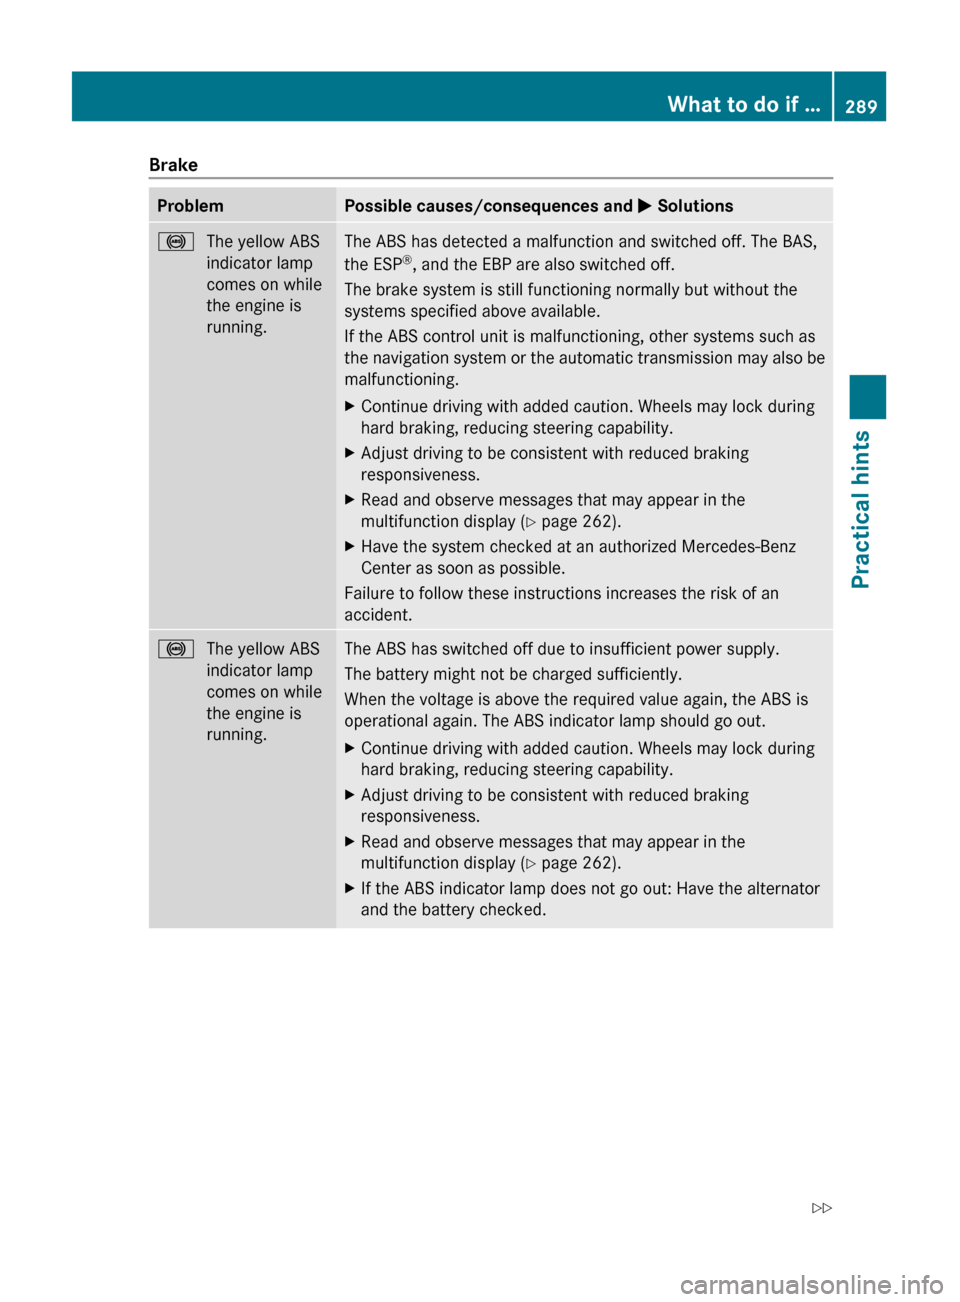
BrakeProblemPossible causes/consequences and M Solutions!The yellow ABS
indicator lamp
comes on while
the engine is
running.The ABS has detected a malfunction and switched off. The BAS,
the ESP ®
, and the EBP are also switched off.
The brake system is still functioning normally but without the
systems specified above available.
If the ABS control unit is malfunctioning, other systems such as
the navigation system or the automatic transmission may also be
malfunctioning.XContinue driving with added caution. Wheels may lock during
hard braking, reducing steering capability.XAdjust driving to be consistent with reduced braking
responsiveness.XRead and observe messages that may appear in the
multifunction display ( Y page 262).XHave the system checked at an authorized Mercedes-Benz
Center as soon as possible.
Failure to follow these instructions increases the risk of an
accident.
!The yellow ABS
indicator lamp
comes on while
the engine is
running.The ABS has switched off due to insufficient power supply.
The battery might not be charged sufficiently.
When the voltage is above the required value again, the ABS is
operational again. The ABS indicator lamp should go out.XContinue driving with added caution. Wheels may lock during
hard braking, reducing steering capability.XAdjust driving to be consistent with reduced braking
responsiveness.XRead and observe messages that may appear in the
multifunction display ( Y page 262).XIf the ABS indicator lamp does not go out: Have the alternator
and the battery checked.What to do if …289Practical hintsX204_AKB; 3; 23, en-USd2ureepe,Version: 2.11.8.12009-07-16T19:16:58+02:00 - Seite 289Z