2010 MERCEDES-BENZ GLK350 4MATIC fold seats
[x] Cancel search: fold seatsPage 58 of 344
RIf you must install a rear-facing child
restraint on the front passenger seat
because circumstances require you to do
so, make sure the 45 indicator lamp
is illuminated, indicating that the front
passenger front air bag is deactivated.
Should the 45 indicator lamp not
illuminate or go out while the restraint is
installed, please check installation.
Periodically check the 45 indicator
lamp while driving to make sure the
45 indicator lamp is illuminated. If
the 45 indicator lamp goes out or
remains out, do not transport a child on the
front passenger seat until the system has
been repaired.
A child in a rear-facing child restraint on the
front passenger seat will be seriously
injured or even killed if the front passenger
front air bag inflates.
RIf you have to place a child in a forward-
facing child restraint on the front passenger
seat, move the seat as far back as possible,
use the proper child restraint
recommended for the age, size and weight
of the child, and secure child restraint with
the vehicle’s seat belt according to the child
seat manufacturer’s instructions.
GWarning!
Infants and small children should never share
a seat belt with another occupant. During an
accident, they could be crushed between the
occupant and seat belt.
A child’s risk of serious or fatal injuries is
significantly increased if the child restraints
are not properly secured in the vehicle and/
or the child is not properly secured in the child
restraint.
Children too big for a toddler restraint must
ride in seats using regular seat belts. Position
shoulder belt across chest and shoulder, not
face or neck. A booster seat may be
necessary to achieve proper seat belt
positioning for children over 41 lb (18 kg) until
they reach a height where a lap/shoulder belt
fits properly without a booster.
When the child restraint is not in use, remove
it from the vehicle or secure it with the seat
belt to prevent the child restraint from
becoming a projectile in the event of an
accident.
Installation of infant and child restraint
systems
GObserve Safety notes, see page 53.GWarning!
Always lock the seat backrests in their upright
position when the rear seats are occupied by
passengers. Lock the seat backrests in their
upright position before installing top tether
straps or when the extended cargo
compartment is not in use. Make sure that
seat backrests are secured properly by
pushing and pulling on the seat backrests. If
a seat backrest is not locked properly, the
seat backrest could fold. The child seat would
no longer be supported properly or positioned
to provide its intended benefit. That could
cause serious or even fatal injuries.
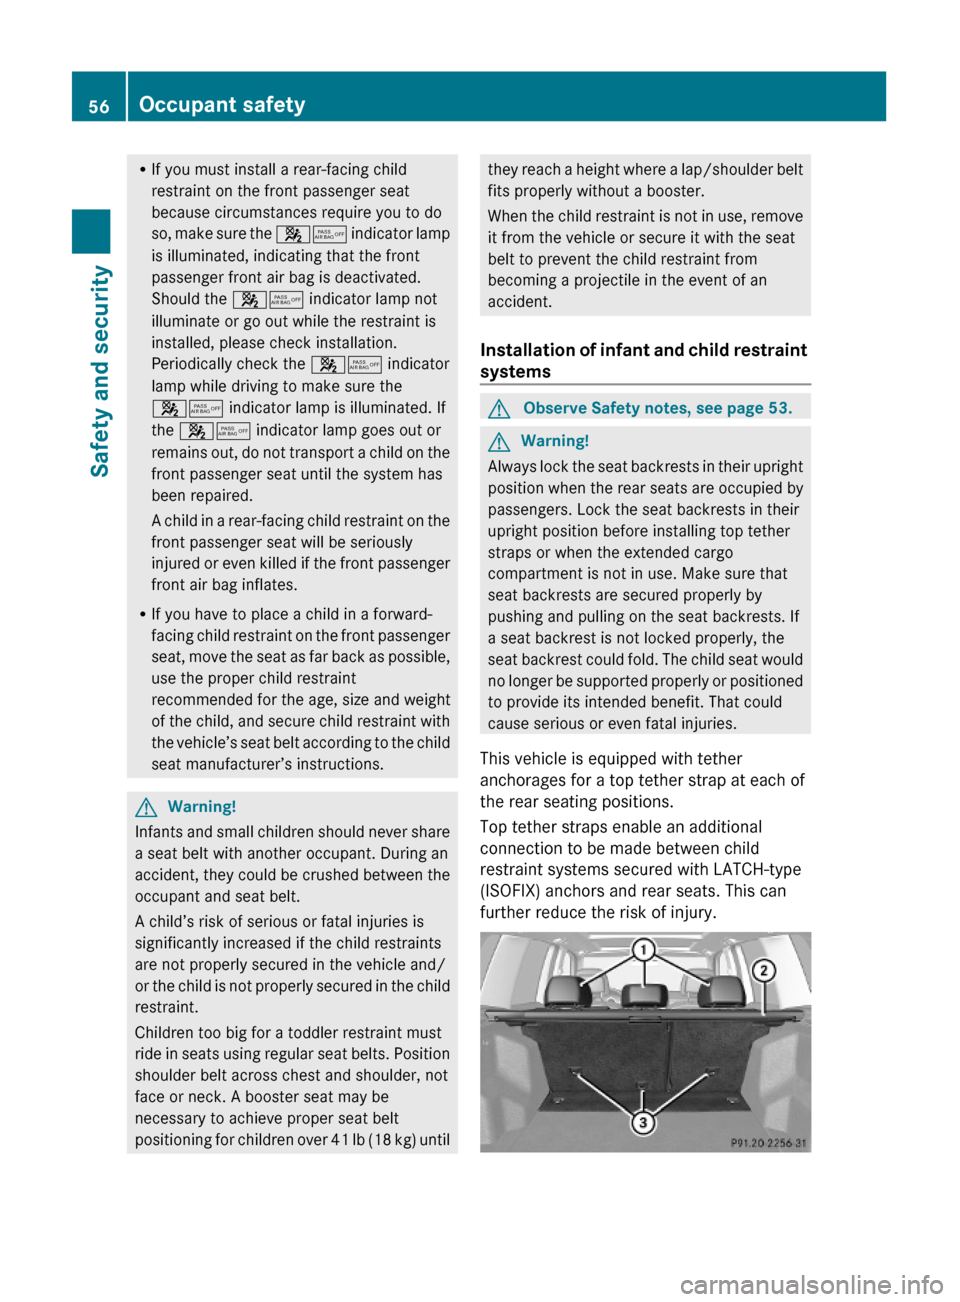
This vehicle is equipped with tether
anchorages for a top tether strap at each of
the rear seating positions.
Top tether straps enable an additional
connection to be made between child
restraint systems secured with LATCH-type
(ISOFIX) anchors and rear seats. This can
further reduce the risk of injury.
56Occupant safetySafety and security
X204_AKB; 3; 23, en-USd2ureepe,Version: 2.11.8.12009-07-16T19:16:58+02:00 - Seite 56
Page 59 of 344
XMove the respective head restraint : to
its uppermost position (Y page 80).
XRelease the rear seat backrest
(Y page 189).
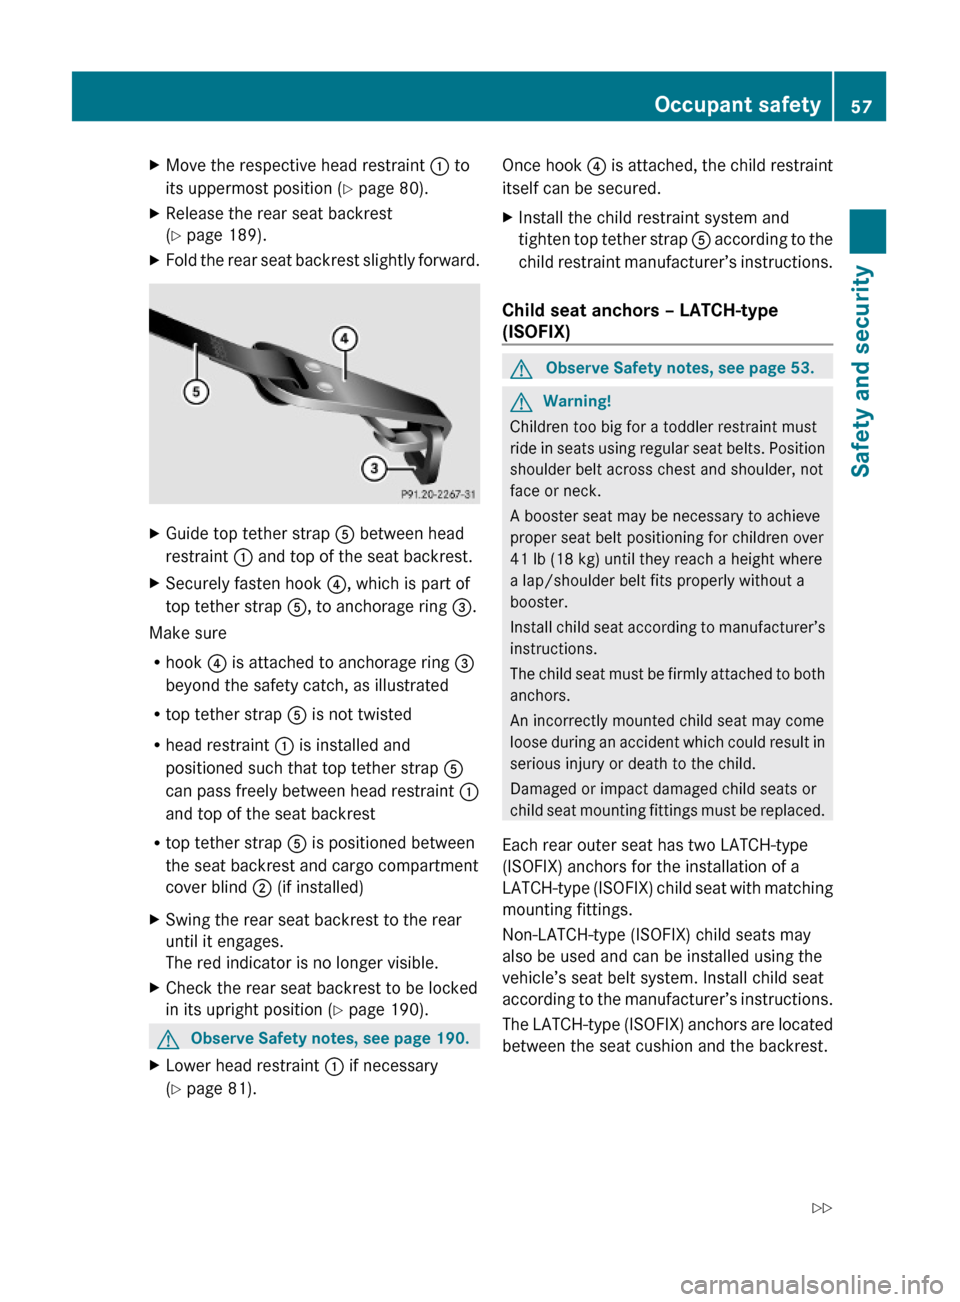
XFold the rear seat backrest slightly forward.XGuide top tether strap A between head
restraint : and top of the seat backrest.
XSecurely fasten hook ?, which is part of
top tether strap A, to anchorage ring =.
Make sure
Rhook ? is attached to anchorage ring =
beyond the safety catch, as illustrated
Rtop tether strap A is not twisted
Rhead restraint : is installed and
positioned such that top tether strap A
can pass freely between head restraint :
and top of the seat backrest
Rtop tether strap A is positioned between
the seat backrest and cargo compartment
cover blind ; (if installed)
XSwing the rear seat backrest to the rear
until it engages.
The red indicator is no longer visible.
XCheck the rear seat backrest to be locked
in its upright position (Y page 190).
GObserve Safety notes, see page 190.XLower head restraint : if necessary
(Y page 81).
Once hook ? is attached, the child restraint
itself can be secured.
XInstall the child restraint system and
tighten top tether strap A according to the
child restraint manufacturer’s instructions.
Child seat anchors – LATCH-type
(ISOFIX)
GObserve Safety notes, see page 53.GWarning!
Children too big for a toddler restraint must
ride in seats using regular seat belts. Position
shoulder belt across chest and shoulder, not
face or neck.
A booster seat may be necessary to achieve
proper seat belt positioning for children over
41 lb (18 kg) until they reach a height where
a lap/shoulder belt fits properly without a
booster.
Install child seat according to manufacturer’s
instructions.
The child seat must be firmly attached to both
anchors.
An incorrectly mounted child seat may come
loose during an accident which could result in
serious injury or death to the child.
Damaged or impact damaged child seats or
child seat mounting fittings must be replaced.
Each rear outer seat has two LATCH-type
(ISOFIX) anchors for the installation of a
LATCH-type (ISOFIX) child seat with matching
mounting fittings.
Non-LATCH-type (ISOFIX) child seats may
also be used and can be installed using the
vehicle’s seat belt system. Install child seat
according to the manufacturer’s instructions.
The LATCH-type (ISOFIX) anchors are located
between the seat cushion and the backrest.
Occupant safety57Safety and securityX204_AKB; 3; 23, en-USd2ureepe,Version: 2.11.8.12009-07-16T19:16:58+02:00 - Seite 57Z
Page 191 of 344
Hooks
Three hooks are located in the cargo
compartment.
Use the hooks to secure light-weight items
only. The maximum permissible weight per
hook is 9 lbs (4 kg).
Coat hooks on the tailgate
GWarning!
The tailgate may close if too great a load is
placed on the coat hooks.
You and/or others could be trapped and
injured.
Only use the coat hooks for light clothing.
Expanding cargo volume
To expand the cargo volume, you can fold the
left and right rear seat backrests.
The two sections can be folded separately to
enlarge the cargo volume.
GWarning!
Always lock the seat backrest in its upright
position when the rear seat bench is
occupied, or the extended cargo volume is not
in use.
Check for secure locking by pushing and
pulling on the seat backrest.
In an accident, during hard braking or sudden
maneuvers, loose items will be thrown around
inside the vehicle. This can cause injury to
vehicle occupants unless the items are
securely fastened in the vehicle.
To help avoid personal injury during a collision
or sudden maneuver, exercise care when
transporting cargo.
GWarning!
Never drive a vehicle with the tailgate open.
Deadly carbon monoxide (CO) gases may
enter vehicle interior resulting in
unconsciousness and death.
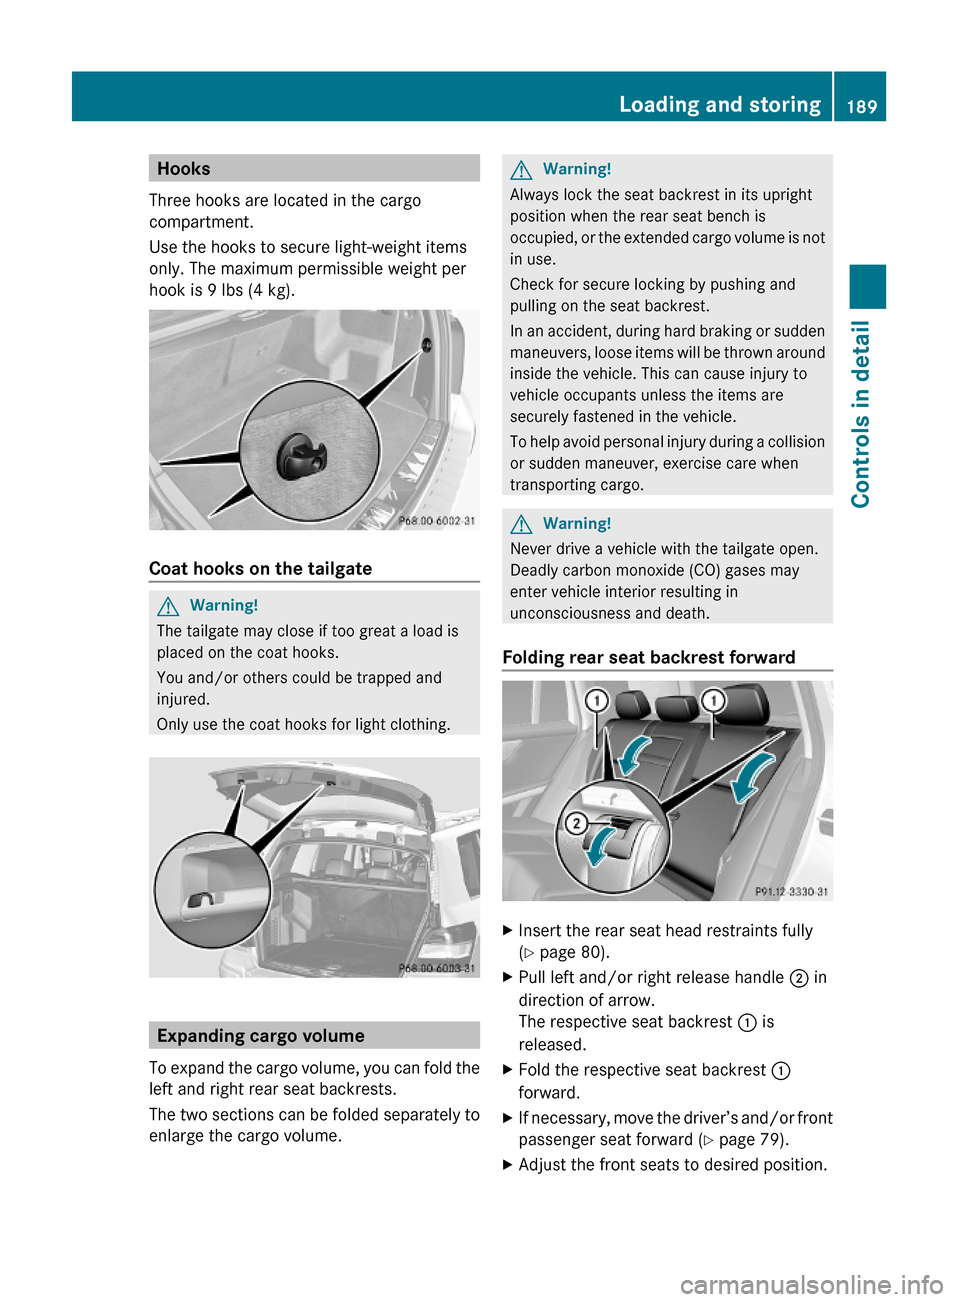
Folding rear seat backrest forward
XInsert the rear seat head restraints fully
(Y page 80).
XPull left and/or right release handle ; in
direction of arrow.
The respective seat backrest : is
released.
XFold the respective seat backrest :
forward.
XIf necessary, move the driver’s and/or front
passenger seat forward (Y page 79).
XAdjust the front seats to desired position.Loading and storing189Controls in detailX204_AKB; 3; 23, en-USd2ureepe,Version: 2.11.8.12009-07-16T19:16:58+02:00 - Seite 189Z
Page 192 of 344
Setting up rear seat backrestGWarning!
If a red indicator is visible with the seat
backrest up, then the seat backrest is not
properly locked into position.
Always lock seat backrest in its upright
position when rear seat bench is occupied, or
the expanded cargo volume is not in use.
Check for secure locking by pushing and
pulling on the seat backrest.
In an accident, during hard braking or sudden
maneuvers, loose items will be thrown around
inside the vehicle. This can cause injury to
vehicle occupants unless the items are
securely fastened in the vehicle.
To help avoid personal injury during a collision
or sudden maneuver, exercise care when
transporting cargo.
XIf necessary, move the driver’s and/or front
passenger seat forward (Y page 79).
! Make sure that the seat belt is not
pinched when folding rear seat backrest.
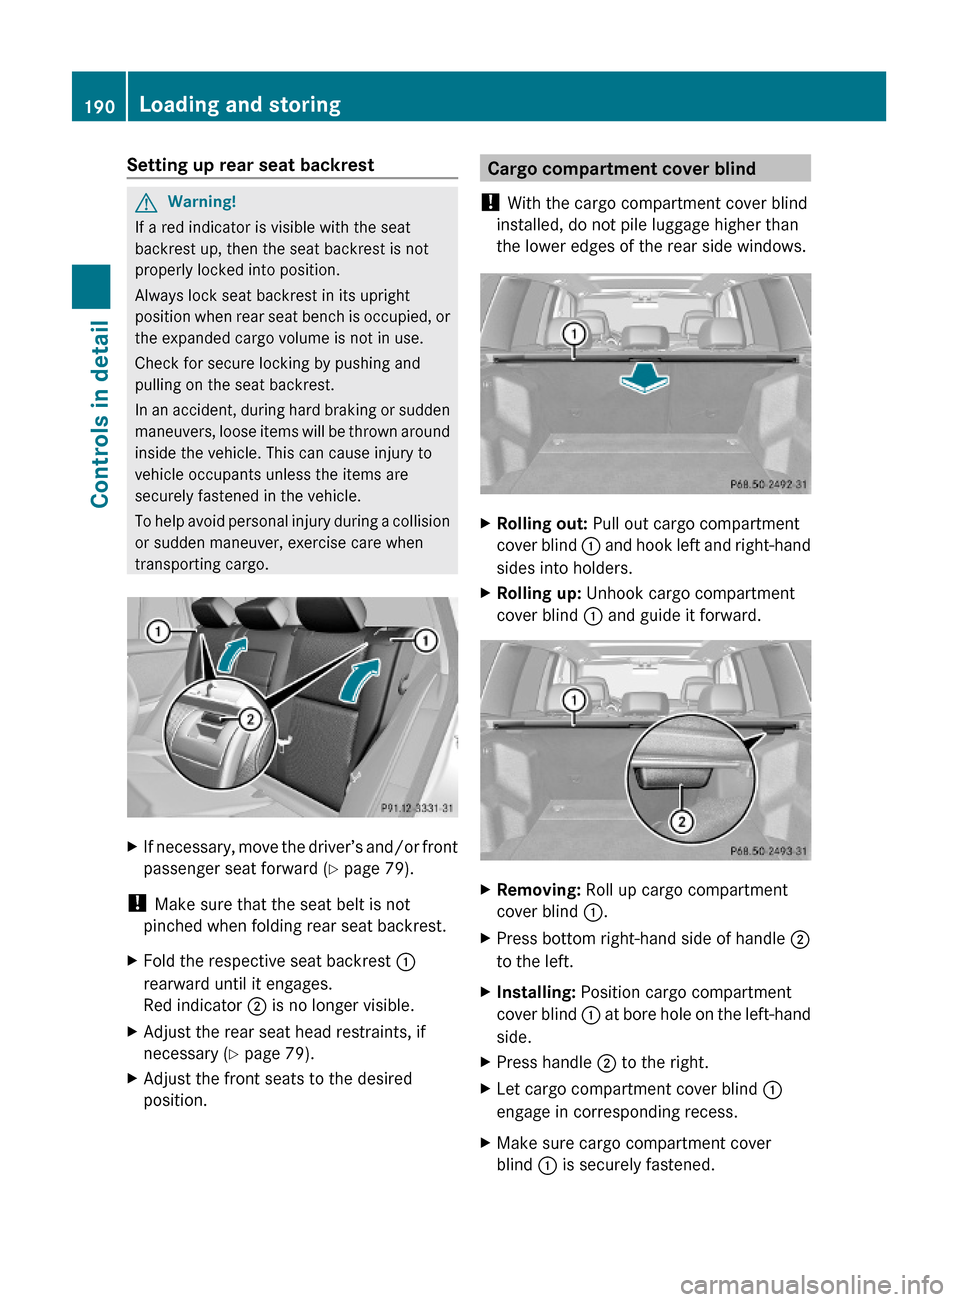
XFold the respective seat backrest :
rearward until it engages.
Red indicator ; is no longer visible.
XAdjust the rear seat head restraints, if
necessary (Y page 79).
XAdjust the front seats to the desired
position.Cargo compartment cover blind
! With the cargo compartment cover blind
installed, do not pile luggage higher than
the lower edges of the rear side windows.
XRolling out: Pull out cargo compartment
cover blind : and hook left and right-hand
sides into holders.
XRolling up: Unhook cargo compartment
cover blind : and guide it forward.
XRemoving: Roll up cargo compartment
cover blind :.
XPress bottom right-hand side of handle ;
to the left.
XInstalling: Position cargo compartment
cover blind : at bore hole on the left-hand
side.
XPress handle ; to the right.XLet cargo compartment cover blind :
engage in corresponding recess.
XMake sure cargo compartment cover
blind : is securely fastened.
190Loading and storingControls in detail
X204_AKB; 3; 23, en-USd2ureepe,Version: 2.11.8.12009-07-16T19:16:58+02:00 - Seite 190
Page 193 of 344
Cargo net (Canada only)GWarning!
Make sure the cargo net is properly engaged
at top and bottom position and the tightening
belts are securely fastened.
Never use a damaged cargo net.
Always use cargo net when transporting
cargo. This helps to avoid personal injury from
smaller objects being thrown around in the
occupant compartment during a collision or
sudden maneuver.
The cargo net cannot prevent the movement
of large, heavier objects into the passenger
compartment in an accident. Such items must
be properly secured using the cargo tie-down
rings in the cargo compartment floor.
Passenger use of seats behind installed cargo
net is restricted because of the footwell being
taken up by the net.
Use of the cargo net is a particularly
important safety factor when the vehicle is
loaded higher than the top of the seat
backrests with smaller objects. For your
safety, always use the cargo net when
transporting cargo.
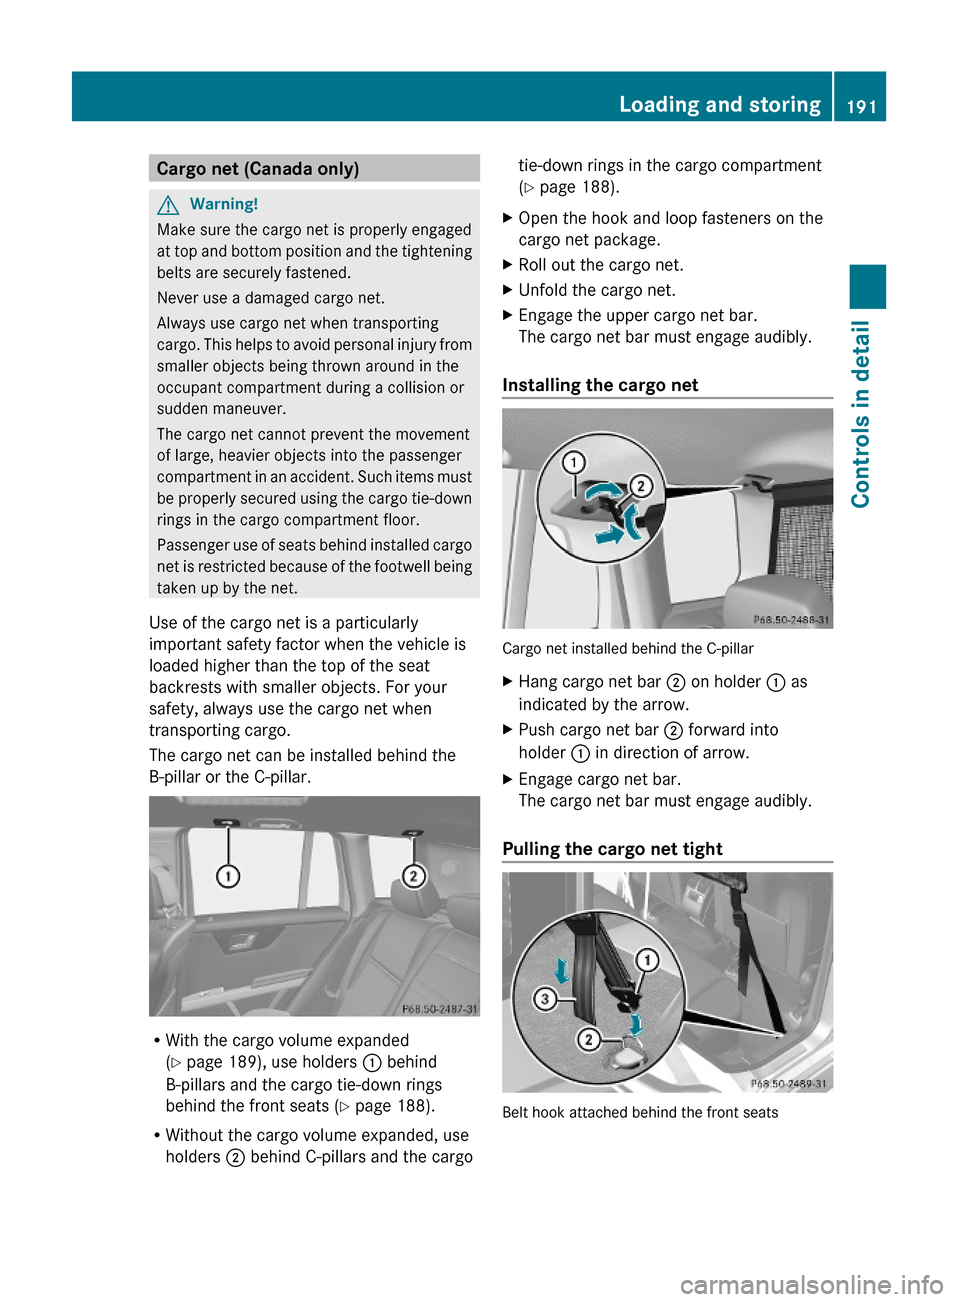
The cargo net can be installed behind the
B-pillar or the C-pillar.
RWith the cargo volume expanded
(Y page 189), use holders : behind
B-pillars and the cargo tie-down rings
behind the front seats (Y page 188).
RWithout the cargo volume expanded, use
holders ; behind C-pillars and the cargo
tie-down rings in the cargo compartment
(Y page 188).
XOpen the hook and loop fasteners on the
cargo net package.
XRoll out the cargo net.XUnfold the cargo net.XEngage the upper cargo net bar.
The cargo net bar must engage audibly.
Installing the cargo net
Cargo net installed behind the C-pillar
XHang cargo net bar ; on holder : as
indicated by the arrow.
XPush cargo net bar ; forward into
holder : in direction of arrow.
XEngage cargo net bar.
The cargo net bar must engage audibly.
Pulling the cargo net tight
Belt hook attached behind the front seats
Loading and storing191Controls in detailX204_AKB; 3; 23, en-USd2ureepe,Version: 2.11.8.12009-07-16T19:16:58+02:00 - Seite 191Z
Page 194 of 344
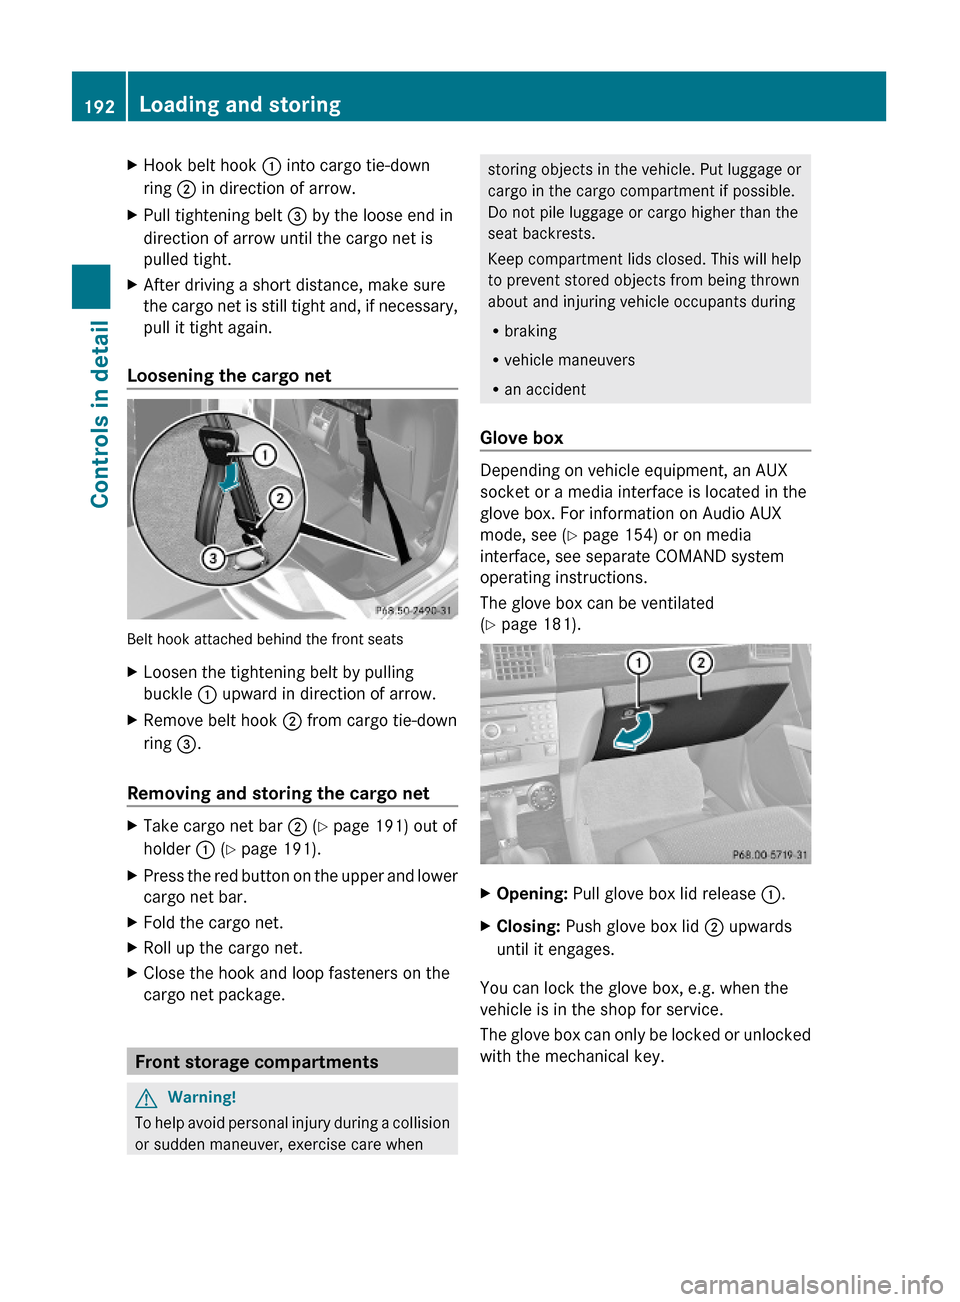
XHook belt hook : into cargo tie-down
ring ; in direction of arrow.
XPull tightening belt = by the loose end in
direction of arrow until the cargo net is
pulled tight.
XAfter driving a short distance, make sure
the cargo net is still tight and, if necessary,
pull it tight again.
Loosening the cargo net
Belt hook attached behind the front seats
XLoosen the tightening belt by pulling
buckle : upward in direction of arrow.
XRemove belt hook ; from cargo tie-down
ring =.
Removing and storing the cargo net
XTake cargo net bar ; (Y page 191) out of
holder : (Y page 191).
XPress the red button on the upper and lower
cargo net bar.
XFold the cargo net.XRoll up the cargo net.XClose the hook and loop fasteners on the
cargo net package.
Front storage compartments
GWarning!
To help avoid personal injury during a collision
or sudden maneuver, exercise care when
storing objects in the vehicle. Put luggage or
cargo in the cargo compartment if possible.
Do not pile luggage or cargo higher than the
seat backrests.
Keep compartment lids closed. This will help
to prevent stored objects from being thrown
about and injuring vehicle occupants during
Rbraking
Rvehicle maneuvers
Ran accident
Glove box
Depending on vehicle equipment, an AUX
socket or a media interface is located in the
glove box. For information on Audio AUX
mode, see (Y page 154) or on media
interface, see separate COMAND system
operating instructions.
The glove box can be ventilated
(Y page 181).
XOpening: Pull glove box lid release :.XClosing: Push glove box lid ; upwards
until it engages.
You can lock the glove box, e.g. when the
vehicle is in the shop for service.
The glove box can only be locked or unlocked
with the mechanical key.
192Loading and storingControls in detail
X204_AKB; 3; 23, en-USd2ureepe,Version: 2.11.8.12009-07-16T19:16:58+02:00 - Seite 192
Page 195 of 344
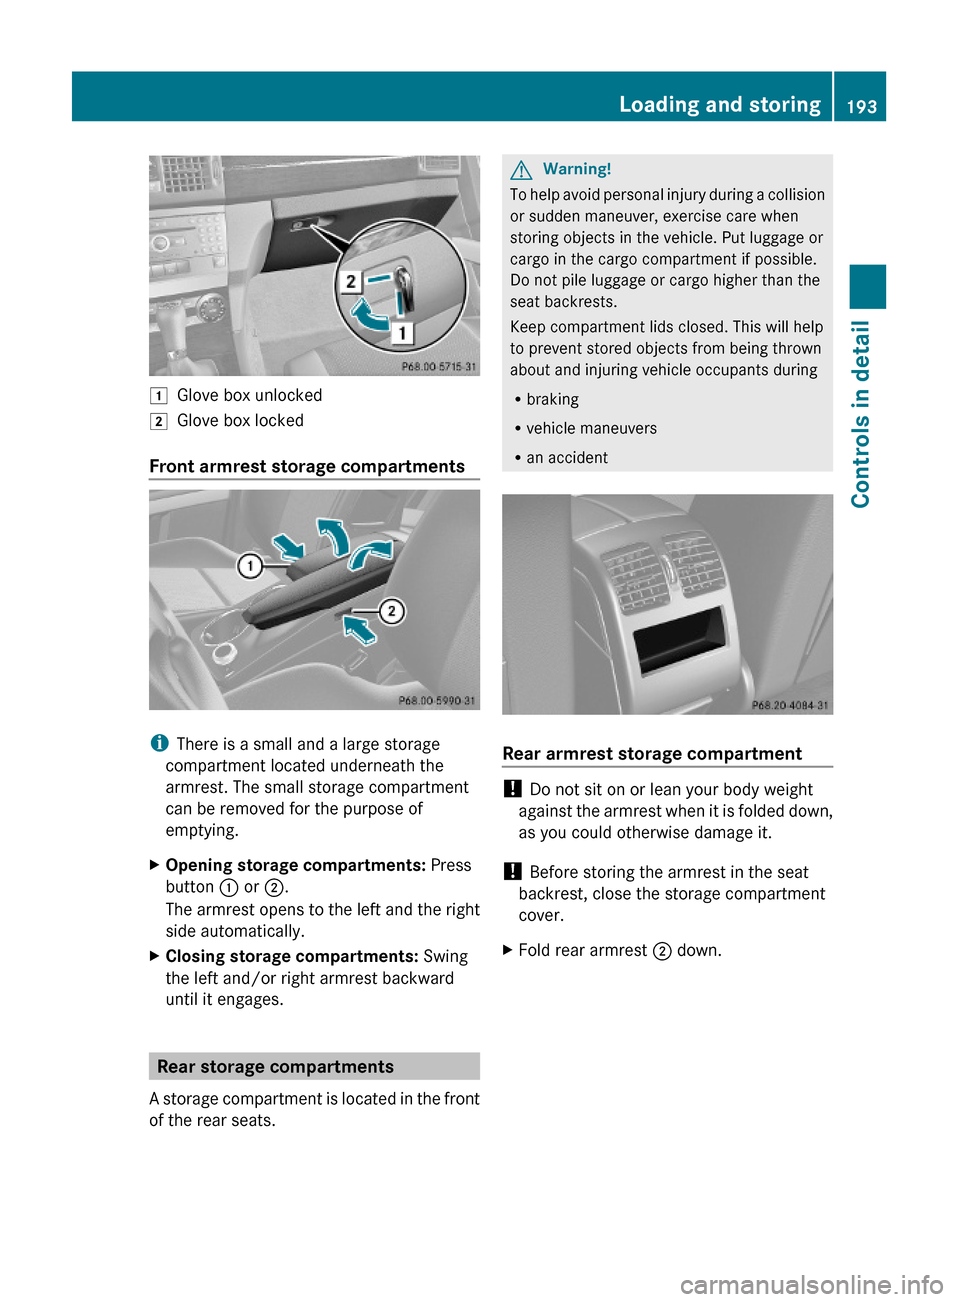
1Glove box unlocked2Glove box locked
Front armrest storage compartments
iThere is a small and a large storage
compartment located underneath the
armrest. The small storage compartment
can be removed for the purpose of
emptying.
XOpening storage compartments: Press
button : or ;.
The armrest opens to the left and the right
side automatically.
XClosing storage compartments: Swing
the left and/or right armrest backward
until it engages.
Rear storage compartments
A storage compartment is located in the front
of the rear seats.
GWarning!
To help avoid personal injury during a collision
or sudden maneuver, exercise care when
storing objects in the vehicle. Put luggage or
cargo in the cargo compartment if possible.
Do not pile luggage or cargo higher than the
seat backrests.
Keep compartment lids closed. This will help
to prevent stored objects from being thrown
about and injuring vehicle occupants during
Rbraking
Rvehicle maneuvers
Ran accident
Rear armrest storage compartment
! Do not sit on or lean your body weight
against the armrest when it is folded down,
as you could otherwise damage it.
! Before storing the armrest in the seat
backrest, close the storage compartment
cover.
XFold rear armrest ; down.Loading and storing193Controls in detailX204_AKB; 3; 23, en-USd2ureepe,Version: 2.11.8.12009-07-16T19:16:58+02:00 - Seite 193Z