2010 MERCEDES-BENZ GLK350 4MATIC fuses
[x] Cancel search: fusesPage 11 of 344
Front air bagssee Air bags
Front axle oil ...................................... 334
Front lamps see Headlamps
Front passenger front air bag ............ 40
Messages in the multifunction
display ........................................... 264
Front passenger front air bag off
indicator lamp (Canada only) ..... 45, 297
Front passenger front air bag off
indicator lamp (USA only) .......... 42, 298
Front seat head restraints see Head restraints
Fuel ..................................................... 212
Additives ........................................ 337
Capacity, fuel tank .........................335
Drive sensibly–safe fuel .................243
Fuel consumption statistics ...........114
Fuel filler flap and cap ...................213
Fuel tank reserve warning lamp .....294
Premium unleaded gasoline ...........336
Refueling ........................................ 212
Requirements ................................ 337
Fuel filler flap ..................................... 213
Opening manually ..........................301
Fuel gauge ................................... 28, 110
Fuels, coolants, lubricants etc. ........ 334
Fuel tank
Capacity ........................................ 335
Fuel filler flap and cap ...................213
Refueling ........................................ 212
Fuses .................................................. 325
G
Garage door opener .................... 32, 205
Gasoline see Fuel
GAWR (Gross Axle Weight Rating) ... 240
Gear range ......................................... 106
Indicator ........................................ 106
Limiting .......................................... 107
Shifting into optimal ......................108
Gear selector lever ............................ 103
Cleaning ......................................... 256
Gearshift pattern ........................... 103
Lock ......................................... 99, 104
Shifting procedure .........................104
Transmission position indicator .....104
Transmission positions ..................104
Generator
see Alternator
Global locking/unlocking
see Key, SmartKey
Glove box ........................................... 192
Gross Axle Weight Rating see GAWR
Gross Trailer Weight
see GTW
Gross Vehicle Weight
see GVW
Gross Vehicle Weight Rating
see GVWR
GTW (Gross Trailer Weight) .............. 240
GVW (Gross Vehicle Weight) ............ 240
GVWR (Gross Vehicle Weight
Rating) ................................................ 240
H
Halogen headlamps see Headlamps
Hard plastic trim items, cleaning .... 256
Hazard warning flasher ....................... 90
Headlamp cleaning system ................ 91
Headlamps
Active Bi-Xenon headlamps .............87
Automatic headlamp mode ..............88
Bi-Xenon .................................. 87, 304
Cleaning lenses ............................. 254
Cleaning system .............................. 91
Daytime running lamp mode ............88
Delayed shut-off ............................ 122
Halogen ......................................... 304
High-beam flasher ............................ 90
High-beam headlamps .....................90
Low-beam headlamps ......................88
Messages in the multifunction
display ........................................... 283
Replacing bulbs ............................. 303
Switch .............................................. 87
Headliner, cleaning and care of ....... 256
Head restraints .................................... 78
Adjustment ................................ 78, 80
Folding back .................................... 80
Index9X204_AKB; 3; 23, en-USd2ureepe,Version: 2.11.8.12009-07-16T19:16:58+02:00 - Seite 9
Page 261 of 344
Vehicle equipment ............................260
Where will I find ...? ..........................260
Vehicle status messages in the
multifunction display .......................262
What to do if … ..................................288
Unlocking/locking manually ...........299
Resetting activated NECK-PRO
active front head restraints .............301
Replacing SmartKey batteries .........302
Replacing bulbs .................................303
Replacing wiper blades ....................310
Flat tire ..............................................312
Battery ...............................................317
Jump starting ....................................319
Towing the vehicle ............................321
Fuses ..................................................325
259Practical hintsX204_AKB; 3; 23, en-USd2ureepe,Version: 2.11.8.12009-07-16T19:16:58+02:00 - Seite 259
Page 327 of 344

Note the following when freeing a stranded
vehicle:
RAvoid pulling the vehicle abruptly or
diagonally, since it could result in damage
to the chassis alignment.
RNever try to free a vehicle that is still
coupled to a trailer.
RIf possible, a vehicle equipped with a trailer
hitch receiver should be pulled backward in
its own previously made tracks.
Fuses
Introduction
The electrical fuses in your vehicle serve to
switch off malfunctioning power circuits.
If a fuse is blown, the components and
systems secured by that fuse will stop
operating.
GWarning!
Only use fuses approved by Mercedes-Benz
with the specified amperage for the system in
question and do not attempt to repair or
bridge a blown fuse. Using other than
approved fuses or using repaired or bridged
fuses may cause an overload leading to a fire,
and/or cause damage to electrical
components and/or systems. Have the cause
determined and remedied by an authorized
Mercedes-Benz Center.
A blown fuse must be replaced by an
appropriate spare fuse (recognizable by its
color or the fuse rating given on the fuse) of
the amperage recommended in the fuse
chart. Any Mercedes-Benz Center will be glad
to advise you on this subject.
iIn case of a blown fuse contact Roadside
Assistance or an authorized Mercedes-
Benz Center.
If a newly inserted fuse blows again, have the
cause determined and rectified by an
authorized Mercedes-Benz Center.
The fuse chart is located in the cargo
compartment with the vehicle tool kit
(Y page 260). The fuse chart explains the fuse
allocation and fuse amperages.
Before replacing fuses
XEngage the parking brake.XMake sure the automatic transmission is in
park position P.
XSwitch off all electrical consumers.XTurn off the engine.XRemove the SmartKey from the starter
switch.
Fuse box in passenger compartment
! Do not use sharp objects such as a
screwdriver to open the fuse box cover in
the dashboard. You could damage the fuse
box cover or the dashboard.
XOpen the driver’s door.XOpening: Using your hands, pull fuse box
cover : in direction of arrow = and
remove in direction of arrow ;.
XClosing: Hook fuse box cover : into the
opening at the front.
XPress fuse box cover : back on until it
engages.
! The fuse box cover must be properly
positioned as described. Otherwise,
Fuses325Practical hintsX204_AKB; 3; 23, en-USd2ureepe,Version: 2.11.8.12009-07-16T19:16:58+02:00 - Seite 325Z
Page 328 of 344
moisture or dirt could enter the fuse box
and possibly impair fuse operation.
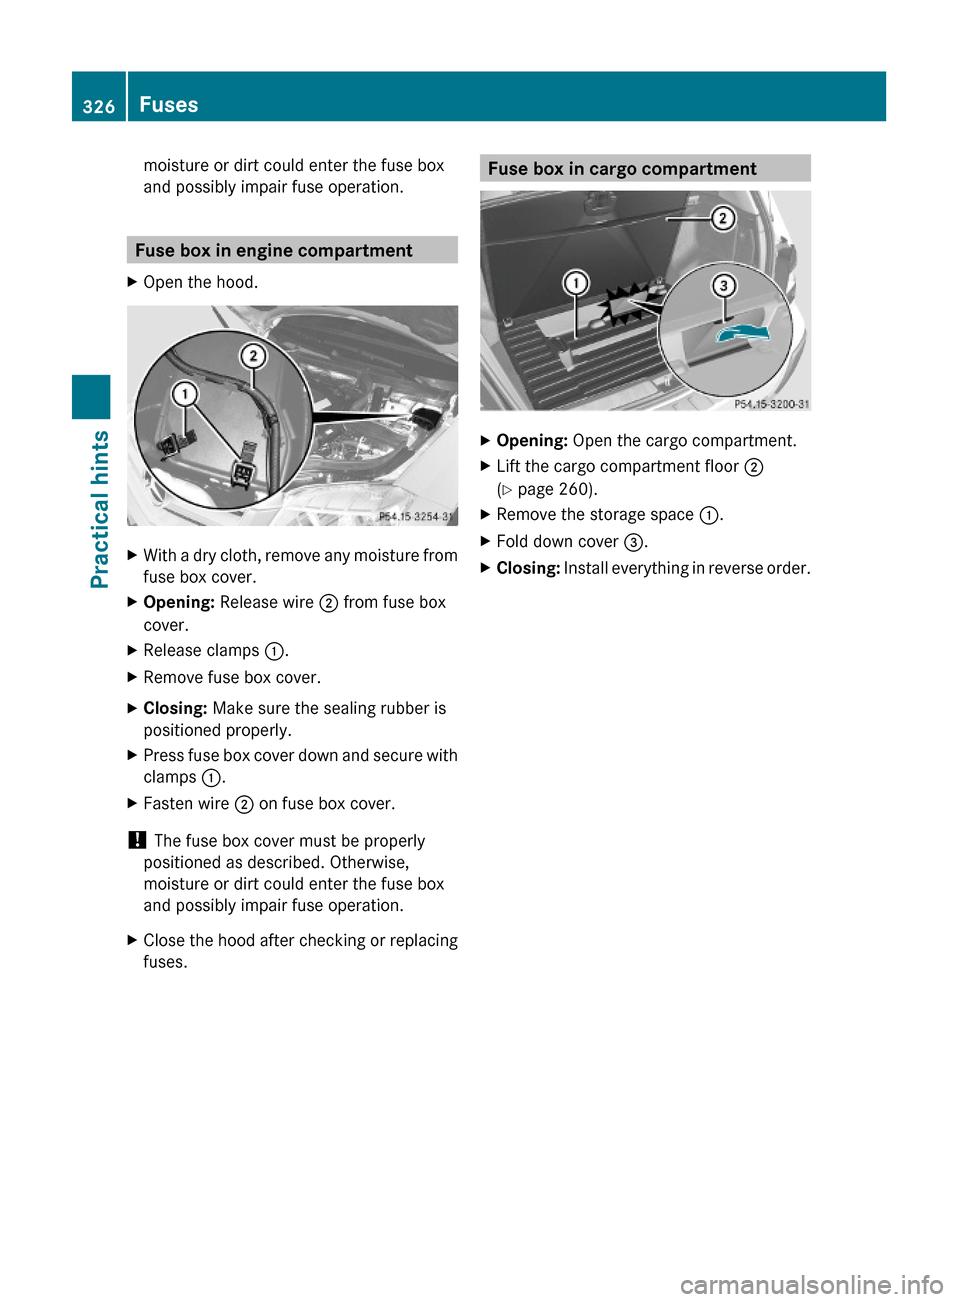
Fuse box in engine compartment
XOpen the hood.XWith a dry cloth, remove any moisture from
fuse box cover.
XOpening: Release wire ; from fuse box
cover.
XRelease clamps :.XRemove fuse box cover.XClosing: Make sure the sealing rubber is
positioned properly.
XPress fuse box cover down and secure with
clamps :.
XFasten wire ; on fuse box cover.
! The fuse box cover must be properly
positioned as described. Otherwise,
moisture or dirt could enter the fuse box
and possibly impair fuse operation.
XClose the hood after checking or replacing
fuses.Fuse box in cargo compartmentXOpening: Open the cargo compartment.XLift the cargo compartment floor ;
(Y page 260).
XRemove the storage space :.XFold down cover =.XClosing: Install everything in reverse order.326FusesPractical hints
X204_AKB; 3; 23, en-USd2ureepe,Version: 2.11.8.12009-07-16T19:16:58+02:00 - Seite 326