Page 145 of 224

Gracenote®
Media Database
i This function is only available in CD Audio
mode.
CD information including album title, artist
name and track name is obtained from the
Gracenote ®
Media Database. A version of the
Gracenote ®
Media Database is stored on the
COMAND’s hard drive. Access to this
database is indicated by the Gracenote logo
being displayed in the lower right of some
audio displays.
Many audio CDs contain CD text. COMAND
uses the information contained in this text for
displaying the name of the artist, album and
track.
If the audio CD does not contain any CD text,
COMAND can recognize unknown audio
tracks in CD Audio mode with the aid of the
Gracenote Media Database. For this to
happen, the corresponding information must
be stored in the Gracenote Media Database
and the “Read CD Database” function must
be switched on.
If this is the case, COMAND provides the
corresponding data, such as name of artist,
album and track, in the corresponding
displays and lists.
If COMAND accesses the Gracenote Media
Database while reading an audio CD, the
following information is displayed:
Switching "Read CD Database"
Function On and Off
XSwitch to CD Audio mode ( Y page 139).XSelect CD£ Read CD Database .
A list opens from which you can select the
desired data. Select None if you do not want
to display any of the data.
Updating the Gracenote ®
Media
Database
As new music CD releases occur it is
necessary to update the Gracenote Media
Database. Optimum Gracenote ®
music
recognition function is only achieved when
the most up-to-date database is available in
your vehicle.
You can have the music recognition software
updated at an Authorized Mercedes-Benz
center by means of a DVD or perform the
update process yourself.
i The Gracenote ®
Media Database is
updated at the same time as the map
software ( Y page 48).
Setting Audio Format
It is only possible to set the audio format in
DVD Audio mode. The number of available
audio formats depends on the DVD. The
content of a DVD Audio is called the “album”,
which can be divided into a maximum of nine
groups. A group may contain, for example,
music of different sound qualities (stereo and
CD Audio/DVD Audio/MP3143AudioZ
Page 146 of 224
 or bonus tracks. Each
group can include up to 99 tracks. If a DVD
Audio only comprises one audio format, the
“Group” menu item(s) cannot be selected.XSwitch to DVD Audio mod")
multi-channel formats) or bonus tracks. Each
group can include up to 99 tracks. If a DVD
Audio only comprises one audio format, the
“Group” menu item(s) cannot be selected.XSwitch to DVD Audio mode ( Y page 139).XSelect DVD-A£Group .
The list of available audio formats appears.
The dot R indicates the format currently
selected.XTo change setting: Rotate ym z or slide
q m r.XPress n.
Playback Options
The following options are available:
R Normal Track Sequence
You will hear the tracks in the normal order
(e.g. track 1, 2, 3, etc.).
R Random Tracks
You will hear the tracks in random order
(e.g. track 3, 8, 5, etc.).
R Random Folder (MP3 mode only)
You hear the tracks in the currently active
folder and any subfolders in random order.
XTo select an option: Switch to CD Audio,
DVD Audio or MP3 mode ( Y page 139).XSelect CD or DVD-A or MP3 .
The option list appears. A dot R indicates
the option selected.XSelect an option.
The option is activated. For all options
except Normal Track Sequence , you will
see a corresponding display in the main
area.
i The Normal Track Sequence option is
automatically selected when you change
the medium you are currently listening to
or when you select a different medium. If
an option is selected, it remains selected
after COMAND is switched on or off.
Music Register
You can record tracks from Audio CDs and
store them in the Music Register. The
memory capacity is 6 GB.
! Keep your original music files in a safe
place. A fault with the COMAND may cause
the music files stored in the Music Register
to be lost. Mercedes-Benz USA, LLC is not
liable for any loss of data.
Switching to the Music Register
From Another Main Function
XSelect Audio£Audio £Music
Register in the Audio menu display.
i
If Music Register was the last mode,
you only need to select Audio.
Within the Audio Function
XSelect Audio£Music Register .
Music Register is loaded. The Music
Register display appears.
No music files available:
A message will be displayed.
XFirst record music files from an Audio CD
( Y page 145).
Music files available:
You will hear the first track of the first folder
found or playback will start from the point
listened to last.
144Music RegisterAudio
Page 147 of 224

1Storage media type — Music Register Ñ2Track number3Track name4Elapsed track time5Visual time and track display6Current playback option7Sound settings8Media selection9Current folderaFolder functionsbStorage medium position in the media listcCalls up Music Register menu
Recording Music Files
i CD information, including album title,
artist name and track name is obtained
from the Gracenote ®
Media Database
( Y page 143).
XIn the Disc submenu with Audio CD
inserted, select REC. The Record submenu
appears.
Selecting Tracks to Be Recorded
XRotate ym z or slide om p until Tracks is
highlighted.XPress n.XSelect tracks to be recorded by switching
the check mark next to each track entry on
or off.1Record all tracks (default);Option for selecting individual tracks=Confirm selection
i If you do not select individual tracks
before recording, all tracks on the CD will
be recorded.
Selecting a Destination Folder
XRotate ym z or slide om p until
Destination Folder is highlighted.XPress n.
Selection list
1Create new folder (default)2Existing folders3Currently active folderXTo select folder: Rotate ym z or slide
q m r.XPress n.
i
If you do not select a destination folder
before recording, a new folder will be
created.
Music Register145AudioZ
Page 148 of 224

Start the RecordingXRotate ym z or slide om p until Start is
highlighted.XPress n.
In the display information about source,
destination and progress of the recording
is shown.
i The Disc menu re-appears automatically
after a successful recording.
XTo stop the recording: Rotate ym z or
slide om p until Cancel is highlighted..XPress n.
The Disc menu re-appears.
Deleting all Music Files
This function deletes all music files from
Music Register.
XSelect Music Register £Delete All
Music Files .
A prompt appears. No is highlighted.XDo not delete: Press the n button.
The Music Register display appears.XTo delete: Select Yes.
A corresponding message appears.
Calling up Memory Space Info
XSelect Music Register £Memory Info .A window appears containing information on:
R Memory capacity
R Available memory
R Occupied memory
R Content (folders, tracks)
Folder Functions
You can view the content of Music Register,
change folder or track names and delete
individual folders or tracks.
XSelect Folder in the submenu.
or
XPress n when the main area is highlighted.1Back folder symbol2Current folder3Music file symbolXTo switch to the next folder up: Select
the Q symbol.
The display changes to the next folder up.
Changing Folder/Track Name
XSelect Folder .XTo select a folder/track: Rotate ym z or
slide qm r.XSelect Options £Change .XEnter a name for the folder/track in the
input line.XTo save changes: Select d.146Music RegisterAudio
Page 149 of 224

Deleting Folders/TrackXSelect Folder .XTo select a folder/track: Rotate ym z or
slide qm r.XSelect Options £Delete .
A query appears. No is highlighted.XDo not delete: Press the n button.XTo delete: Select Yes and press n.
A message appears.
Playback Options
The following options are available:
R Normal Track Sequence
You will hear the tracks in the normal
sequence (e.g. track 1, 2, 3 etc.).
R Random Tracks:
You hear the tracks in random order.
R Random Folder
The tracks of the currently active folder and
any subfolders are heard in random order.
XTo select an option: Switch to Music
Register ( Y page 144).XSelect Music Register in the submenu.
The option list appears. A R dot indicates
the activated option.XSelect an option.
The option is activated. A corresponding
display will appear in the main area for all
options except Normal Track Sequence .
i
The option Normal Track Sequence is
automatically activated if you change the
medium which is currently being played or
if you select another medium. An activated
option remains active after COMAND is
switched on or off.
Media Interface
Important Notes
Connection Options
Via the UCI connection (Universal Consumer
Interface) you can connect the following
media to COMAND:
R iPods
R MP3 player
R USB devices
Supported iPod ®
Versions
The following iPod ®
versions are fully
supported:
R iPod ®
mini
R iPod ®
nano
R iPod ®
classic
R iPod ®
touch
Supported USB Devices
The following USB devices are supported:
R USB sticks (flash memory)
R USB hard drives (1-inch, 1.8-inch and
2.5-inch drives) with a starting/continuous
current rating of maximum 800 mA
(otherwise a separate power supply will be
necessary)
i The Media Interface supports USB
storage media of "USB Device Subclass 6".
You can obtain information about the "USB
Device Subclass 6" from the manufacturer.
Further Information on Supported
Devices
Further information on compatible
multimedia devices is available via the
Internet at www.mbusa-mobile.com. Or call
the Mercedes-Benz Customer Assistance
Center at 1-800-FOR-MERCedes
(1-800-367-6372) (US), or Customer
Relations at 1-800-387-0100 (Canada).
Media Interface147AudioZ
Page 150 of 224

The following data types are supported:
R MP3: CBR, VBR (up to 320 kbit/s)
R WMA: CBR, VBR (up to 320 kbit/s)
In order to display the metadata during
playback,")
Supported Data Formats (USB devices)
The following data types are supported:
R MP3: CBR, VBR (up to 320 kbit/s)
R WMA: CBR, VBR (up to 320 kbit/s)
In order to display the metadata during
playback, ID3 tags (version 1.x, 2.3, 2.4) and
WMA tags in ASCII and UTF16 coding are
supported.
Notes on USB Devices
R In order to keep the initialisation time short,
do not store data other than music files on
the USB device.
R Up to eight directory levels with up to 1,000
tracks are supported.
R Do not use a USB extension cable or
adapter. These may impair functionality.
R Playlists are searched for in the
background on the USB device and, if
available, are offered beside folders in a
separate category.
R You can only use USB devices formatted
with the file system format FAT (File
Allocation Table).
i Files protected with DRM (Digital Rights
Management) are not supported by the
Media Interface.
Connecting External Devices
You will find the connection sockets in the
glove compartment.
Never connect more than one device at a
time. Please consult a Mercedes-Benz
Service Center for further information.
i Do not leave external devices in the
vehicle, as functionality cannot be
guaranteed above certain temperatures
(such as inside a vehicle in direct sunlight).
Mercedes-Benz does not take
responsibility for any damage to external
devices.
1Connection socket for 1/8 inch jack plug,
for MP3 players, for example.2iPod ®
plug for connecting an iPod ®3USB socket for connecting a USB device4Example device: iPod®XConnect the external device using
appropriate connection 1, 2 or 3.
Never connect more than one device at a
time. You will otherwise not be able to play
back from the external device.
COMAND activates the device.
If you remove a device, the No Device
Connected message appears.
i The connected iPod ®
or USB device
should not be operated with a remote
control (such as a Bluetooth remote
control) while it is being operated with
Media Interface, as this could cause
unforeseen technical difficulties.
i The initialisation period may be extended
if you connect an iPod ®
or USB device
which has a fully discharged battery.
i Error messages appear while the device
is being activated if:
R you have connected two devices at the
same time
R COMAND does not support the device
connected
R the device connected consumes too
much power
R the Media Interface connection is
defective
148Media InterfaceAudio
Page 151 of 224

If necessary, consult a Mercedes-Benz
Service Center.
Switching to Media Interface
From Another Main Function
XSelect Audio£Audio £Media
Interface in the audio menu display.
i
If you previously selected operation with
Media Interface, you need only select
Audio .
or
XPress the h function button.
Switch on the previous disc operating
mode.
i If you previously selected operation with
Media Interface, it will now be switched on.
XSelect Media.
The media list appears. The R dot
indicates the current medium being played.XRotate ym z or slide qm r until the position
of Media Interface is highlighted in the
media list.
i If no device is connected, you will see the
entry Media Interface instead of a
device name.
XPress n.
COMAND activates the connected device
(only for iPods and USB devices). You will
see a corresponding message. The basic
display then appears.
Example display: iPod ®
operation
1Device type2Track number3Track name4Visual elapsed track time5Numeric elapsed track time (also in
format 00:00:00 for audiobooks)6Visual track display7Current playback option8Sound settings9Media listaAlbum name, if availablebCategories, playlists and/or folderscArtist, if availabledPlayback options
i If the device connected does not contain
any playable tracks, a corresponding
message appears.
Within the Audio Function
XConnect an external device ( Y page 148).
COMAND activates the device. The basic
display appears.
or
XSelect Audio£Media Interface .
i
The type of device 1 that has been
connected is indicated by the
corresponding icons for iPod ®
, MP3 player
or USB mass storage device.
Media Interface149AudioZ
Page 152 of 224

Selecting Music Files
i COMAND displays the data stored on the
iPod ®
, MP3 player or USB mass storage
device in the storage structure used in the
medium in question.
Selecting by Skipping to a TrackXTo skip forwards or backwards to a
track: Slide om p.
or
XPress the F or E button.
i
Skipping forwards skips to the next track.
Skipping backwards skips to the beginning
of the current track if the track has been
playing for more than 8 seconds. If the
track has been playing for less than 8
seconds, it skips to the start of the previous
track. If you have selected a playback
option other than Normal Track
Sequence , the track sequence is random.
Selecting by Manual Track Number
Entry
XTo make an entry: Press the l button.
An input menu appears. The number of
possible input places depends on the
number of tracks stored.XTo enter a track number: Press a number
key, such as s.
The number is entered in the first position
in the input line.
i If an invalid number is entered, COMAND
will ignore it and it will not be displayed.
XEnter more numbers if desired.XTo confirm your entry: Press the n
button.
The selected track is played.Fast forward/rewindXWhen the main area is highlighted, slide
and hold om p until the desired position has
been reached.
or
XPress and hold the F or E button
until the desired position has been
reached.
Selecting a Category/Playlist/Folder
iPods and MP3 Players
You can select tracks by category for iPods
and by folder for MP3 players.
Depending on the connected device, the
categories may include:
R Current track list
R Playlists (e.g. All, My top 25 or Music
videos )
R Artists
R Albums
R Podcasts
R Audiobooks
R Genres
R Composers
i Some playback categories contain the
All entry. Further entries of this type can
follow depending on the hierarchy level.
After selecting a title at the track level, the
entire content of the category selected will
be played.
USB Devices
For USB mass storage devices, you can select
folders and also playlists (if available).
COMAND can also display the album name
and artist (“metadata”) during playback, if
this information has previously been entered.
Playlists are shown in the display with a
particular icon. When you open the playlist,
150Media InterfaceAudio
 1
1 2
2 3
3 4
4 5
5 6
6 7
7 8
8 9
9 10
10 11
11 12
12 13
13 14
14 15
15 16
16 17
17 18
18 19
19 20
20 21
21 22
22 23
23 24
24 25
25 26
26 27
27 28
28 29
29 30
30 31
31 32
32 33
33 34
34 35
35 36
36 37
37 38
38 39
39 40
40 41
41 42
42 43
43 44
44 45
45 46
46 47
47 48
48 49
49 50
50 51
51 52
52 53
53 54
54 55
55 56
56 57
57 58
58 59
59 60
60 61
61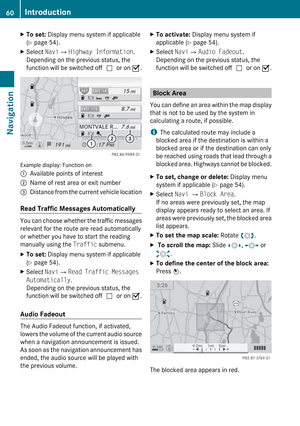 62
62 63
63 64
64 65
65 66
66 67
67 68
68 69
69 70
70 71
71 72
72 73
73 74
74 75
75 76
76 77
77 78
78 79
79 80
80 81
81 82
82 83
83 84
84 85
85 86
86 87
87 88
88 89
89 90
90 91
91 92
92 93
93 94
94 95
95 96
96 97
97 98
98 99
99 100
100 101
101 102
102 103
103 104
104 105
105 106
106 107
107 108
108 109
109 110
110 111
111 112
112 113
113 114
114 115
115 116
116 117
117 118
118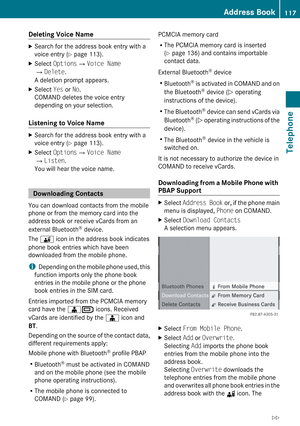 119
119 120
120 121
121 122
122 123
123 124
124 125
125 126
126 127
127 128
128 129
129 130
130 131
131 132
132 133
133 134
134 135
135 136
136 137
137 138
138 139
139 140
140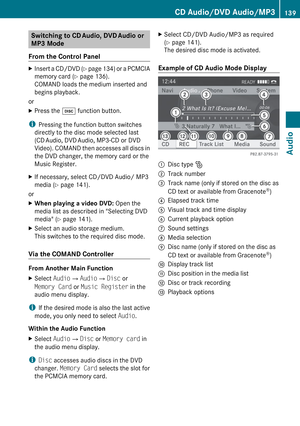 141
141 142
142 143
143 144
144 145
145 146
146 147
147 148
148 149
149 150
150 151
151 152
152 153
153 154
154 155
155 156
156 157
157 158
158 159
159 160
160 161
161 162
162 163
163 164
164 165
165 166
166 167
167 168
168 169
169 170
170 171
171 172
172 173
173 174
174 175
175 176
176 177
177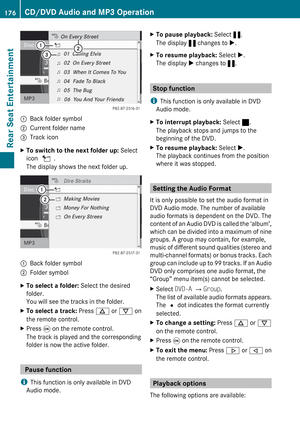 178
178 179
179 180
180 181
181 182
182 183
183 184
184 185
185 186
186 187
187 188
188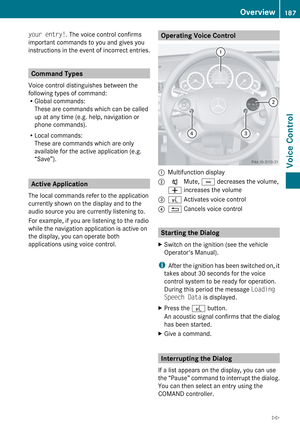 189
189 190
190 191
191 192
192 193
193 194
194 195
195 196
196 197
197 198
198 199
199 200
200 201
201 202
202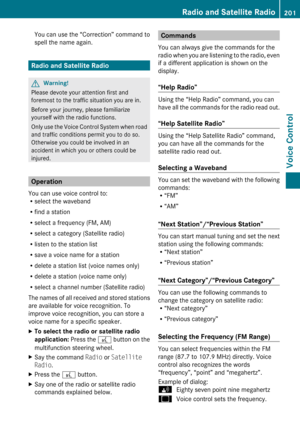 203
203 204
204 205
205 206
206 207
207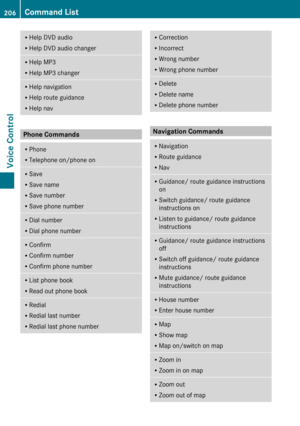 208
208 209
209 210
210 211
211 212
212 213
213 214
214 215
215 216
216 217
217 218
218 219
219 220
220 221
221 222
222 223
223