Page 113 of 224
.XTo switch off: Select Mic Off .
If the microphone is s")
5Device name of the connected mobile
phone6Terminates call
Switching Hands-Free Microphone On
or Off
XOpen the phone main menu ( Y page 102).XTo switch off: Select Mic Off .
If the microphone is switched off, the >
icon appears in the main area.XTo switch on: Select Mic On.
The > symbol disappears.
DTMF Tone Transmission
i
This function is not possible with all
mobile phones.
Answering machines or other devices can be
controlled by DTMF tones, e.g. for remote
query functions.
XTo send individual characters: During a
call select the required characters using
the COMAND controller.
or
XPress the corresponding button on the
COMAND control unit keypad.
Every character selected will be
transmitted immediately.XTransmitting phone book entry as a
sequence of characters: Select Name.XSelect the desired phone book entry.
The entry is transmitted immediately as a
sequence of characters.XTo switch back to the call display: Select
Back . Ending an Active Call XIf necessary, open the phone main menu
( Y page 102).XTo terminate call: Select 4.
or
XPress the ~ button on the COMAND
control panel or the ~ button on the
multifunction steering wheel.
Call Waiting
i The call waiting function must be
supported and activated by the phone
provider.
If you are conducting a single call and you
receive another, the second call number is
entered into the received calls list and a signal
tone will sound.
Address Book
GWarning!
Please devote your attention first and
foremost to the traffic situation you are in.
Before your journey, please familiarize
yourself with the address book functions.
Only use the COMAND when road and traffic
conditions permit you to do so. Otherwise you
could be involved in an accident in which you
or others could be injured.
General Information
The entries of the address book can be used
for making phone calls and for setting
navigation destinations.
i You should delete your personal data
before selling your vehicle, using the Reset
function ( Y page 45).
Address Book111TelephoneZ
Page 114 of 224

Opening the Address Book
From Another Main FunctionXSelect Phone£Phone £Address Book .
i
If the address book was last open in the
telephone function, you only need to select
Phone .
Within the Phone Function
XSelect Phone£Address Book .
The address book main display appears.
Address book with address book entry ¥ and
navigable data ¤
i An address book entry may contain up to
five phone numbers and both a private and
business address.
Submenu Overview for Address Book
Address BookSearchDownloading
contacts (from
mobile phone, from
memory card or
business cards)
Deleting contactsSearching for an
address book entryNewDeleteCreating a new
address book entryDeleting an address
book entry Selecting Entry in the Address Book XRotate ym z or slide om p when the
display/selection window is active.
Creating a New Address Book Entry
i You can create address data directly in
the address book. If you save phone
numbers in the COMAND phone book,
these are saved in the address book. When
you save a navigation destination,
COMAND creates an address book entry
containing the complete address data that
support navigation.
XOpen the address book ( Y page 112) and
select New.
The input menu containing data fields and
the input speller appears.
Input menu with data fields
1Selected data field with cursor2Input speller
Switching Data Field
XSlide qm repeatedly until the input speller
is hidden.XThen slide qm r and press n.
or
XSelect [ or ] in the input speller.
The input menu indicates the selected data
field.112Address BookTelephone
Page 115 of 224

Entering Data into a FieldXSelect all the characters one after the other
in the input speller 2.
i
The input speller provides the characters
corresponding to the selected data field.
XTo switch input speller to upper or
lower case characters: Select ( or
& .XTo switch input speller character set:
Select k.
Every time this is selected it switches the
character set.XTo change the input speller language:
Select !.XRotate ym z or slide qm r until the desired
language is highlighted and then press n.XTo move the cursor in the data field:
Select Y or Z.
Deleting
XTo delete an individual character: Select
õ and briefly press n.
or
XPress the 2 button next to the
COMAND controller.
The character to the left of the cursor is
deleted.XTo delete an entire entry: Select õ
and press n until the entire entry has been
deleted.
or
XPress the 2 button next to the
COMAND controller and hold it until the
entire entry is deleted.Canceling an EntryXSelect á.
If one of the data fields contains new data,
a prompt will appear asking whether you
wish to store the entry.XSelect Yes or No.
The entry will either be stored or not,
depending on your selection.
Saving an Entry
XSelect d.
The address book displays the entry.
Searching for an Address Book Entry
XOpen the address book ( Y page 112) and
select Search .
If there are more than eight entries, the
search menu with the predictive speller
appears.
Search menu with predictive speller
1¥ Symbol for address book entry2¤ Symbol for complete address data
from the navigation3¦ Symbol for voice name4å Symbol for phone book entry from the
mobile phone5Predictive speller
Entries without symbols or with the symbols
1 and 3 are just address book entries. A
voice name has additionally been saved for
entries with the symbol 3. Entries with the
Address Book113TelephoneZ
Page 116 of 224

symbol 2 contain complete address data
from the navigation system, which support
navigation and are covered by the digital map
data. You can quickly start route guidance to
this kind of entry ( Y page 116).
Switching from the Predictive Speller
to the ListXSlide mq or press n and hold it until the
predictive speller is hidden.
or
XSelect d.
Switching from the List to the
Predictive Speller
XSelect Back from the list.
or
XPress the k button next to the
COMAND controller.
Searching
Searching via Predictive Speller
XSwitch from the list to the predictive speller
if necessary.XTo change the language of the
predictive speller: Select !.XTo switch the character set of the
predictive speller : Select k.
Depending on the previous setting, you will
change to letters with special characters or
to numbers with special characters.XTo enter characters: Select the
characters for the required entry one after
another.XTo delete individual characters: Select
õ and briefly press n.
or
XPress the 2 button next to the
COMAND controller.
Each time you enter or delete a character,
the closest match will be displayed at the
top of the list.XTo delete an entire entry: Select õ
and press n until the entire entry has been
deleted.
or
XPress the 2 button next to the
COMAND controller and hold it until the
entire entry is deleted.XTo end search: Switch from the predictive
speller to the list.
The top list entry is highlighted
automatically.XBack to the address book: If necessary,
switch from the list to the predictive speller
and select á in the predictive speller.
or
XPress the k button next to the
COMAND controller.
Searching via the List
XIf necessary, switch from the predictive
speller to the list ( Y page 113).XTurn ym z or slide qm r until the desired
entry is highlighted in the list.
Deleting Entry
XSearch for the required entry
( Y page 113).XSelect Options £Delete .
or
XSelect Delete from the address book
( Y page 112).
A deletion prompt appears.XSelect Yes or No.
The entry will be deleted or retained on the
basis of the selection.
i Deleting an entry in the phone book on
the mobile phone does not delete the entry
in the address book.
114Address BookTelephone
Page 117 of 224
.
or
XSelect an address book entry from the
address book ( Y page 112).XPress n.
The deta")
Displaying Details About an Address
Book Entry XSwitch from the predictive speller to the list
( Y page 113).
or
XSelect an address book entry from the
address book ( Y page 112).XPress n.
The detailed display appears.
Details screen for private data
1Back to the previous menu2Selected data field3@ symbol for private data4Calls up options5\ symbol for business data
Selecting Another Data Field
XRotate ym z or slide qm r.
Displaying Abbreviated Content in Full
XSelect Options £Details .
The complete display appears.XTo close complete display: Slide om p or
press n.
or
XPress the k button next to the
COMAND controller.Closing Details ScreenXSelect Back.
or
XPress the k button next to the
COMAND controller.
Changing Entry
Changing an Address Book Entry
XSearch for the address book entry
( Y page 113).XSelect Options £Change Entry .
or
XDisplay details about an address book
entry.XSelect Options £Change Entry .
The input menu with data fields appears.XContinue from the step "Switching Data
Field" in the "Creating a New Address Book
Entry" section ( Y page 112).
Changing Category of a Phone Number
Data Field
XDisplay the details for an entry and
highlight the phone number data field
( Y page 115).XSelect Options £Change Category .XSelect a number category, e.g. Home.XSelect a telephone category, e.g. Mobile
Phone .Address Book115TelephoneZ
Page 118 of 224

XSelect Preferred , where applicable.
Depending on the previous state, switch
the option on Ç or off c. The phone
number is displayed as the first number in
the phone book and can be dialed
immediately.XSelect Save.
The new category is saved.
Initiating a Phone Call to an Entry
i The mobile phone must be connected via
the Bluetooth ®
interface.
XDisplay the details for an entry and
highlight the phone number data field
( Y page 115).XPress n.
The phone initiates the call. The display
switches to the phone mode display.
or
XSelect Options £Call .
The phone initiates the call.
Starting Navigation to an Entry
i You can use this function as soon as you
have saved a destination in the destination
memory ( Y page 91). COMAND then also
saves the destination in the address book
with the complete address data that
supports navigation.
XSearch for an address book entry with the
¤ symbol ( Y page 113).XDisplay the details about an entry and
highlight the address data field
( Y page 115).XPress n.
i
Pressing n only works if the address data
field contains complete navigable data.
This is indicated by the ¤ symbol.
or
XSelect Options £Navigate .i
Navigate can only be selected when the
address data field contains complete
navigable data. This is indicated by the ¤
symbol.1Address that supports navigation2Opens Enter Destination menu
The Enter Destination menu appears, the
selector bar is located at the menu item
Start (Y page 70).
Voice Names
i Voice names can be entered via Voice
Control System.
Adding Voice Name
i You can add one voice name per address
book entry.
XSearch for an address book entry without
or with a voice name ( ¦ icon)
( Y page 113).XSelect Options £Voice Name £Add .
The process continues by voice
commands. The Voice Control System
guides you through the dialogs
( Y page 197).116Address BookTelephone
Page 119 of 224
.XSelect Options £Voice Name
£ Delete .
A deletion prompt appears.XSelect Yes or No.
COMAND deletes the voice")
Deleting Voice NameXSearch for the address book entry with a
voice entry ( Y page 113).XSelect Options £Voice Name
£ Delete .
A deletion prompt appears.XSelect Yes or No.
COMAND deletes the voice entry
depending on your selection.
Listening to Voice Name
XSearch for the address book entry with a
voice entry ( Y page 113).XSelect Options £Voice Name
£ Listen .
You will hear the voice name.
Downloading Contacts
You can download contacts from the mobile
phone or from the memory card into the
address book or receive vCards from an
external Bluetooth ®
device.
The à icon in the address book indicates
phone book entries which have been
downloaded from the mobile phone.
i Depending on the mobile phone used, this
function imports only the phone book
entries in the mobile phone or the phone
book entries in the SIM card.
Entries imported from the PCMCIA memory
card have the ÆÂ icons. Received
vCards are identified by the Æ icon and
BT .
Depending on the source of the contact data,
different requirements apply:
Mobile phone with Bluetooth ®
profile PBAP
R Bluetooth ®
must be activated in COMAND
and on the mobile phone (see the mobile
phone operating instructions).
R The mobile phone is connected to
COMAND ( Y page 99).
PCMCIA memory card
R The PCMCIA memory card is inserted
( Y page 136) and contains importable
contact data.
External Bluetooth ®
device
R Bluetooth ®
is activated in COMAND and on
the Bluetooth ®
device ( N operating
instructions of the device).
R The Bluetooth ®
device can send vCards via
Bluetooth ®
(N operating instructions of the
device).
R The Bluetooth ®
device in the vehicle is
switched on.
It is not necessary to authorize the device in
COMAND to receive vCards.
Downloading from a Mobile Phone with
PBAP SupportXSelect Address Book or, if the phone main
menu is displayed, Phone on COMAND.XSelect Download Contacts
A selection menu appears.XSelect From Mobile Phone .XSelect Add or Overwrite .
Selecting Add imports the phone book
entries from the mobile phone into the
address book.
Selecting Overwrite downloads the
telephone entries from the mobile phone
and overwrites all phone book entries in the
address book with the d icon. TheAddress Book117TelephoneZ
Page 120 of 224

previous phone book entries are then no
longer available.
After successfully downloading the contact
data you see a corresponding message.
The address book or the phone main menu
is displayed.
i You can select the Overwrite menu item
if the address book already contains such
entries. If the address book is full, you see
a corresponding message.
Downloading from the Memory Card
XSelect Address Book or, if the phone main
menu is displayed, Phone.XSelect Download Contacts .
A selection menu appears.XSelect From Memory Card .XSelect Add or Overwrite .
Selecting Add imports the entries from the
PCMCIA memory card into the address
book.
Selecting Overwrite imports the entries
from the PCMCIA memory card and
overwrites all entries in the address book
with the ¥Â icons. The previous entries
are then no longer available.
After successfully importing the contact
data you see a corresponding message.
The address book or the phone main menu
is displayed.
i You can select the Overwrite menu item
if the address book already contains such
entries. If the address book is full, you see
a corresponding message.
Downloading vCards via Bluetooth ®
You can receive vCards from devices (such as
a PC) which support the transmission of
vCards via Bluetooth ®
.
It is not necessary to authorize the device in
COMAND to do so.
Received vCards are imported into the
address book.
i If you switch to another main function,
e.g. navigation, while receiving vCards, the
reception of vCards will be terminated.XSelect Address Book or, if the phone main
menu is displayed, Phone.XSelect Download Contacts .
A selection menu appears.XSelect Receive Business Cards .
This interrupts the Bluetooth connection
between COMAND and your active mobile
phone. COMAND is ready to receive vCards
from another Bluetooth ®
device.XStart data transfer on the external
Bluetooth device ( N operating instructions
of the device).
The data on the vCards is automatically
transferred to the address book. The
number of vCards received is displayed.XTo cancel the transfer: Press W.
or
XPress the % button.
Deleting Data
XIf the address book is displayed, select
Address Book QDelete Contacts .
or
XIf the phone main menu is displayed, select
Phone QDelete Contacts .
A selection menu appears.118Address BookTelephone
 1
1 2
2 3
3 4
4 5
5 6
6 7
7 8
8 9
9 10
10 11
11 12
12 13
13 14
14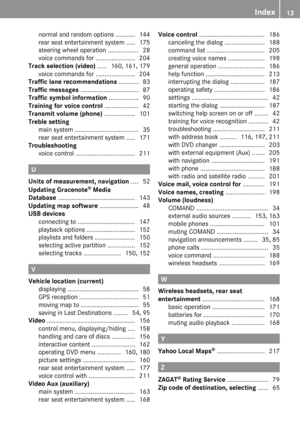 15
15 16
16 17
17 18
18 19
19 20
20 21
21 22
22 23
23 24
24 25
25 26
26 27
27 28
28 29
29 30
30 31
31 32
32 33
33 34
34 35
35 36
36 37
37 38
38 39
39 40
40 41
41 42
42 43
43 44
44 45
45 46
46 47
47 48
48 49
49 50
50 51
51 52
52 53
53 54
54 55
55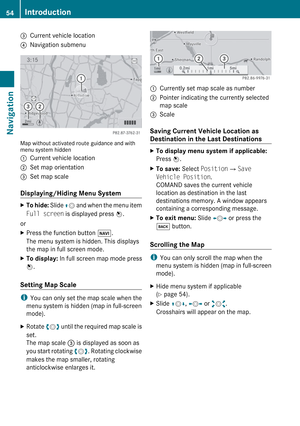 56
56 57
57 58
58 59
59 60
60 61
61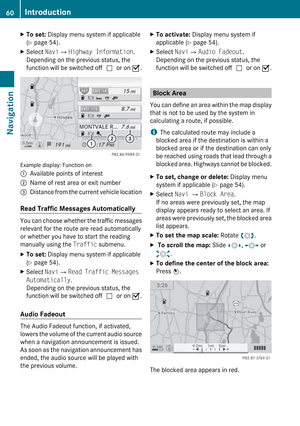 62
62 63
63 64
64 65
65 66
66 67
67 68
68 69
69 70
70 71
71 72
72 73
73 74
74 75
75 76
76 77
77 78
78 79
79 80
80 81
81 82
82 83
83 84
84 85
85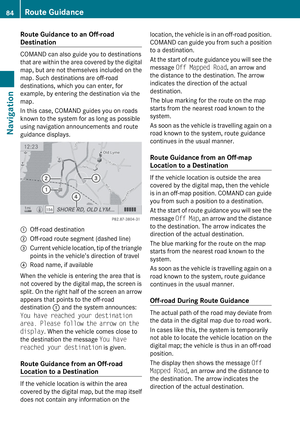 86
86 87
87 88
88 89
89 90
90 91
91 92
92 93
93 94
94 95
95 96
96 97
97 98
98 99
99 100
100 101
101 102
102 103
103 104
104 105
105 106
106 107
107 108
108 109
109 110
110 111
111 112
112 113
113 114
114 115
115 116
116 117
117 118
118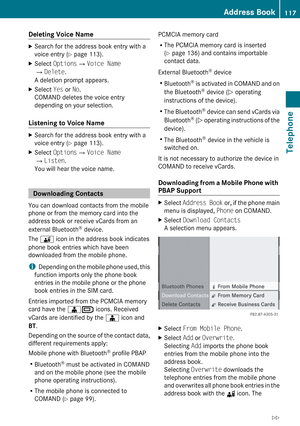 119
119 120
120 121
121 122
122 123
123 124
124 125
125 126
126 127
127 128
128 129
129 130
130 131
131 132
132 133
133 134
134 135
135 136
136 137
137 138
138 139
139 140
140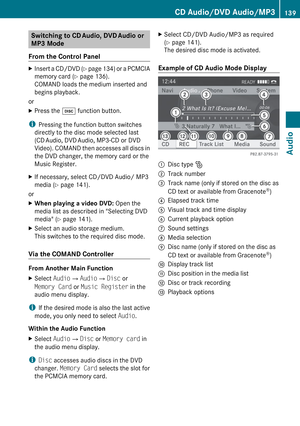 141
141 142
142 143
143 144
144 145
145 146
146 147
147 148
148 149
149 150
150 151
151 152
152 153
153 154
154 155
155 156
156 157
157 158
158 159
159 160
160 161
161 162
162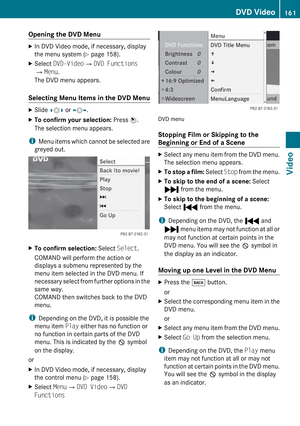 163
163 164
164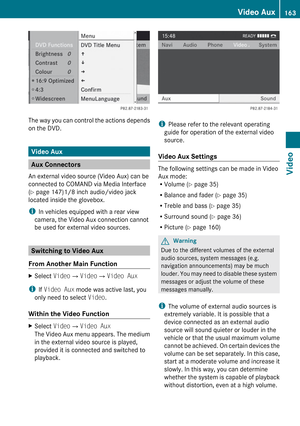 165
165 166
166 167
167 168
168 169
169 170
170 171
171 172
172 173
173 174
174 175
175 176
176 177
177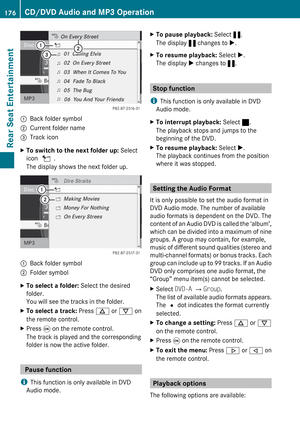 178
178 179
179 180
180 181
181 182
182 183
183 184
184 185
185 186
186 187
187 188
188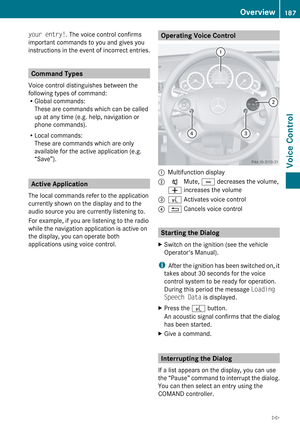 189
189 190
190 191
191 192
192 193
193 194
194 195
195 196
196 197
197 198
198 199
199 200
200 201
201 202
202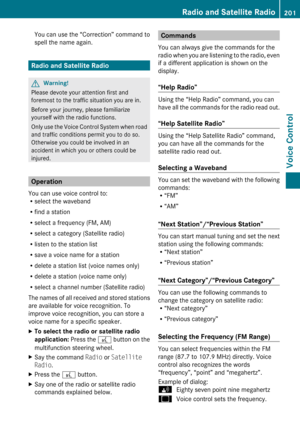 203
203 204
204 205
205 206
206 207
207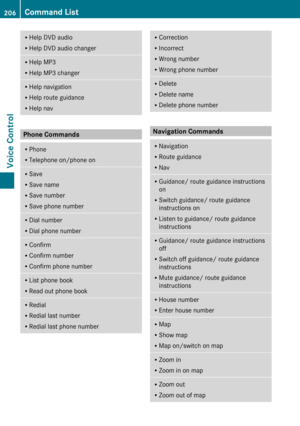 208
208 209
209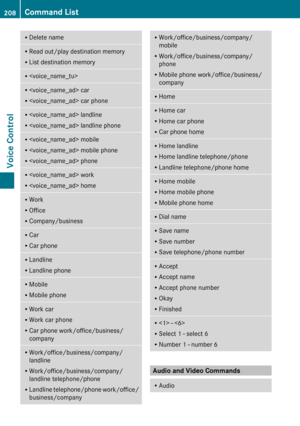 210
210 211
211 212
212 213
213 214
214 215
215 216
216 217
217 218
218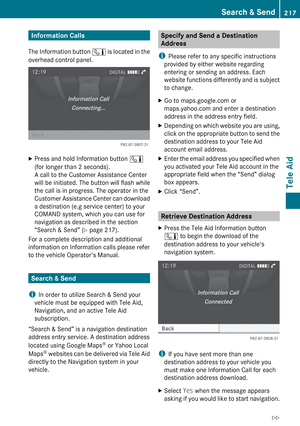 219
219 220
220 221
221 222
222 223
223