2010 MERCEDES-BENZ CLS COUPE light
[x] Cancel search: lightPage 122 of 337

X
Turn the key to position 0in the ignition
lock or remove it.
X To switch on: press theÌbutton.
The indicator lamp in the Ìbutton lights
up.
X To deactivate: press theÌbutton.
The indicator lamp in the Ìbutton goes
out.
i Residual heat is deactivated automati-
cally:
R after about 30 minutes
R when the ignition is switched on
R if the battery voltage drops
R if the coolant temperature is too low Auxiliary heating
Important safety notes G
Risk of poisoning
Exhaust fumes are produced when the auxili-
ary heating is in operation. Inhaling these
exhaust fumes can be poisonous. You should
therefore switch off the auxiliary heating in
confined spaces without an extraction sys-
tem, e.g. a garage. G
Risk of fire
When operating the auxiliary heating, parts of
the vehicle may become very hot, and highly
inflammable material such as fuels could be
ignited. Operating the auxiliary heating is thus
prohibited at filling station sorwhen your vehi-
cle is being refuelled. You must therefore
switch off the auxiliary heating at filling sta-
tions.
! Operating the auxiliary heating/ventila-
tion draws on the vehicle battery. After you
have heated or ventilated the vehicle a
maximum of two times, drive for a longer
distance.
i Switch on the auxiliary heating regularly,
e.g. for about ten minutes every month. The auxiliary heating heats the air in the vehi-
cle interior to the set temperature without
using the heat of the running engine. The aux-
iliary heating is operated directly using the
vehicle's fuel. For this reason, the tank con-
tent must be at least at reserve fuel level to
ensure that the auxiliary heating functions.
The auxiliary heating/ventilation automati-
cally adjusts to changes in temperature and
weather conditions. For this reason, the aux-
iliary heating could switch from ventilation
mode to heating mode or from heating mode
to ventilation mode.
The auxiliary heating switches off automati-
cally after 50 minutes. This time limit can be
altered. To do this, visit a qualified specialist
workshop, e.g. a Mercedes-Ben
zService
Centre.
You cannot use the auxiliary ventilation to
cool the vehicle interior to a temperature
lower than the outside temperature.
Before switching on X
Turn the key to position 2in the ignition
lock.
X Set the temperature.
The auxiliary heating/ventilation can be acti-
vated even when the climate control is being
controlled manually. Optimum comfort can
be attained when the system is set to auto-
matic mode. Set the temperature to 22 †.
The auxiliary heating/ventilation can be acti-
vated or deactivated using the remote control
or the button on the centre console.
The on-board computer can be used to spec-
ify up to three departure times, one of which
may be preselected (Y page 210). Operating the climate control system
119Climate control Z
Page 123 of 337
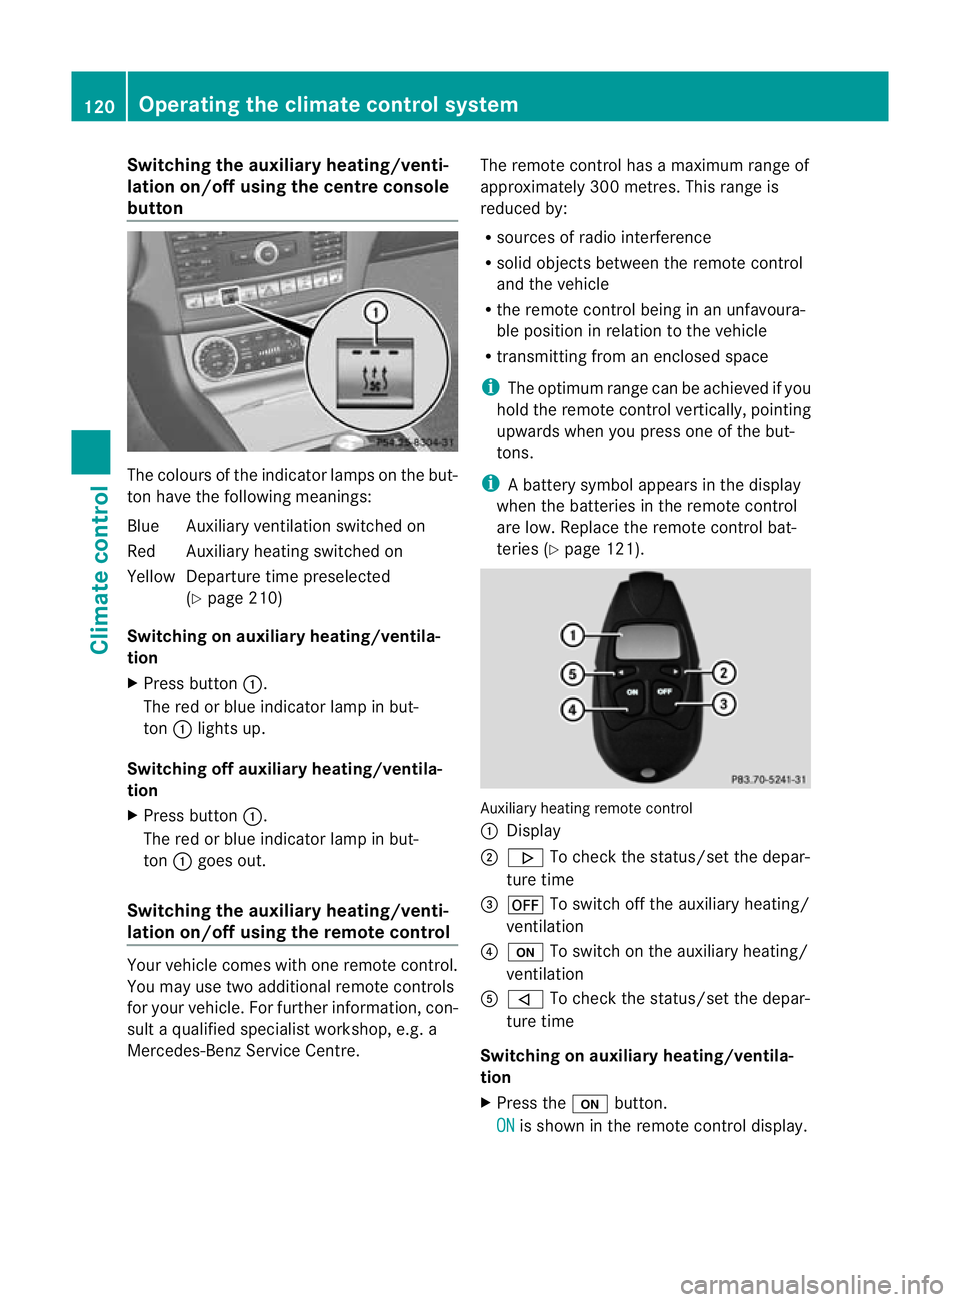
Switching the auxiliary heating/venti-
lation on/off using the centre console
button The colours of the indicator lamps on the but-
ton have the following meanings:
Blue Auxiliary ventilation switched on
Red Auxiliary heating switched on
Yellow Departure time preselected
(Ypage 210)
Switching on auxiliary heating/ventila-
tion
X Press button :.
The red or blue indicator lamp in but-
ton :lights up.
Switching off auxiliary heating/ventila-
tion
X Press button :.
The red or blue indicator lamp in but-
ton :goes out.
Switching the auxiliary heating/venti-
lation on/off using the remote control Your vehicle comes with one remote control.
You may use two additional remote controls
for your vehicle. For further information, con-
sult a qualified specialist workshop, e.g. a
Mercedes-Benz Service Centre. The remote control has a maximum range of
approximately 300 metres. This range is
reduced by:
R
sources of radio interference
R solid objects between the remote control
and the vehicle
R the remote control being in an unfavoura-
ble position in relation to the vehicle
R transmitting from an enclosed space
i The optimum range can be achieved if you
hold the remote control vertically, pointing
upwards when you press one of the but-
tons.
i Abattery symbol appears in the display
when the batteries in the remote control
are low. Replace the remot econtrol bat-
teries (Y page 121). Auxiliary heating remote control
:
Display
; . To check the status/set the depar-
ture time
= ^ To switch off the auxiliary heating/
ventilation
? u To switch on the auxiliary heating/
ventilation
A , To check the status/set the depar-
ture time
Switching on auxiliary heating/ventila-
tion
X Press the ubutton.
ON is shown in the remote control display.120
Operating the climate control systemClimate control
Page 133 of 337
is open, the power supply is deactivated
again.
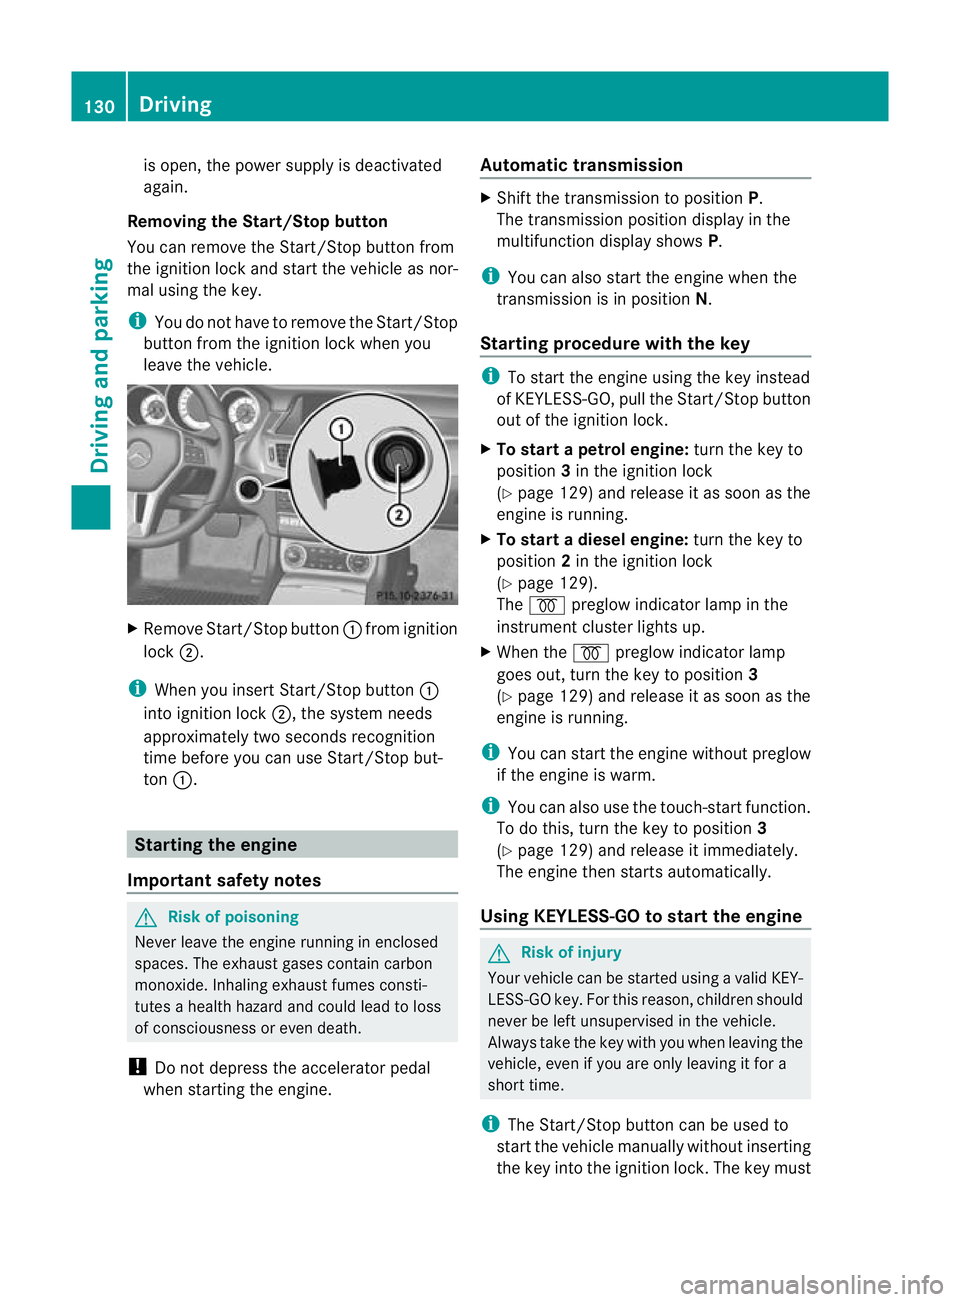
Removing the Start/Stop button
You can remove the Start/Stop button from
the ignition lock and start the vehicle as nor-
mal using the key.
i You do not have to remove the Start/Stop
button from the ignition lock when you
leave the vehicle. X
Remove Start/Stop button :fromi gnition
lock ;.
i When you insert Start/Stop button :
into ignition lock ;, the system needs
approximately two seconds recognition
time before you can use Start/Stop but-
ton :. Starting the engine
Important safety notes G
Risk of poisoning
Never leave the engine running in enclosed
spaces. The exhaust gases contain carbon
monoxide. Inhaling exhaust fumes consti-
tutes a health hazard and could lead to loss
of consciousness or even death.
! Do not depress the accelerator pedal
when starting the engine. Automatic transmission X
Shift the transmission to position P.
The transmission position display in the
multifunction display shows P.
i You can also start the engine when the
transmission is in position N.
Starting procedure with the key i
To start the engine using the key instead
of KEYLESS-GO, pull the Start/Stop button
out of the ignition lock.
X To start a petrol engine: turn the key to
position 3in the ignition lock
(Y page 129) and release it as soon as the
engine is running.
X To startad iesel engine: turn the key to
position 2in the ignition lock
(Y page 129).
The % preglow indicator lamp in the
instrumen tcluster lights up.
X When the %preglow indicator lamp
goes out, tur nthe key to position 3
(Y page 129) and release it as soon as the
engine is running.
i You can start the engine without preglow
if the engine is warm.
i You can also use the touch-start function.
To do this, turn the key to position 3
(Y page 129) and release it immediately.
The engine then starts automatically.
Using KEYLESS-GO to startt he engine G
Risk of injury
You rvehicle can be started using a valid KEY-
LESS-GO key. For this reason, children should
never be left unsupervised in the vehicle.
Always take the key with you when leaving the
vehicle, even if you are only leaving it for a
short time.
i The Start/Stop button can be used to
start the vehicle manually without inserting
the key into the ignition lock. The key must 130
DrivingDriving and parking
Page 136 of 337
Automatic engine start
The engine is started automatically if you:
R release the brake pedal when HOLD is not
activated and the transmission is in posi-
tion Dor N
R shif tthe transmission to position R
R depress the accelerator pedal
R switch off the ECO start/stop function by
pressing the ECO button (except for AMG
vehicles)
R change to drive program S,S+ orM(AMG
vehicles)
R unfasten your seat belt or open the driver's
door
The engine is also started automatically if:
R the vehicle starts to roll.
R the brake system requires this.
R the system detects moisture on the wind-
screen when the air-conditioning system is
switched on.
R the temperature in the vehicle interior devi-
ates from the set range.
R the battery's charge status is too low.
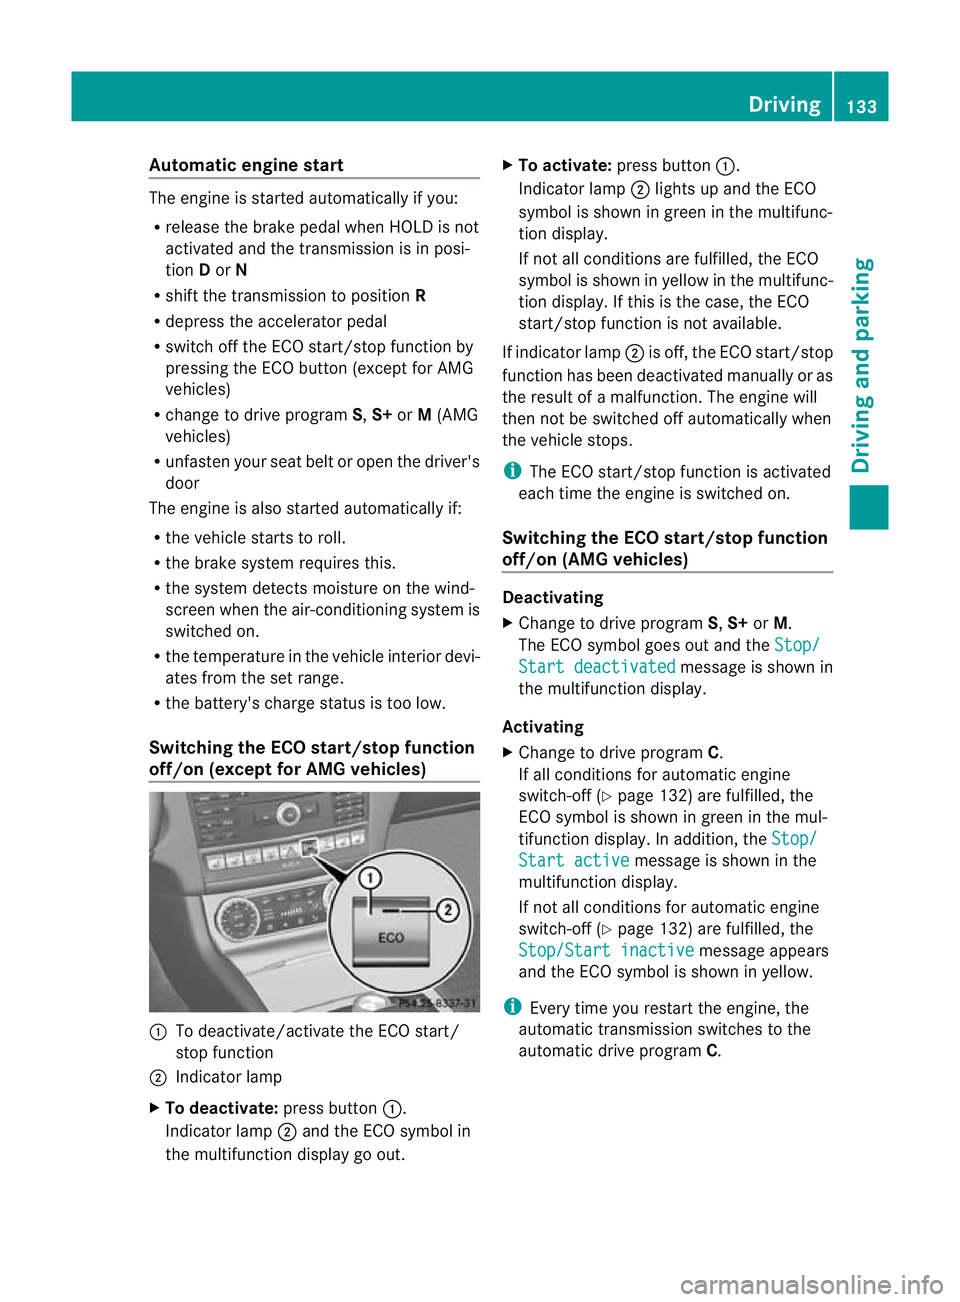
Switching the ECO start/stop function
off/on (except for AMG vehicles) :
To deactivate/activate the ECO start/
stop function
; Indicator lamp
X To deactivate: press button:.
Indicator lamp ;and the ECO symbol in
the multifunction display go out. X
To activate: press button :.
Indicator lamp ;lights up and the ECO
symbol is shown in green in the multifunc-
tion display.
If not all conditions are fulfilled, the ECO
symbol is shown in yellow in the multifunc-
tion display. If this is the case, the ECO
start/stop function is not available.
If indicator lamp ;is off, the ECO start/stop
function has been deactivated manually or as
the result of a malfunction. The engine will
then not be switched off automatically when
the vehicle stops.
i The ECO start/stop function is activated
each time the engine is switched on.
Switching the ECO start/stop function
off/on (AMG vehicles) Deactivating
X
Change to drive program S,S+ orM.
The ECO symbol goes out and the Stop/ Start deactivated message is shown in
the multifunction display.
Activating
X Change to drive program C.
If all conditions for automatic engine
switch-off (Y page 132) are fulfilled, the
ECO symbol is shown in green in the mul-
tifunction display. In addition, the Stop/ Start active message is shown in the
multifunction display.
If not all conditions for automatic engine
switch-off (Y page 132) are fulfilled, the
Stop/Start inactive message appears
and the ECO symbol is shown in yellow.
i Every time you restart the engine, the
automatic transmission switches to the
automatic drive program C. Driving
133Driving and parking Z
Page 138 of 337
Problem Possible causes/consequences and
M Solutions
Vehicles with a petrol
engine:
The engine is not run-
ning smoothly and is
misfiring. There is a malfunction in the engine electronics or a mechanical
component of the engine management system.
X
Only depress the accelerator pedal slightly.
X Have the cause rectified immediately at a qualified specialist
workshop, e.g. a Mercedes-Benz Service Centre.
Otherwise, non-combusted fuel may get into the catalytic con-
verter and damage it. The coolant tempera-
ture display is showing
more than 120 †. The
coolant warning lamp
may also be lit and a
warning tone may
sound. The coolant level is too low. The coolant is too hot and the engine
is no longer being cooled sufficiently.
X Stop as soon as possible and allow the engine and the coolant
to cool down.
X Check the coolant level (Y page 268). Observe the warning
notes as you do so and top up the coolant if necessary. If the coolant level is correct, the radiator fan may be faulty. The
coolant is too hot and the engine is no longer being cooled suffi-
ciently.
X At coolant temperatures under 120 †, drive on to the nearest
qualified specialist workshop e.g. to a Mercedes-Benz Service
Centre.
X Avoid heavy loads on the engine as you do so, e.g. driving on
mountain roads and stop/start driving. Automatic transmission
Important safety notes
G
Risk of accident
The movement of the pedals must not be
impaired in any way. Do not keep any objects
in the driver's footwell. Make sure that floor-
mats or carpets are correctly secured and
that there is sufficient clearance for the ped-
als.
Do not place several floormats on top of one
another. G
Risk of accident
Do not change down for additional engine
braking on a slippery road surface. This could
cause the drive wheels to lose their grip and
the vehicle could skid. This could cause you to lose control of your vehicle and cause an
accident. Automatic transmission
135Driving and parking Z
Page 142 of 337
i
Further information on the "Automatic
drive program" (Y page 139).
X Press program selector button :repeat-
edly until the letter for the desired gearshift
program appears in the multifunction dis-
play.
i The automatic transmission switches to
automatic drive program Eeach time the
engine is started.
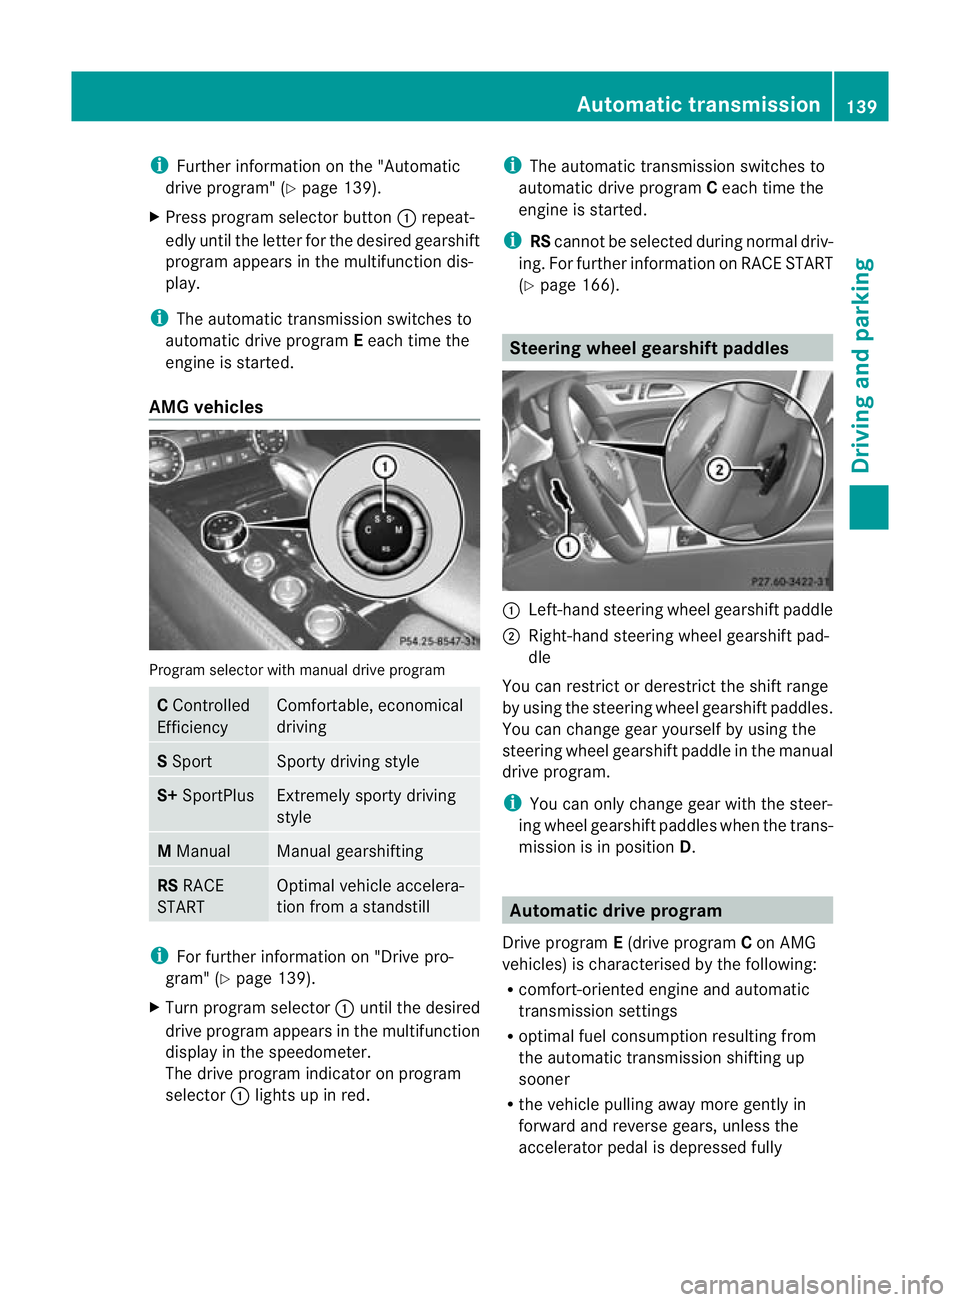
AMG vehicles Program selector with manual drive program
C
Controlled
Efficiency Comfortable, economical
driving
S
Sport Sporty driving style
S+
SportPlus Extremely sporty driving
style
M
Manual Manual gearshifting
RS
RACE
START Optimal vehicle accelera-
tion from a standstill
i
For further information on "Drive pro-
gram" (Y page 139).
X Turn program selector :until the desired
drive program appears in the multifunction
display in the speedometer.
The drive program indicator on program
selector :lights up in red. i
The automatic transmission switches to
automatic drive program Ceach time the
engine is started.
i RScannot be selected during normal driv-
ing. For further information on RACE START
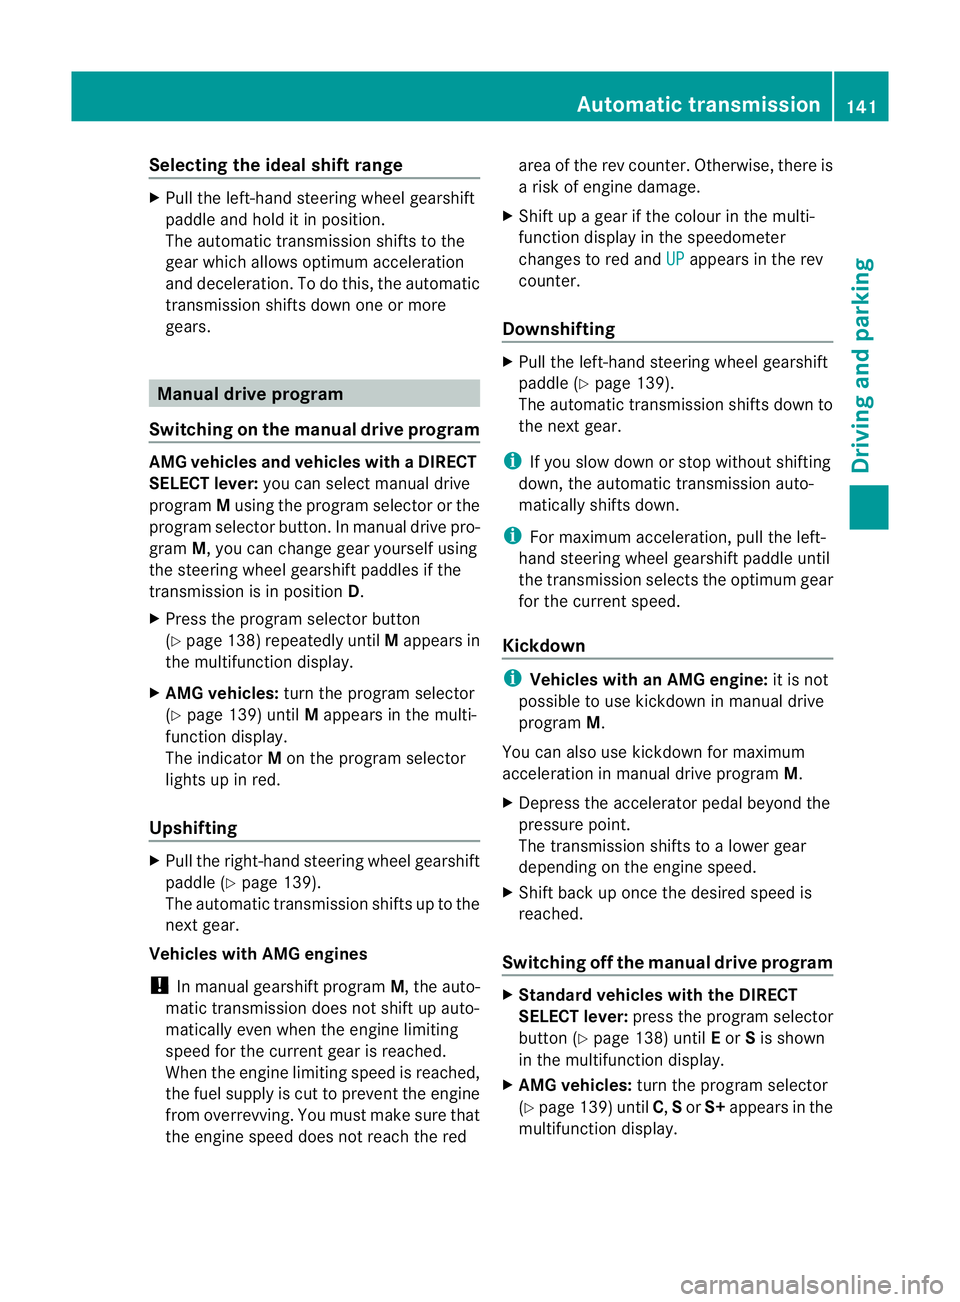
(Y page 166). Steering wheel gearshif
tpaddles :
Left-hand steering wheel gearshift paddle
; Right-hand steering wheel gearshift pad-
dle
You can restrict or derestrict the shift range
by using the steering wheel gearshift paddles.
You can change gea ryourself by using the
steering wheel gearshift paddle in the manual
drive program.
i You can only change gear with the steer-
ing wheel gearshift paddles when the trans-
mission is in position D. Automatic drive program
Drive program E(drive program Con AMG
vehicles) is characterised by the following:
R comfort-oriented engine and automatic
transmission settings
R optimal fuel consumption resulting from
the automatic transmission shifting up
sooner
R the vehicle pulling away more gently in
forward and reverse gears, unless the
accelerator pedal is depressed fully Automatic transmission
139Driving and parking Z
Page 144 of 337
Selecting the ideal shift range
X
Pull the left-hand steering wheel gearshift
paddle and hold it in position.
The automatic transmission shifts to the
gear which allows optimum acceleration
and deceleration. To do this, the automatic
transmission shifts down one or more
gears. Manual drive program
Switching on the manual drive program AMG vehicles and vehicles with
aDIRECT
SELECT lever: you can select manual drive
program Musing the program selector or the
program selector button. In manual drive pro-
gram M, you can change gear yourself using
the steering wheel gearshif tpaddles if the
transmission is in position D.
X Press the program selecto rbutton
(Y page 138) repeatedly until Mappears in
the multifunction display.
X AMG vehicles: turn the program selector
(Y page 139) until Mappears in the multi-
function display.
The indicator Mon the program selector
lights up in red.
Upshifting X
Pull the right-hand steering wheel gearshift
paddle (Y page 139).
The automatic transmission shifts up to the
next gear.
Vehicles with AMG engines
! In manual gearshif tprogram M, the auto-
matic transmission does not shift up auto-
matically even when the engine limiting
speed for the current geari s reached.
When the engine limiting speed is reached,
the fuel supply is cut to prevent the engine
from overrevving. You must make sure that
the engine speed does not reach the red area of the rev counter. Otherwise, there is
a risk of engine damage.
X Shift up a gear if the colour in the multi-
function display in the speedometer
changes to red and UP appears in the rev
counter.
Downshifting X
Pull the left-hand steering wheel gearshift
paddle (Y page 139).
The automatic transmission shifts down to
the next gear.
i If you slow down or stop without shifting
down, the automatic transmission auto-
matically shifts down.
i For maximum acceleration, pull the left-
hand steering wheel gearshift paddle until
the transmission selects the optimum gear
for the current speed.
Kickdown i
Vehicles with an AMG engine: it is not
possible to use kickdown in manual drive
program M.
You can also use kickdown for maximum
acceleration in manual drive program M.
X Depress the accelerator pedal beyond the
pressure point.
The transmission shifts to a lower gear
depending on the engine speed.
X Shift back up once the desired speed is
reached.
Switching off the manual drive program X
Standard vehicles with the DIRECT
SELECT lever: press the program selector
button (Y page 138) until Eor Sis shown
in the multifunction display.
X AMG vehicles: turn the program selector
(Y page 139) until C,Sor S+ appears in the
multifunction display. Automatic transmission
141Driving and parking Z
Page 148 of 337
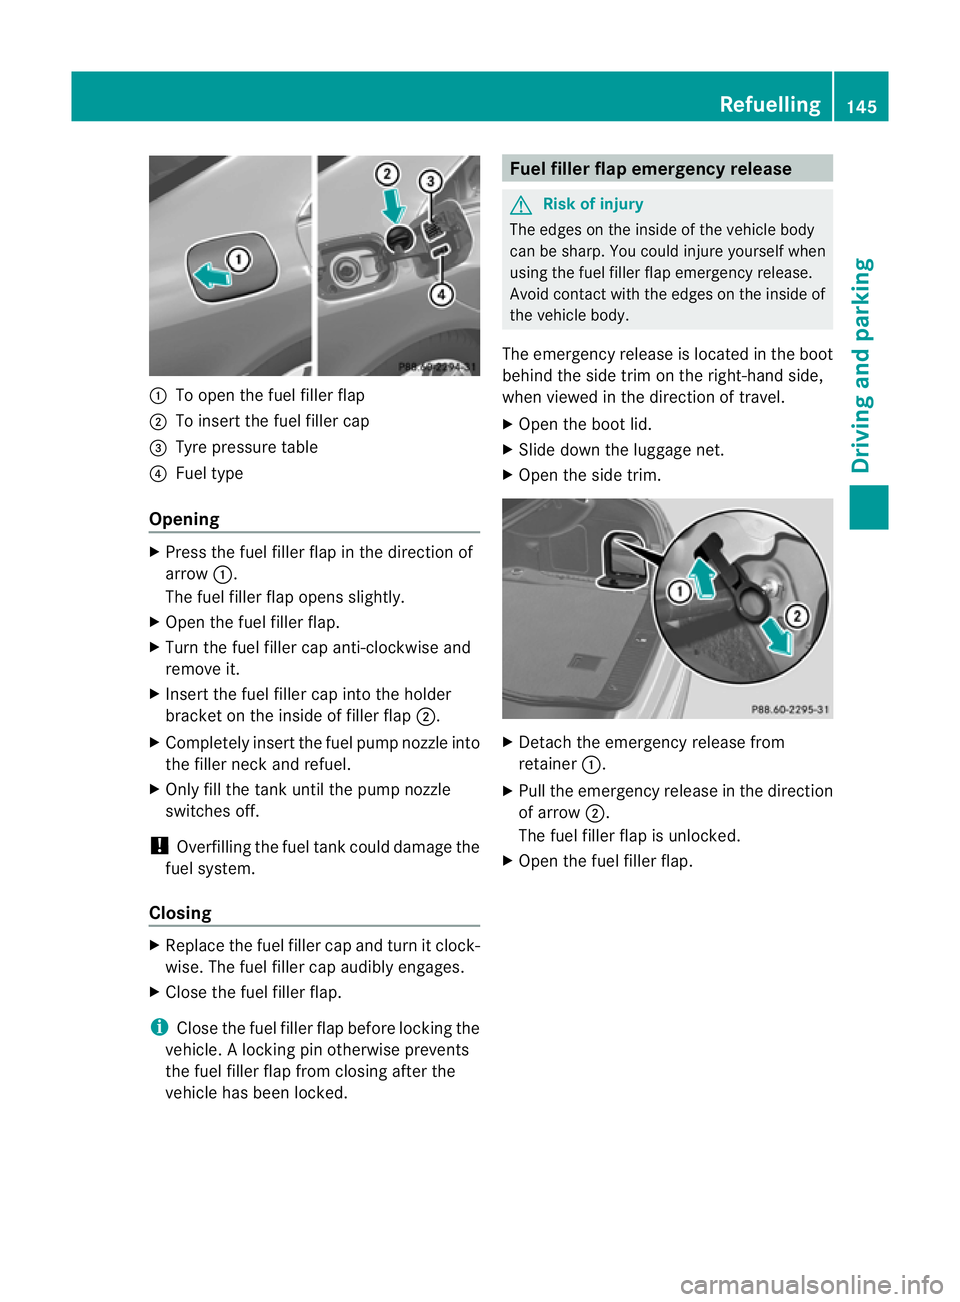
:
To open the fuel filler flap
; To insert the fuel filler cap
= Tyre pressure table
? Fuel type
Opening X
Press the fuel filler flap in the direction of
arrow :.
The fuel filler flap opens slightly.
X Open the fuel filler flap.
X Turn the fuel filler cap anti-clockwise and
remove it.
X Insert the fuel filler cap into the holder
bracket on the inside of filler flap ;.
X Completely insert the fuel pump nozzle into
the filler neck and refuel.
X Only fill the tank until the pump nozzle
switches off.
! Overfilling the fuel tank could damage the
fuel system.
Closing X
Replace the fuel filler cap and turn it clock-
wise. The fuel filler cap audibly engages.
X Close the fuel filler flap.
i Close the fuel filler flap before locking the
vehicle. Alocking pin otherwise prevents
the fuel filler flap from closing after the
vehicle has been locked. Fuel filler flap emergency release
G
Risk of injury
The edges on the inside of the vehicle body
can be sharp. You could injure yourself when
using the fuel filler flap emergency release.
Avoid contact with the edges on the inside of
the vehicle body.
The emergency release is located in the boot
behind the side trim on the right-hand side,
when viewed in the direction of travel.
X Open the boot lid.
X Slide down the luggage net.
X Open the side trim. X
Detach the emergency release from
retainer :.
X Pull the emergency release in the direction
of arrow ;.
The fuel filler flap is unlocked.
X Open the fuel filler flap. Refuelling
145Driving and parking Z