2010 MERCEDES-BENZ CLS COUPE start stop button
[x] Cancel search: start stop buttonPage 8 of 337
Setting the centre air vents
...........124
Setting the side air vents ...............124
Alarm system
see ATA
Alertness Assistant
see ATTENTION ASSIST
Ambient lighting
Setting the brightness (on-board
computer) ...................................... 208
Setting the colou r(on-board com-
puter) ............................................ .208
AMGMenu (on-board computer) ....... 212
AMG RIDE CONTROL sports sus-
pension (CLS 63 AMG) ......................169
Anti-glare film .................................... 264
Anti-lock Brake System see ABS
Anti-Theft Alarm system
see ATA
Anti-theft system
ATA (Anti-Theft Alarm system) .........63
Immobiliser ...................................... 63
Interior motion sensor .....................64
Tow-away protection ........................ 64
Aquaplaning ....................................... 151
Ashtray ............................................... 257
Assistance menu (on-board com-
puter) ................................................. .203
ASSYST PLUS see ASSYST PLUS service interval
display
ASSYST PLUS service interval dis-
play ..................................................... 269
Displaying a service message (on-
board computer) ............................ 270
ATA (Anti-Theft Alarm system)
Activating/deactivating ...................63
Function .......................................... .63
Switching off the alarm ....................63
ATTENTIO NASSIST
Activating/deactivating (on-
board computer) ............................ 204
Display message ............................ 226
Function/notes ............................. 177
Audio menu (on-board computer) ....200
Automatic car wash ..........................271Automatic engine start
With ECO start/stop function ........133
Automatic engine switch-off
With ECO start/stop function ........132
Automatic transmission
DIRECT SELECT leve r..................... 136
Display message ............................ 234
Driving tips .................................... 138
Emergency running mode ..............142
Kickdow n....................................... 138
Malfunction ................................... .142
Progra mselecto rbutton ................ 138
Pulling away ................................... 131
Selector leve r................................ 136
Starting .......................................... 130
Auxiliary heating ............................... 119
Adjusting (on-board computer) ......210
Display message ............................ 236
Important safety information .........119
Auxiliary heating/ventilation ...........120
Display message ............................ 123
Remote control .............................. 120
Auxiliary ventilation ..........................119 B
Bag hook ............................................ 252
BAS (Brake Assist System) .................57
BAS PLUS (Brake Assist System
Plus) ...................................................... 57
Battery Changing (auxiliary heating
remote control) .............................. 121
Changing (key )................................. 71
Charging ........................................ 292
Checking (key )................................. 70
Disconnecting ................................ 292
Display message ............................ 225
Important safety guidelines (key )..... 70
Installatio nlocation ....................... 291
Jump-starting ................................. 294
Reconnecting ................................. 293
Removing/fitting ........................... 292
Safety notes .................................. 290
Belt
see Seat belt Index
5
Page 27 of 337
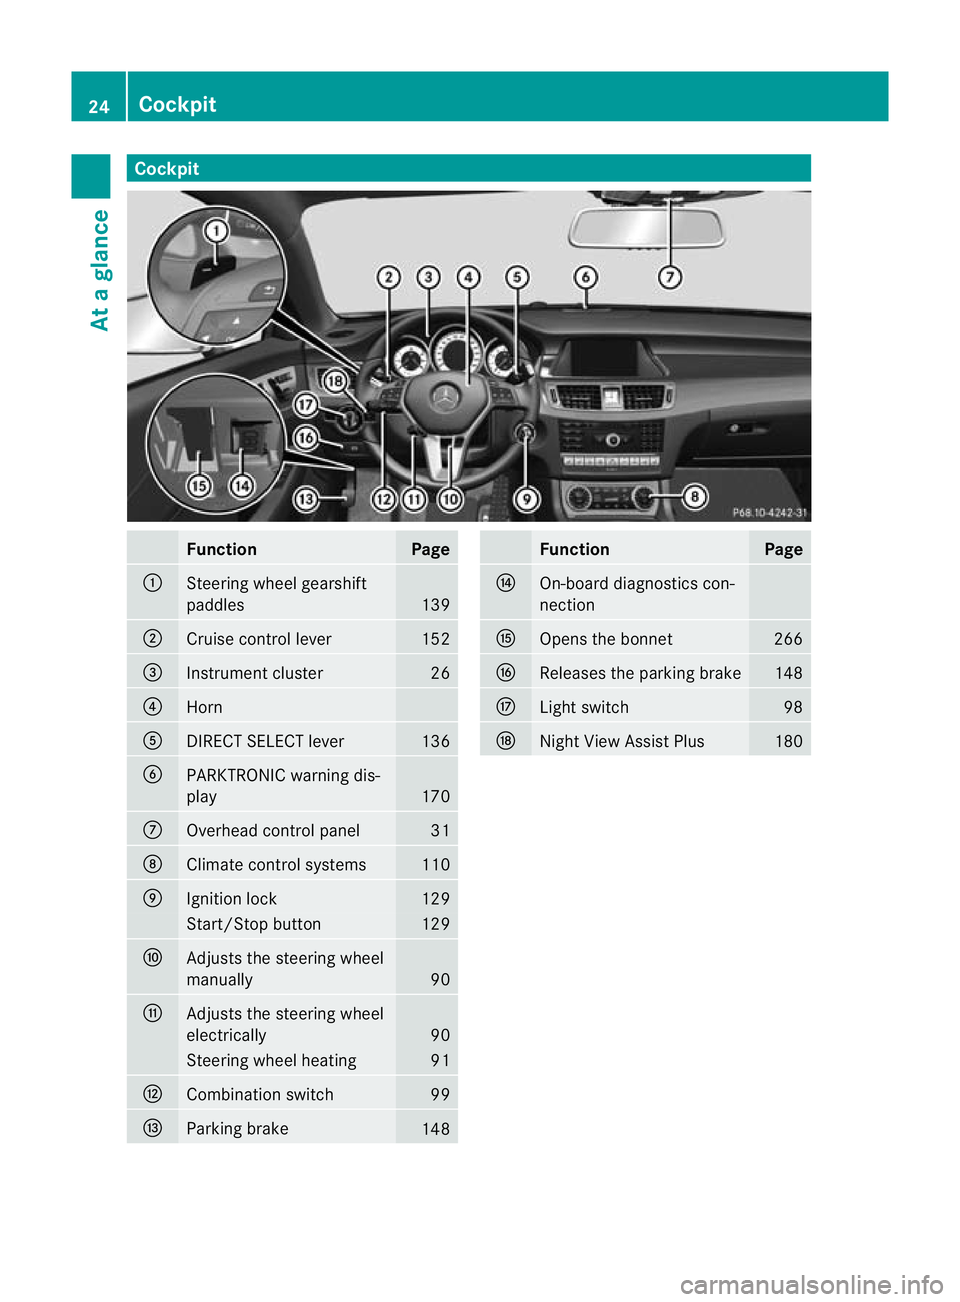
Cockpit
Function Page
:
Steering wheel gearshift
paddles
139
;
Cruise control lever 152
=
Instrument cluster 26
?
Horn
A
DIRECT SELECT lever 136
B
PARKTRONIC warning dis-
play
170
C
Overhead control panel 31
D
Climate control systems 110
E
Ignition lock 129
Start/Stop button 129
F
Adjusts the steering wheel
manually
90
G
Adjusts the steering wheel
electrically
90
Steering wheel heating 91
H
Combination switch 99
I
Parking brake
148 Function Page
J
On-board diagnostics con-
nection K
Opens the bonnet 266
L
Releases the parking brake 148
M
Ligh
tswitch 98
N
Night View Assist Plus 18024
CockpitAt a glance
Page 28 of 337
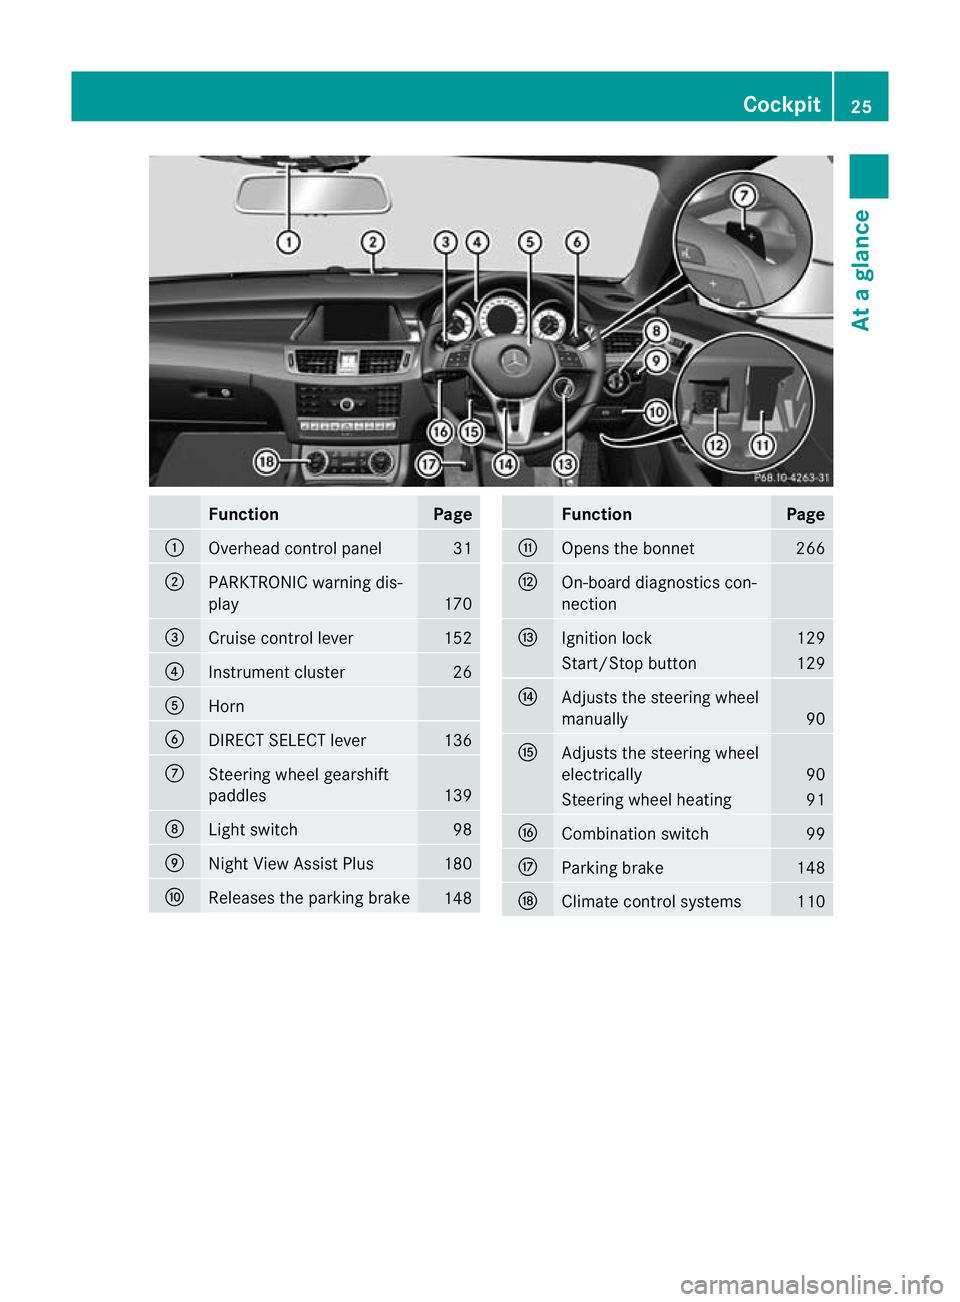
Function Page
:
Overhead control panel 31
;
PARKTRONIC warning dis-
play
170
=
Cruise control lever 152
?
Instrument cluster 26
A
Horn
B
DIRECT SELECT lever 136
C
Steering wheel gearshift
paddles
139
D
Ligh
tswitch 98
E
Nigh
tView Assist Plus 180
F
Releases the parking brake
148 Function Page
G
Opens the bonnet 266
H
On-board diagnostics con-
nection
I
Ignition lock 129
Start/Stop button 129
J
Adjusts the steering wheel
manually
90
K
Adjusts the steering wheel
electrically
90
Steering wheel heating 91
L
Combination switch 99
M
Parking brake 148
N
Climate control systems 110Cockpit
25At a glance
Page 67 of 337
X
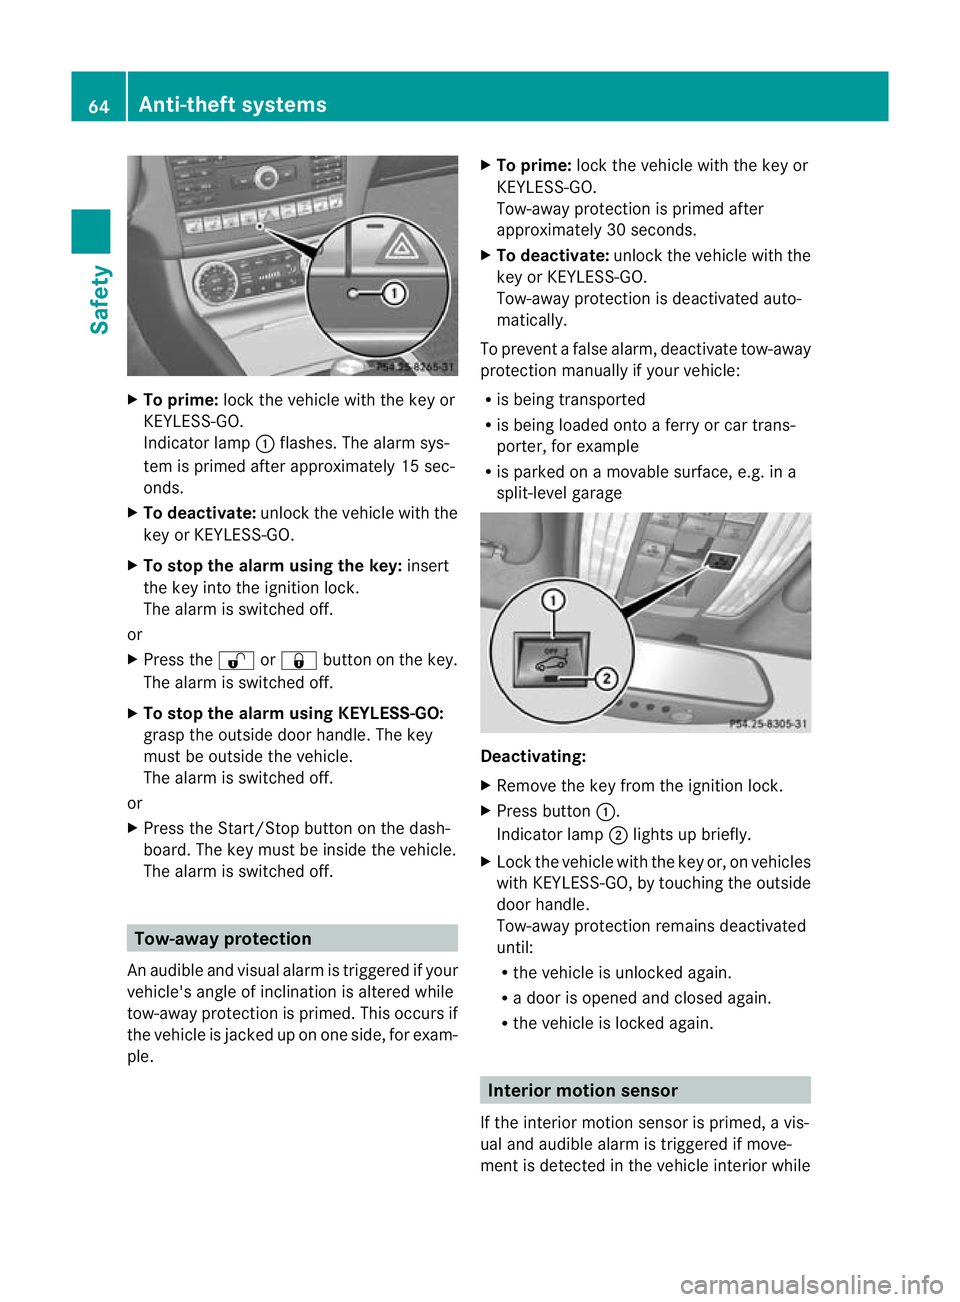
To prime: lock the vehicle with the key or
KEYLESS-GO.
Indicato rlamp :flashes. The alarm sys-
te mi s primed after approximately 15 sec-
onds.
X To deactivate: unlock the vehicle with the
key or KEYLESS-GO.
X To stop the alarm using the key: insert
the key into the ignition lock.
The alarm is switched off.
or
X Press the %or& button on the key.
The alarm is switched off.
X To stop the alarm using KEYLESS-GO:
grasp the outside door handle. The key
must be outside the vehicle.
The alarm is switched off.
or
X Press the Start/Stop button on the dash-
board. The key must be inside the vehicle.
The alarm is switched off. Tow-away protection
An audible and visual alarm is triggered if your
vehicle's angle of inclination is altered while
tow-away protection is primed. This occurs if
the vehicle is jacked up on one side, for exam-
ple. X
To prime: lock the vehicle with the key or
KEYLESS-GO.
Tow-away protection is primed after
approximately 30 seconds.
X To deactivate: unlock the vehicle with the
key or KEYLESS-GO.
Tow-away protection is deactivated auto-
matically.
To prevent a false alarm, deactivate tow-away
protection manually if your vehicle:
R is being transported
R is being loaded onto a ferry or car trans-
porter, for example
R is parked on a movable surface, e.g. in a
split-level garage Deactivating:
X
Remove the key from the ignition lock.
X Press button :.
Indicator lamp ;lights up briefly.
X Lock the vehicle with the key or, on vehicles
with KEYLESS-GO, by touching the outside
door handle.
Tow-away protection remains deactivated
until:
R the vehicle is unlocked again.
R a door is opened and closed again.
R the vehicle is locked again. Interior motion sensor
If the interior motion sensor is primed, a vis-
ual and audible alarm is triggered if move-
ment is detected in the vehicle interior while 64
Anti-theft systemsSafety
Page 73 of 337

lid, the anti-theft alarm system will be trig-
gered (Y
page 63).
There are several ways to tur noff the alarm:
X To deactivate the alarm with the key:
press the %or& button on the key.
or
X Insert the key into the ignition lock.
or
X To deactivate the alarm with KEYLESS-
GO: press the Start/Stop button in the igni-
tion lock. The key must be in the vehicle.
or
X Lock or unlock the vehicle using KEYLESS-
GO. The key must be outside the vehicle.
If you unlock the vehicle using the emergency
key element, the fuel filler flap will not be
unlocked automatically.
X To unlock the fuel filler flap: insert the
key in the ignition lock.
Removing the emergency key element X
Push release catch :in the direction of
the arrow and at the same time, remove
emergency key element ;from the key. Battery of the key
Important safety notes It is advisable to have batteries replaced at a
qualified specialist workshop, e.g. at a
Mercedes-Benz Service Centre. G
Risk of poisoning
Batteries are toxic and contain caustic sub-
stances. For this reason, keep batteries out of
the reach of children.
If a battery has been swallowed, visi tadoctor
immediately. H
Environmental note Batteries contain pollutants.
It is against the law to dis-
pose of them with the house-
hold rubbish. They must be
collected separately and
recycled in an environmen-
tally responsible manner. Dispose of batteries in an
environmentally responsible
manner. Take discharged
batteries to a qualified spe-
cialist workshop, e.g. a
Mercedes-Benz Service
Centre, or to a special col-
lection point for old batter-
ies.
Checking the battery X
Press the &or% button.
The key battery is working properly if the
battery charge indicator lamp :lights up
briefly.
If battery charge indicator lamp :does not
light up briefly during the test, the key battery
is discharged.
X Replace the key battery (Y page 71).70
KeyOpening and closing
Page 82 of 337
X
Turn the key to position 2in the ignition
lock.
X To open: press the corresponding switch.
X To close: pull the corresponding switch.
i If you press the switch beyond the point
of resistance, an automatic opening/clos-
ing process is started in the corresponding
direction .You can stop automatic opera-
tion by pressing again.
i You can continue to operate the side win-
dows after you switch off the engine. This
function remains active for five minutes or
until one of the front doors is opened. Convenience opening feature
You can ventilate the vehicle before you start
driving. To do this, you can use the key to
simultaneously:
R open the side windows
R open the sliding sunroof
R switch on the seat ventilation
i The convenience opening feature can
only be operated using the key. The key
must be close to the driver's door handle.
X Point the tip of the key at the driver's door
handle.
X Unlock the vehicle by pressing the %
button.
X Press and hold the %button until the
side windows and the sliding sunroof are in
the desired position. Convenience closing feature
General notes When you lock the vehicle, you can simulta-
neously:
R close the side windows
R close the sliding sunroof G
Risk of injury
When using the convenience closing feature,
make sure that nobody can become trapped.
Proceed as follows if there is a risk of entrap-
ment:
With the key:
R release the &button.
R press and hold the %button until the
side windows and the sliding sunroof open
again.
With KEYLESS-GO:
R release the sensor surface on the door han-
dle.
R pull the door handle immediately and hold
it.
The side windows and the sliding sunroof
open.
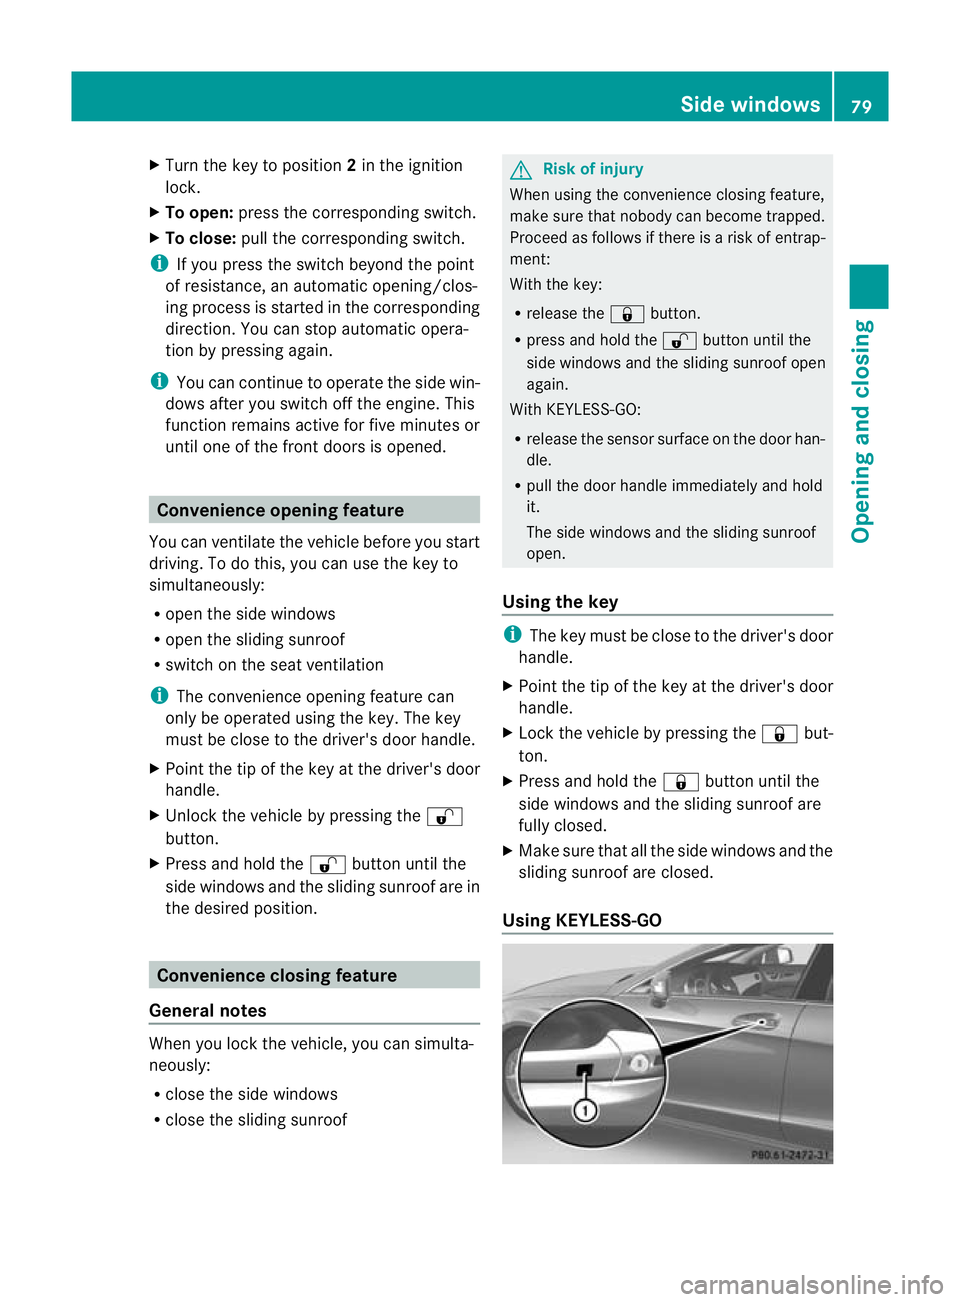
Using the key i
The key must be close to the driver's door
handle.
X Point the tip of the key at the driver's door
handle.
X Lock the vehicle by pressing the &but-
ton.
X Press and hold the &button until the
side windows and the sliding sunroof are
fully closed.
X Make sure that all the side windows and the
sliding sunroof are closed.
Using KEYLESS-GO Side windows
79Opening and closing Z
Page 132 of 337
the vehicle could skid. Thi
scould cause you
to lose control of your vehicle and cause an
accident.
! Warm up the engine quickly. Do not use
the engine's full performance until it has
reached operating temperature.
Only set the automatic transmission to the
respective drive positions when the vehicle
is stationary.
Where possible, avoid spinning the drive
wheels when pulling away on slippery
roads. Otherwise, you could damage the
drive train.
! AMG vehicles: at low engine oil tempera-
tures (below +20 †), the maximum engine
speed is restricted in order to protect the
engine. To protect the engine and maintain
smooth engine operation, avoid driving at
full throttle when the engine is cold. Key positions
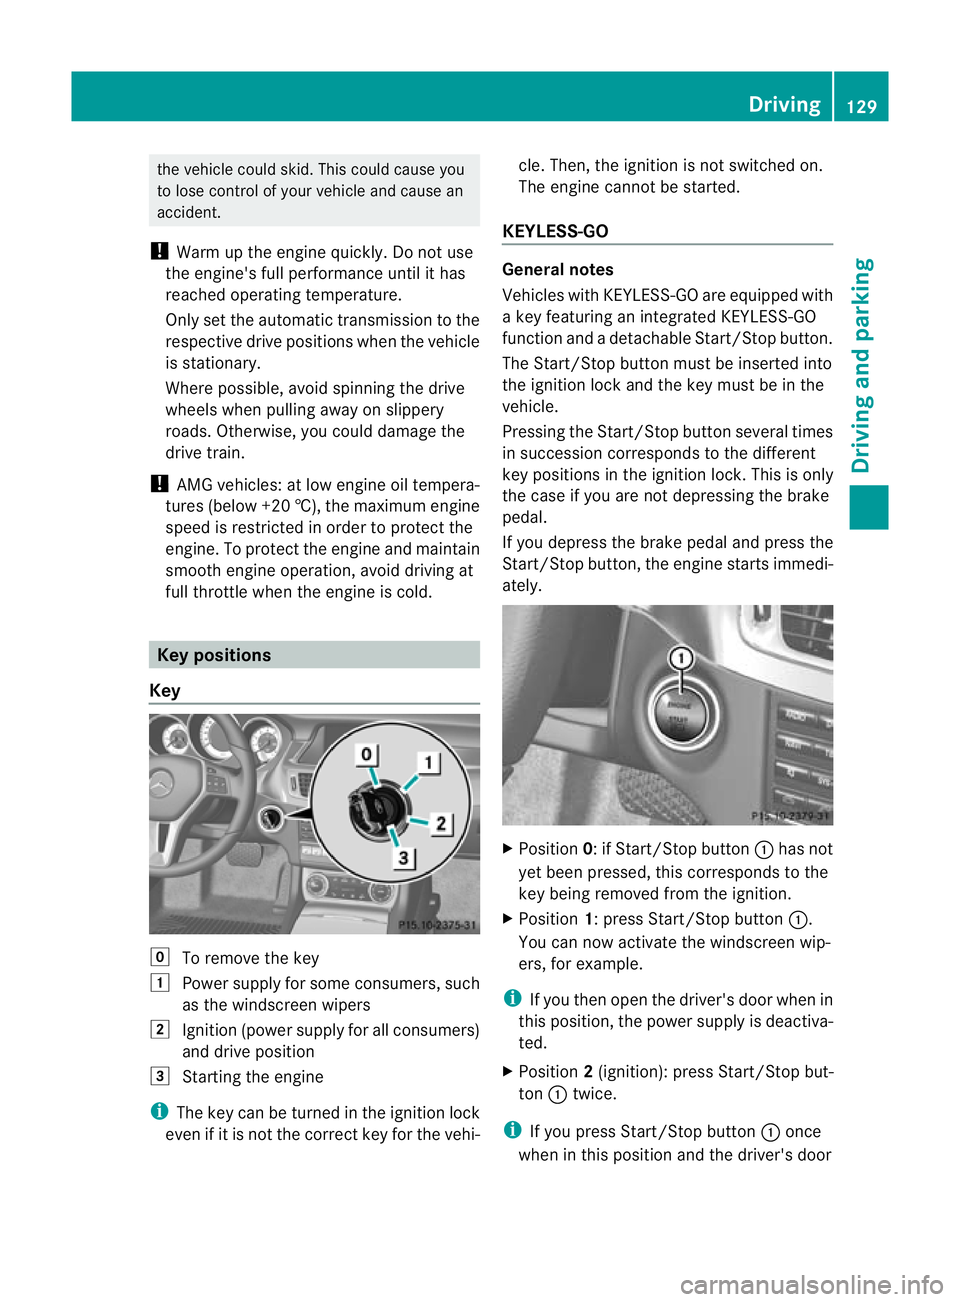
Key g
To remove the key
1 Power supply for some consumers, such
as the windscreen wipers
2 Ignition (power supply for all consumers)
and drive position
3 Starting the engine
i The key can be turned in the ignition lock
even if it is not the correc tkey for the vehi- cle. Then, the ignition is not switched on.
The engine cannot be started.
KEYLESS-GO General notes
Vehicles with KEYLESS-GO are equipped with
a key featuring an integrated KEYLESS-GO
function and a detachable Start/Stop button.
The Start/Stop button must be inserted into
the ignition lock and the key must be in the
vehicle.
Pressing the Start/Stop button several times
in succession corresponds to the different
key positions in the ignition lock. This is only
the case if you are not depressing the brake
pedal.
If you depress the brake pedal and press the
Start/Stop button, the engine starts immedi-
ately.
X
Position 0: if Start/Stop button :has not
yet been pressed, this corresponds to the
key being removed from the ignition.
X Position 1: press Start/Stop button :.
You can now activate the windscreen wip-
ers, for example.
i If you then open the driver's door when in
this position, the power supply is deactiva-
ted.
X Position 2(ignition): press Start/Stop but-
ton :twice.
i If you press Start/Stop button :once
when in this position and the driver's door Driving
129Driving and parking Z
Page 133 of 337
is open, the power supply is deactivated
again.
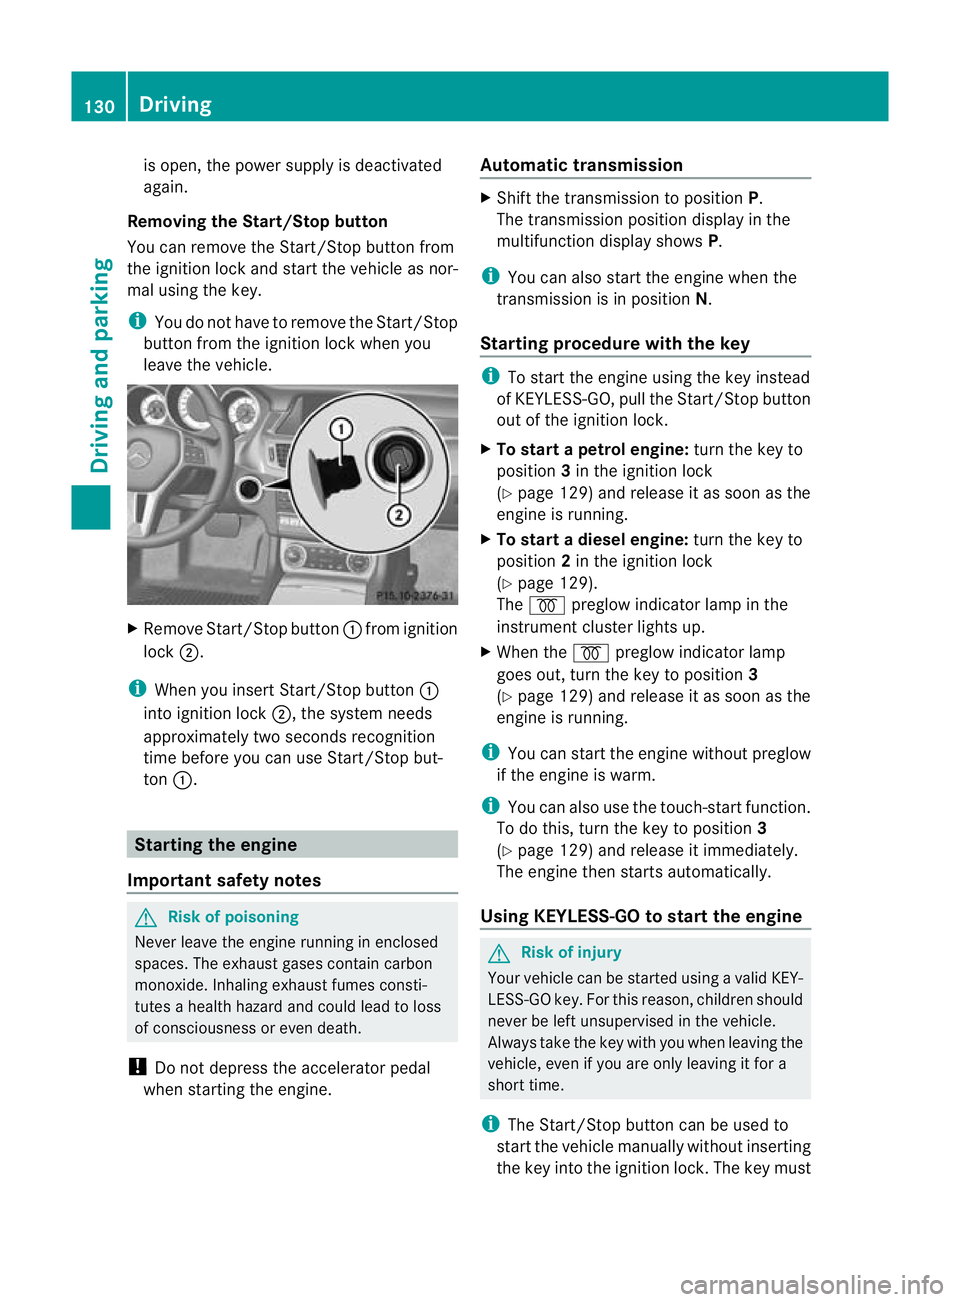
Removing the Start/Stop button
You can remove the Start/Stop button from
the ignition lock and start the vehicle as nor-
mal using the key.
i You do not have to remove the Start/Stop
button from the ignition lock when you
leave the vehicle. X
Remove Start/Stop button :fromi gnition
lock ;.
i When you insert Start/Stop button :
into ignition lock ;, the system needs
approximately two seconds recognition
time before you can use Start/Stop but-
ton :. Starting the engine
Important safety notes G
Risk of poisoning
Never leave the engine running in enclosed
spaces. The exhaust gases contain carbon
monoxide. Inhaling exhaust fumes consti-
tutes a health hazard and could lead to loss
of consciousness or even death.
! Do not depress the accelerator pedal
when starting the engine. Automatic transmission X
Shift the transmission to position P.
The transmission position display in the
multifunction display shows P.
i You can also start the engine when the
transmission is in position N.
Starting procedure with the key i
To start the engine using the key instead
of KEYLESS-GO, pull the Start/Stop button
out of the ignition lock.
X To start a petrol engine: turn the key to
position 3in the ignition lock
(Y page 129) and release it as soon as the
engine is running.
X To startad iesel engine: turn the key to
position 2in the ignition lock
(Y page 129).
The % preglow indicator lamp in the
instrumen tcluster lights up.
X When the %preglow indicator lamp
goes out, tur nthe key to position 3
(Y page 129) and release it as soon as the
engine is running.
i You can start the engine without preglow
if the engine is warm.
i You can also use the touch-start function.
To do this, turn the key to position 3
(Y page 129) and release it immediately.
The engine then starts automatically.
Using KEYLESS-GO to startt he engine G
Risk of injury
You rvehicle can be started using a valid KEY-
LESS-GO key. For this reason, children should
never be left unsupervised in the vehicle.
Always take the key with you when leaving the
vehicle, even if you are only leaving it for a
short time.
i The Start/Stop button can be used to
start the vehicle manually without inserting
the key into the ignition lock. The key must 130
DrivingDriving and parking