2010 MERCEDES-BENZ CLS COUPE ad blue
[x] Cancel search: ad bluePage 19 of 337
Starting the engine
Important safety notes ..................130
Station
see Radio
Steering (display message) ..............235
Steering wheel Adjusting (electrically). ....................91
Adjusting (manually). .......................91
Buttons (on-board computer) ......... 195
Important safety instructions ...........90
Memory function (storing set-
tings) ................................................ 91
Steering wheel heating ....................91
Storing settings (memory func-
tion) ................................................. 95
Steering wheel gearshift paddles ....139
Steering wheel heating Malfunction indicator lamp ..............92
Stowage compartments
Armrest (under) ............................. 249
Centre console .............................. 249
Centre console (rea rcompart-
ment). ............................................ 250
Cuph older..................................... 255
Glove compartment .......................248
Rea r............................................... 250
Under driver's seat/front-
passenger sea t.............................. 250
Stowage space
Important safety information .........248
Stowage well
Boot floo r(underneath) ................. 254
Submenu (on-board computer)
Convenience .................................. 211
Factory setting ............................... 212
Heating .......................................... 210
Instrument cluster .........................205
Lights ............................................ .207
Standard displa y............................ 198
Time/Date ..................................... 206
Vehicle .......................................... .209
Summer opening
see Convenience opening feature
Summer tyres .................................... 303
Sun visor ............................................ 256
Supplemental Restraint System see SRS Surround lighting (on-board com-
puter)
................................................. .208
Suspension tuning ....................168, 169
Switching off the alarm (ATA) ............63 T
Tail lamp (display message) .............222
Technical data CLS 250 CDI BlueEFFICIENCY .......324
CLS 350 BlueEFFICIENCY ..............323
CLS 350 CDI 4MATIC BlueEFFI-
CIENC Y.......................................... 325
CLS 350 CDI BlueEFFICIENCY .......325
CLS 500 4MATIC BlueEFFI-
CIENC Y.......................................... 323
CLS 500 BlueEFFICIENCY ..............323
CLS 63 AMG .................................. 324
Notes ............................................. 316
Tyres/wheels ................................. 310
Telephone
Accepting acall............................. 202
Menu (on-board computer) ............201
Number from the phone book ....... .202
Redialling ....................................... 203
Rejecting/ending acall................. 202
Telephone compartment ..................249
Temperature Coolant .......................................... 194
Coolant (on-board computer) ......... 212
Engine oil (on-board computer) ...... 212
Outside temperature ..................... .195
Setting ........................................... 115
TEMPOMAT
Function/notes ............................. 152
Through-loading feature ...................251
Tilt/sliding sunroof see Sliding sunroof
Time (on-board computer) ................206
Timer (on-board computer) ..............212
TIREFIT kit .......................................... 281
Top Tether ............................................ 50
Total distance recorder ....................198
Tow-away protection ..........................64
Towing Important safety notes ..................29516
Index
Page 93 of 337
The system automatically switches down
from level
2to level 1after approximately ten
minutes.
The system automatically switches off
approximately 20 minutes after it is set to
level 1.
X Make sure that the key is in position 1or
2 in the ignition lock.
X To switch on: press button:repeatedly
until the desired heating level is set.
X To switch off: press button:repeatedly
until all the indicator lamps go out.
Problems with the seat heating The seat heating has switched off prema-
turely or cannot be switched on. The vehicle's
electrical system voltage is too low because
too many electrical consumers are switched
on.
X
Switch off electrical consumers which you
do not need, such as the rear window heat-
ing or interior lighting. Switching the seat ventilation on/off
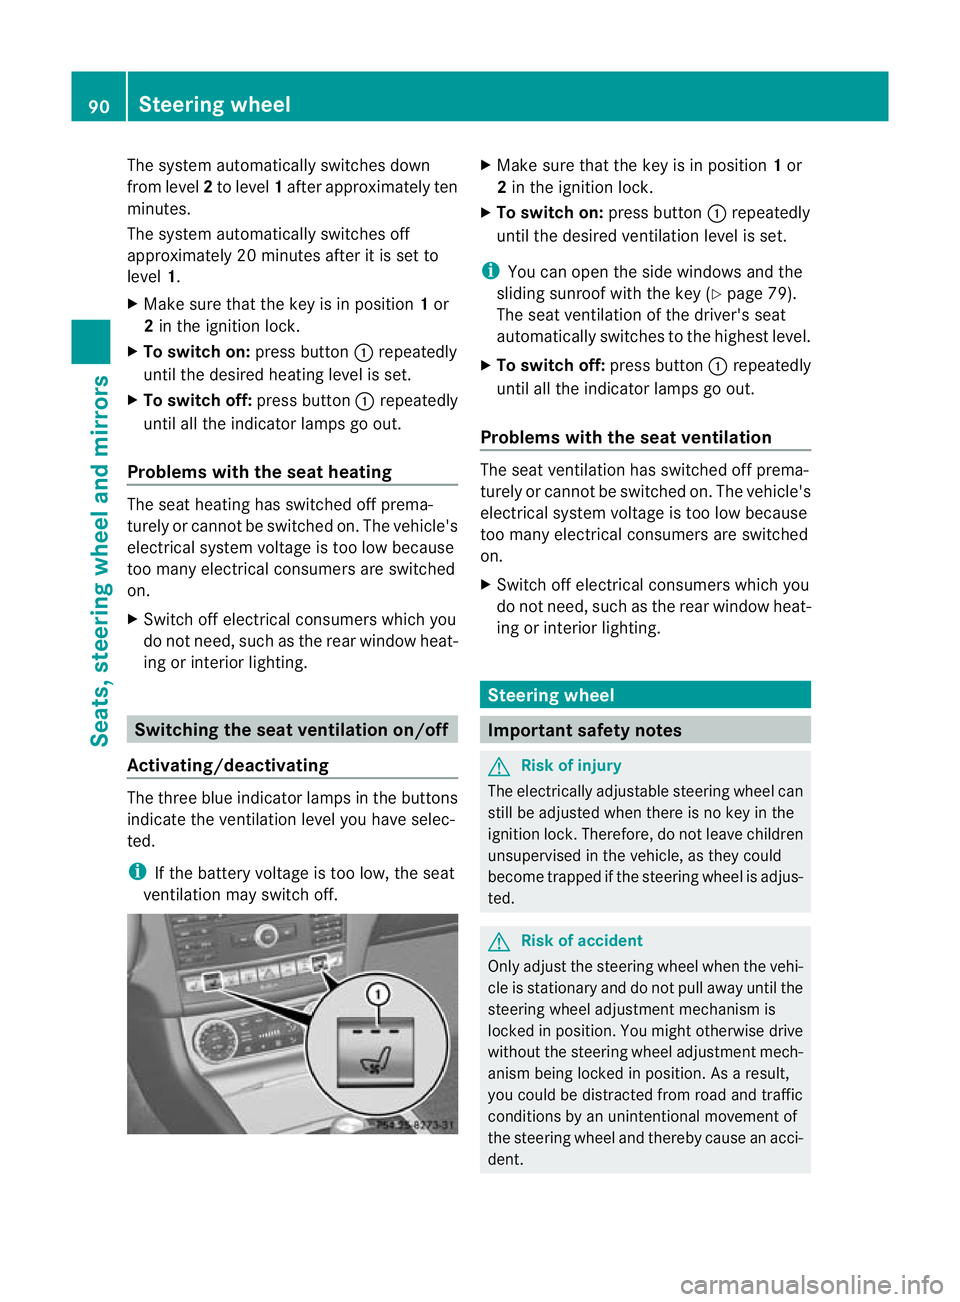
Activating/deactivating The three blue indicator lamps in the buttons
indicate the ventilation level you have selec-
ted.
i
If the battery voltage is too low, the seat
ventilation may switch off. X
Make sure that the key is in position 1or
2 in the ignition lock.
X To switch on: press button:repeatedly
until the desired ventilation level is set.
i You can open the side windows and the
sliding sunroof with the key (Y page 79).
The seat ventilation of the driver's seat
automatically switches to the highest level.
X To switch off: press button:repeatedly
until all the indicator lamps go out.
Problems with the seat ventilation The seat ventilation has switched off prema-
turely or cannot be switched on. The vehicle's
electrical system voltage is too low because
too many electrical consumers are switched
on.
X Switch off electrical consumers which you
do not need, such as the rear window heat-
ing or interior lighting. Steering wheel
Important safety notes
G
Risk of injury
The electrically adjustable steering wheel can
still be adjusted when there is no key in the
ignition lock. Therefore, do not leave children
unsupervised in the vehicle, as they could
become trapped if the steering wheel is adjus-
ted. G
Risk of accident
Only adjust the steering wheel when the vehi-
cle is stationary and do not pull away until the
steering wheel adjustmen tmechanism is
locked in position .You might otherwise drive
without the steering wheel adjustmen tmech-
anism being locked in position .As a result,
you could be distracted from road and traffic
conditions by an unintentional movement of
the steering wheel and thereby cause an acci-
dent. 90
Steering wheelSeats, steering wheel and mirrors
Page 123 of 337
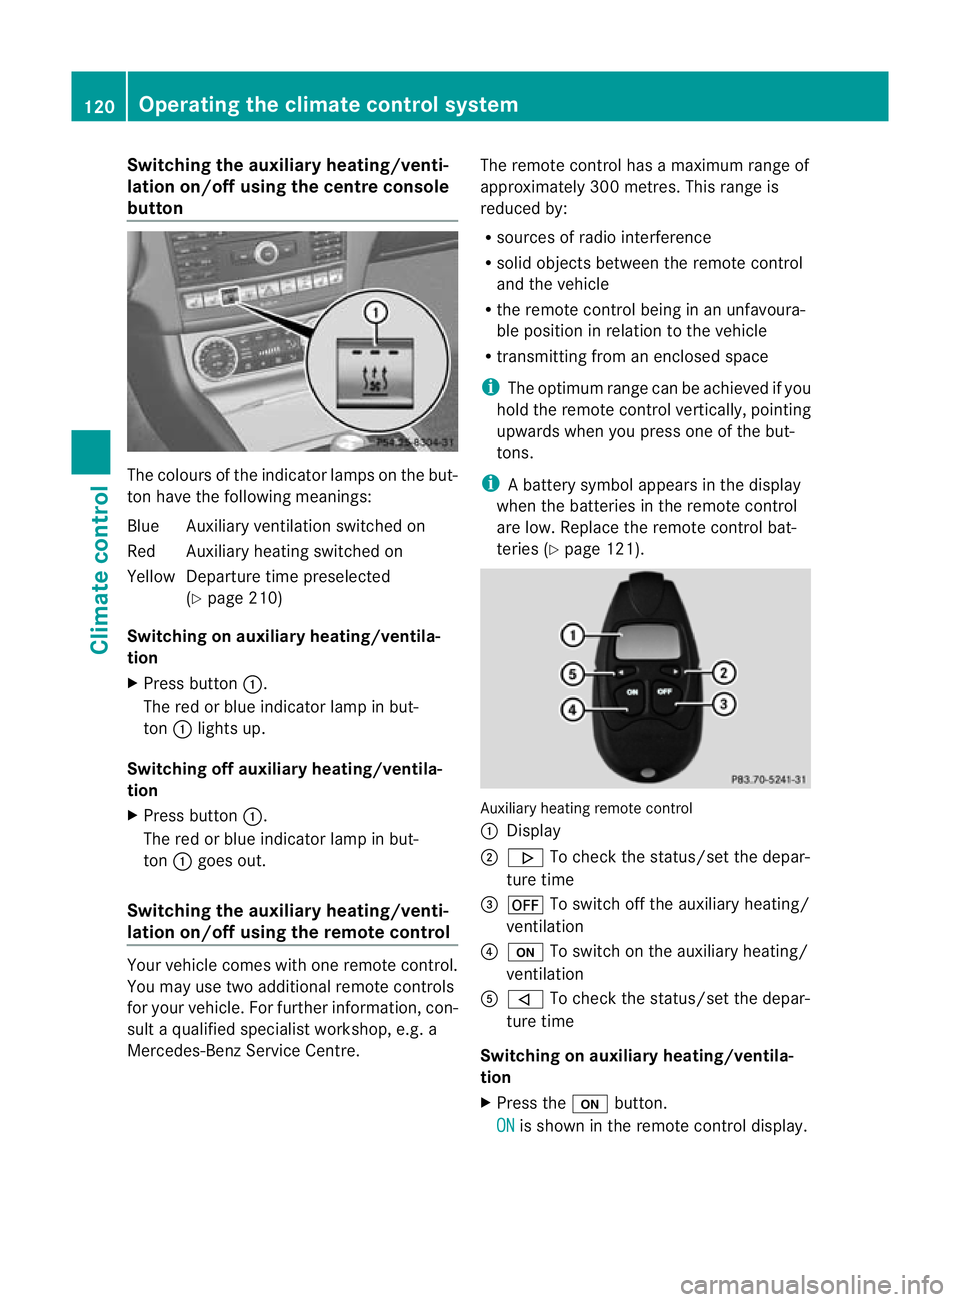
Switching the auxiliary heating/venti-
lation on/off using the centre console
button The colours of the indicator lamps on the but-
ton have the following meanings:
Blue Auxiliary ventilation switched on
Red Auxiliary heating switched on
Yellow Departure time preselected
(Ypage 210)
Switching on auxiliary heating/ventila-
tion
X Press button :.
The red or blue indicator lamp in but-
ton :lights up.
Switching off auxiliary heating/ventila-
tion
X Press button :.
The red or blue indicator lamp in but-
ton :goes out.
Switching the auxiliary heating/venti-
lation on/off using the remote control Your vehicle comes with one remote control.
You may use two additional remote controls
for your vehicle. For further information, con-
sult a qualified specialist workshop, e.g. a
Mercedes-Benz Service Centre. The remote control has a maximum range of
approximately 300 metres. This range is
reduced by:
R
sources of radio interference
R solid objects between the remote control
and the vehicle
R the remote control being in an unfavoura-
ble position in relation to the vehicle
R transmitting from an enclosed space
i The optimum range can be achieved if you
hold the remote control vertically, pointing
upwards when you press one of the but-
tons.
i Abattery symbol appears in the display
when the batteries in the remote control
are low. Replace the remot econtrol bat-
teries (Y page 121). Auxiliary heating remote control
:
Display
; . To check the status/set the depar-
ture time
= ^ To switch off the auxiliary heating/
ventilation
? u To switch on the auxiliary heating/
ventilation
A , To check the status/set the depar-
ture time
Switching on auxiliary heating/ventila-
tion
X Press the ubutton.
ON is shown in the remote control display.120
Operating the climate control systemClimate control
Page 134 of 337
be in the vehicle and the Start/Stop button
must be inserted in the ignition lock .This
mode for starting the engine operates inde-
pendently of the ECO start/stop automatic
engine start function.
X Depress the brake pedal and keep it
depressed.
X To startap etrol engine: press the Start/
Stop button (Y page 129) once.
The engine starts.
X To start adiesel engine: press the Start/
Stop button (Y page 129) once.
Preglow is activated and the engine starts. Pulling away
Automatic transmission i
It is only possible to shift the transmission
from position Pto the desired position if
you depress the brake pedal. Only then is
the parking lock released.
X Depress the brake pedal and keep it
depressed.
X Shif tthe transmission to position Dor R.
X Release the parking brake (Y page 148).
X Release the brake pedal.
X Carefully depress the accelerator pedal.
i The vehicle locks centrally once you have
pulled away.T he locking knobs in the doors
drop down.
You can open the doors from the inside at
any time.
You can also deactivate the automatic lock-
ing feature (Y page 209).
i Upshifts take place at higher engine
speeds after a cold start. This helps the
catalytic converter to reach its operating
temperature more quickly.
Hill starta ssist Hill start assist helps you when pulling away
forwards or in reverse on an uphill gradient. It holds the vehicle for a short time after you
have removed your foot from the brake pedal.
This gives you enough time to move your foot
from the brake pedal to the accelerator pedal
and depress it before the vehicle begins to
roll. G
Risk of accident
Never leave the vehicle when it is held by hill
start assist. After approximately one second,
hill start assist will no longer brake your vehi-
cle and it could roll away.
X Take your foot off the brake pedal.
i Once you have taken your foot off the
brake pedal, the vehicle is held for around
one second.
X Pull away.
Hill start assist will not function if:
R you are pulling away on a level road or a
downhill gradient.
R the transmission is in position N.
R the parking brake is applied.
R ESP ®
is malfunctioning. ECO start/stop function
General notes The ECO start/stop function is only available
for the CLS 350 BlueEFFICIENCY and
CLS 63 AMG models.
AMG vehicles:
the ECO start/stop function
is only available in the Cdrive program.
The ECO start/stop function switches the
engine off automatically when the vehicle
stops moving.
The engine starts automatically when you pull
away again. The ECO start/stop function
thereby helps you to reduce the fuel con-
sumption and emissions of your vehicle. Driving
131Driving and parking Z
Page 135 of 337
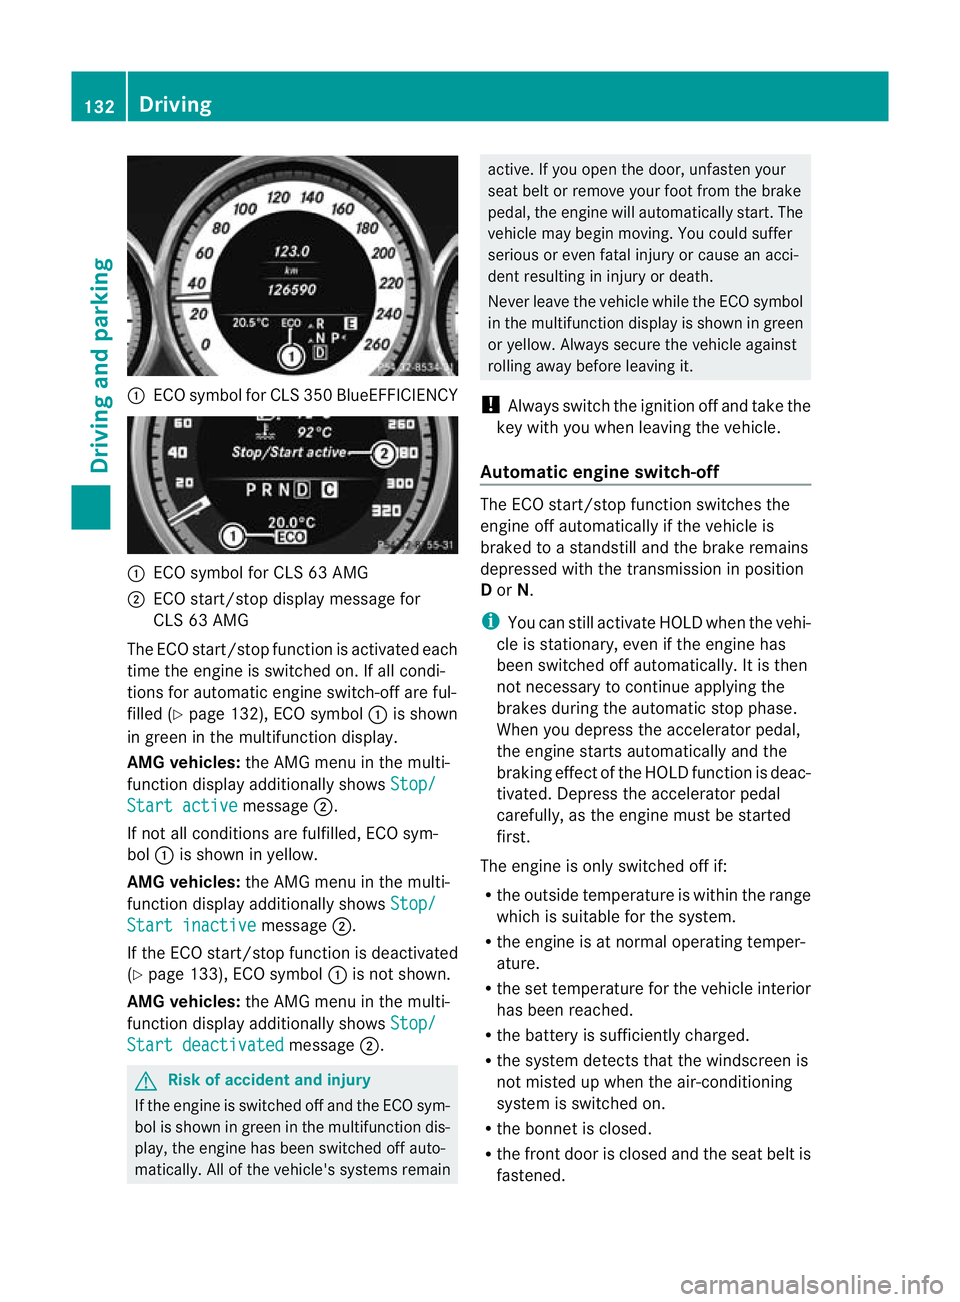
:
ECO symbo lfor CLS 350 BlueEFFICIENCY :
ECO symbol for CLS 63 AMG
; ECO start/stop display message for
CLS 63 AMG
The ECO start/stop function is activated each
time the engine is switched on. If all condi-
tions for automatic engine switch-off are ful-
filled (Y page 132), ECO symbol :is shown
in green in the multifunction display.
AMG vehicles: the AMG menu in the multi-
function display additionally shows Stop/Start active message
;.
If not all conditions are fulfilled, ECO sym-
bol :is shown in yellow.
AMG vehicles: the AMG menu in the multi-
function display additionally shows Stop/Start inactive message
;.
If the ECO start/stop function is deactivated
(Y page 133), ECO symbol :is not shown.
AMG vehicles: the AMG menu in the multi-
function display additionally shows Stop/Start deactivated message
;. G
Risk of accident and injury
If the engine is switched off and the ECO sym-
bol is shown in green in the multifunction dis-
play, the engine has been switched off auto-
matically. All of the vehicle's systems remain active. If you open the door, unfasten your
seat belt or remove your foot from the brake
pedal, the engine will automatically start.T
he
vehicle may begin moving. You could suffer
serious or even fatal injury or cause an acci-
dent resulting in injury or death.
Never leave the vehicle while the ECO symbol
in the multifunction display is shown in green
or yellow. Always secure the vehicle against
rolling away before leaving it.
! Always switch the ignition off and take the
key with you when leaving the vehicle.
Automatic engine switch-off The ECO start/stop function switches the
engine off automatically if the vehicle is
braked to a standstill and the brake remains
depressed with the transmission in position
D or N.
i You can still activate HOLD when the vehi-
cle is stationary, even if the engine has
been switched off automatically .Itis then
not necessary to continue applying the
brakes during the automatic stop phase.
When you depress the accelerator pedal,
the engine starts automatically and the
braking effect of the HOLD function is deac-
tivated. Depress the accelerator pedal
carefully, as the engine must be started
first.
The engine is only switched off if:
R the outside temperature is within the range
which is suitable for the system.
R the engine is at normal operating temper-
ature.
R the set temperature for the vehicle interior
has been reached.
R the battery is sufficiently charged.
R the system detects that the windscreen is
not misted up when the air-conditioning
system is switched on.
R the bonnet is closed.
R the front door is closed and the seat belt is
fastened. 132
DrivingDriving and parking
Page 146 of 337
R
M85 (petrol with 85 % methanol)
R M100 (100 % methanol)
R diesel
Do not mix these fuels with petrol and do
not use any special additives. Otherwise,
this can lead to damage to the engine. This
does not include additives for the removal
and prevention of residue build-up on the
inlet valves.
! Use a filter when adding fuel from a fuel
can. The fuel lines and/or the diesel injec-
tion system could otherwise be blocked by
particles from the fuel can.
i If the recommended fuel is not available,
but only as a temporary measure, you may
also use regular unleaded petrol,
91 RON/82.5 MON. This may reduce
engine performance and increase fuel con-
sumption. Avoid driving at full throttle.
In some countries, the fuel grade available
may not be adequate and could cause res-
idue to build up around the inlet valves. In
such cases, and in consultation with a
Mercedes-Benz Service Centre, the petrol
may be mixed with the additive recommen-
ded by Mercedes-Ben z(part no.
A000989254510). You must observe the
notes and mixing ratios specified on the
container.
For further information on "Fuel", see
(Y page 319).
AMG vehicles !
Only refuel using super-grade unleaded
petrol with at least 98 RON/88 MON,
which conforms to European standard EN
228 or equivalent.
You can otherwise impair engine output or
damage the engine.
i If the recommended fuel is not available
and only as a temporary measure, you may
also use premium-grade unleaded petrol,
95 RON/85 MON. This may reduce engine performance and increase fuel consump-
tion. Avoid driving at full throttle.
! In emergencies, and only when the rec-
ommended fuel is not available, you may
also use standard unleaded petrol,
91 RON/82.5 MON.
However, using this fuel results in consid-
erably higher petrol consumption and sig-
nificantly reduced engine performance.
Avoid driving at full throttle.
If no fuel other than regular petrol with
91 RON/82.5 MON or a lower grade is per-
manently available, you should have the
vehicle adapted to run on this fuel by the
local after-sales service centre.
CLS 350 BlueEFFICIENCY !
Only refuel using unleaded, sulphur-free
premium-grade petrol with at least
95 RON/85 MON, which conform stoEuro-
pean standard EN 228 or an equivalent
specification.
You can otherwise impai rengine outpu tor
damage the engine.
i In some countries, the available petrol
may not be sufficiently low in sulphur. This
fuel can temporarily produce unpleasant
odours, especially on short journeys. As
soon as sulphur-free fuel (sulphur content
<10p pm) is used for refuelling, the odours
are reduced. Diesel (EN 590, DIN 51628)
Fuel grade !
Only refuel with diesel that conforms to
European standard EN 590 or German
standard DIN 51628 or equivalent. You can
otherwise impair engine output or damage
the engine.
! Vehicles with diesel particle filters: in
countries outside the EU, only use low sul-
phur Euro diesel with a sulphur conten tof Refuelling
143Driving and parking Z
Page 204 of 337
Operating audio devices or media
Audio data from various audio devices or
media can be played, depending on the equip-
ment fitted in the vehicle.
X Switch on the audio system or COMAND
APS and select the audio device or medium
(see the separate operating instructions).
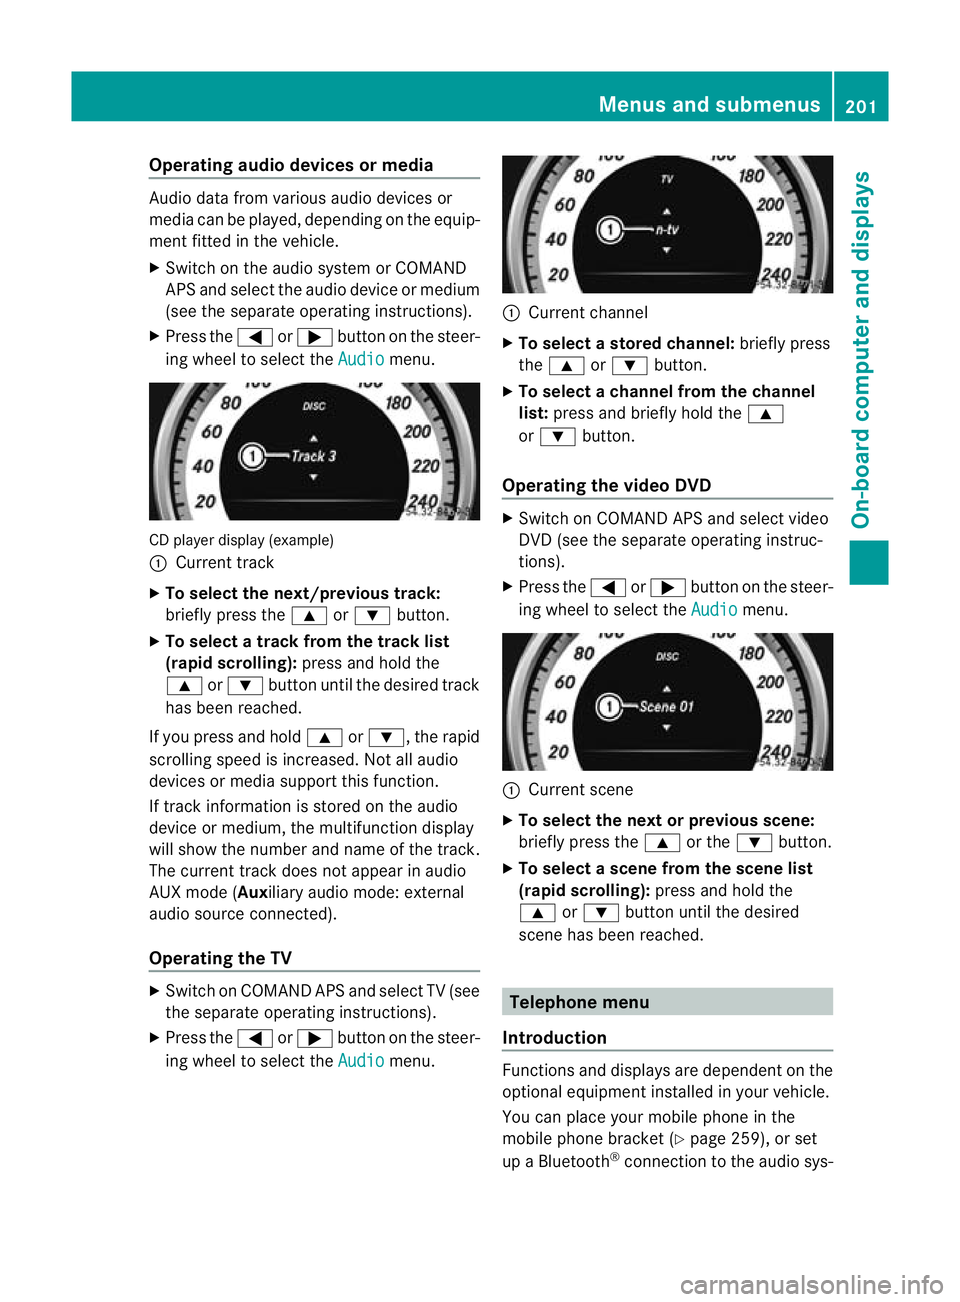
X Press the =or; button on the steer-
ing wheel to select the Audio menu.
CD player display (example)
:
Current track
X To select the next/previous track:
briefly press the 9or: button.
X To select a track from the track list
(rapid scrolling): press and hold the
9 or: button until the desired track
has been reached.
If you press and hold 9or:, the rapid
scrolling speed is increased. Not all audio
devices or media support this function.
If track information is stored on the audio
device or medium, the multifunction display
will show the number and name of the track.
The curren ttrack does not appear in audio
AUX mode (Auxiliary audio mode: external
audio source connected).
Operating the TV X
Switch on COMAND APS and select TV (see
the separate operating instructions).
X Press the =or; button on the steer-
ing wheel to select the Audio menu. :
Current channel
X To selectas toredchannel: briefly press
the 9 or: button.
X To selectac hannel from the channel
list: press and briefly hold the 9
or : button.
Operating the video DVD X
Switch on COMAND APS and select video
DVD (see the separate operating instruc-
tions).
X Press the =or; button on the steer-
ing wheel to select the Audio menu.
:
Current scene
X To selectt he next or previous scene:
briefly press the 9or the :button.
X To selectas cene from the scene list
(rapid scrolling): press and hold the
9 or: buttonuntil the desired
scene has been reached. Telephone menu
Introduction Functions and displays ar
edependen tonthe
optional equipment installed in your vehicle.
You can place your mobile phone in the
mobile phone bracket (Y page 259), or set
up a Bluetooth ®
connection to the audio sys- Menus and submenus
201On-board computer and displays Z
Page 314 of 337
i
You will find a table of tyre pressures on
the inside of your vehicle's fuel filler flap.
For further information on tyre pressure,
see (Y page 305).
i Notes on the vehicle equipmen t–always
fit the vehicle:
R with tyres of the same size on a given axle
(left/right)
R with the same type of tyres at a given
time (summer tyres, winter tyres,
MOExtended tyres)
i Vehicles with MOExtended tyres are not
equipped with a TIREFIT kit at the factory.
It is therefore recommended that you addi-
tionally equip your vehicle with a TIREFIT kit
if you fit tyres that do not feature run-flat
properties, e.g. winter tyres. You can obtain
aT IREFIT kit from aMercedes-Benz Service
Centre, for example.
i Overview of abbreviations used in the fol-
lowing tyre tables:
R BA: both axles
R FA: front axle
R RA: rear axle
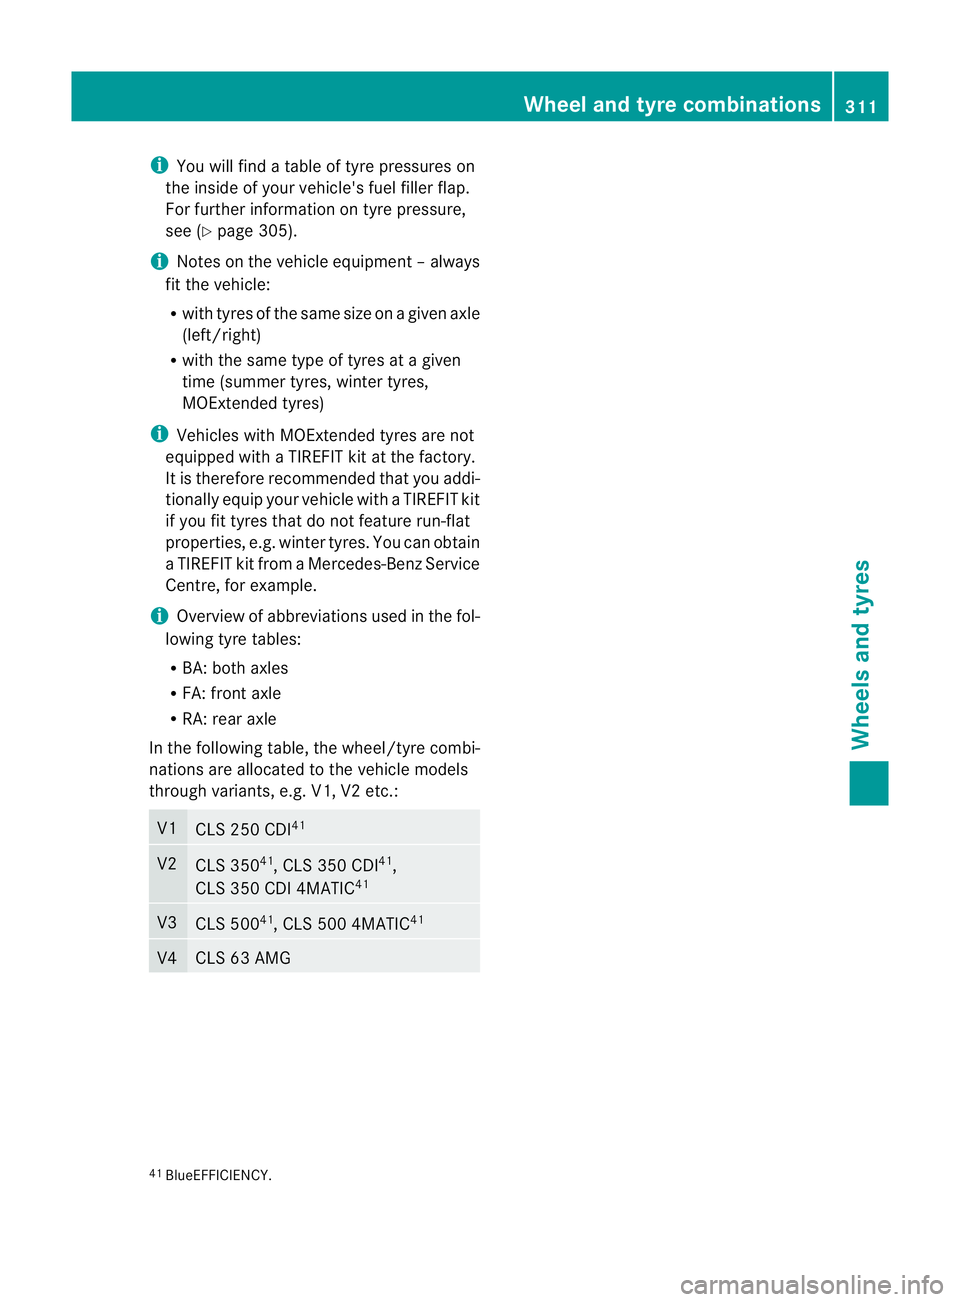
In the following table, the wheel/tyre combi-
nations are allocated to the vehicle models
through variants, e.g. V1, V2 etc.: V1
CLS 250 CDI
41 V2
CLS 350
41
, CLS 350 CDI 41
,
CLS 350 CDI 4MATIC 41V3
CLS 500
41
, CLS 500 4MATIC 41 V4 CLS 63 AMG
41
BlueEFFICIENCY. Wheel and tyre combinations
311Wheels and tyres Z