2010 MERCEDES-BENZ CLS COUPE winter tyres
[x] Cancel search: winter tyresPage 21 of 337
Washer fluid (display message)
.......236
see Washer fluid (display message)
Wheel bol ttightening torque ...........288
Wheel chock ...................................... 285
Wheels Changing/replacing .......................309
Changing awheel .......................... 284
Checking ........................................ 302
Cleaning ......................................... 272
Fitting awheel ............................... 287
Removing awheel .......................... 286
Storing ........................................... 310
Tightening torque ........................... 288
Whee lsize/tyre size ...................... 310
Windowbag
Display message ............................ 218
Operation ........................................ .39
Windows
see Side windows
Windows (cleaning instructions) .....273
Windscreen Demisting ...................................... 116
Windscreen washe rsystem ............. 269
Windscreen wipers Replacing the wiper blades ............107
Switching on/off ........................... 106
Troubleshooting ............................. 107
Winte rdriving ............................ 151, 303
Winter tyres Limiting the speed (on-board com-
puter) ............................................. 209
M+S tyres ...................................... 303
Wiper blades
Cleaning ......................................... 273
Replacing ....................................... 10718
Index
Page 59 of 337
vehicle is unlocked, the door can be opened
from the outside.
X
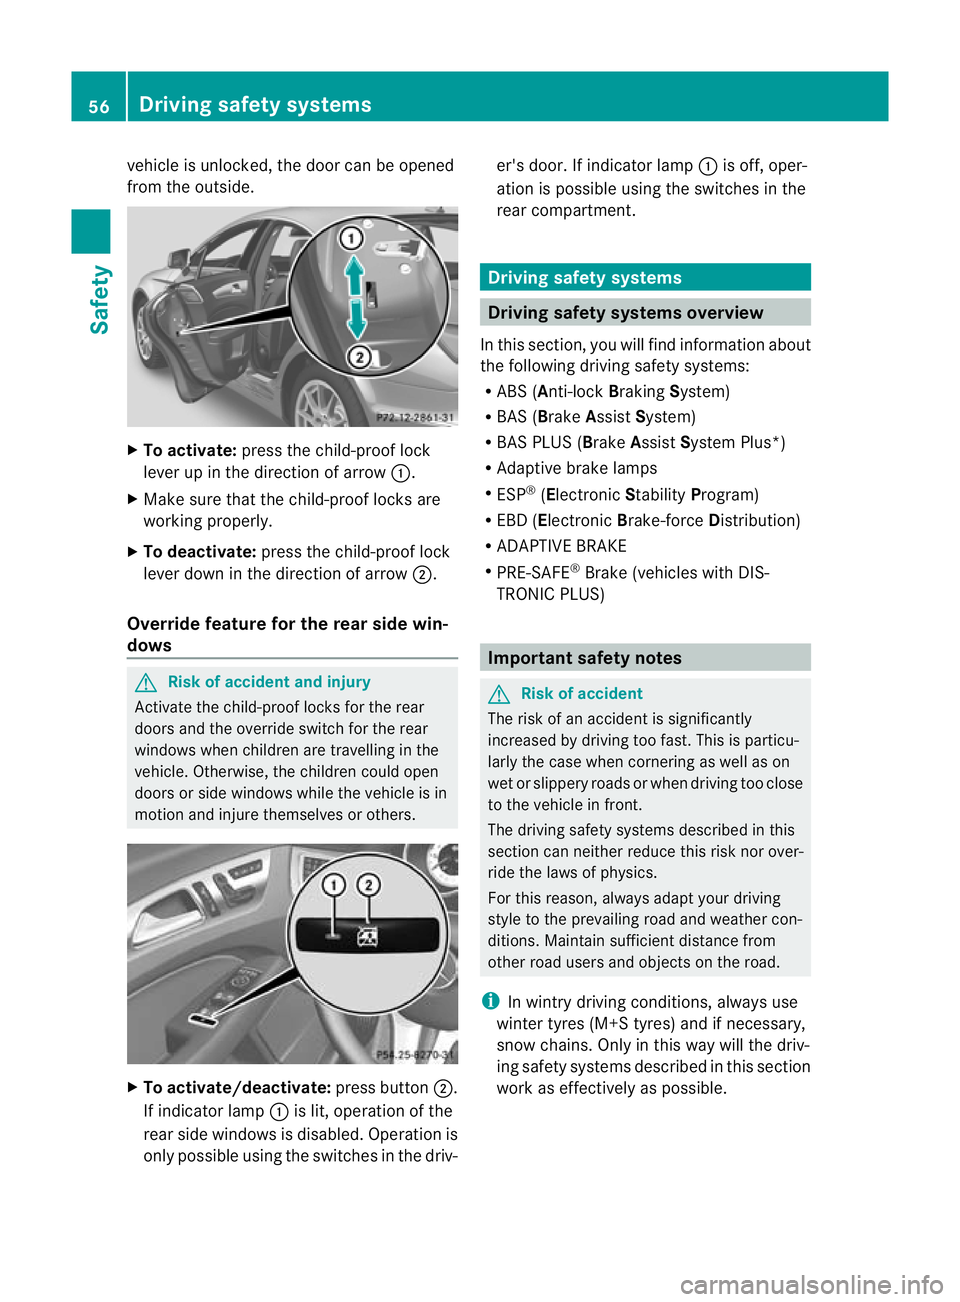
To activate: press the child-proof lock
leve rup in the direction of arrow :.
X Make sure that the child-proof locks are
working properly.
X To deactivate: press the child-proof lock
lever down in the direction of arrow ;.
Override feature for the rear side win-
dows G
Risk of accident and injury
Activate the child-proof locks for the rear
doors and the override switch for the rear
windows when children are travelling in the
vehicle. Otherwise, the children could open
doors or side windows while the vehicle is in
motion and injure themselves or others. X
To activate/deactivate: press button;.
If indicator lamp :is lit, operation of the
rear side windows is disabled. Operation is
only possible using the switches in the driv- er's door. If indicator lamp
:is off, oper-
ation is possible using the switches in the
rear compartment. Driving safet
ysystems Driving safety systems overview
In this section, you will find information about
the following driving safety systems:
R ABS ( Anti-lock BrakingSystem)
R BAS ( Brake Assist System)
R BAS PLUS ( BrakeAssist System Plus*)
R Adaptive brake lamps
R ESP ®
(Electronic StabilityProgram)
R EBD ( Electronic Brake-force Distribution)
R ADAPTIVE BRAKE
R PRE-SAFE ®
Brake (vehicles with DIS-
TRONIC PLUS) Important safety notes
G
Risk of accident
The risk of an accident is significantly
increased by driving too fast. This is particu-
larly the case when cornering as well as on
wet or slippery roads or when driving too close
to the vehicle in front.
The driving safety systems described in this
section can neither reduce this risk nor over-
ride the laws of physics.
For this reason, always adapty our driving
style to the prevailing road and weather con-
ditions. Maintain sufficient distance from
other road users and objects on the road.
i In wintry driving conditions, always use
winter tyres (M+S tyres) and if necessary,
snow chains. Only in this way will the driv-
ing safety systems described in this section
work as effectively as possible. 56
Driving safety systemsSafety
Page 154 of 337
or brake discs, depends on the individual driv-
ing style and operating conditions.
For this reason, it is impossible to state a
mileage that will be valid under all circum-
stances. An aggressive driving style will lead
to high wear. You can obtain further informa-
tion about this from your Mercedes-Benz
Service Centre. Tyre traction
G
Risk of accident
Whereas the vehicle can be fully controlled at
a certain speed on dry roads, you must reduce
your speed on wet or icy roads to achieve the
same road safety. You could otherwise cause
an accident.
Pay particular attention to the road conditions
at temperatures around freezing point.
If ice has formed on the road surface (e.g.
from fog), a thin film of water rapidly forms on
the ice when you brake, considerably reduc-
ing tyre traction. Drive with particular care in
such weather conditions. Driving on wet roads
Aquaplaning If water has accumulated to a certain depth
on the road surface, there is a danger of aqua-
planing occurring, even if:
R you drive at low speeds
R the tyres have adequate tread depth
For this reason, do not drive in tyre ruts, and
brake carefully. Driving on flooded roads If you have to drive on stretches of road on
which water has collected, please bear in
mind that:
R
the maximum permitted still water depth is
25 cm.
R you should drive no faster than at walking
pace.
! Bear in mind that vehicles travelling in
front or in the opposite direction create
waves. This may cause the maximum per-
missible water depth to be exceeded.
These notes must be observed under all
circumstances. You could otherwise dam-
age the engine, the electronics or the trans-
mission. Winter driving
General notes G
Risk of poisoning
If the vehicle becomes trapped in snow,
ensure that snow is kept away from the
exhaust pipe and from around the vehicle as
long as the engine is running. Otherwise, poi-
sonous carbon monoxide (CO) may enter the
vehicle, resulting in loss of consciousness and
even death.
To assure sufficient fresh air ventilation, open
a window slightly on the side of the vehicle
not facing the wind.
At the onset of winter, have your vehicle win-
terproofed at a qualified specialist workshop,
e.g. at a Mercedes-Benz Service Centre.
Observe the notes in the "Winter operation"
section .
Slippery road surfaces G
Risk of accident
Do not shift down for additional engine brak-
ing on a slippery road surface. This could Driving tips
151Driving and parking
Z
Page 166 of 337
G
Risk of accident
Do not change dow nfor additional engine
braking on a slippery road surface. This could
cause the drive wheels to lose their grip and
the vehicle could skid.
You can set a variable or permanent limit
speed:
R variable for speed limits, e.g. in built-up
areas
R permanent for long-term speed restric-
tions, e.g. when driving with winter tyres
fitted (Y page 164) G
Risk of accident
Speedtronic is only an aid designed to assist
driving. You are responsible for the vehicle's
speed and for braking in good time.
i The speed indicated in the speedometer
may differ slightly from the limit speed
stored.
Variable SPEEDTRONIC General notes
With the cruise control lever, you can operate
cruise control or DISTRONIC PLUS and vari-
able SPEEDTRONIC.
The LIM indicator lamp on the cruise control
lever indicates which system you have selec-
ted:
R LIM indicator lamp off: cruise control or
DISTRONIC PLUS is selected.
R LIM indicator lamp on: variable SPEED-
TRONIC is selected.
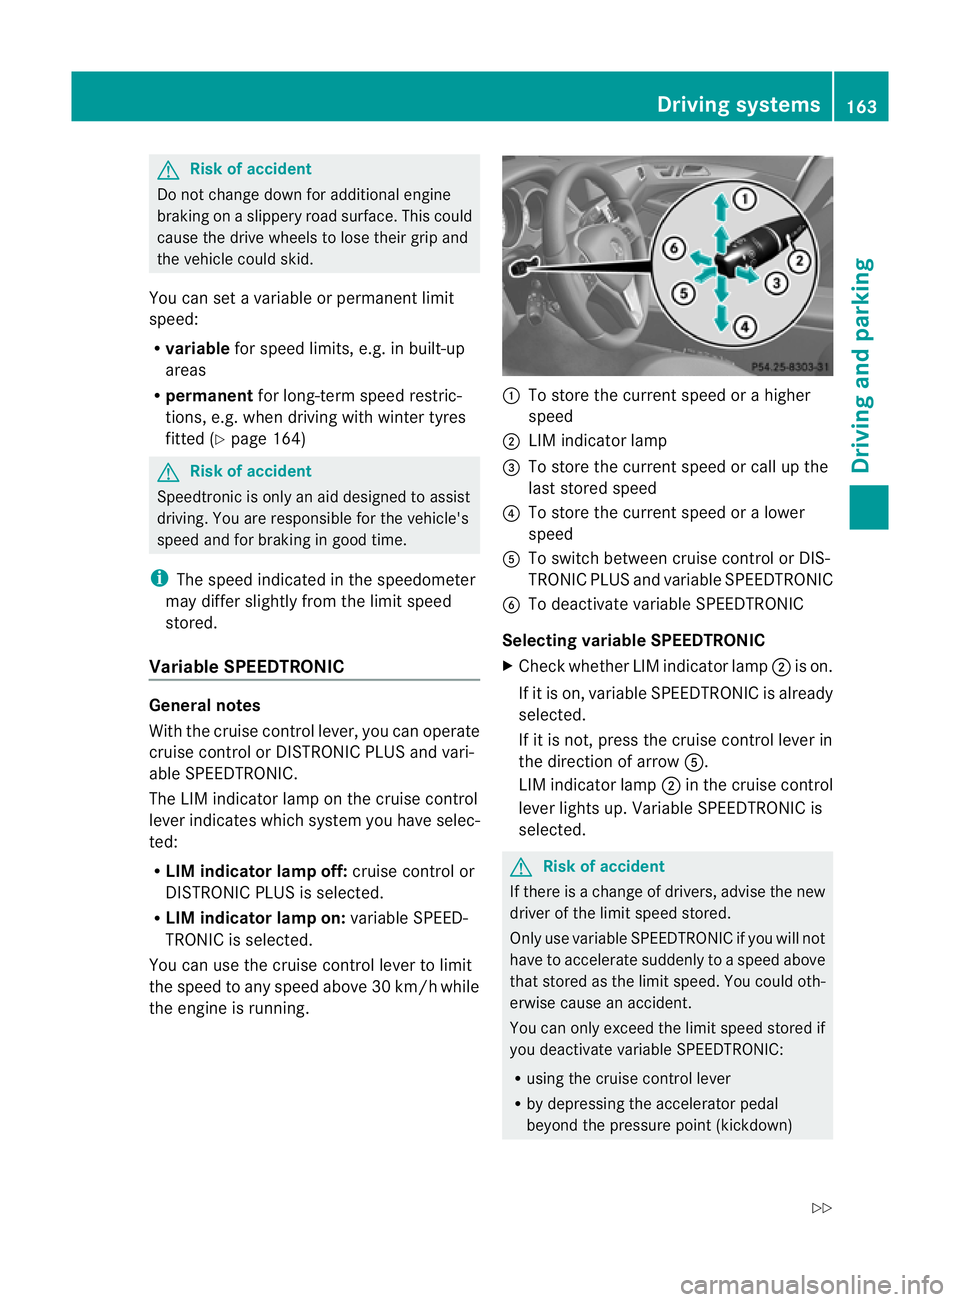
You can use the cruise control lever to limit
the speed to any speed above 30 km/hw hile
the engine is running. :
To store the current speed or a higher
speed
; LIM indicator lamp
= To store the current speed or call up the
last stored speed
? To store the current speed or a lower
speed
A To switch between cruise control or DIS-
TRONIC PLUS and variable SPEEDTRONIC
B To deactivate variable SPEEDTRONIC
Selecting variable SPEEDTRONIC
X Check whether LIM indicator lamp ;is on.
If it is on, variable SPEEDTRONIC is already
selected.
If it is not, press the cruise control lever in
the direction of arrow A.
LIM indicator lamp ;in the cruise control
lever lights up. Variable SPEEDTRONIC is
selected. G
Risk of accident
If there is a change of drivers, advise the new
driver of the limit speed stored.
Only use variable SPEEDTRONIC if you will not
have to accelerate suddenly to a speed above
that stored as the limit speed. You could oth-
erwise cause an accident.
You can only exceed the limit speed stored if
you deactivate variable SPEEDTRONIC:
R using the cruise control lever
R by depressing the accelerator pedal
beyond the pressure point (kickdown) Driving systems
163Driving and parking
Z
Page 167 of 337
It is not possible to deactivate variable
SPEEDTRONIC by braking.
Storing the current speed
You can use the cruise control lever to limit
the speed to any speed above 30 km/h while
the engine is running.
X Briefly press the cruise control lever
up : or down ?to the pressure point.
The current speed is stored and shown in
the multifunction display.
The segments in the multifunction display
lightu p from the start of the scale up to the
stored speed.
Storing the current speed or calling up the
last stored speed G
Risk of accident
Only select a stored speed if you know what
that speed is and whether it is suitable for the
current driving and traffic situation. Other-
wise, sudden braking could endanger you or
others.
X Briefly pull the cruise control lever towards
you =.
Making adjustments in 10 km/h incre-
ments
X Briefly press the cruise control lever
beyond the pressure point, up :for a
higher speed or down ?for a lower speed.
or
X Keep the cruise control lever pressed
beyond the pressure point until the desired
speed is set. Press the cruise control lever
up : for a higher speed or down ?for a
lower speed. Making adjustments in 1 km/h incre-
ments
X
Briefly press the cruise control lever to the
pressure point, up :for a higher speed or
down ?for a lower speed.
or
X Keep the cruise control lever pressed to the
pressure point until the desired speed is
set. Press the cruise control lever up :for
a higher speed or down ?for a lower
speed.
Deactivating variable SPEEDTRONIC
There are several ways to deactivate variable
SPEEDTRONIC:
X Briefly press the cruise control lever for-
wards B.
or
X Briefly press the cruise control lever in the
direction of arrow A.
LIM indicator lamp ;in the cruise control
lever goes out. Variable SPEEDTRONIC is
deactivated.
Cruise control or DISTRONIC PLUS is selec-
ted.
Variable SPEEDTRONIC is deactivated auto-
matically when you depress the accelerator
pedal beyond the pressure point (kickdown),
but only if your curren tspeed does not differ
by more than 20 km/ hfrom the stored speed.
You will hearawarning tone if this is the case. G
Risk of accident
It is not possible to deactivate variable Speed-
tronic by braking.
i The last speed stored is cleared when you
switch off the engine.
Permanent SPEEDTRONIC You can use the on-board compute
rto limit
the speed permanently to avalue between
160 km/h (e.g. for driving on winter tyres)
and the maximum speed ( Ypage 209). 164
Driving systemsDriving and parking
Page 212 of 337
Deactivating the delayed switch-off tempora-
rily:
X Before leaving the vehicle, tur nthe key to
position 0in the ignition lock.
X Turn the key to position 2in the ignition
lock and back to position 0.
The delayed switch-off is deactivated.
Delayed switch-off is reactivated the next
time you start the engine.
Activating/deactivating the interior light-
ing delayed switch-off
If the Light. delay function is activated and
you remove the key from the ignition lock, the
interior lighting remains on for 20 seconds.
X Press the =or; button on the steer-
ing wheel to select the Settings menu.
X Press the :or9 button to select the
Light submenu.
X Press the abutton to confirm.
X Press the :or9 button to select the
Light. delay function.
When the Light. delay function is acti-
vated, the vehicle interior is displayed in
red in the multifunction display.
X Press the abutton to save the setting.
Vehicle Setting permanent SPEEDTRONIC
You can set permanent SPEEDTRONIC
(Y page 164) using the Limit speed (win‐ter tyres): function.
X Press the =or; button on the steer-
ing wheel to select the menu.
X Press the :or9 button to select the
Vehicle submenu.
X Press the abutton to confirm.
X Press :or9 to select the Limit speed (winter tyres): function.
You will see the current setting.
X Press the abutton to confirm.
X Press :or9 to adjust permanent
SPEEDTRONIC in increments of 10 (240 km/h to
160 km/h ). The
Off setting
switches permanent SPEEDTRONIC off.
X Press the abutton to store the entry.
Switching the automatic locking feature
on/off
If you select the Automatic door lock func-
tion, the vehicle is centrally locked above a
speed of around 15 km/h.
i For further information on the automatic
locking feature, see (Y page 74).
X Press the =or; button on the steer-
ing wheel to select the Sett. menu.
X Press the :or9 button to select the
Vehicle submenu.
X Press the abutton to confirm.
X Press the :or9 button to select the
Automatic door lock function.
When the Automatic door locks func-
tion is activated, the vehicle doors are dis-
played in red in the multifunction display.
X Press the abutton to save the setting.
Activating/deactivating the acoustic
locking confirmation
If you activate the Acoustic Lock function,
an acoustic signal sounds when you lock or
unlock the vehicle. When unlocking, the sig-
nal sounds once. When locking, it sounds
three times.
X Press the =or; button on the steer-
ing wheel to select the Settings menu.
X Press the :or9 button to select the
Vehicle submenu.
X Press the abutton to confirm.
X Press :or9 to select the Acous‐ tic Lock function.
If the Acoustic Lock function is activated,
the & symbol is displayed in red in the
multifunction display.
X Press the abutton to save the setting. Menus and submenus
209On-board computer and displays Z
Page 215 of 337
X
Press the =or; button on the steer-
ing wheel to select the Settings menu.
X Press the :or9 button to select the
Convenience submenu.
X Press the abutton to confirm.
X Press the :or9 button to select the
Auto. fold in function.
When the Auto. fold in function is acti-
vated, the vehicle's exterior mirror is dis-
played in red in the multifunction display.
X Press the abutton to save the setting.
Resetting to factor ysettings For safety reasons, no
tall functions are reset:
the Limit Speed (winter tyres) function
in permanent SPEEDTRONIC can only be set
in the Vehicle submenu. If you want to reset
the Daytime driving lights in the
Light submenu, you must tur
nthe key in the igni-
tion lock to position 1.
X Press the =or; button on the steer-
ing wheel to select the Settings menu.
X Press the :or9 button to select the
Factory setting submenu.
X Press the abutton to confirm.
The Reset all settings? message
appears.
X Press the :or9 button to select
No or
Yes .
X Press the abutton to confirm the selec-
tion.
If you select Yes , the multifunction display
shows a confirmation message. AMG menu in AMG vehicles
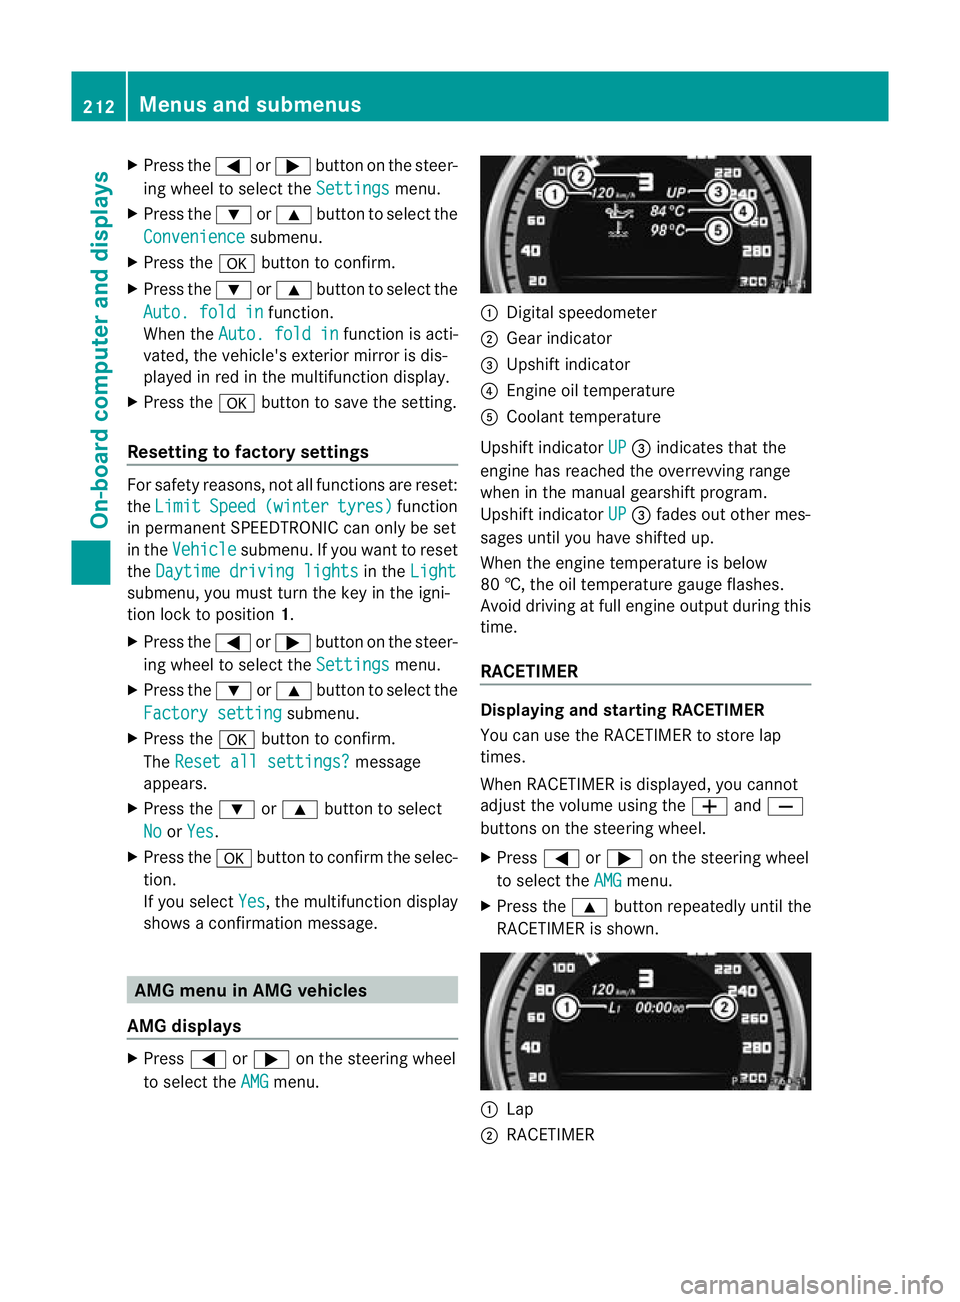
AMG displays X
Press =or; on the steering wheel
to select the AMG menu. :
Digital speedometer
; Gear indicator
= Upshift indicator
? Engine oil temperature
A Coolant temperature
Upshift indicator UP =
indicates that the
engine has reached the overrevving range
when in the manual gearshift program.
Upshift indicator UP =
fades out other mes-
sages until you have shifted up.
When the engine temperature is below
80 †, the oil temperature gauge flashes.
Avoid driving at full engine output during this
time.
RACETIMER Displaying and starting RACETIMER
You can use the RACETIMER to store lap
times.
When RACETIMER is displayed, you cannot
adjust the volume using the
WandX
buttons on the steering wheel.
X Press =or; on the steering wheel
to select the AMG menu.
X Press the 9button repeatedly until the
RACETIMER is shown. :
Lap
; RACETIMER 212
Menus and submenusOn-board computer and displays
Page 284 of 337
X
Screw the valve insert back into the valve.
X Screw the valve cap back on. Flat tyre
Preparing the vehicle
Your vehicle may be equipped with:
R a TIREFIT kit
R an emergency spare wheel
R MOExtended tyres (tyres with run-fla tchar-
acteristics) (Y page 289)
i Vehicle preparation is not necessary on
vehicles with MOExtended tyres.
i Vehicles with MOExtended tyres are not
equipped with a TIREFIT kit at the factory.
It is therefore recommended that you addi-
tionally equip your vehicle with a TIREFIT kit
if you fit tyres that do not feature run-flat
properties, e.g. winter tyres. You can obtain
aT IREFIT kit from aMercedes-Benz Service
Centre, for example.
X Vehicles with AIRMATIC: make sure that
"normal" level is selected (Y page 167).
X Stop the vehicle as far away as possible
from traffic on solid, non-slippery and level
ground.
X Switch on the hazard warning lamps.
X Bring the fron twheels into the straight-
ahead position.
X Move the DIRECT SELECT lever to P.
X Switch off the engine.
X Vehicles without KEYLESS-GO: remove
the key from the ignition lock.
X Vehicles with KEYLESS-GO: open the
driver's door.
The on-board electronics have status 0,
which is the same as the key having been
removed.
X Vehicles with KEYLESS-GO: remove the
Start/Stop button from the ignition lock
(Y page 129). X
All occupants must get out of the vehicle.
Make sure that they are not endangered as
they do so.
X Make sure that no one is near the danger
area whilst a wheel is being changed. Any-
one who is not directly assisting in the
wheel change should, for example, stand
behind the barrier.
X Get out of the vehicle. Pay attention to traf-
fic conditions when doing so.
X Close the driver's door.
X Place the warning triangle (Y page 278) a
suitable distance away.O bserve legal
requirements. TIREFIT kit
Using the TIREFIT kit You can use the TIREFIT kit to seal small
punctures, particularly those in the tyre tread.
You can use TIREFIT at outside temperatures
down to -20 †.
G
Risk of accident
In the following situations, your safety is at
particular risk as tyre sealant is unable to pro-
vide sufficient breakdown assistance:
R there are cuts or punctures in the tyre
greater than 4 mm.
R the wheel rim is damaged.
R you have driven at very low tyre pressures
or on a flat tyre.
Do not drive any further. Consult a qualified
specialist workshop which has the necessary
specialist knowledge and tools to carry out
the work required.
Mercedes-Benz recommends that you use a
Mercedes-Benz Service Centre for this pur-
pose. In particular, work relevant to safety or
on safety-related system smust be carried out
at a qualified specialist workshop. Flat tyre
281Breakdown assistance Z