2010 MERCEDES-BENZ CLS COUPE battery
[x] Cancel search: batteryPage 8 of 337
Setting the centre air vents
...........124
Setting the side air vents ...............124
Alarm system
see ATA
Alertness Assistant
see ATTENTION ASSIST
Ambient lighting
Setting the brightness (on-board
computer) ...................................... 208
Setting the colou r(on-board com-
puter) ............................................ .208
AMGMenu (on-board computer) ....... 212
AMG RIDE CONTROL sports sus-
pension (CLS 63 AMG) ......................169
Anti-glare film .................................... 264
Anti-lock Brake System see ABS
Anti-Theft Alarm system
see ATA
Anti-theft system
ATA (Anti-Theft Alarm system) .........63
Immobiliser ...................................... 63
Interior motion sensor .....................64
Tow-away protection ........................ 64
Aquaplaning ....................................... 151
Ashtray ............................................... 257
Assistance menu (on-board com-
puter) ................................................. .203
ASSYST PLUS see ASSYST PLUS service interval
display
ASSYST PLUS service interval dis-
play ..................................................... 269
Displaying a service message (on-
board computer) ............................ 270
ATA (Anti-Theft Alarm system)
Activating/deactivating ...................63
Function .......................................... .63
Switching off the alarm ....................63
ATTENTIO NASSIST
Activating/deactivating (on-
board computer) ............................ 204
Display message ............................ 226
Function/notes ............................. 177
Audio menu (on-board computer) ....200
Automatic car wash ..........................271Automatic engine start
With ECO start/stop function ........133
Automatic engine switch-off
With ECO start/stop function ........132
Automatic transmission
DIRECT SELECT leve r..................... 136
Display message ............................ 234
Driving tips .................................... 138
Emergency running mode ..............142
Kickdow n....................................... 138
Malfunction ................................... .142
Progra mselecto rbutton ................ 138
Pulling away ................................... 131
Selector leve r................................ 136
Starting .......................................... 130
Auxiliary heating ............................... 119
Adjusting (on-board computer) ......210
Display message ............................ 236
Important safety information .........119
Auxiliary heating/ventilation ...........120
Display message ............................ 123
Remote control .............................. 120
Auxiliary ventilation ..........................119 B
Bag hook ............................................ 252
BAS (Brake Assist System) .................57
BAS PLUS (Brake Assist System
Plus) ...................................................... 57
Battery Changing (auxiliary heating
remote control) .............................. 121
Changing (key )................................. 71
Charging ........................................ 292
Checking (key )................................. 70
Disconnecting ................................ 292
Display message ............................ 225
Important safety guidelines (key )..... 70
Installatio nlocation ....................... 291
Jump-starting ................................. 294
Reconnecting ................................. 293
Removing/fitting ........................... 292
Safety notes .................................. 290
Belt
see Seat belt Index
5
Page 14 of 337

Sea
tbelt ........................................ 239
SPORT handling mode ...................243
SRS ................................................ 243
Tyr ep ressure monitor ...................246
Instrument cluster
Displays. .......................................... 26
Overview .......................................... 26
Submenu (on-board computer) ......205
Warning and indicator lamps ...........28
Intelligen tLight System
Display message ............................ 223
Setting dipped-bea mheadlamps
for driving on the right/left (on-
board computer) ............................ 207
Switching on/off (on-board com-
puter) ............................................. 207
Interior lighting
Automatic control system ..............104
Delayed switch-off (on-board
computer) ...................................... 209
Emergency lighting ........................104
Manual control ............................... 104
Reading lamp ................................. 103
Setting brightness for display/
switches (on-board computer) .......206
Setting the ambient lighting
brightness (on-board computer) ....208
Setting the ambient lighting col-
our (on-board computer) ................ 208
Interior motion sensor ........................64
ISOFIX child seat securing system ....49 J
Jack Storage location ............................ 279
Using ............................................. 285
Jump-starting ..................................... 294
see Jump-starting K
Key Changing the battery .......................71
Checking the battery .......................70
Convenience closing feature ............79
Convenience opening feature ..........79
Display message ............................ 236Malfunction ...................................... 72
Modifying the programming
.............69
Starting the engine ........................130
KEYLESS-GO
Button ............................................ 129
Convenience closing ........................79
Display message ............................ 236
Locking ............................................ 69
Starting the engine ........................130
Unlocking ......................................... 69
Keyp ositions
Key ................................................ 129
KEYLESS GO .................................. 129
Kickdown ................................... 138, 141
Kneebag ............................................... 38 L
Lane-change assistant see Active Blind Spot Assist
see Blind Spot Assist
Lane Keeping Assist
Activating/deactivating (on-
board computer) ............................ 205
Display message ............................ 228
Function/informatio n.................... 185
Lane package ..................................... 183
Lashing eyelets ................................. 252
Lights Activating/deactivating the inte-
rior lighting delayed switch-off
(on-board computer) ......................209
Active light function .......................102
Automatic headlamp mode ..............99
Cornering light function .................102
Daytime driving lights ......................99
Dipped-bea mheadlamps ................. 99
Driving abroad ................................. 98
Foglamps (extended range) ...........103
Hazard warning lamps ...................101
Ligh tswitc h..................................... 98
Main-beam headlamps ................... 100
Motorway mode ............................. 103
Rea rfoglamp ................................... 99
Setting brightness for display/
switches (on-board computer) .......206
Setting the ambient lighting
brightness (on-board computer) ....208 Index
11
Page 72 of 337
If you do not open
adoor or the boot lid within
approximately 40 seconds of unlocking the
vehicle:
R the vehicle is locked again.
R the anti-theft system is primed again.
X To lock centrally: press the&button. KEYLESS-GO
You can start, lock or unlock the vehicle using
KEYLESS-GO. To do this, you only need carry
the key with you. When you touch the surface
of the sensors on the vehicle's outside door
handles, KEYLESS-GO establishes a radio
connection between the vehicle and the key.
The distance from the door handle with which
you wish to lock or unlock the vehicle must
not be greater than 1 m.
When the engine is started and whilst you are
driving, KEYLESS-GO also checks whether a
valid key is in the vehicle by periodically
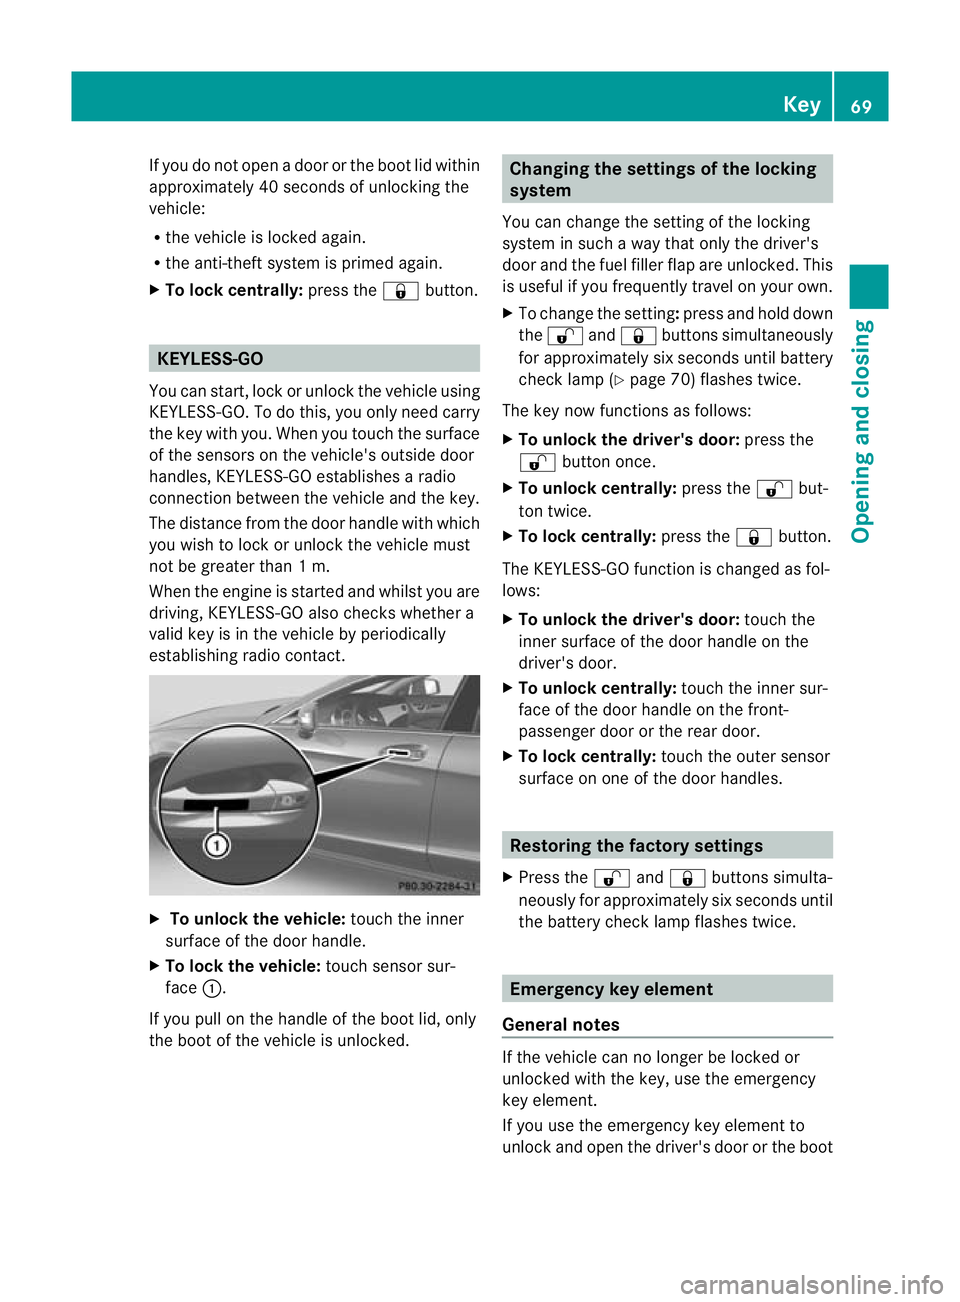
establishing radio contact. X
To unlock the vehicle: touch the inner
surface of the door handle.
X To lock the vehicle: touch sensor sur-
face :.
If you pull on the handle of the boot lid, only
the boot of the vehicle is unlocked. Changing the settings of the locking
system
You can change the setting of the locking
system in such a way that only the driver's
door and the fuel filler flap are unlocked. This
is useful if you frequently travel on your own.
X To change the setting: press and hold down
the % and& buttons simultaneously
for approximately six seconds until battery
check lamp (Y page 70) flashes twice.
The key now functions as follows:
X To unlock the driver's door: press the
% button once.
X To unlock centrally: press the%but-
ton twice.
X To lock centrally: press the&button.
The KEYLESS-GO function is changed as fol-
lows:
X To unlock the driver's door: touch the
inner surface of the door handle on the
driver's door.
X To unlock centrally: touch the inner sur-
face of the door handle on the front-
passenger door or the rear door.
X To lock centrally: touch the outer sensor
surface on one of the door handles. Restoring the factory settings
X Press the %and& buttons simulta-
neously for approximately six seconds until
the battery check lamp flashes twice. Emergency key element
General notes If the vehicle can no longer be locked or
unlocked with the key, use the emergency
key element.
If you use the emergenc
ykey element to
unlock and open the driver's door or the boot Key
69Opening and closing Z
Page 73 of 337

lid, the anti-theft alarm system will be trig-
gered (Y
page 63).
There are several ways to tur noff the alarm:
X To deactivate the alarm with the key:
press the %or& button on the key.
or
X Insert the key into the ignition lock.
or
X To deactivate the alarm with KEYLESS-
GO: press the Start/Stop button in the igni-
tion lock. The key must be in the vehicle.
or
X Lock or unlock the vehicle using KEYLESS-
GO. The key must be outside the vehicle.
If you unlock the vehicle using the emergency
key element, the fuel filler flap will not be
unlocked automatically.
X To unlock the fuel filler flap: insert the
key in the ignition lock.
Removing the emergency key element X
Push release catch :in the direction of
the arrow and at the same time, remove
emergency key element ;from the key. Battery of the key
Important safety notes It is advisable to have batteries replaced at a
qualified specialist workshop, e.g. at a
Mercedes-Benz Service Centre. G
Risk of poisoning
Batteries are toxic and contain caustic sub-
stances. For this reason, keep batteries out of
the reach of children.
If a battery has been swallowed, visi tadoctor
immediately. H
Environmental note Batteries contain pollutants.
It is against the law to dis-
pose of them with the house-
hold rubbish. They must be
collected separately and
recycled in an environmen-
tally responsible manner. Dispose of batteries in an
environmentally responsible
manner. Take discharged
batteries to a qualified spe-
cialist workshop, e.g. a
Mercedes-Benz Service
Centre, or to a special col-
lection point for old batter-
ies.
Checking the battery X
Press the &or% button.
The key battery is working properly if the
battery charge indicator lamp :lights up
briefly.
If battery charge indicator lamp :does not
light up briefly during the test, the key battery
is discharged.
X Replace the key battery (Y page 71).70
KeyOpening and closing
Page 74 of 337
i
When checking the key battery within the
signal area of the vehicle, pressing the
& or% button locks or unlocks the
vehicle, respectively.
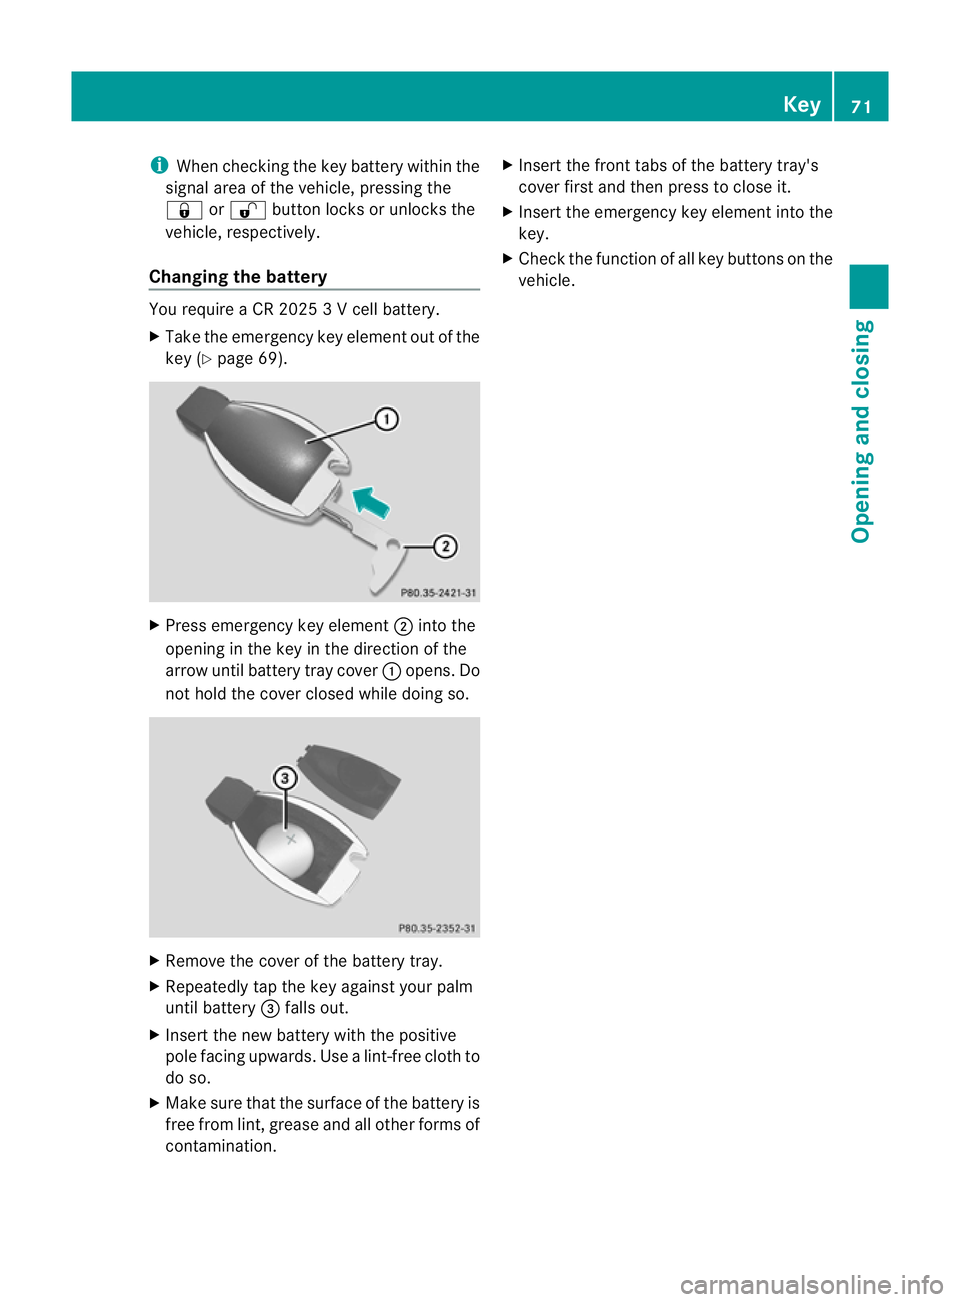
Changing the battery You require a CR 2025 3 V cell battery.
X Take the emergency key element out of the
key (Y page 69). X
Press emergency key element ;into the
opening in the key in the direction of the
arrow until battery tray cover :opens. Do
not hold the cover closed while doing so. X
Remove the cover of the battery tray.
X Repeatedly tap the key against your palm
until battery =falls out.
X Inser tthe new battery with the positive
pole facing upwards. Use alint-free cloth to
do so.
X Make sure that the surface of the battery is
free fro mlint, grease and all other forms of
contamination. X
Insert the front tabs of the battery tray's
cover first and then press to close it.
X Insert the emergency key elemen tinto the
key.
X Check the functio nofall key buttons on the
vehicle. Key
71Opening and closing Z
Page 75 of 337
Problems with the key
Problem Possible causes/consequences and
M Solutions
You cannot lock or
unlock the vehicle
using the key. The key battery is discharged or nearly discharged.
X
Point the tip of the key at the driver's door handle from a dis-
tance of approximately 50 cm and try to unlock or lock the
vehicle again.
If this does not work:
X Check the key battery and replace it if necessary (Y page 71).
X Lock (Y page 75) or unlock (Y page 75) the vehicle using
the emergency key element. The key is faulty.
X
Lock (Y page 75) or unlock (Y page 75) the vehicle using
the emergency key element.
X Have the key checked at a qualified specialist workshop. You can no longer lock
or unlock the vehicle
using KEYLESS-GO. There is a fault with KEYLESS-GO.
X
Lock/unlock the vehicle using the remote control function of
the key. Point the tip of the key at the driver's door handle from
close range and press the %/&button.
X Have KEYLESS-GO checked at a qualified specialist workshop. There is interference from a powerful source of radio waves.
X
Lock/unlock the vehicle using the remote control function of
the key. Point the tip of the key at the driver's door handle from
close range and press the %/&button. You have lost a key. X
Have the key cancelled at a Mercedes-Benz Service Centre.
X Report the loss immediately to the vehicle insurers.
X If necessary, have the locks changed as well. You have lost the emer-
gency key element. X
Report the loss immediately to the vehicle insurers.
X If necessary, have the locks changed as well. 72
KeyOpening and closing
Page 76 of 337
Problem Possible causes/consequences and
M Solutions
The engine cannot be
started using the key. The on-board voltage is too low.
X
Switch off non-essential consumers, e.g. seat heating or interior
lighting, and try to start the engine again.
If this does not work:
X Check the starter battery and charge it if necessary
(Y page 290).
or
X Jump-start the vehicle (Y page 294).
or
X Consult a qualified specialist workshop. The engine cannot be
started using KEYLESS-
GO. The key is in the
vehicle. Ad
oor is open. Therefore, the key cannot be detected as easily.
X Close the door and try to start the vehicle again. There is interference from a powerful source of radio waves.
X Start your vehicle with the key in the ignition lock. Doors
Important safety notes
G
Risk of injury
Only for the United Kingdom: if the vehicle
has been locked with the key, the double lock
function is activated as standard. It is then not
possible to open the doors from inside the
vehicle.
Therefore, do not leave any people behind in
the vehicle, particularly children, elderly peo-
ple or people requiring special assistance, if
the vehicle has been locked with the key. As
a result, they may not be able to free them-
selves in the event of an emergency. They
could be seriously or even fatally injured by
prolonged exposure to extremely high or low
temperatures, for example. In this case, res-
cuing people from outside the vehicle is diffi-
cult.
Deactivate the interior motion sensor before
you lock the vehicle with the key. The doors
can then be opened from the inside after the vehicle has been locked from the outside with
the key.
If the vehicle has been locked with KEYLESS-
GO, the doors can be opened from inside the
vehicle.
G
Risk of accident
If children are left unsupervised in the vehicle,
they could:
R open a door from inside the vehicle at any
time, even if it has been locked
R start the vehicle using akey which has been
left in the vehicle
R release the parking brake
They could thereby endanger themselves and
others. Never leave children unsupervised in
the vehicle. Always take the key with you
when leaving the vehicle, even if you are only
leaving it for a short time. Doors
73Opening and closing Z
Page 92 of 337
Adjusting lumbar support
You can adjust the contour of the driver's seat
so as to provide optimum support for your
back. X
Move adjustmen tlever :in the direction
of the arrow until the desired backrest con-
tour is achieved. Adjusting the 4-way lumbar support
You can adjust the contour of the front seat
backrests individually to provide optimum
support for your back. :
To raise the backrest contour
; To soften the backrest contour
= To lower the backrest contour
? To harden the backrest contour Switching the seat heating on/off
Activating/deactivating G
Risk of injury
Repeatedly setting the seat heating to level
3 may result in excessive seat temperatures.
The health of passengers that have limited
temperature sensitivity or a limited ability to
react to excessively high temperatures may
be affected or they may even suffer burn-like
injuries. Therefore, do not use seat heating
level 3repeatedly.
The three red indicator lamps in the button
indicate the heating level you have selected.
i If the battery voltage is too low, the seat
heating may switch off. Driver's and front-passenger seat
Rear-compartment seats
The system automatically switches down
from level
3to level 2after about eight
minutes (driver's seat and front-passenger
seat) or five minutes (rear seats). Seats
89Seats, steering wheel and mirrors Z