2010 MERCEDES-BENZ CLS COUPE warning lights
[x] Cancel search: warning lightsPage 10 of 337

Climate control
Activating/deactivating rear win-
dow heating ................................... 117
Activating/deactivating the auxil-
iary heating/ventilatio n................. 120
Convenience opening/closing (air
recirculation) ................................. 118
Demisting the windows .................. 117
Important safety information .........110
Indicator lamp ................................ 114
Problems with "cooling with air
dehumidification" ........................... 114
Problems with the rear window
heating .......................................... 117
Setting the climate mode (AIR
FLOW) ............................................ 114
Switching the ZONE function on/
off .................................................. 116
Clock( on-board computer) ...............206
Cockpit ................................................. 24
Collapsible spare wheel see Emergency spare wheel
Combination switch ............................99
Constant headlamp mode see Daytime driving lights
Consumption statistics (on-board
computer) .......................................... 198
Convenience box ............................... 252
Convenience closing feature ..............79
Convenience opening/closing Air-recirculation mode ...................118
Convenience opening feature ............79
Coolan t(engine)
Checkin gthe level ......................... 268
Display message ............................ 224
Notes ............................................. 322
Temperature (on-board computer) .212
Temperature gauge ........................ 194
Warning lamp ................................. 244
Cooling
see Climate control
Cornering light function (display
message) ............................................ 221
Crash-responsive emergency light-
ing ....................................................... 104Cruise control
Cruise control leve r....................... 152
Display message ............................ 231
Cup holder ......................................... 255
Centre console .............................. 255
Rea rcompartmen t......................... 255
Current fuel consumption (on-
board computer) ............................... 198 D
Dashboard see Cockpit
Data, technical .................................. 316
Date (on-board computer) ................206
Daytime driving lights Display message ............................ 223
Switching on/off (on-board com-
puter) ............................................. 207
Delaye dswitch-off
Exterio rlighting (on-board com-
puter )............................................. 208
Interior lighting (on-board com-
puter) ............................................. 209
Diesel particle filter ..........................149
Digital speedometer .........................198
Dipped-beam headlamps Display message ............................ 221
Setting for driving on the right/
left (on-board computer) ................207
DIREC TSELECT lever
see Automatic transmission
Display (cleaning instructions) ........274
Display messages ASSYST PLUS service interval dis-
play................................................ 269
Brakes ........................................... 219
Calling up (on-board computer) .....215
Clearing (on-board computer) ........215
Driving systems ............................. 226
Engine ............................................ 224
Key ................................................ 236
KEYLESS-GO .................................. 236
Lamp s............................................ 221
Safety systems .............................. 215
Tyres .............................................. 232
Vehicle .......................................... .234 Index
7
Page 14 of 337

Sea
tbelt ........................................ 239
SPORT handling mode ...................243
SRS ................................................ 243
Tyr ep ressure monitor ...................246
Instrument cluster
Displays. .......................................... 26
Overview .......................................... 26
Submenu (on-board computer) ......205
Warning and indicator lamps ...........28
Intelligen tLight System
Display message ............................ 223
Setting dipped-bea mheadlamps
for driving on the right/left (on-
board computer) ............................ 207
Switching on/off (on-board com-
puter) ............................................. 207
Interior lighting
Automatic control system ..............104
Delayed switch-off (on-board
computer) ...................................... 209
Emergency lighting ........................104
Manual control ............................... 104
Reading lamp ................................. 103
Setting brightness for display/
switches (on-board computer) .......206
Setting the ambient lighting
brightness (on-board computer) ....208
Setting the ambient lighting col-
our (on-board computer) ................ 208
Interior motion sensor ........................64
ISOFIX child seat securing system ....49 J
Jack Storage location ............................ 279
Using ............................................. 285
Jump-starting ..................................... 294
see Jump-starting K
Key Changing the battery .......................71
Checking the battery .......................70
Convenience closing feature ............79
Convenience opening feature ..........79
Display message ............................ 236Malfunction ...................................... 72
Modifying the programming
.............69
Starting the engine ........................130
KEYLESS-GO
Button ............................................ 129
Convenience closing ........................79
Display message ............................ 236
Locking ............................................ 69
Starting the engine ........................130
Unlocking ......................................... 69
Keyp ositions
Key ................................................ 129
KEYLESS GO .................................. 129
Kickdown ................................... 138, 141
Kneebag ............................................... 38 L
Lane-change assistant see Active Blind Spot Assist
see Blind Spot Assist
Lane Keeping Assist
Activating/deactivating (on-
board computer) ............................ 205
Display message ............................ 228
Function/informatio n.................... 185
Lane package ..................................... 183
Lashing eyelets ................................. 252
Lights Activating/deactivating the inte-
rior lighting delayed switch-off
(on-board computer) ......................209
Active light function .......................102
Automatic headlamp mode ..............99
Cornering light function .................102
Daytime driving lights ......................99
Dipped-bea mheadlamps ................. 99
Driving abroad ................................. 98
Foglamps (extended range) ...........103
Hazard warning lamps ...................101
Ligh tswitc h..................................... 98
Main-beam headlamps ................... 100
Motorway mode ............................. 103
Rea rfoglamp ................................... 99
Setting brightness for display/
switches (on-board computer) .......206
Setting the ambient lighting
brightness (on-board computer) ....208 Index
11
Page 38 of 337
Airbags and belt tensioners could fail to
deploy or be triggered in an accident despite
the deceleratio nforce being sufficient to trig-
ger the systems, or could be triggered unin-
tentionally. For this reason, never make any
modifications to the restraint systems.
Therefore, you must not tamper with elec-
tronic components or their software. SRS (Supplemental Restraint System)
Introduction SRS reduces the risk of occupants coming
into contact with the vehicle's interior in the
event of an accident. It can also reduce the
effect of the forces to which occupants are
subjected during an accident.
SRS consists of:
R the 6 SRS warning lamp
R airbags
R airbag control unit (with crash sensors)
R belt tensioners
R belt force limiters
SRS warning lamp SRS functions are checked regularly when
you switch on the ignition and when the
engine is running. Therefore, malfunctions
can be detected in good time.
The 6 SRS warning lamp in the instrument
cluster lights up when the ignition is switched
on. It goes out no later than a few seconds
after the engine is started. G
Risk of injury
If SRS is malfunctioning, individual systems
may be activated unintentionally or may not
be triggered in the event of an accident with
a high rate of vehicle deceleration. A malfunction has occurred if:
R
the 6 SRS warning lamp does not light
up when the ignition is switched on.
R the engine is running and the 6SRS
warning lamp does not go out after a few
seconds.
R the engine is running and the 6SRS
warning lamp lights up again.
In this case, have SRS checked immediately
at a qualified specialist workshop. Mercedes-
Benz recommends that you use a Mercedes-
Benz Service Centre for this purpose.
In particular, work relevant to safety or on
safety-related systems must be carried out at
a qualified specialist workshop.
Triggering of belt tensioners, belt force
limiters and airbags During the first stage of a collision, the airbag
control unit evaluates important physical
data relating to vehicle deceleration or accel-
eration, such as
R
duration
R direction
R magnitude
Based on the evaluation of this data, the air-
bag control unit pre-emptively triggers the
belt tensioners in the first stage.
i The front belt tensioners can only be trig-
gered if the seat belt tongues on the front
seats are correctly engaged in the seat belt
buckles.
If there is an even higher rate of vehicle decel-
eration or acceleration in a longitudinal direc-
tion, the front airbags are also deployed.
Your vehicle has adaptive, two-stage front air-
bags. The airbag control unit evaluates vehi-
cle deceleration or acceleration in the event
of a collision. When the first deployment
threshold is reached, the front airbag is filled
with enough propellant gas to reduce the risk
of injuries. The front airbag is fully deployed
if a second deployment threshold is exceeded
within a few milliseconds. Occupant safety
35Safety Z
Page 39 of 337
The belt tensioner and airbag triggering
thresholds are variable and are adapted to the
rate of deceleration or acceleration of the
vehicle. This process is pre-emptive in nature.
The triggering process must take place in
good time at the start of the collision.
i Not all airbags are deployed in an acci-
dent. The different airbag systems work
independently of each other.
How the airbag system works is deter-
mined by the severity of the accident detec-
ted, especially the vehicle deceleration or
acceleration, and the apparent type of acci-
dent:
R head-on collision
R side impact
R overturn
The rate of vehicle deceleration or accelera-
tion and the direction of the force are essen-
tially determined by:
R the distribution of forces during the colli-
sion
R the collision angle
R the deformation characteristics of the vehi-
cle
R the characteristics of the object with which
the vehicle has collided
Factors which can only be seen and measured
after a collision has occurred do not play a
decisive role in the deployment of an airbag
nor do they provide an indication of airbag
deployment.
The vehicle may be deformed significantly,
e.g. the bonnet or the wing, without an airbag
being deployed. This is the case if only parts
which are relatively easily deformed are affec-
ted and the deployment threshold is not
reached. Conversely, airbags may be
deployed even though the vehicle suffers only
minor deformation .This is the case if, for
example, very rigid vehicle parts such as lon-
gitudinal body members are hit and sufficient
deceleration occurs as a result. Airbags
Important safety notes Airbag deployment slows down and restricts
the movement of the vehicle occupant.
If the airbags are deployed, you will hear a
bang, and a small amount of powder may also
be released. Only in rare cases will the bang
affect your hearing. The powder that is
released generally does not constitute a
health hazard. The 6SRS warning lamp
lights up.
The airbag installation locations are identified
by the AIRBAG symbol. G
Risk of injury
Airbags provide additional protection; they
are not, however, a substitute for seat belts.
Observe the following notes to reduce the risk
of serious or even fatal injury caused by airbag
deployment:
R All vehicle occupants –inparticular, preg-
nant women – must wear their seat belt
correctly at all times and lean back against
the backrest, which should be positioned
as close to the vertical as possible. The
head restraint must support the back of the
head at about eye level.
R Always secure childre nless than 1.50mt all
and unde r12years of age in suitable child
restraint systems.
R All vehicle occupants must select a seat
position that is as far away from the airbag
as possible. The driver's seat position must
allow the vehicle to be driven safely. The
driver's chest should be as far away from
the centre of the driver's airbag cover as
possible.
R Move the front-passenger seat as far back
as possible. This is especially important if
you have secured a child in a child restraint
system on the front-passenger seat.
R Vehicle occupants –inparticular, children
–m ust no tlean their heads into the area of
the window in which the sidebag/window-
bag is deployed. 36
Occupant safetySafety
Page 47 of 337
The belt strap is tightened slightly when:
R you engage the belt tongue in the belt
buckle and you then turn the key to position
2in the ignition lock.
R the key is in position 2in the ignition lock
and you then engage the belt tongue in the
buckle.
The seat-belt adjustmen twill apply a certain
tightening force if any slack is detected
between the occupant and the seat belt. Do
not hold on to the seat belt tightly while it is
adjusting. You can switch the seat-belt
adjustment on and off in the on-board com-
puter (Y page 211).
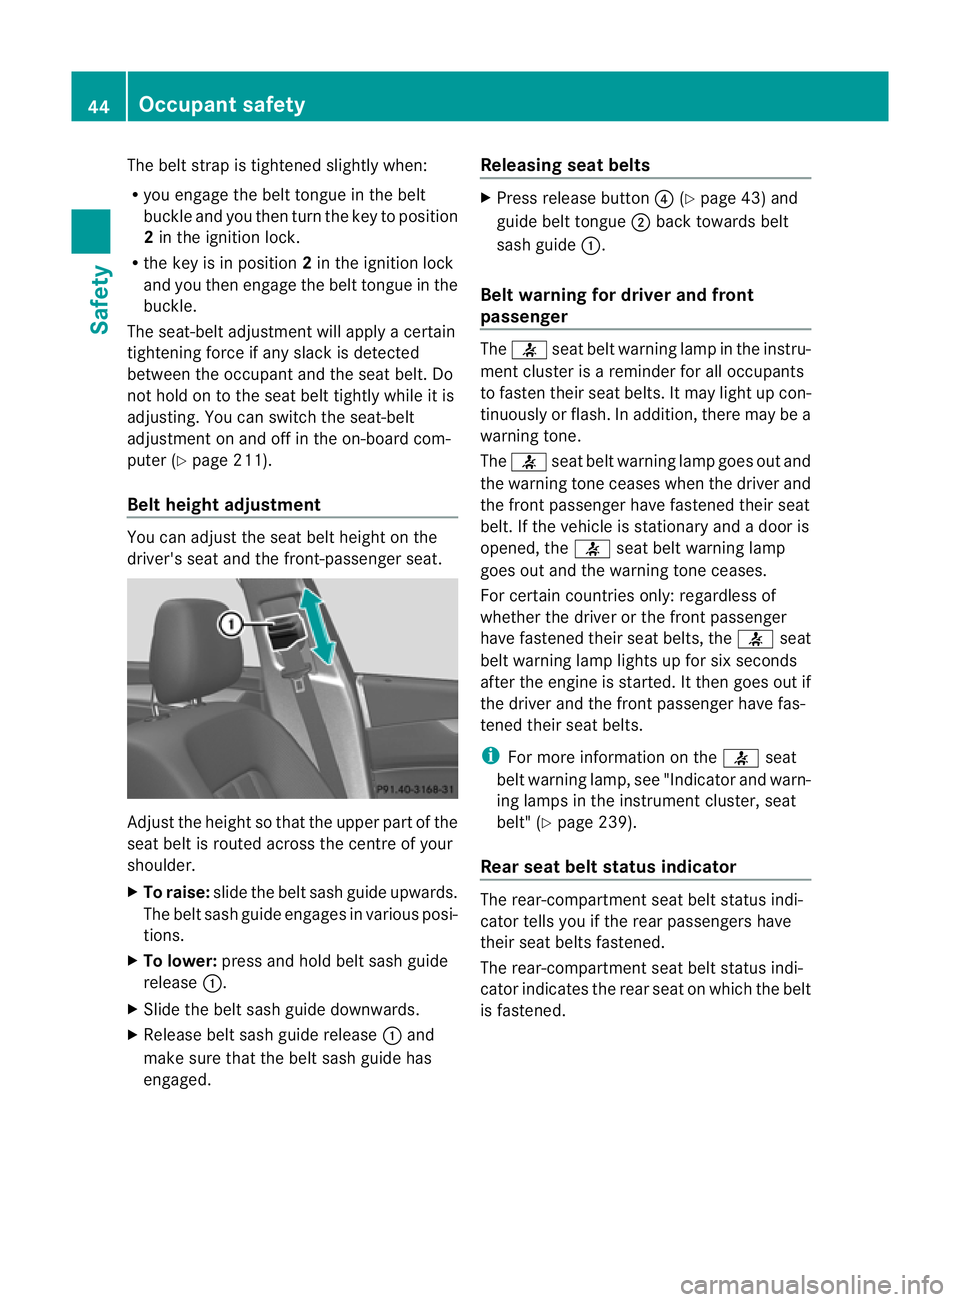
Belt height adjustment You can adjust the seat belt height on the
driver's seat and the front-passenger seat.
Adjust the height so that the upper part of the
seat belt is routed across the centre of your
shoulder.
X
To raise: slide the belt sash guide upwards.
The belt sash guide engages in various posi-
tions.
X To lower: press and hold belt sash guide
release :.
X Slide the belt sash guide downwards.
X Release belt sash guide release :and
make sure that the belt sash guide has
engaged. Releasing seat belts X
Press release button ?(Ypage 43) and
guide belt tongue ;back towards belt
sash guide :.
Belt warning for driver and front
passenger The
7 seat belt warning lamp in the instru-
ment cluster is a reminder for all occupants
to fasten their seat belts .Itmay light up con-
tinuously or flash. In addition, there may be a
warning tone.
The 7 seat belt warning lamp goes out and
the warning tone ceases when the driver and
the fron tpassenger have fastened their seat
belt .Ift he vehicle is stationary and a door is
opened, the 7seat belt warning lamp
goes out and the warning tone ceases.
For certain countries only: regardless of
whether the driver or the front passenger
have fastened their seat belts, the 7seat
belt warning lamp lights up for six seconds
after the engine is started. It then goes out if
the driver and the front passenger have fas-
tened their seat belts.
i For more information on the 7seat
belt warning lamp, see "Indicator and warn-
ing lamps in the instrumentc luster, seat
belt" (Y page 239).
Rear seat belt status indicator The rear-compartmen
tseat belt status indi-
cator tells you if the rear passengers have
their seat belts fastened.
The rear-compartment seat belt status indi-
cator indicates the rear seat on which the belt
is fastened. 44
Occupant safetySafety
Page 48 of 337

The rear-compartmen
tseat belt status indi-
cator appears in the multifunction display for
around 30 seconds if:
R you drive off and reach a speed of approx-
imately 10 km/h.
R the rear passengers fasten or unfasten
their seat belts while the vehicle is in
motion.
R someone gets in or out of the vehicle and
the vehicle drives off again.
You can also cancel the rear seat belt status
indicator immediately (Y page 215).
i The status indicator for the rear-compart-
ment seat belts is only available for certain
countries.
Belt tensioners, belt force limiters The seat belts are fitted with belt tensioners.
!
If the front-passenger seat is not occu-
pied, do not engage the seat belt tongue in
the buckle on the front-passenger seat.
Otherwise, the belt tensioner could be trig-
gered in the event of an accident.
The belt tensioners tighten the seat belts in
an accident, pulling them close against the
body.
Belt tensioners do not correct incorrect seat
positions or incorrectly fastened seat belts.
Belt tensioners do not pull vehicle occupants
back towards the backrest.
If the seat belt is also fitted with a belt force
limiter and this is triggered, the force exerted
by the seat belt on the vehicle occupan tis
reduced.
The front beltf orce limiters are synchronised
with the front airbags, which take on a part of
the deceleration force. Thus, the force exer-
ted on the occupant is distributed over a
greater area. The belt tensioners can only be activated
when:
R the ignition is switched on.
R the restraint systems are operational; see
"SRS warning lamp" (Y page 35).
R the belt tongue is engaged in the buckle on
each of the three-point seat belts in the
front.
The belt tensioners on the seats in the rear
compartment are triggered independently of
the lock status of the seat belts.
The belt tensioners are triggered depending
on the type and severity of an accident:
R in the event of a head-on or rear-end colli-
sion if the vehicle decelerates or acceler-
ates rapidly in a longitudinal direction dur-
ing the initial stages of the impact
R in the event of a side impact, on the side
opposite the impact if the vehicle deceler-
ates or accelerates rapidly in a lateral direc-
tion
R in certain situations if the vehicle overturns
and the system determines that it can pro-
vide additional protection
If the airbags are deployed, you will hear a
bang and a small amount of powder may also
be released. Only in rare cases will the bang
affect your hearing. The powder that is
released generally does not constitute a
health hazard. The 6SRS warning lamp
lights up. G
Risk of injury
If the seat belt tensioners have been trig-
gered, they provide no additional protection
in the event of another accident. Therefore,
have belt tensioners which have been trig-
gered replaced at a qualified specialist work-
shop.
Comply with safety regulations when dispos-
ing of belt tensioners. Any Mercedes-Benz
Service Centre can provide details of these
regulations. Occupant safety
45Safety Z
Page 52 of 337
G
Risk of injury
Do not place electronic devices on the front-
passenger seat, e.g.:
R laptops, whe nswitched on
R mobile phones
R cards with transponders, e.g .ski passes or
access cards
Signals from electronic equipment can cause
interference in the automatic child seat rec-
ognitio nsensor system. This can lead to a
system malfunction. This may cause the
4 PASSENGER AIRBAG OFF indicator
lamp to light up without there being a child
seat with automatic child seat recognition fit-
ted, and the front-passenger fron tairbag will
not deploy during an accident .Itis also pos-
sible that the 6SRS warning lamp lights
up and/or the 4PASSENGER AIRBAG OFF
indicator lamp does not light up briefly when
you turn the key in the ignition lock to position
2.
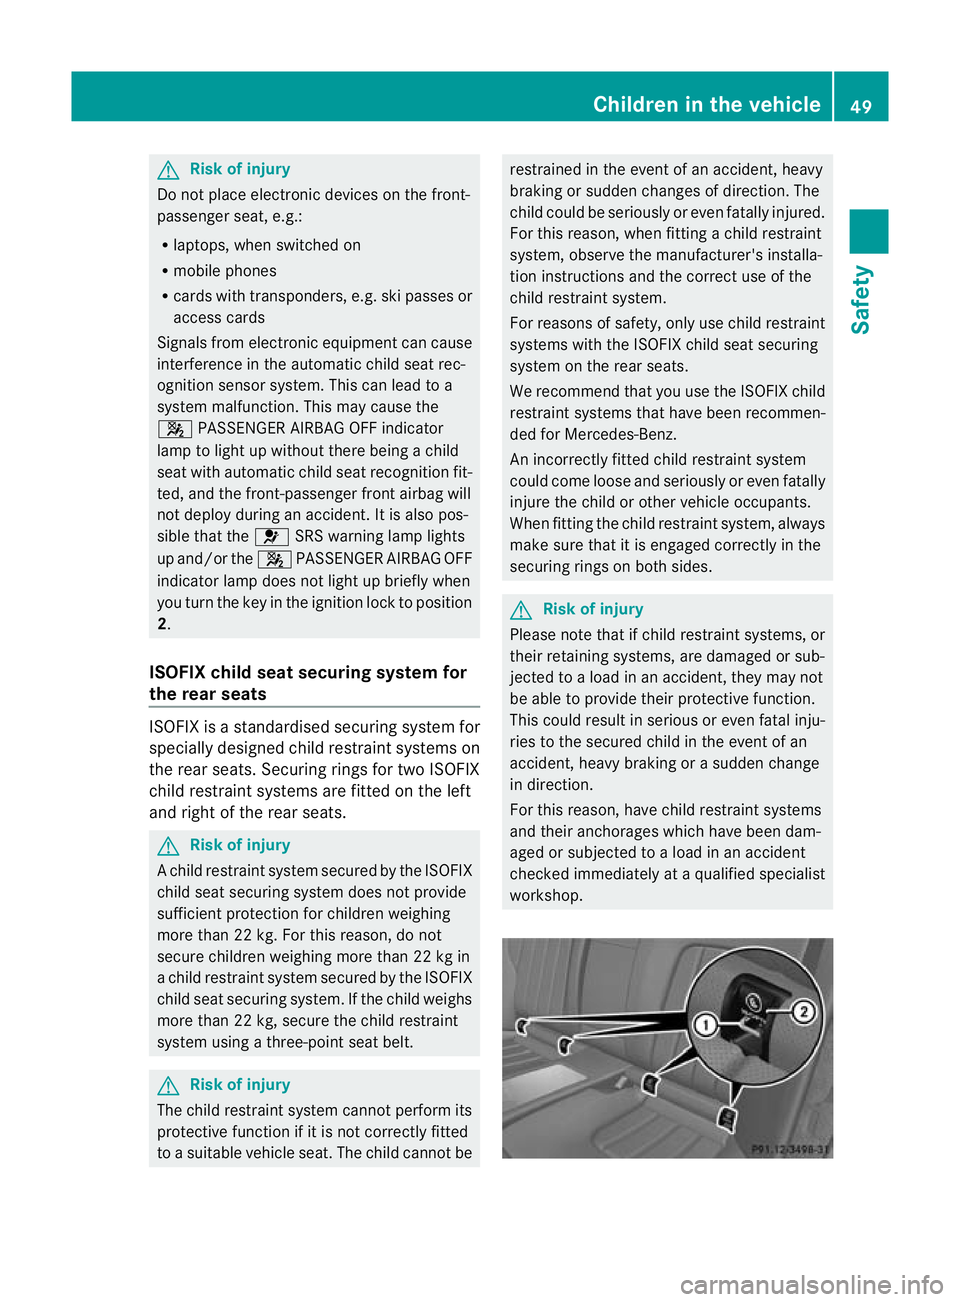
ISOFIX child seat securing system for
the rear seats ISOFIX is a standardised securing system for
specially designed child restraint systems on
the rear seats. Securing rings for two ISOFIX
child restraint systems are fitted on the left
and right of the rear seats. G
Risk of injury
Ac hild restraint system secured by the ISOFIX
child seat securing system does not provide
sufficient protection for children weighing
more than 22 kg. For this reason, do not
secure children weighing more than 22 kg in
a child restraint system secured by the ISOFIX
child seat securing system. If the child weighs
more than 22 kg, secure the child restraint
system using a three-point seat belt. G
Risk of injury
The child restraint system cannot perform its
protective function if it is not correctly fitted
to a suitable vehicle seat. The child cannot be restrained in the event of an accident, heavy
braking or sudden changes of direction. The
child could be seriously or even fatally injured.
For this reason, when fitting a child restraint
system, observe the manufacturer's installa-
tion instructions and the correct use of the
child restraint system.
For reasons of safety, only use child restraint
systems with the ISOFIX child seat securing
system on the rear seats.
We recommend that you use the ISOFIX child
restraint systems that have been recommen-
ded for Mercedes-Benz.
An incorrectly fitted child restraint system
could come loose and seriously or even fatally
injure the child or other vehicle occupants.
When fitting the child restraint system, always
make sure that it is engaged correctly in the
securing rings on both sides. G
Risk of injury
Please note that if child restraint systems, or
their retaining systems, are damaged or sub-
jected to a load in an accident, they may not
be able to provide their protective function.
This could result in serious or even fatal inju-
ries to the secured child in the event of an
accident, heavy braking or a sudden change
in direction.
For this reason, have child restraint systems
and their anchorages which have been dam-
aged or subjected to a load in an accident
checked immediately at a qualified specialist
workshop. Children in the vehicle
49Safety Z
Page 54 of 337
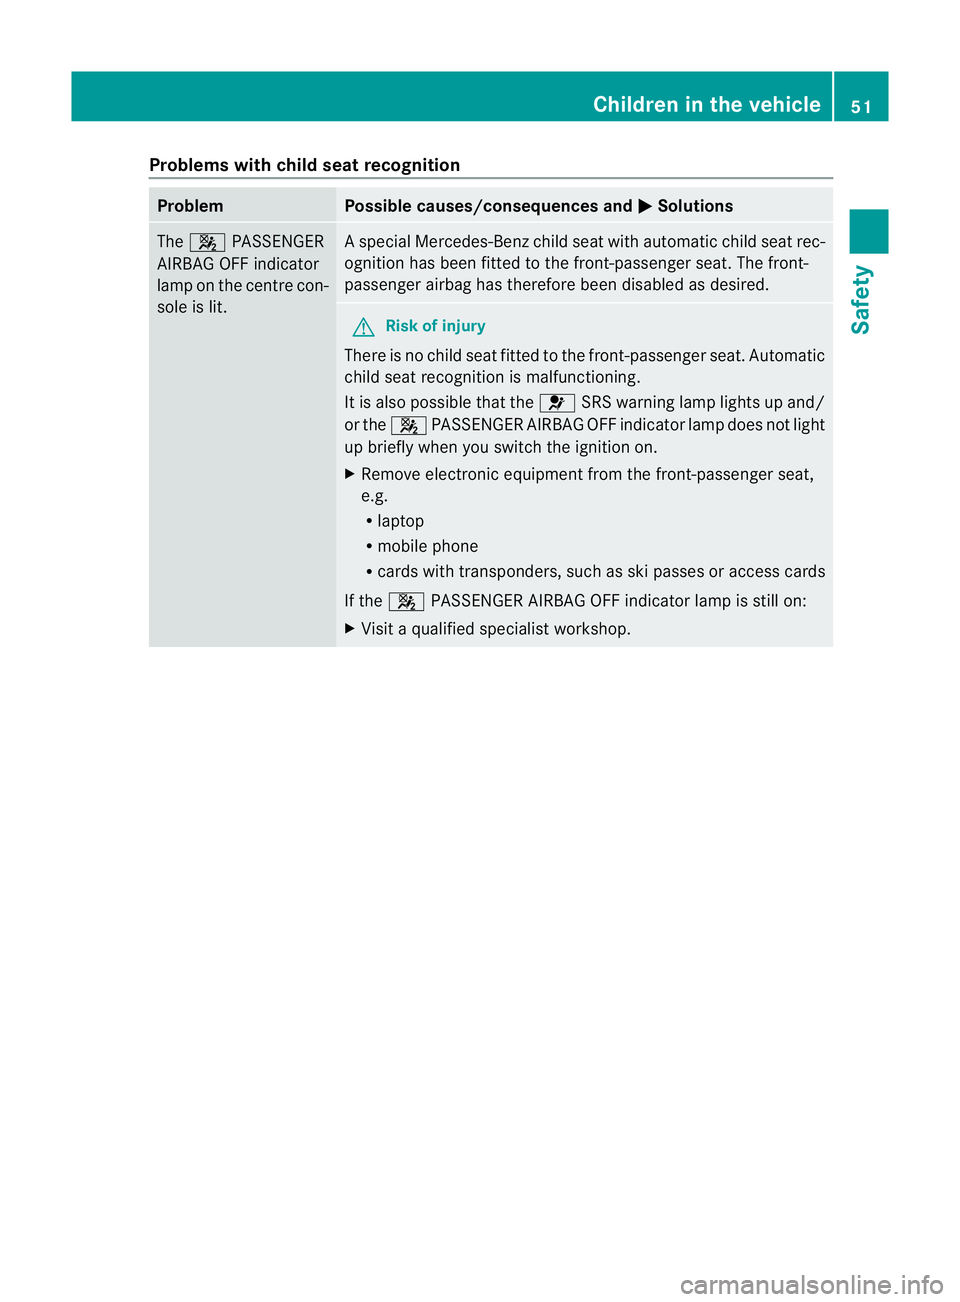
Problems with child seat recognition
Problem Possible causes/consequences and
M Solutions
The
4 PASSENGER
AIRBAG OFF indicator
lamp on the centre con-
sole is lit. As
pecial Mercedes-Benz child seat with automatic child seat rec-
ognition has been fitted to the front-passenger seat. The front-
passenger airbag has therefore been disabled as desired. G
Risk of injury
There is no child seat fitted to the front-passenger seat. Automatic
child seat recognition is malfunctioning.
It is also possible that the 6SRS warning lamp lights up and/
or the 4PASSENGER AIRBAG OFF indicator lamp does not light
up briefly when you switch the ignition on.
X Remove electronic equipment from the front-passenger seat,
e.g.
R
laptop
R mobile phone
R cards with transponders, such as ski passes or access cards
If the 4 PASSENGER AIRBAG OFF indicator lamp is still on:
X Visit a qualified specialist workshop. Children in the vehicle
51Safety Z