2010 MERCEDES-BENZ CLS COUPE remote start
[x] Cancel search: remote startPage 8 of 337
Setting the centre air vents
...........124
Setting the side air vents ...............124
Alarm system
see ATA
Alertness Assistant
see ATTENTION ASSIST
Ambient lighting
Setting the brightness (on-board
computer) ...................................... 208
Setting the colou r(on-board com-
puter) ............................................ .208
AMGMenu (on-board computer) ....... 212
AMG RIDE CONTROL sports sus-
pension (CLS 63 AMG) ......................169
Anti-glare film .................................... 264
Anti-lock Brake System see ABS
Anti-Theft Alarm system
see ATA
Anti-theft system
ATA (Anti-Theft Alarm system) .........63
Immobiliser ...................................... 63
Interior motion sensor .....................64
Tow-away protection ........................ 64
Aquaplaning ....................................... 151
Ashtray ............................................... 257
Assistance menu (on-board com-
puter) ................................................. .203
ASSYST PLUS see ASSYST PLUS service interval
display
ASSYST PLUS service interval dis-
play ..................................................... 269
Displaying a service message (on-
board computer) ............................ 270
ATA (Anti-Theft Alarm system)
Activating/deactivating ...................63
Function .......................................... .63
Switching off the alarm ....................63
ATTENTIO NASSIST
Activating/deactivating (on-
board computer) ............................ 204
Display message ............................ 226
Function/notes ............................. 177
Audio menu (on-board computer) ....200
Automatic car wash ..........................271Automatic engine start
With ECO start/stop function ........133
Automatic engine switch-off
With ECO start/stop function ........132
Automatic transmission
DIRECT SELECT leve r..................... 136
Display message ............................ 234
Driving tips .................................... 138
Emergency running mode ..............142
Kickdow n....................................... 138
Malfunction ................................... .142
Progra mselecto rbutton ................ 138
Pulling away ................................... 131
Selector leve r................................ 136
Starting .......................................... 130
Auxiliary heating ............................... 119
Adjusting (on-board computer) ......210
Display message ............................ 236
Important safety information .........119
Auxiliary heating/ventilation ...........120
Display message ............................ 123
Remote control .............................. 120
Auxiliary ventilation ..........................119 B
Bag hook ............................................ 252
BAS (Brake Assist System) .................57
BAS PLUS (Brake Assist System
Plus) ...................................................... 57
Battery Changing (auxiliary heating
remote control) .............................. 121
Changing (key )................................. 71
Charging ........................................ 292
Checking (key )................................. 70
Disconnecting ................................ 292
Display message ............................ 225
Important safety guidelines (key )..... 70
Installatio nlocation ....................... 291
Jump-starting ................................. 294
Reconnecting ................................. 293
Removing/fitting ........................... 292
Safety notes .................................. 290
Belt
see Seat belt Index
5
Page 17 of 337
PRE-SAFE
®
system
Display message ............................ 216
Operation ........................................ .40
Program selector ...............................1 39
Program selector button ..................138
Pulling away Automatic transmission .................131 R
RACE START (AMG vehicles) .............166
RACETIMER (on-board computer) ....212
Radar sensor system Country overview ........................... 327
Display message ............................ 227
Radar system sensors
Switching on/off (on-board com-
puter) ............................................. 210
Radio
Changing a statio n(on-board
computer) ...................................... 200
see separate operating instructions
Rain closing feature
Sliding sunroo f................................. 81
Range (on-board computer) .............198
Rear compartment Setting the airv ents...................... 124
Setting the temperature ................115
Rear-compartment seat belt sta-
tus indicator ........................................ 44
Rear foglamp (display message) ...... 222
Rear-view mirror Anti-dazzle mode (automatic) ..........94
Dipping (manual) .............................. 92
Rear window blind ............................257
Rear window heating Malfunction ................................... .117
Switching on/off ........................... 117
Refuelling ........................................... 142
Remote control Auxiliary heating ............................ 120
Changing the batteries (auxiliary
heating) ......................................... 121
Reserve (fuel tank)
see Fuel
Reserve fuel
Display message ............................ 225
Warning lamp ................................. 244 Residual heat
Switching on/off ........................... 118
Restraint systems
see SRS
Rev counter ........................................ 194
Reversing camera Function/notes ............................. 176
Reversing camera (cleaning
instructions) ...................................... 274
Reversing lamp (display message) ..223
Reversing lamps (changing bulbs) ..106
Roller sunblind Rea rwindow .................................. 257
Roof carrier ........................................ 254
Roof load (maximum) ........................323
Route see Route guidance (on-board
computer)
Route guidance (on-board com-
puter) ................................................. .199 S
Safety Childre ninthe vehicle ..................... 46
Child restraint systems ....................46
Safety systems
see Driving safety systems
Seat
Active multicontour sea t.................. 88
Seat backrest (rear)
Folding forwards/back ..................251
Seat belt
Adjusting the driver's and front-
passenger sea tbelt ......................... 43
Belt force limiter .............................. 45
Belt tensioner .................................. 45
Cleaning ......................................... 276
Display message ............................ 215
Fastening ......................................... 43
Important safety guidelines .............42
Rea rseat belt status indicator .........44
Releasing ......................................... 44
Switching belt adjustment on/off
(on-board computer) ......................211
Warning lamp (function) ................... 44 14
Index
Page 126 of 337
Problems with auxiliary heating/ventilation
Display messages Possible causes/consequences and
M Solutions
FAIL The starter battery is not charged sufficiently or the system is
faulty.
X
Charge the starter battery.
X Make another attempt to switch on the auxiliary heating using
the remote control.
X Have the auxiliary heating checked at a qualified specialist
workshop. $
FAIL The signal transmission between the transmitter and the vehicle
is faulty.
X Change your position in relation to the vehicle, moving closer if
necessary.
X Make another attempt to switch the auxiliary heating on or off
using the remote control. ©
FAIL There is not enough fuel in the fuel tank, or the auxiliary heating
is faulty.
X
Refuel at the nearest filling station.
X Make another attempt to switch on the auxiliary heating using
the remote control.
X Have the auxiliary heating checked at a qualified specialist
workshop. Adjusting the air vents
Important safety notes
G
Risk of injury
Very hot or very cold air can flow from the air
vents. This could cause burns or frostbite to
bare skin in the immediate vicinity of the
vents. Keep bare skin away from these air
outlets. If necessary, direct the airflow away
to a different area of the vehicle interior. In order to ensure the direct flow of fresh air
through the air vents into the vehicle interior,
please observe the following notes:
R
keep the air inlet between the windscreen
and the bonnet free of blockages, such as
ice, snow or leaves
R never cover the ventsora ir inlet and outlet
grilles in the vehicle interior
i For virtually draught-free ventilation,
adjust the sliders of the air vents to the
centre position. Adjusting the air vents
123Climate control Z
Page 264 of 337
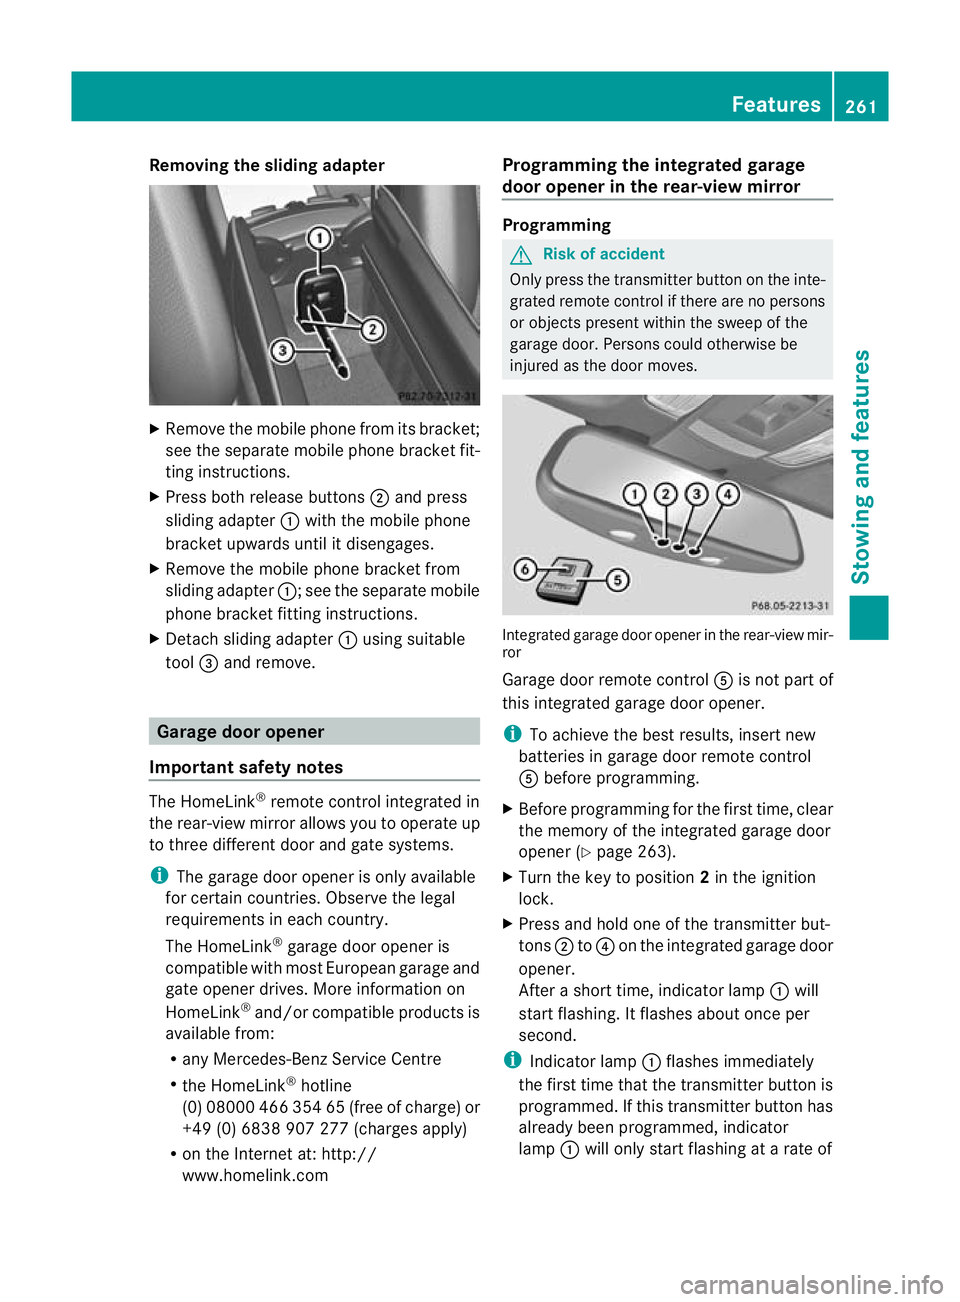
Removing the sliding adapter
X
Remove the mobile phone from its bracket;
see the separate mobile phone bracket fit-
ting instructions.
X Press both release buttons ;and press
sliding adapter :with the mobile phone
bracket upwards until it disengages.
X Remove the mobile phone bracket from
sliding adapter :; see the separate mobile
phone bracket fitting instructions.
X Detach sliding adapter :using suitable
tool =and remove. Garage door opener
Important safety notes The HomeLink
®
remote control integrated in
the rear-view mirror allows you to operate up
to three different doo rand gate systems.
i The garage door opene ris only available
for certain countries. Observe the legal
requirements in each country.
The HomeLink ®
garage door opener is
compatible with most European garage and
gate opener drives. More information on
HomeLink ®
and/or compatible products is
available from:
R any Mercedes-Benz Service Centre
R the HomeLink ®
hotline
(0) 08000 466 354 65 (free of charge) or
+49 (0) 6838 907 277 (charges apply)
R on the Internet at: http://
www.homelink.com Programming the integrated garage
door opener in the rear-view mirror Programming
G
Risk of accident
Only press the transmitter button on the inte-
grated remote control if there are no persons
or objects present within the sweep of the
garage door. Persons could otherwise be
injured as the door moves. Integrated garage door opener in the rear-view mir-
ror
Garage door remote control
Ais not part of
this integrated garage door opener.
i To achieve the best results, insert new
batteries in garage door remote control
A before programming.
X Before programming for the first time, clear
the memory of the integrated garage door
opener (Y page 263).
X Turn the key to position 2in the ignition
lock.
X Press and hold one of the transmitter but-
tons ;to? on the integrated garage door
opener.
After a short time, indicator lamp :will
start flashing. It flashes abouto nce per
second.
i Indicato rlamp :flashes immediately
th ef irst tim ethat the transmitter button is
programmed. If this transmitter button has
already been programmed, indicator
lamp :will only start flashing at a rate of Features
261Stowing and features Z
Page 265 of 337
once a second after 20 seconds have
elapsed.
X Keep the transmitter button depressed.
X Point transmitter button Bof garage door
remote control Atowards the transmitter
buttons on the rear-view mirror at a dis-
tance of 5 to 20 cm.
i The required distance between garage
door remote control Aand the integrated
door opener depends on the garage door
drive system. You might require several
attempts. You should test every position for
at least 20 seconds before trying another
position.
X Press and hold transmitter button Bon
garage door remote control Auntil the
indicator lamp :starts to flash rapidly.
The programming has been successful if
indicator lamp :flashes rapidly.
X Release transmitter button ;,=or? on
the integrated garage door opener and
transmitter button Bon garage door
remote control A.
If indicator lamp :goes out after approx-
imately 20 seconds and has not flashed rap-
idly:
X Repeat the programming procedure for the
transmitter button. This time, change the
distance between the garage door remote
control and the rear-view mirror.
i If the garage door system works with a
rolling code, you must synchronise the
remote control integrated in the rear-view
mirror with the garage door system
receiver after programming.
You will find further information in the
garage door opening system's operating
instructions, e.g. the sections on "Synchro-
nising the transmitter" or "Registering a
new transmitter". You can also call the hot-
line mentioned above. Problems when programming
If you experience problems when program-
ming the garage door opener integrated in the
rear-view mirror, note the following:
R
check the transmitter frequency of garage
door remote control A(this can usually be
found on the rear of the remote control).
R change the batteries in garage door remote
control A.This increases the likelihood
that garage door remote control Awill
send a strong and precise signal to the
integrated remote control in the rear-view
mirror.
R when programming, hold garage door
remote control Aat different distances
and angles from the transmitter button that
you are programming. Try various angles at
distances from 5 to 30 cm or the same
angle but varying distances.
R If there is another remote control for the
same garage door drive, perform the pro-
gramming steps again using the other
remote control. Before performing these
steps, make sure that new batteries have
been fitted in the garage door remote con-
trol.
R Align the aerial cable of the garage door
opener unit. This can improve signal recep-
tion/transmission.
Opening or closing the garage door Once programmed, the integrated remote
control will assume the function of the garage
door system's remote control. Please also
read the operating instructions for the garage
door system.
X
Turn the key to position 2in the ignition
lock.
X Press transmitter button ;,=or? in the
overhead control panel that you have pro-
grammed to operate the garage door.
Garage door system with a fixed code: indi-
cator lamp :lights up green. 262
FeaturesStowing and features